Jewelry Photography - Behind the Scenes Production

See how to set up for jewelry photography on-location in this behind-the-scenes look at PhotoRobot’s transportable, motorized turntable setup.
A PhotoRobot Setup for In-House Jewelry Photography
Jewelry photography on items like bracelets, necklaces, rings and earrings calls for specialized equipment and accessories adaptable to macro photography. The goal is to quickly create visually-rich images that showcase multiple details, ornamentation and true-to-life colors.
To do so, we must afford attention to not only the product but also camera settings and the studio setup. In this post, we’ll demonstrate each stage production to answer the most important questions about jewelry product photography. Find answers to:
- Which equipment and accessories do you need to photograph jewelry?
- What is the best camera to photograph jewelry?
- Do you need a macro lens for jewelry photography?
- How do you minimize reflections in jewelry photos?
- How do you prep jewelry for product photography?
- What are the best camera settings for jewelry?
- What kind of lighting setup is best for jewelry?
- How do you ensure your jewelry is in sharp focus?
But before we set off, let’s make one thing clear. This post isn’t about a traditional product photography setup. Instead, we demonstrate a specialized, mobile module for 360 and 3D jewelry photography. It offers mobility, versatility, and studio automation technology for extremely quick photoshoots from one location to the next.
1 - Equipment for 3D and 360 jewelry photography
PhotoRobot designs a number of studio automation technologies for still, 3D and 360 jewelry product photography. Each serves as an alternative to traditional product photography setups, which require expert knowledge and advanced post-production techniques.
This is not the case with PhotoRobot. Instead, automation serves to simplify shooting and post-processing in a way that even amateur photographers can effectively manage production. Take for example the Case 850 motorized turntable, which is both easily transportable and quickly installable on-location.
Together with automation software, this device becomes the heart of our jewelry photography setup. It syncs cameras and lights with the rotation of the turntable, or combines with the Cube to suspend products in air. An integrated light tent supports taking photos on a pure white background, and enables easily automated background removal.
Below is how to set up the turntable on-location for a photoshoot.

2 - Motorized turntable setup for jewelry photography
The design of the Case 850 turntable offers a truly unique, mobile solution for on-the-go product photography. It packs up neatly into a protective flight case that accommodates every piece of the machinery as well as accessories.
Inside the casing, there is everything necessary to set up a photography workstation in minutes. There is space for the glass plate, the hardware, an integrated diffusion cloth background, background holders, and other items.
After unpacking the device, setup involves attaching the turntable’s glass plate, and installing the diffusion cloth background. For photographing jewelry, we also use an integrated light tent, top lights, and backlighting for optimal translucence.
Shading panels at the sides and bottom of the construction prevent any shadows on objects. We then use a tripod to stabilize our camera to the center of the object inside of the tent.

Above the turntable, the Cube robot is set up in suspension mode. The Cube enables photographers to suspend products in air for photos rather than shooting them flat lay. The device can synchronize with the turntable and other devices, and requires minimal time to install. In fact, we built the entire setup on-location in under an hour.
3 - The Cube - product staging for loose-fitting jewelry
The Cube is a multi-functional product photography robot. It can serve as a standalone motorized turntable, a rotating mannequin stand, or combine with motorized turntables via suspension mode. Suspension mode makes it easy to stage hanging objects like jewelry, handbags, chandeliers, light fittings, and even bicycles.
To photograph a bracelet for example, we install the Cube above the glass plate of the motorized turntable. The device securely fixes to a top portal that also holds lights and has mounting spots for additional accessories.

On the Cube itself, there is a rod to extend its suspension range into the light tent. It inserts into the tent via a small eyelet, and holds a snowflake-shaped wheel to suspend objects on nylon string.

Rods for lasers also attach to the top bar and side frame, and insert into the light tent via small eyelets. This enables laser-guided object positioning for any products (like our bracelet) that we hang inside the light tent.

A setup like this is best for when we need to photograph a higher view point. It provides more diffused light on the object, and supports photography of items such as bracelets, rings, earrings and necklaces.
4 - DSLR cameras for jewelry product photography
Macro photography of jewelry calls for an SLR camera with either an APS-C or Full Frame sensor. However, the full format version offers the highest quality image rendering at this range. They help to maintain sharp focus on smaller products, eliminate motion blur, and provide a much larger depth of field.
If on a budget, there are some very capable entry-level full-format DSLR cameras. These start at the Canon EOS 6D Mark II, with the 5D Mark IV following close behind.
For this particular photoshoot, we used the Canon EOS 5DSR. This is both for the 15 MP sensor and its larger depth of field suitable for smaller pieces of jewelry. Alternatively, you could use any Full Frame camera you are comfortable with. Really, it all comes down to finding the right balance between the camera and the lens within your budget.

5 - Using a macro lens to capture the fine details
Using a macro lens with a fixed focal length is essential for jewelry photos. This type of lens is both sensitive to light and achieves much higher quality renderings than any zoom lens. Macro lenses work well for example to photograph gold or silver jewelry with detailed patterns or ornamentation.
Typically, a macro lens will have a focal length between 35 and 100 mm. To photograph jewelry, you’ll usually want a focal length of 100 mm or higher. The lens should have a large aperture (F2.8), and a 1:1 ratio to photograph products at their actual size.
For this photoshoot, we used the Canon EF 100 mm f2.8 L Macro IS USM lens. The 100 mm lens enables us to get close enough to the product while maintaining sharp focus. Alternatively, we could use a 50 mm lens to get much closer to even smaller objects, such as an engagement ring. 50 mm is capable of capturing the close distance shot, while still maintaining a similar depth of field.

6 - The photo tripod to keep items in focus
Set up in front of the motorized turntable, a quality tripod is essential to stabilize the camera and maintain focus. Together with the lighting setup, this will help us avoid motion blur when photographing the product as it spins in air.
There are a number of quality tripods on the market, including Manfrotto, Gitzo, and Vanguard. Price ranges vary depending on design and material. Aluminum tripods often provide a decent balance between stability, weight, and cost. Meanwhile, carbon fiber boasts great stability and weight, although at a slightly higher price. Plastic tripods, on the other hand, have no place in the studio due to their extremely poor functionality.
For the tripod in this setup, we use a Manfrotto 058B. Alternatively, you could use any quality tripod such those from Gitzo, or Vanguard, as long as it isn't plastic.

7 - Continuous, multi-source, and strobe lighting
A good lighting setup for jewelry photography will help to avoid unwanted shadows and reflections in photos. It will also render both color and materials in a way that is true-to-life, without advanced photo editing necessary.
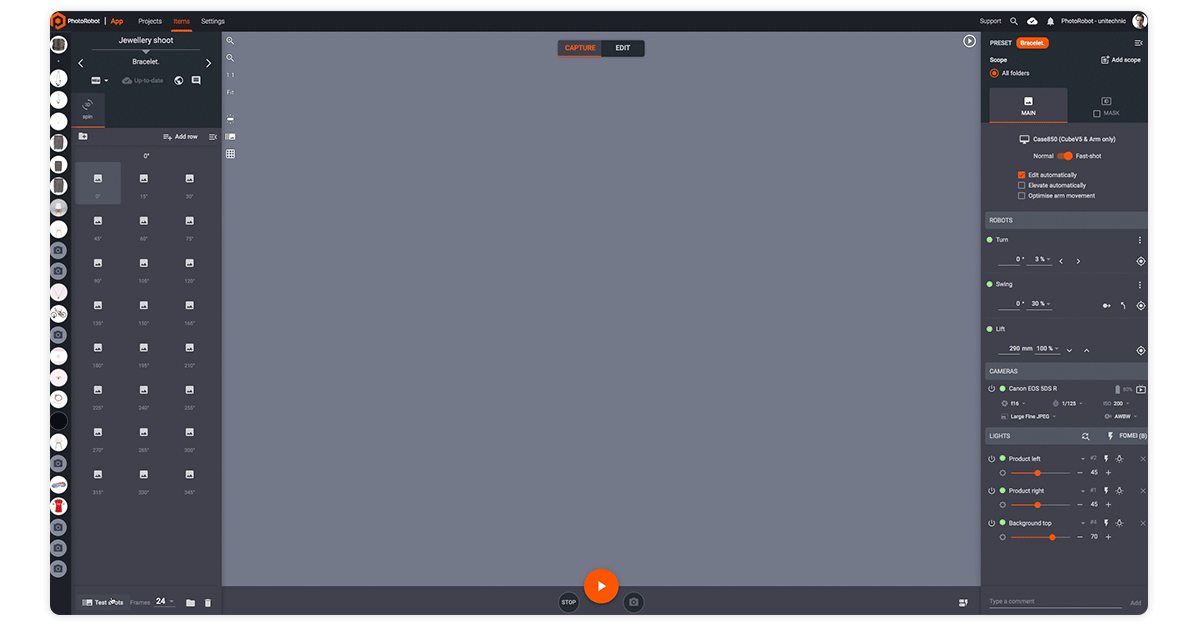
To achieve the best lighting, PhotoRobot supports two types of lights. These include strobes from FOMEI and Broncolor, and any type of LED lights with DMX support. Additionally, the design of the Case 850 integrates a diffusion cloth background, and combines with a light tent.

For items like jewelry, the setup uses two front lights on the right and left, top lights, and backlighting. The front lights on the left and right create the main lighting on the product, and illuminate the material in high clarity. Meanwhile, the two background lights, one at top and the second at bottom, create the white background behind the product.
When shooting, we then use powerful strobes to support fast-spin mode. In fast-spin, the turntable rotates non-stop, without interruption, while the strobes “freeze” the product in place.

In this way, we get dramatically quicker production times in comparison to the “start-stop-capture” of traditional photography systems. The strobes prevent motion blur while the object is in rotation, and provide sharper details in greater illumination.
All lights are completely software-controlled, and in sync with the cameras, lasers, plate movement, and the Cube. This makes background removal easier to automate, and provides advantages in speed, quality, sharpness and dynamic range.
8 - Product prep for jewelry photography
Prepping products such as jewelry calls for careful handling and attention to detail. It’s crucial to inspect products for any blemishes, dust, dirt, or fingerprints that might show up in photos. Thus, you should use cotton gloves when handling items, and have cleaning solutions for different materials on hand.
Use a microfiber cloth to apply a final polish before photos, and consider using compressed air to eliminate dust. Then, before shooting, inspect both the item and the glass plate of the turntable for any unsightly blemishes. Keep in mind that spending even a minute more during product prep can save hours in editing later on.
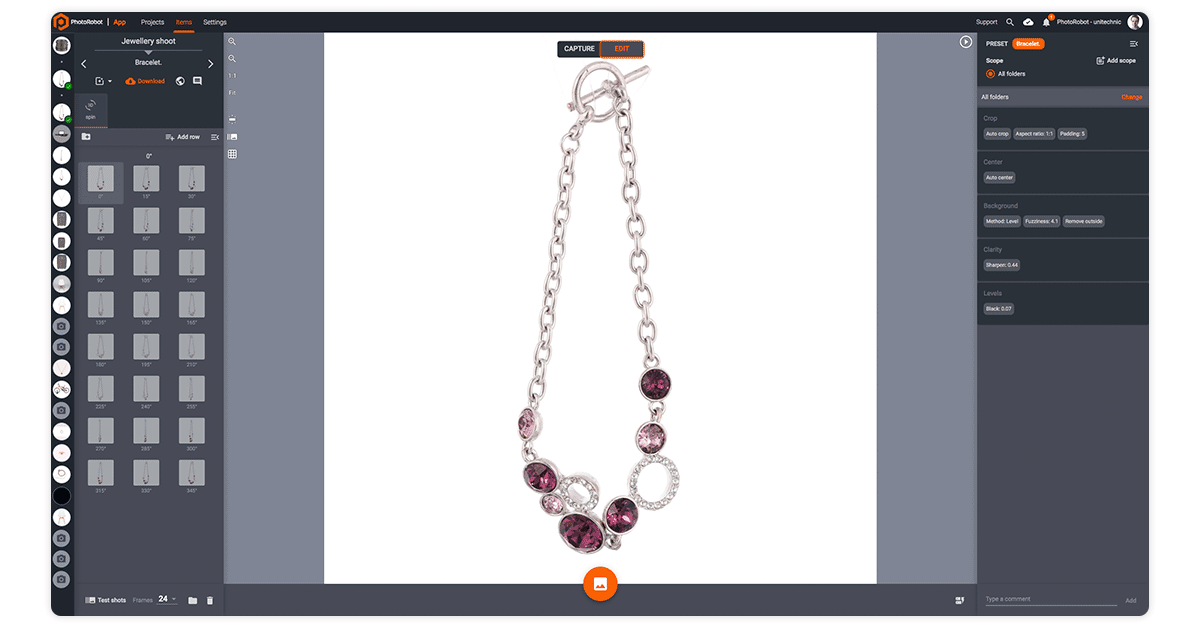
For items that you photograph in suspension, like the bracelet, nylon string suspends the item above the turntable. The nylon string tightens around a snowflake-shaped hanger attached to the Cube’s suspension rod to hold the bracelet in place. Laser-guided positioning then makes it easy to adjust product positioning to exactly where you need it.

When set up, the product can spin 360 degrees with the Cube’s rotation, and with minimal object movement. This approach makes it easy to capture any angle of the item. In this case, it would take approximately 30 seconds to capture 24 photos around the product.
It’s also possible to adjust the speed of rotation, and to save specific settings as software Presets for future automation. Different settings can apply for example to different types, sizes, and categories of products.
9 - Camera settings for jewelry
Some might say the ideal aperture f-stop value for jewelry is between f/11 and f/13. But, in this range, the photos come out with one part of the object out of focus. Instead, we found an f-stop of f/16 was ideal for this specific piece and our desired sharpness.

When shooting with strobes and a tripod, shutter speed is less of a concern. The combination of the two together with PhotoRobot’s fast-capture mode eliminates any risk of movement-induced blur in photos.
As for ISO speed, this depends on the power of the strobes. In this case, we used ISO 100, which is often suitable for many types of jewelry. Typically, between ISO 100 and ISO 200 is most common to ensure less noise in photos. However, there are also some mirrorless camera models that can reach ISO 400 without any noise difference.
10 - Taking a test shot
Before running the photography sequence, it’s important to take one or more test shots. Test shots help to fine-tune camera settings, lighting, and composition for photos. All of these photographers can test without ever leaving the workstation thanks to remote control via the PhotoRobot software interface.
The software enables users to take a test shot at the press of a hotkey or the start button. After capture, test images are then accessible for inspection via a preview window. If any settings need adjustment, photographers have complete remote control over the camera and light group settings on one interface.

Usually, we take a test shot, review the results, adjust light intensity, and repeat this process until we’re satisfied. The software also stores test shots in their own folder, making it easy to compare the results of different settings.
11 - Running the photography sequence
After fine-tuning settings in test shots, we can remotely start the 360 degree photography sequence. In this case, the sequence involves capturing 24 product photos around the bracelet. These photos, the system will capture in approximately 30 seconds, without ever stopping the product’s rotation.
All of this we control via a simple press of the start button, or by scanning a unique “start” barcode. PhotoRobot technology then automates the entire process, from the machines and lights to the precise capture of our desired angles.
The sequence completes when all photo thumbnails in the software fill up with images. As this happens, we observe for any potential misfires of the strobe lights. Sometimes misfires do occur, but we can mark these images and then reshoot without re-running the entire sequence.
After capturing all images, we then switch to edit mode in the software to apply post-processing operations.
12 - Software post-processing
For many pieces of jewelry, there will always be some manual retouching necessary after the photoshoot. However, there are many editing operations which PhotoRobot can automate on capture. These reduce the need for manual retouching to a minimum, and amount to less time (and costs) for further post-processing.
When shooting this bracelet for example, our Presets included a number of basic to advanced editing operations. Automation automatically cropped photos, applied padding value, and removed the background around the object. It enabled us to choose the new background – in this case, transparent – and also automatically sharpened our photos.
For additional retouching, we can then manually edit photos, or easily share with external talent. The workflow software allows the sharing of select images or entire image folders for retouching at a few simple clicks. Retouchers can then download images, work their magic, and import product photos for review and approval.

The final photos and 360 spin
In the end, this photoshoot required minimal manual retouching to achieve web-ready results. The software handled much of the post-processing, and we were able to manually edit out the nylon string without difficulty.
See how the resulting pure white background stills and the 360 spin deploy online via PhotoRobot Viewer:
- Number of images: 1 x 24
- Shooting time: 0 minutes 42 seconds
- Production time: 0 minutes 58 seconds
- Retouching necessary: Minimal
More product photos from the jewelry portfolio
Women’s multi-layer bracelet
- Number of images: 2 x 24
- Shooting time: 0 minutes 56 seconds
- Production time: 1 minute 25 seconds
- Retouching necessary: Minimal
Fashionable ring with engraving
- Number of images: 1 x 36
- Shooting time: 1 minute 45 sec
- Production time: 2 minutes 30 sec
- Retouching necessary: Basic to advanced
Equip your business for smarter, faster product photography
Jewelry photography will always pose a challenge owing to the reflectivity and small size of objects. Thankfully, today’s studio equipment and technology can dramatically simplify and speed up each stage production. There will still be countless adjustments and corrections to make along the way, but automation-driven devices make everything more manageable.
Curious to learn more? Perhaps you run a product photography studio or an eCommerce business? Either way, reach out to see how PhotoRobot can help. We construct custom solutions tailored to any business, build studios from the ground-up, and can better equip any existing operation.


