How to Export Items in PhotoRobot Controls App
In PhotoRobot Controls App (further referred to as “CAPP”), users can export items to a local disk, or export items to the PhotoRobot Cloud.
Use this PhotoRobot User Support Manual to operate and troubleshoot Item Export in CAPP, including:
- Item Export Options
- Output Formats
- File Formatting
- Filename Templates
- Saving and Loading Configurations
- Item Export to a Local Disk
- Item Export to the Cloud
Item Export (Local)
Select Items for Export
To select items for export from CAPP to a local drive, first open the Project where the items are stored.
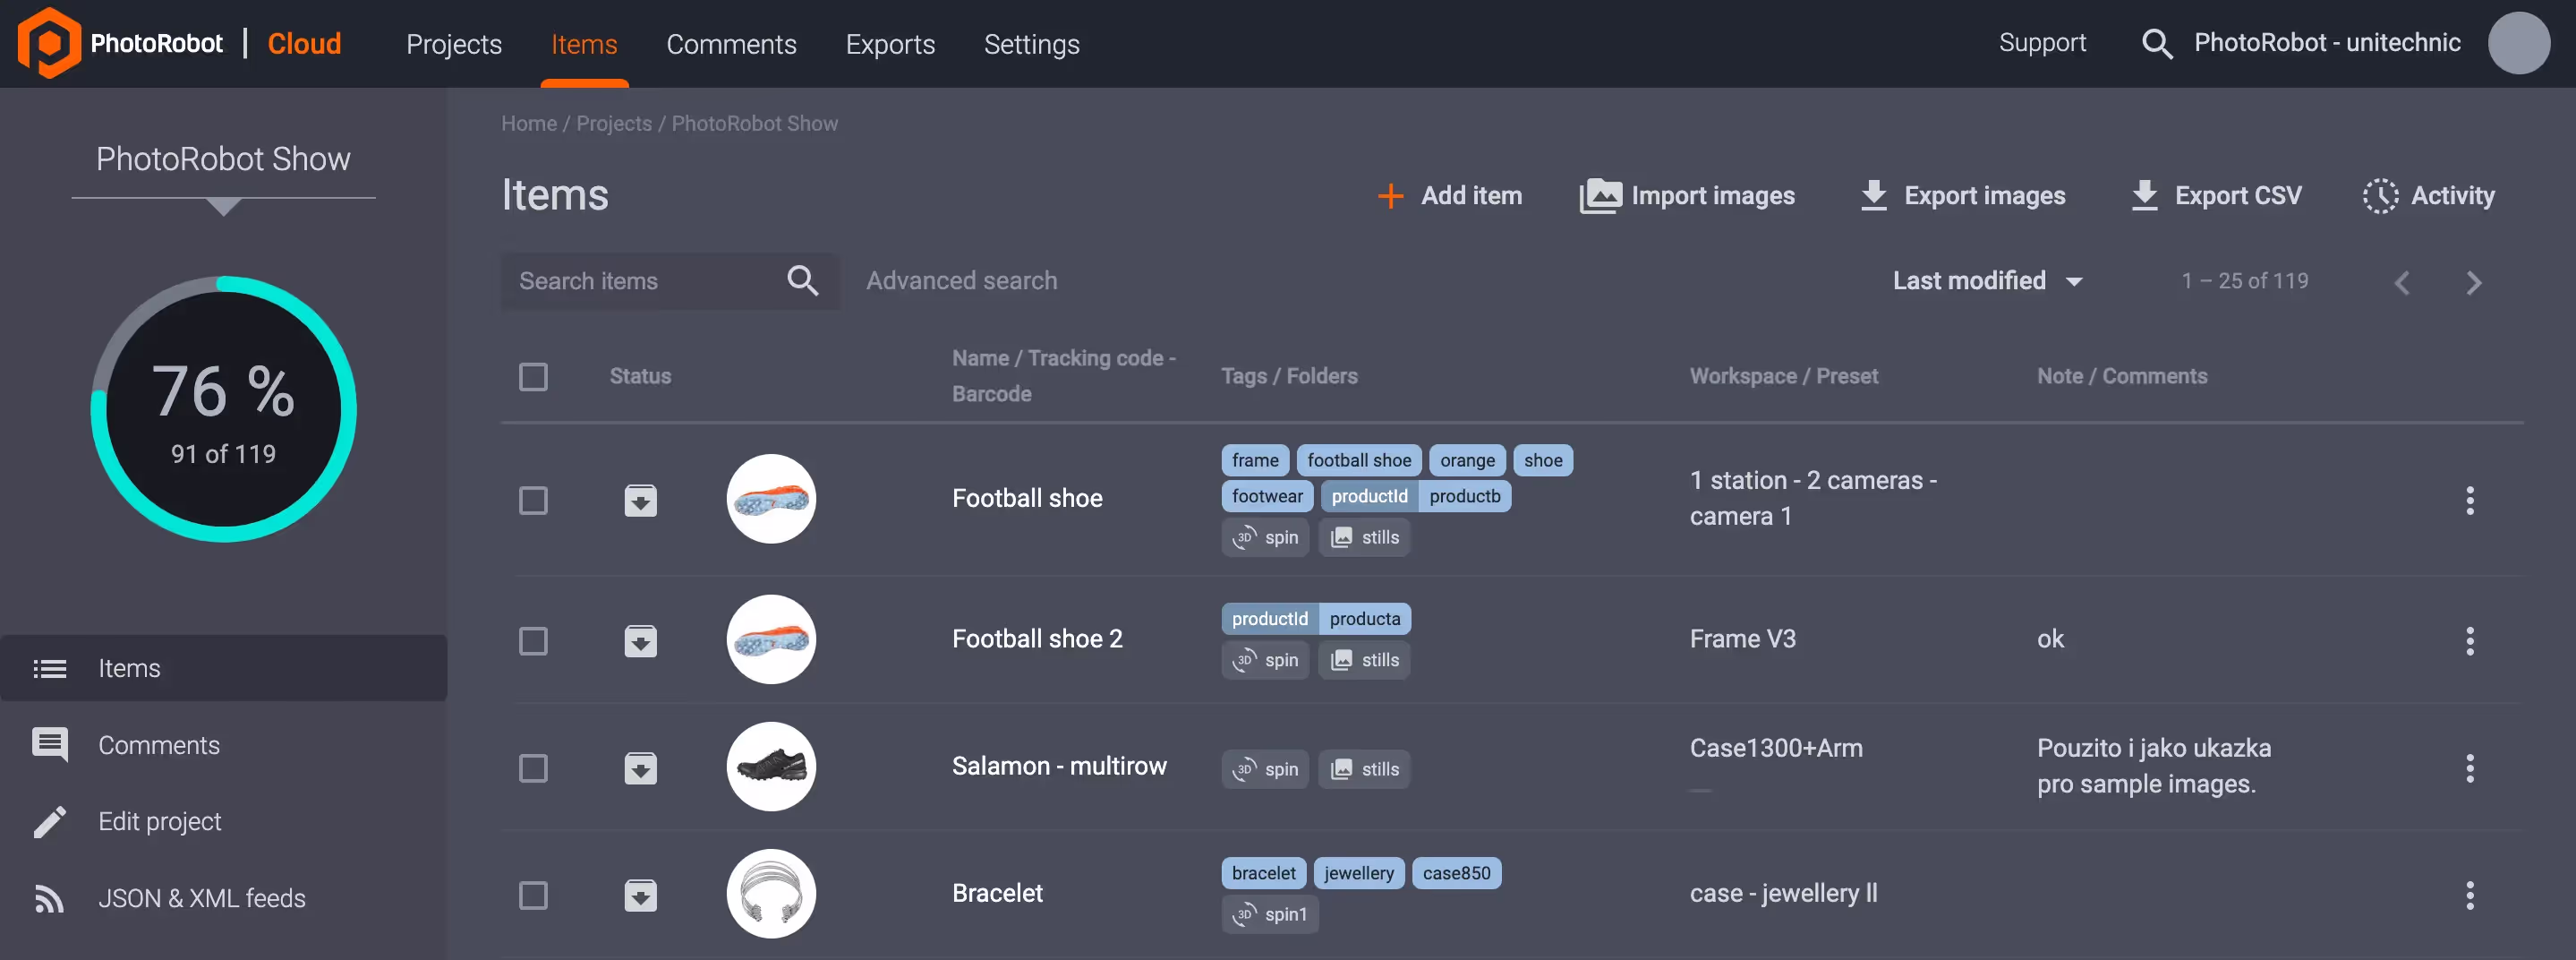
Inside a Project, 25 items display by default. Users can select individual items for export, or select all 25 entries on a page.
To select all items within a project, click the Select all entries prompt, which displays next to the number of entries selected:
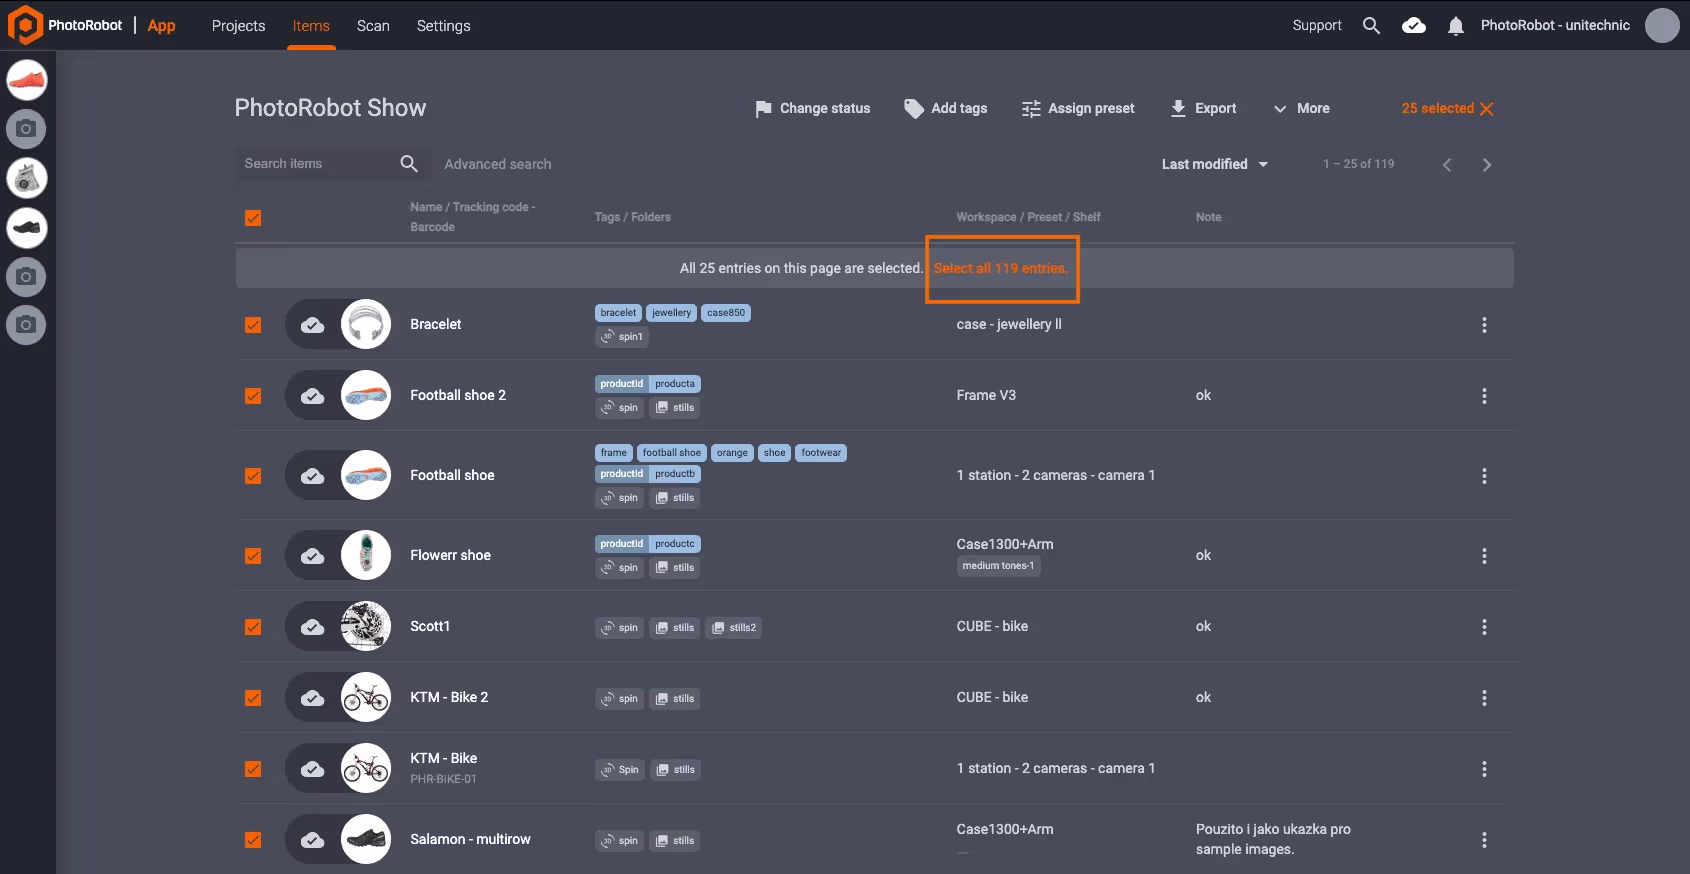
After selecting items for export, the total number of items displays in the upper-right part of the page. Confirm that the total number of items is correct, and click Export to open the export window:

Configure Export Options
In the Export menu, users can configure options for item export to create images and resize on a local disk.
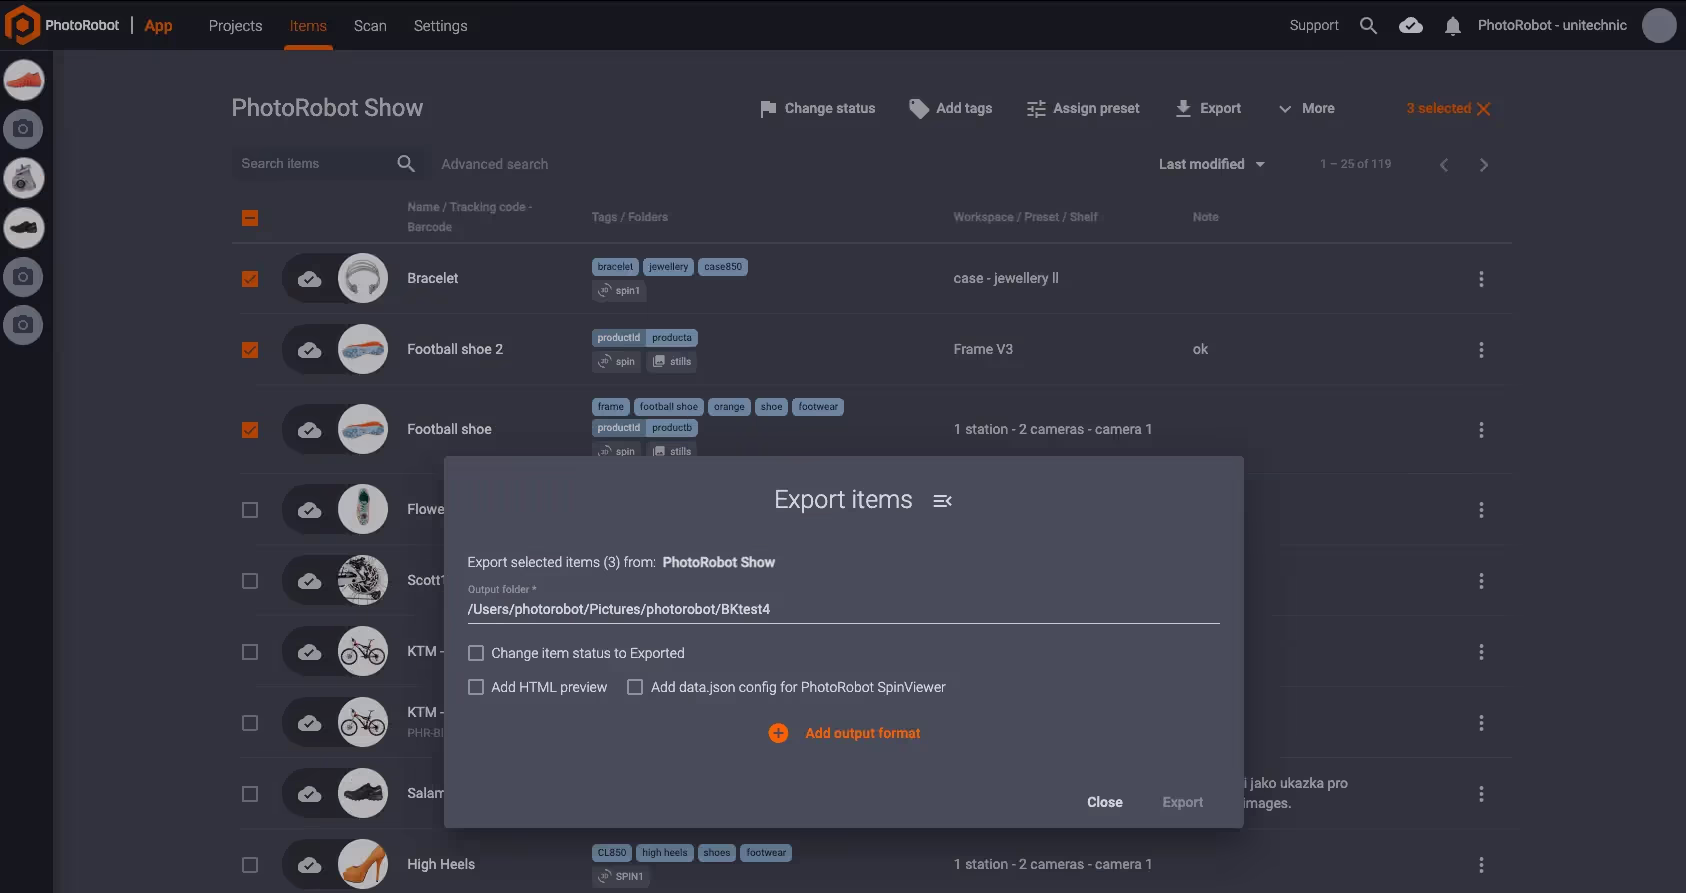
- Change item status to Exported - Check this box to change the status of items after successful export to Exported in the app.
- Add HTML preview - Check this box to generate an HTML preview next to exported items which users can click to inspect.
- Add data json config for PhotoRobot SpinViewer - Check this box to configure the main JSON configuration file. Note: After configuration, double-check that the JSON syntax is valid.
For each export, the user must also select an output format via Add output format. There are three output options by default:
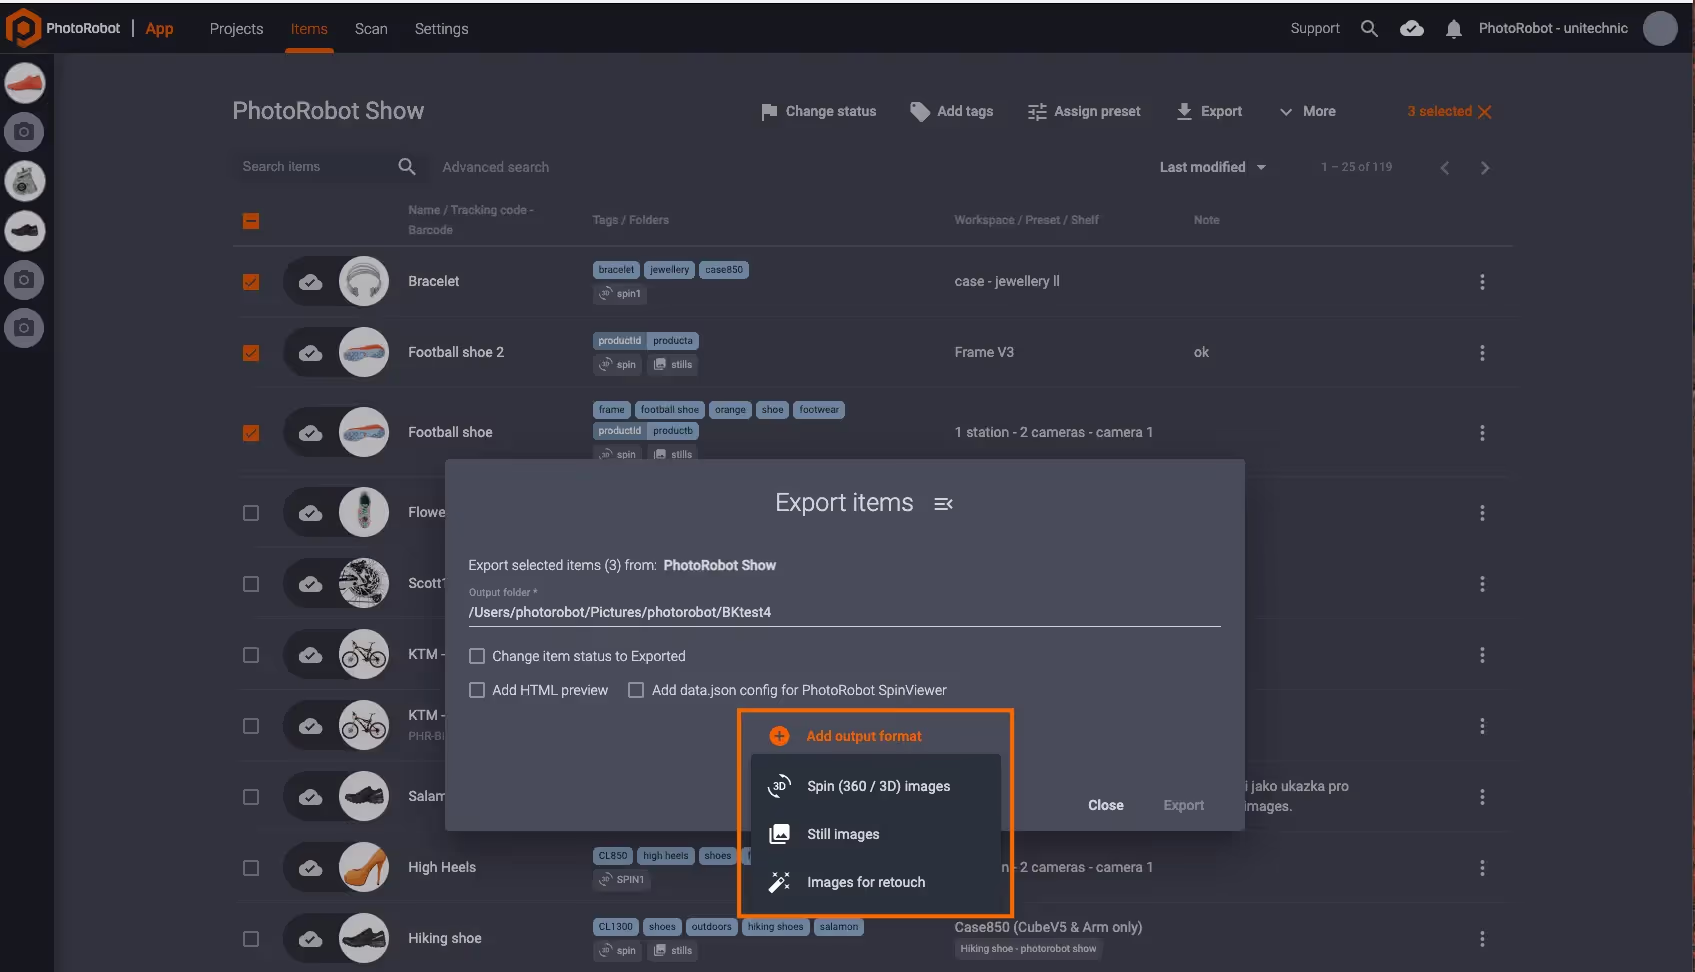
- Spin (360 / 3D) images - Export items as a product spin.
- Still images - Export still images, such as an image gallery of 5 or 6 photos.
- Images for retouch - Mark images for external retouching before final export (detailed in a following manual).
Note: When adding multiple outputs, users configure individual menu options for Spin (360 / 3D) images and for Still images, or for other output formats.
Choose a File Format for Export
After selection of the output format, the export window displays options for users to select which file format to download images in:
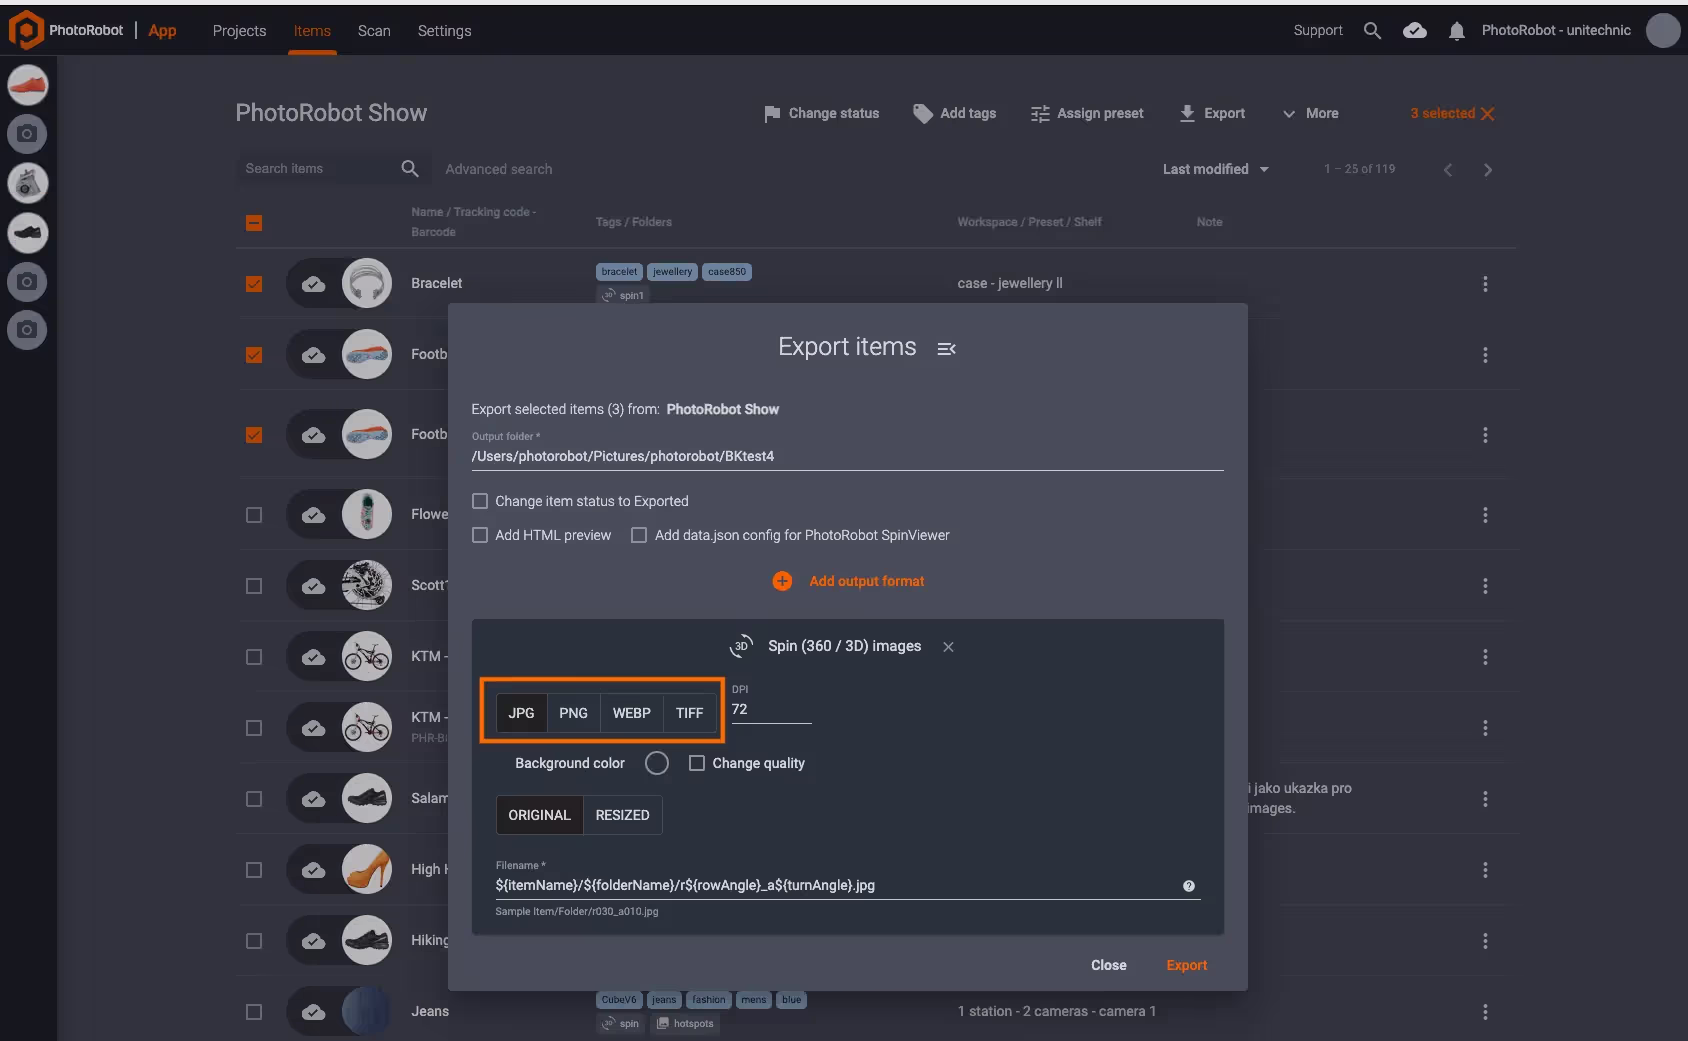
- JPG - The JPG file format is useful for its compatibility and size, although some data may be lost in transfer. This is due to JPG using lossy compression, which does not always result in a 1:1 representation of the original image.
- PNG - The PNG file format uses lossless compression to download images in a 1:1 representation of the original file. PNG files can also be served on a transparent background, however file sizes are much larger than JPG and used very rarely on the web.
- WebP - The WebP file format from Google is generally compatible everywhere, and it combines the properties of JPG and PNG into one format. WebP has superior lossy and lossless compression, files can have transparency, and images can be compressed to extremely small sizes.
- TIFF - The TIFF file format is extremely uncommon, and only used in very special cases for compatibility on legacy systems. TIFF thus has limited support in CAPP, and is not recommended for item export.
Note: The recommended file formats are WebP and JPG. Further, WebP is recommended over JPG, as WebP consistently requires less bits per pixel than JPG for the same SSIM index. Conversely, PNG file sizes are often too large for the web, and only used in special cases.
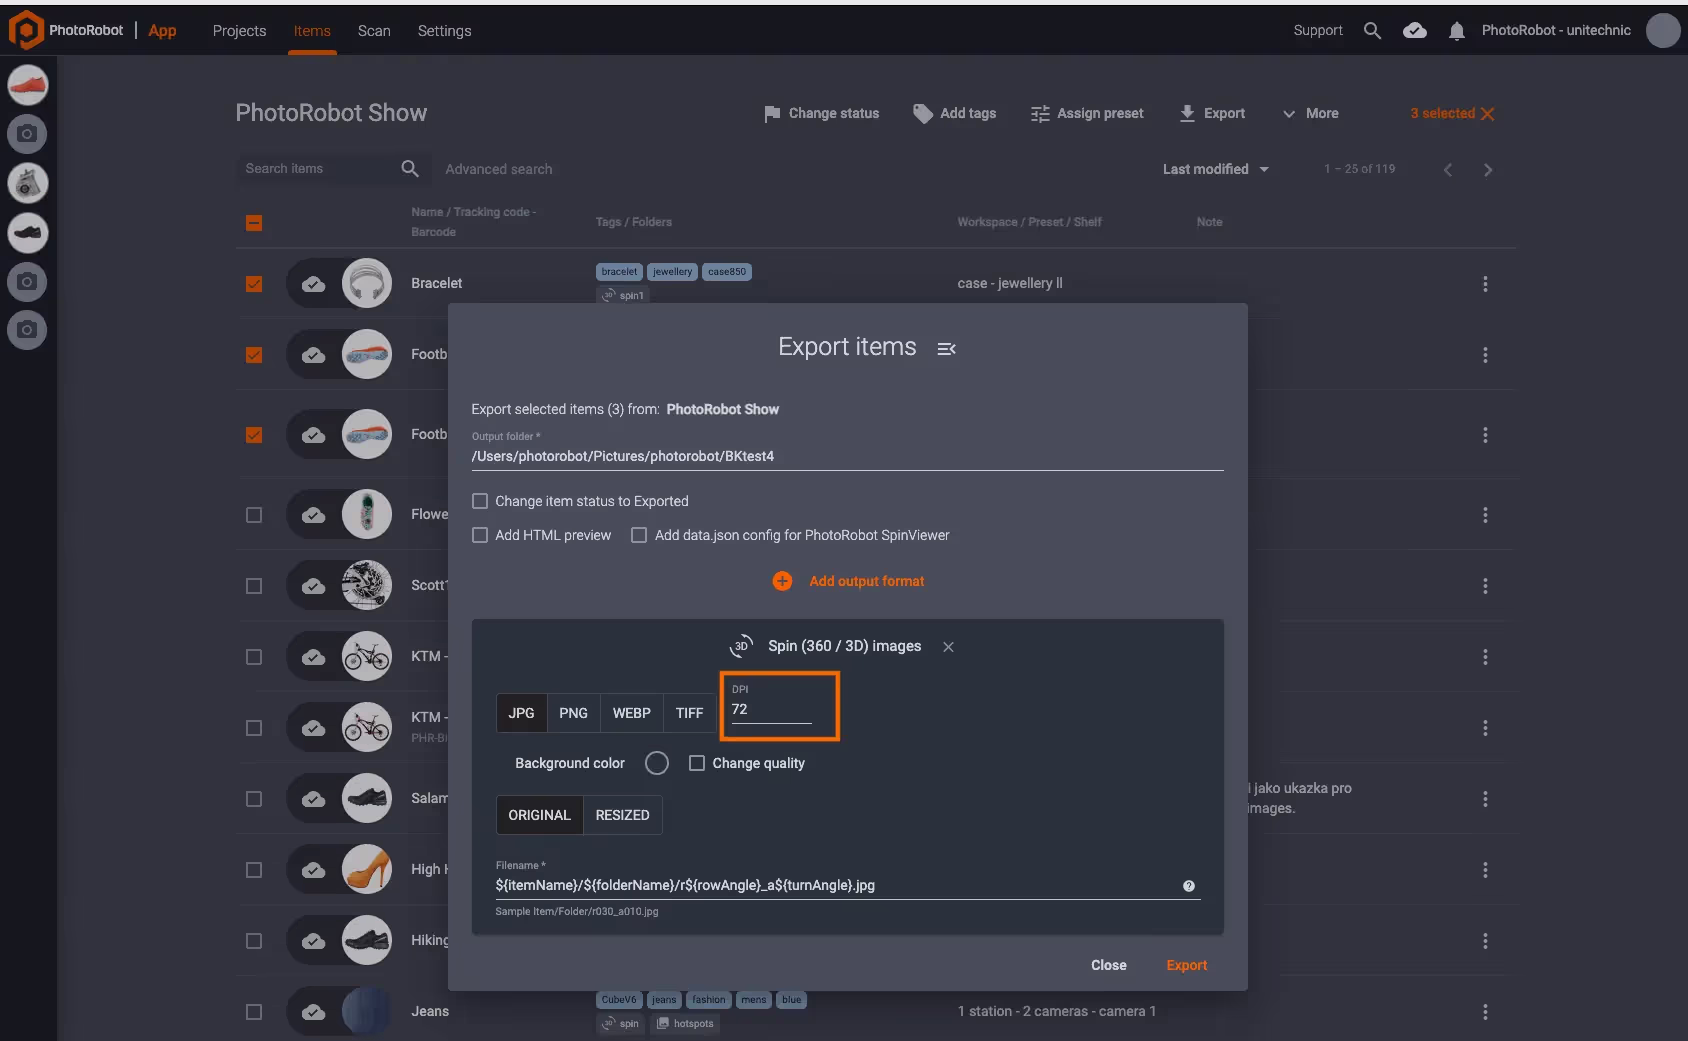
Additionally, on the right of file format selection, DPI is set to 72 by default. Note: adjusting DPI will have no effect on image resolution, so in the majority of cases it is recommended to keep the default setting:
Set Background Color (Transparent JPG Files Only)
If configuring a transparent JPG file for export, users can select a background color by clicking Background color:
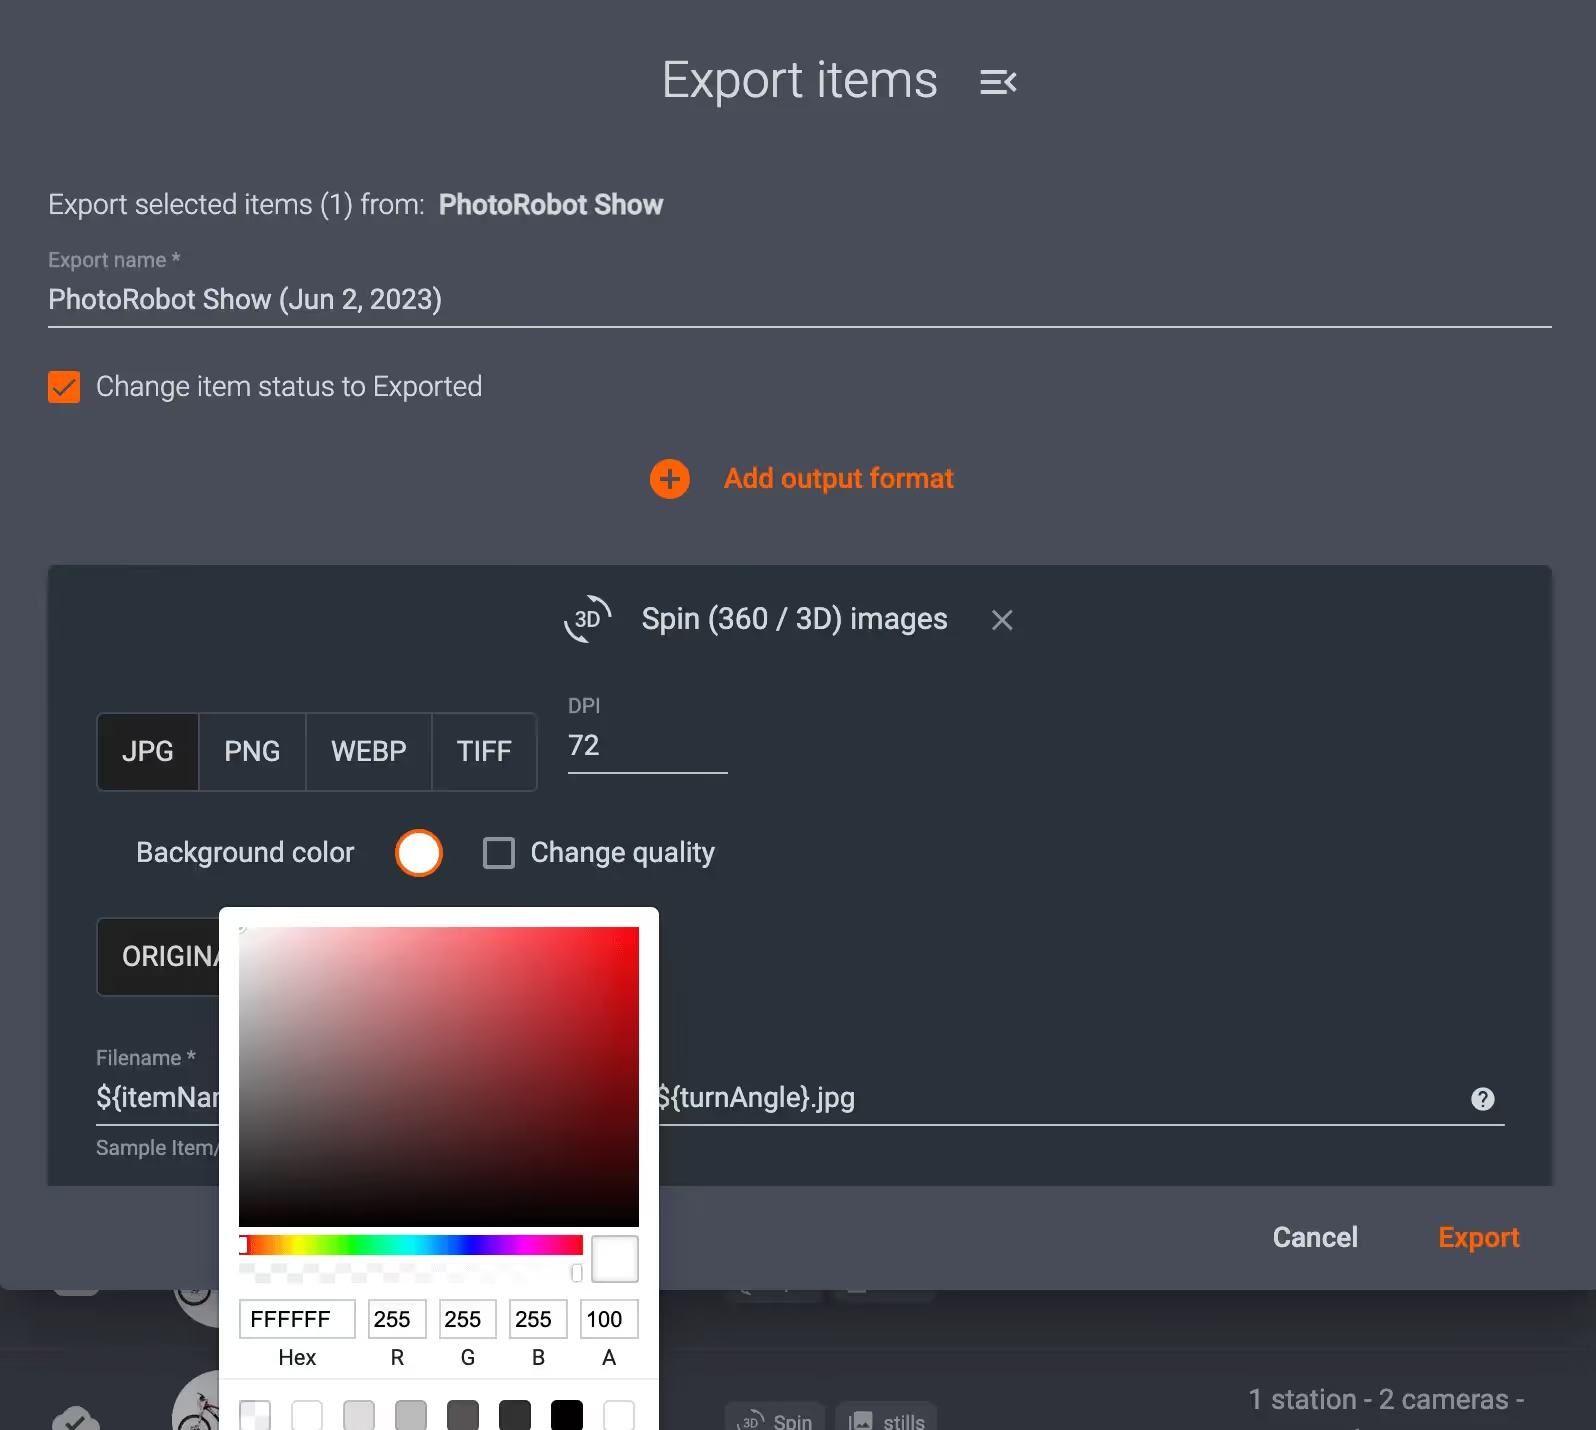
- Note: Background color options are available only for transparent JPG files.
- Change quality options function for both JPG and WebP files.
Change Quality (JPG, WebP)
To adjust image quality on JPG or WebP files, check the Change quality box below file format selection:
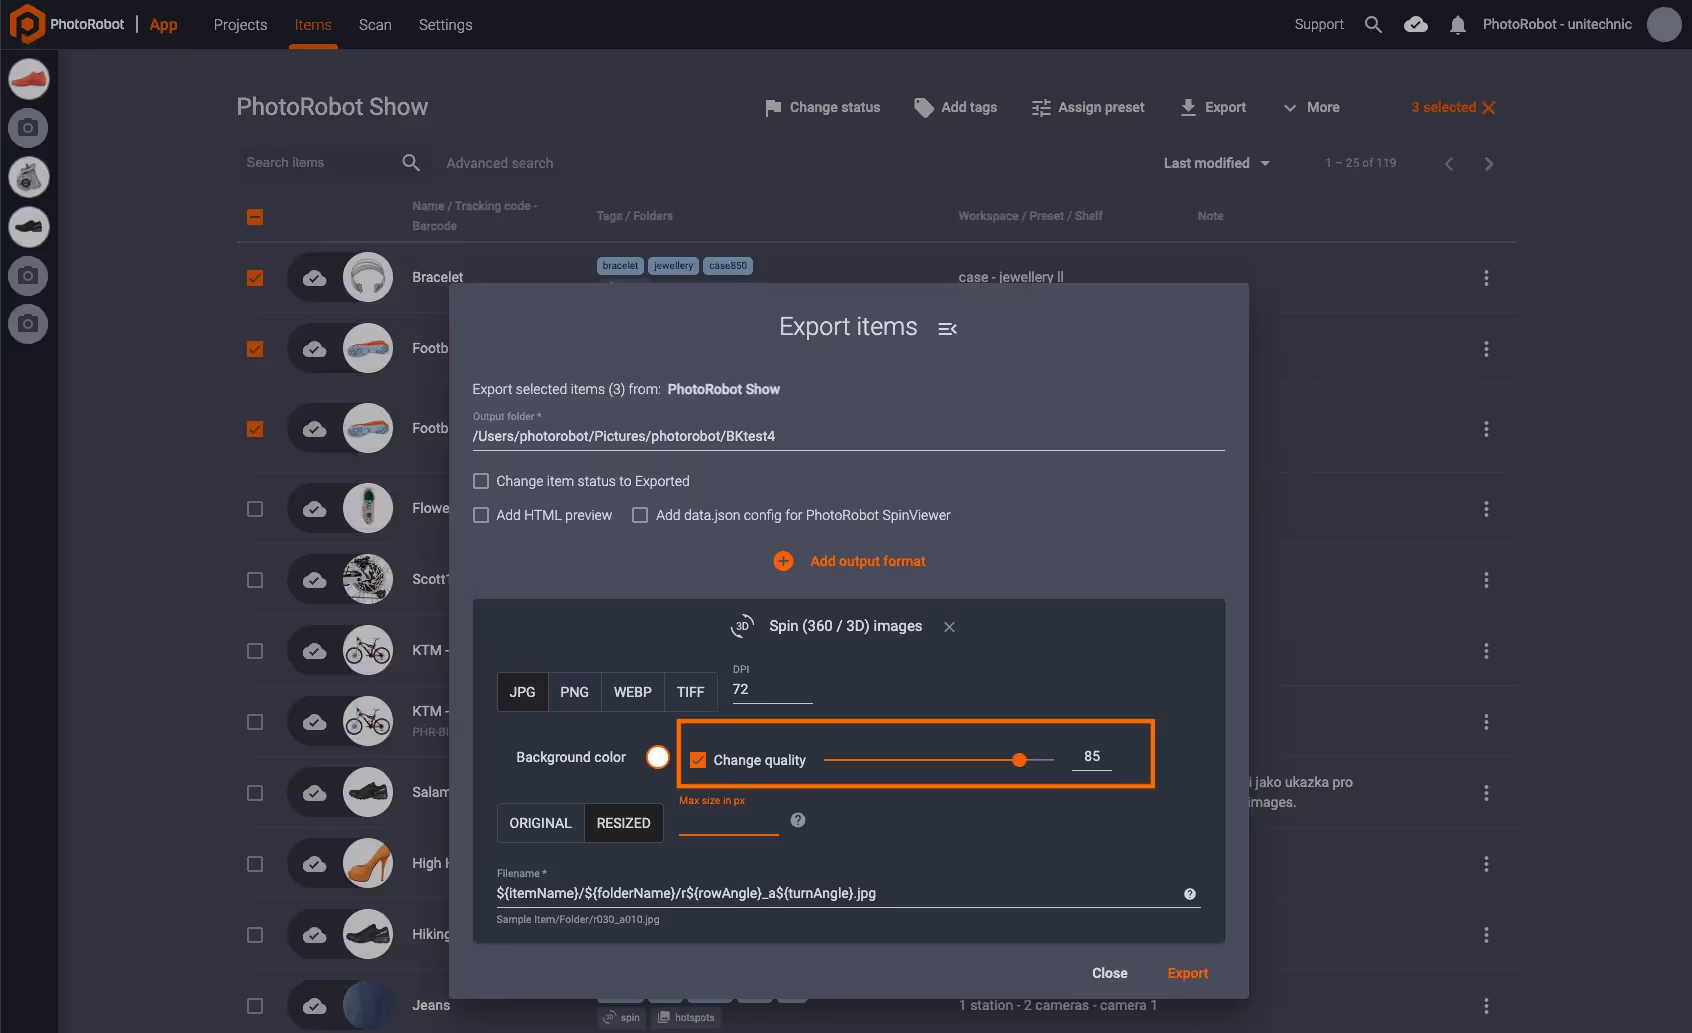
Change quality is measured on a 1 to 100 (lowest to highest level) scale, which affects file size and image quality at the same time.
Note: For JPG and WebP files, the ideal quality levels exist in different ranges. It will thus be necessary to adjust this number depending on the file format, and its desired size versus its desired quality.
- Change quality (JPG) - JPG compression is typically measured as a percentage of quality level. For example, an image of 100 quality has almost no loss, but at the same time has a larger file size. Conversely, an image with 1 quality is an extremely low quality image. In general, JPGs with a quality of 90 or higher are considered “high quality”, while 80 - 90 is “medium quality”, and 70 - 80 is “low quality”.
- Change quality (WebP) - WebP ideal quality levels exist between the 50 - 80 quality range in most cases. If the quality value is 80 or more, there is often no discernible difference in image quality, while file sizes become larger. For values 50 and under, file sizes reduce only slightly, while image quality is severely damaged.
Select Original or Resized Image
For all file types, users can select to export items in original file size, or in a desired resolution:
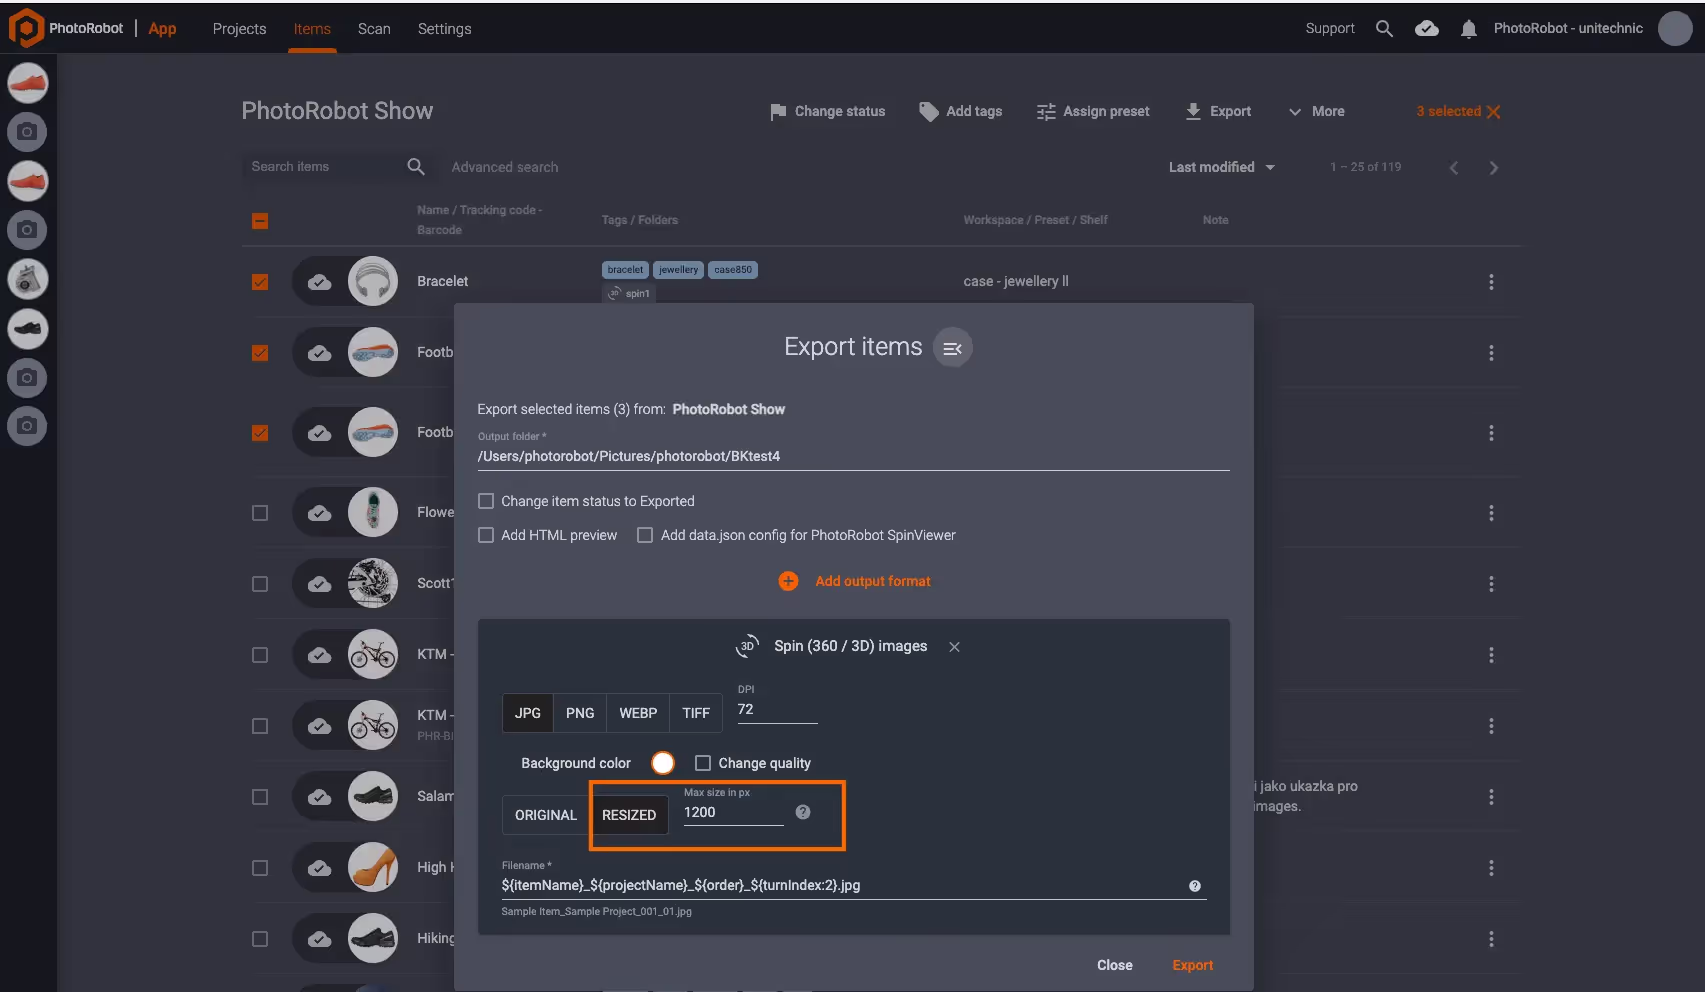
- Original - This is the default setting to keep the original image resolution.
- Resized - Select to specify the maximum size in pixels of an image to export (example: 1200 resolution).
Item Export File Naming
The final step before item export is to choose a Filename*. This step enables users to select or change variables for the image template:
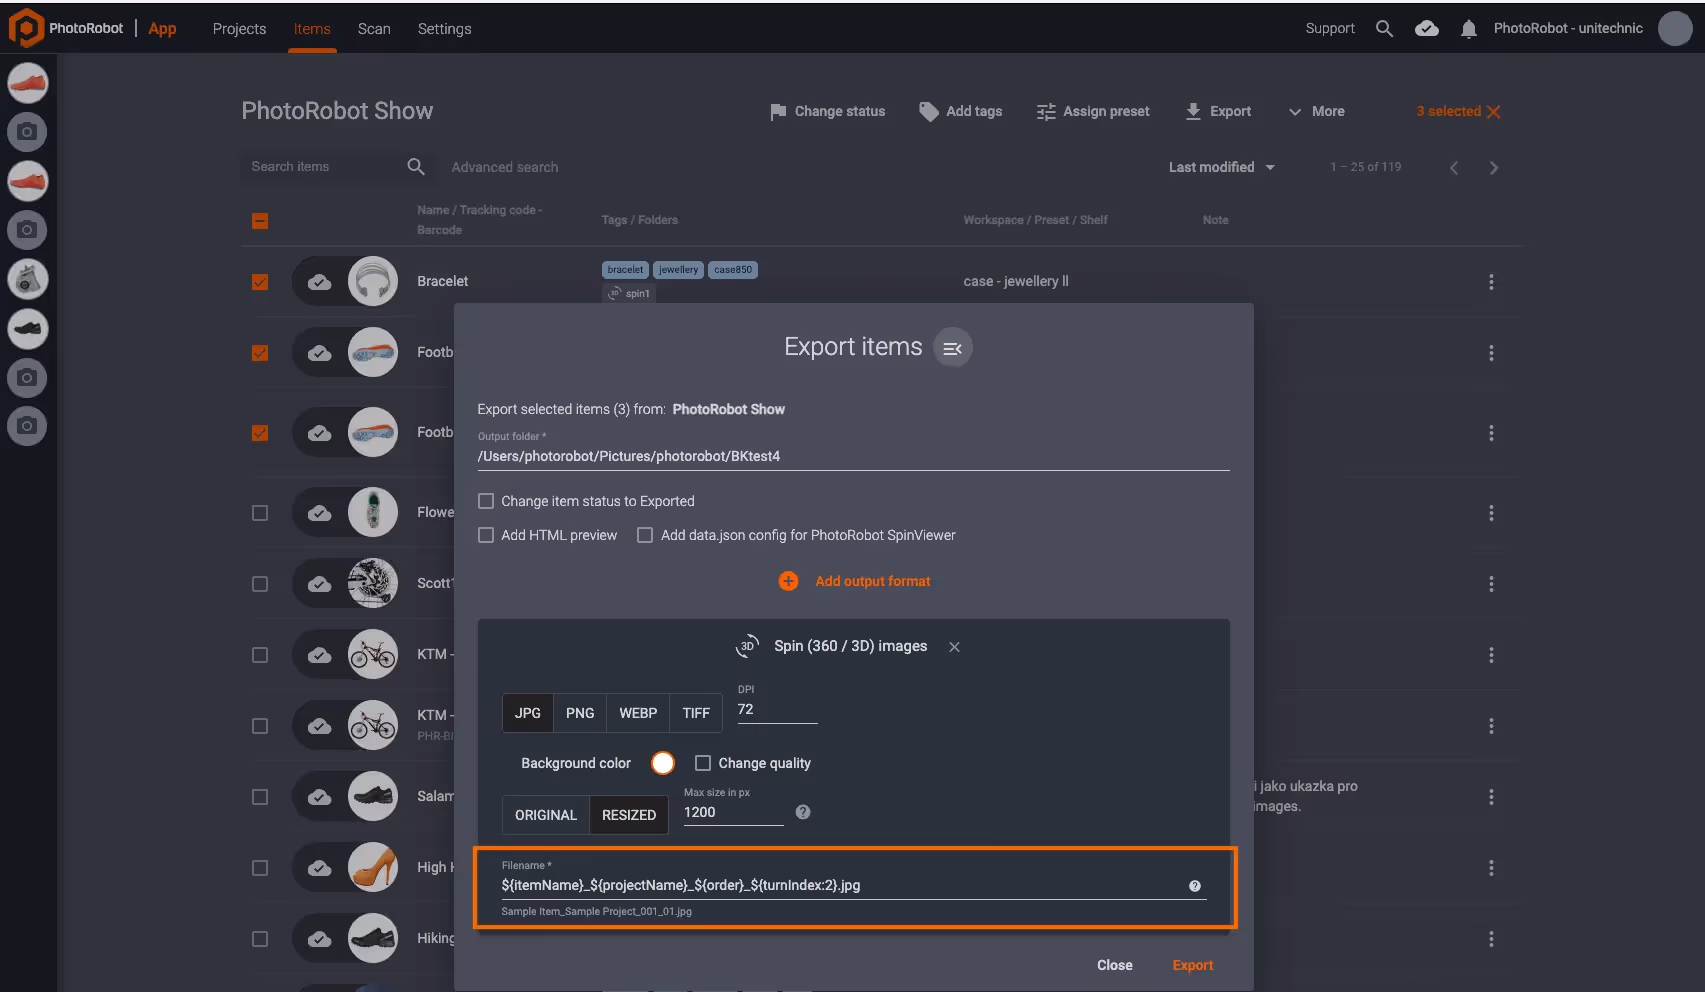
To access the help box, click Show template variables via the question-mark icon to the right of the input filename:

Standard variables include:
- ${projectName}
- ${itemName}
- ${barcode}
- ${trackingCode}
- ${folderName}
Variables for further explanation are:
- ${rowAngle} - This is the vertical angle from which the image has been shot.
- ${turnAngle} - This is the horizontal angle from which the image has been shot.
- ${rowIndex} - These are similar to row angles but use an index within the row (example: If there are 3 rows, the row index is from 001 to 003).
- ${turnIndex} - These are similar to turn angles but use an index within the turn (example: If a spin has 24 frames, the turn index is from 001 to 024).
Templates can be further customized using variables:
- ${label} - Create a basic label for an item for export (example: front, back, side).
- ${gs1} - Configure advanced item labels according to GS1 image standards.
- ${order} - This is the index of the image within the folder. It is similar to the turn index. However, instead of a position within a row, this is a position within a folder (example: if there are 2 rows of 24 frames, the first row is indexed 1 to 24, the second from 25 to 48.
- ${stopId}
- ${tag:key} - This enables users to customize *tags for an item.
Tags within a filename can function for example as a label for “Product A” versus “Product B”. In this case, a filename for Product A might be: ${projectName}/${itemName}(${tag:productid}/${folderName}/${rowAngle}_a${turnAngle}.jpg
Additionally, Custom formatting options exist to further customize some variables, including: ${rowIndex}, ${turnIndex}, and ${order}. Customize these variables by appending the variable with the colon symbol followed by a value, for example:
- ${turnIndex:2} - Format turn index filenames to two-digit rather than the default three-digit numerical index (e.g. 01, 02, 03, etc).
- ${rowIndex:2:0} - Format row index filenames to a length of two, starting with zero (e.g. 00, 01, 02, etc).
- ${order:4:20} - Format order index to a length of four, starting at number 20 (e.g. 0020, 0021, 0022, etc).
( ! ) - Duplicate path error: If using r${rowAngle}_a${turnAngle} in a template and also exporting still images that share rows with the same angles, the user must specify ${order} in the template. This will avoid encountering a “Duplicate path error,” and should look as follows: ${order}_r${rowAngle}_a${turnAngle}.
Save or Load Configurations
Next, users can save an export template and its configurations, or load a template from their archive.
To save or load an export template, access template options via the menu icon next to Export items at the top of the export menu:
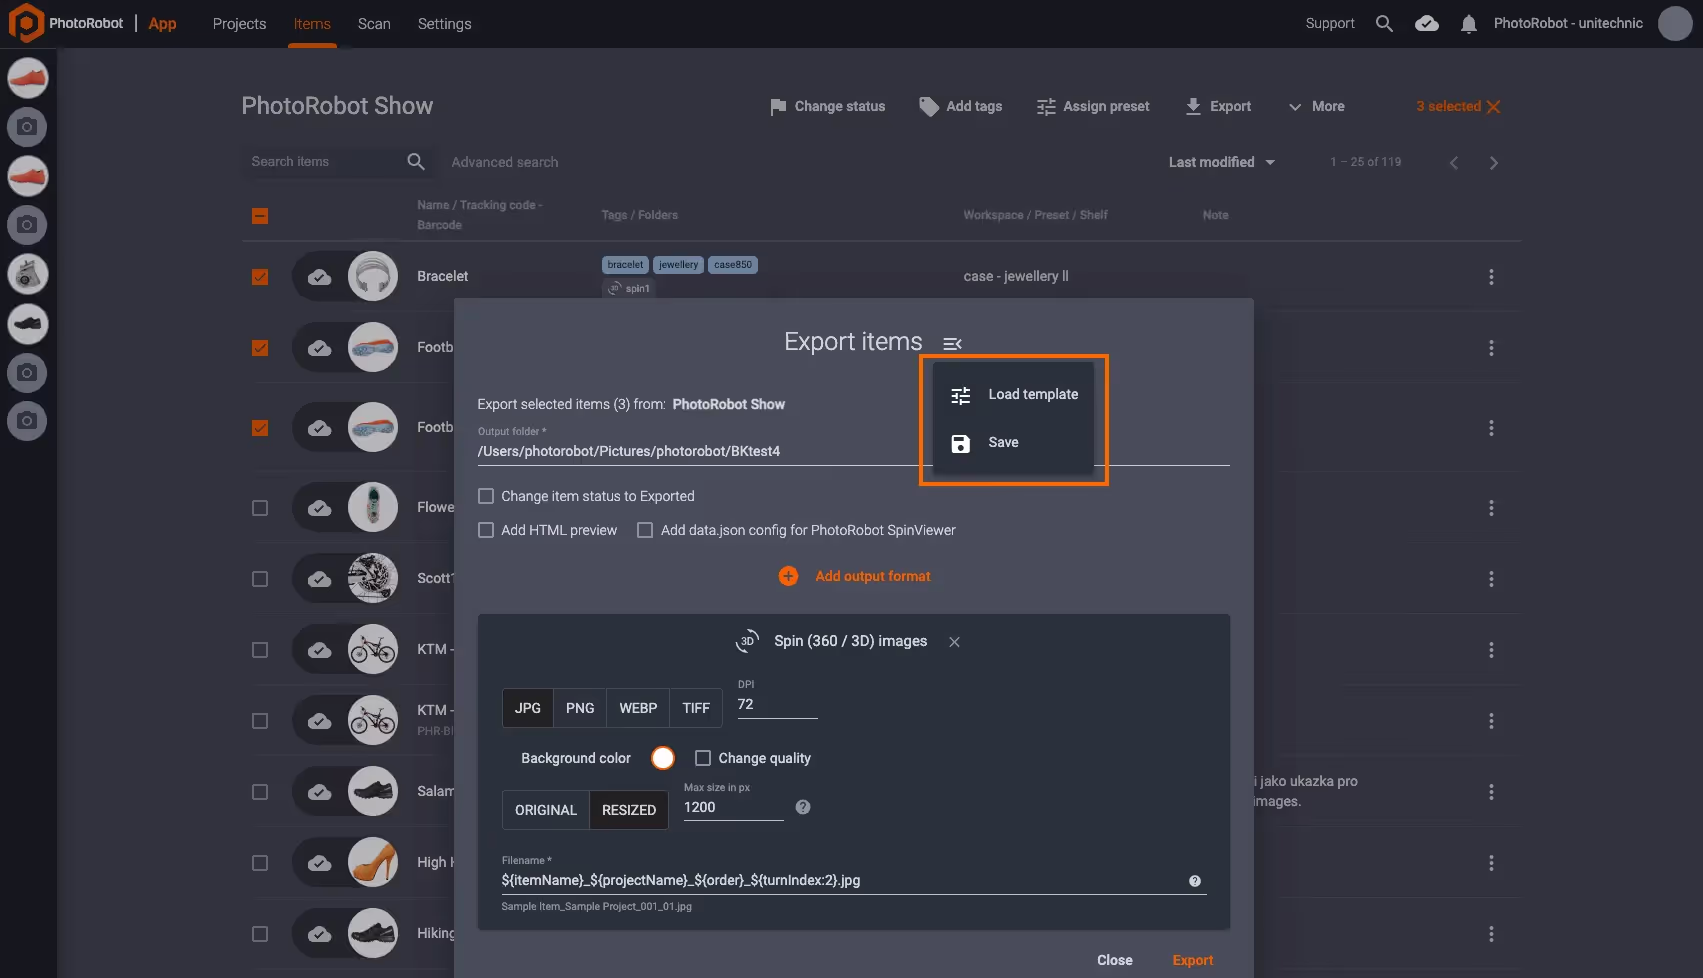
When saving, click Save to create a new template, add a name, and include tags or notes for future indexing or reference:

Export Items to the Local Disk
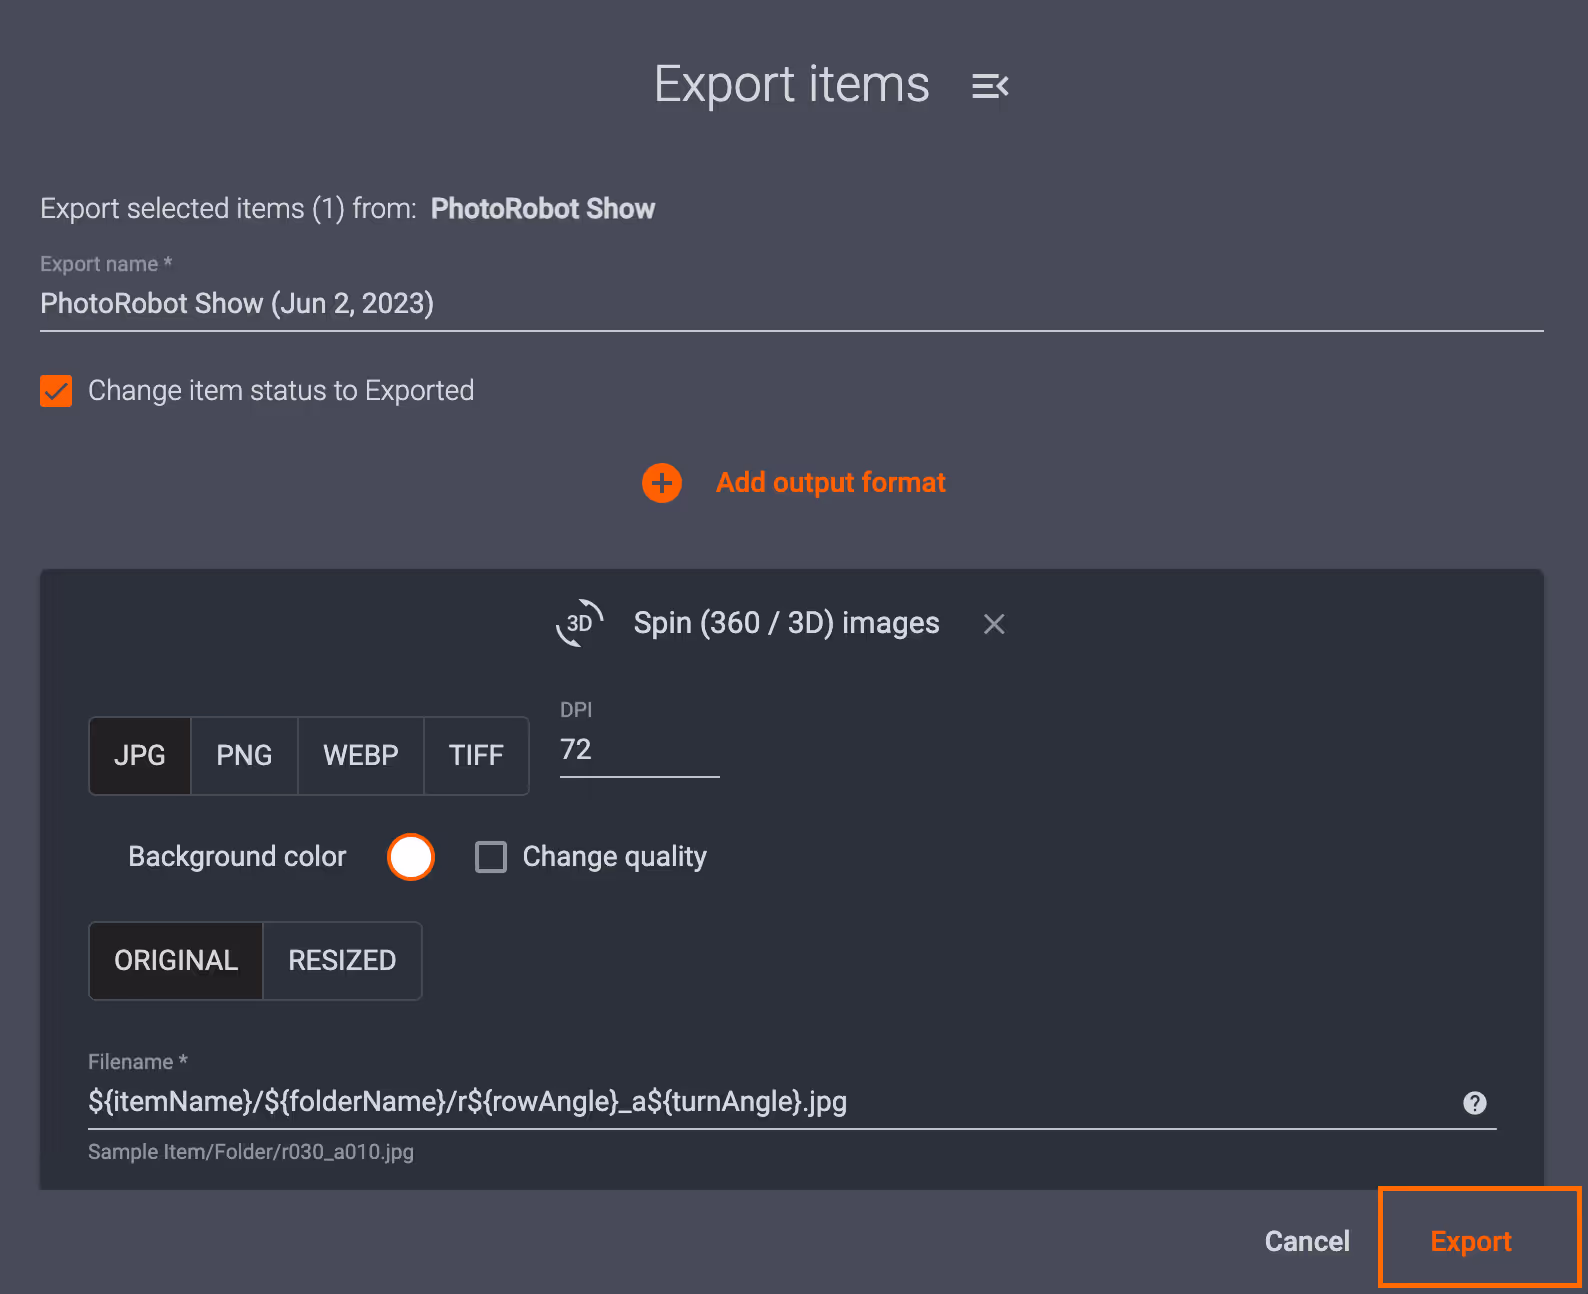
After configuring the export template with all required outputs, file formatting, and filename variables, click Export in the bottom right of the interface:
On successful export, all items will transfer from CAPP to the path specified to your local disk.
Item Export (to the Cloud)
Item export to the cloud follows the same procedure as exporting items to a local disk, and provides the same functionality.
- Users configure export options, outputs, file formats, and filename variables:

*The only difference is that with Cloud-based item export, CAPP generates a link with a URL address to access the exported item.
- In the Exports tab, click Get link next to the item for export:
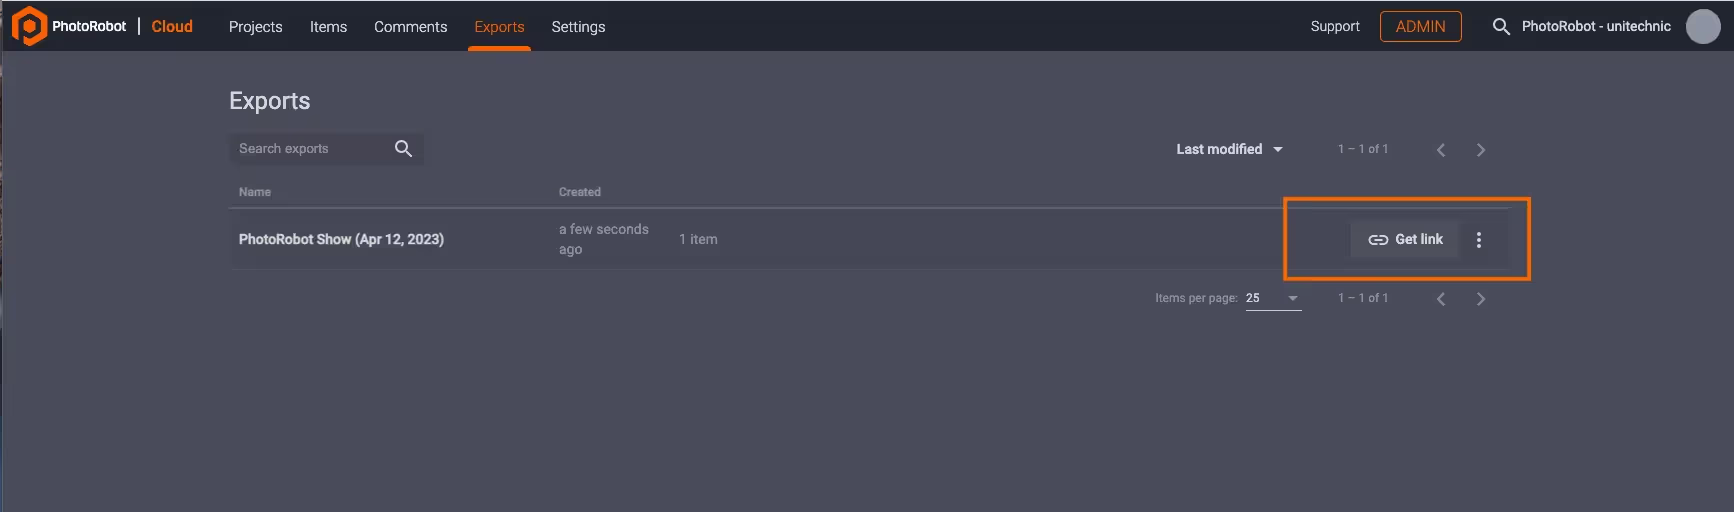
- Click Copy link to save the URL address to the item for export:
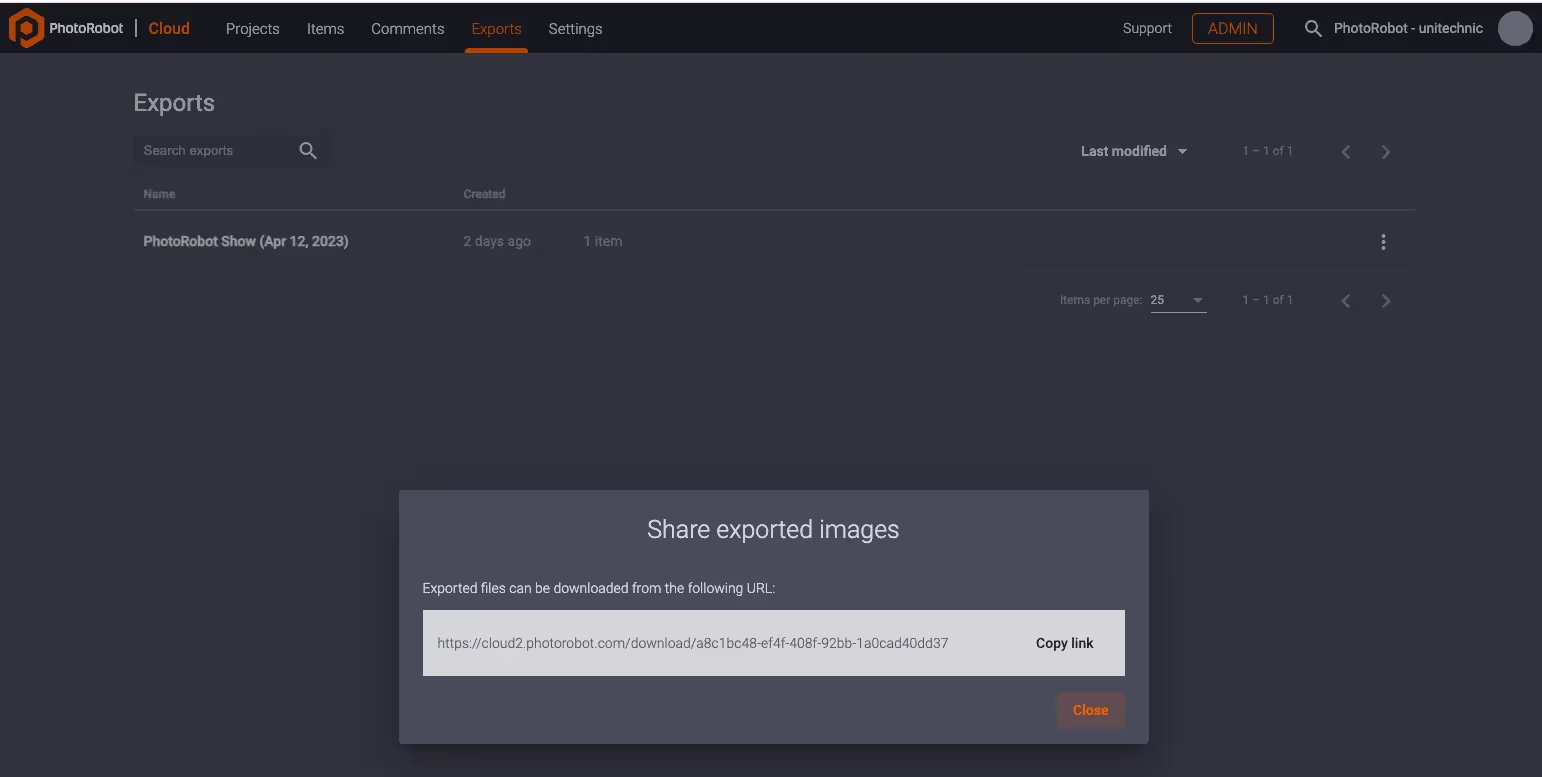
- Paste the link from your clipboard to a browser search bar to access the item for download. Generated links are stored and accessible for download for 7 days.
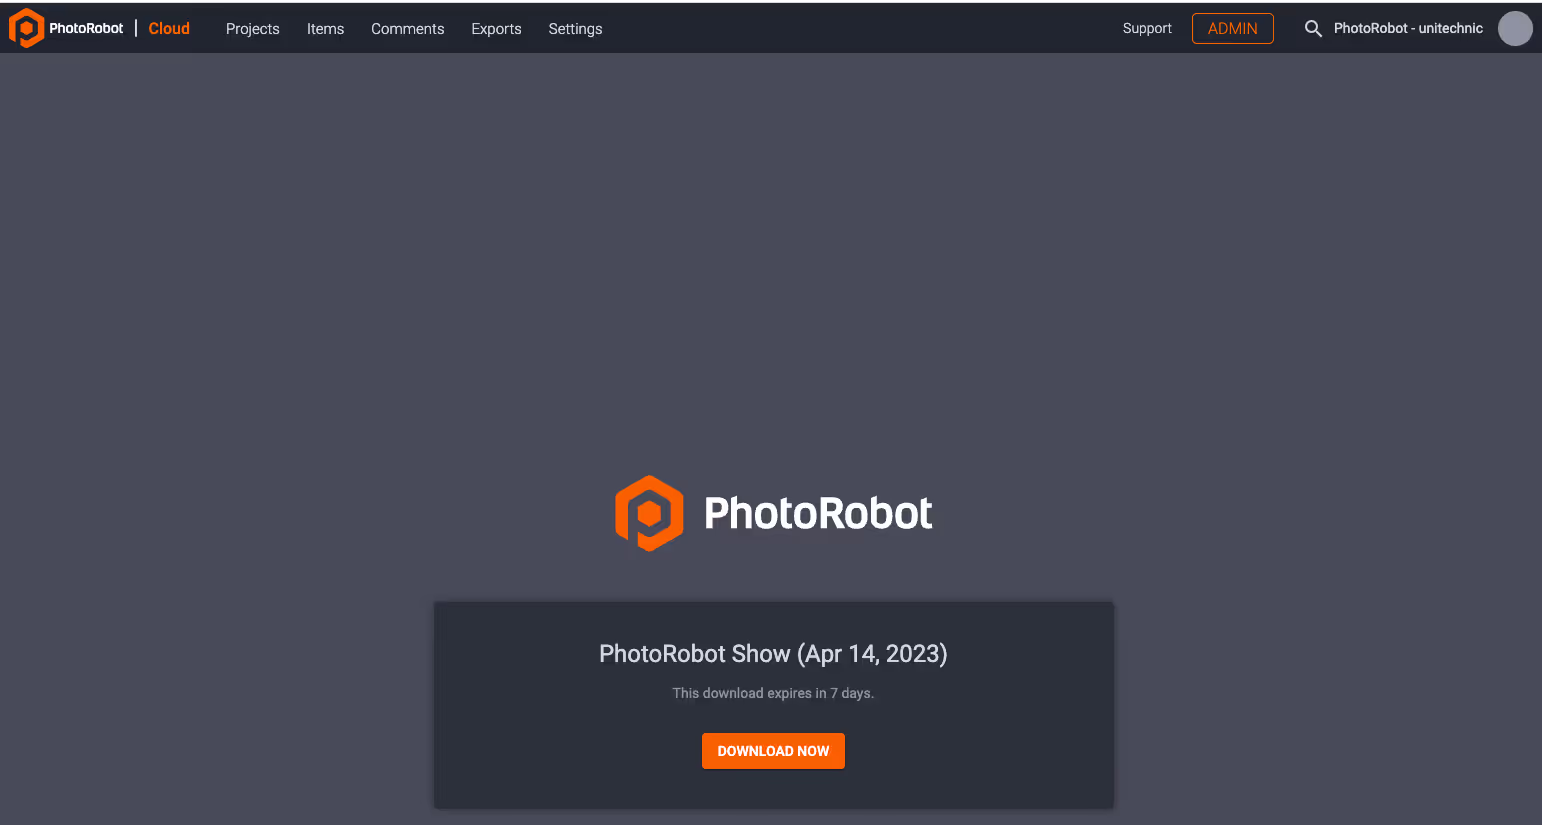
- To download images, users must install the PhotoRobot File Manager app. Click Download Mac installer (also available for Windows) if not already using the app on your device.
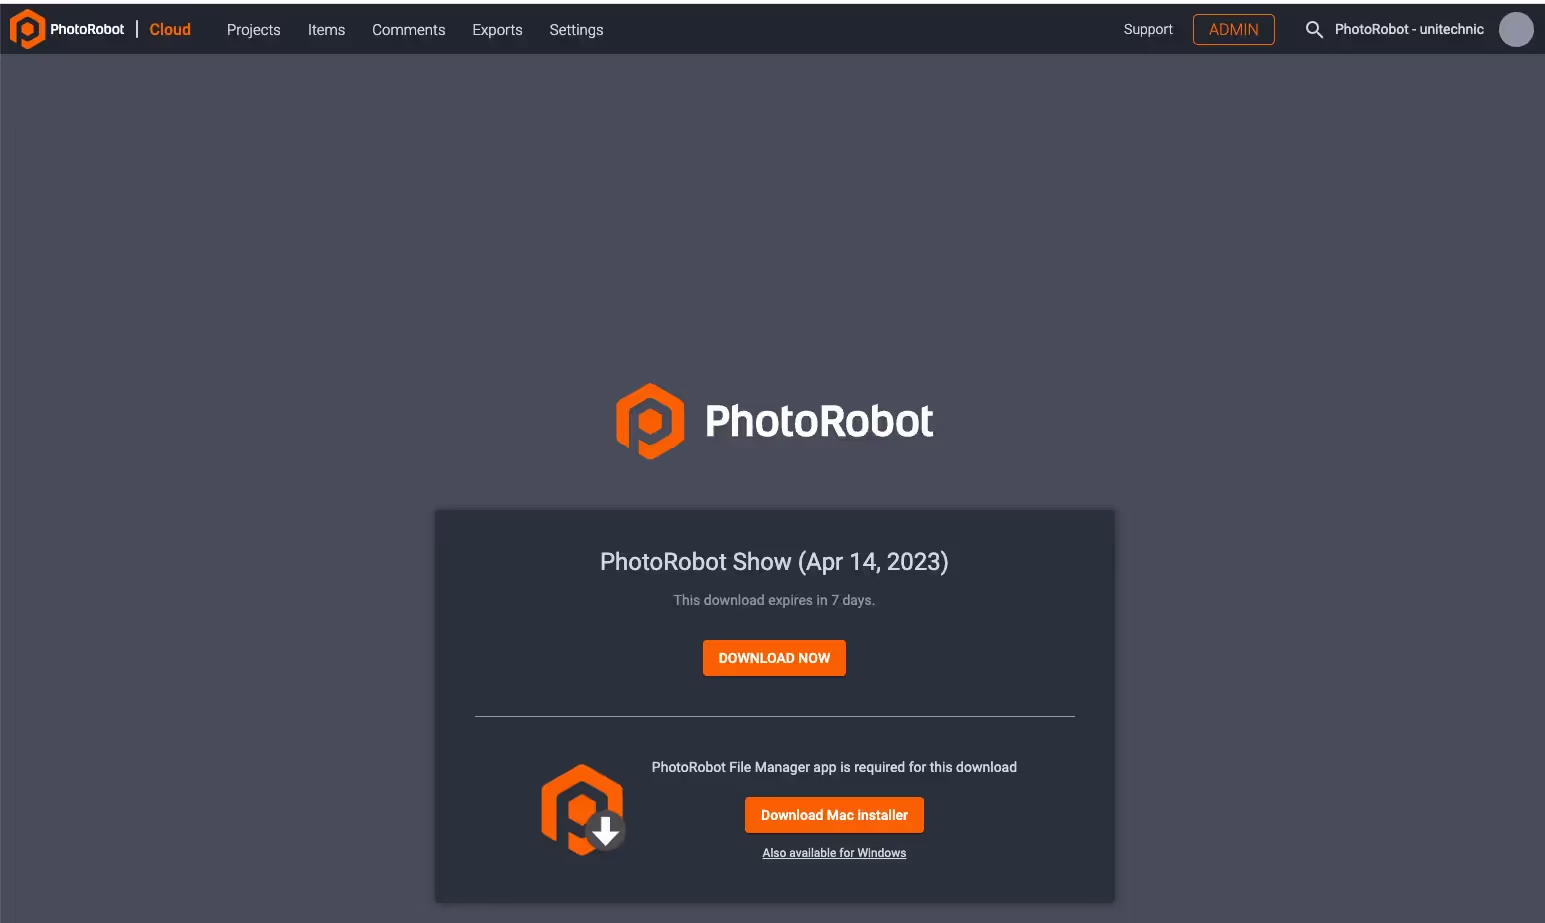
- Click Download now to select a target folder for item download, and click the final Download button underneath the item path:

On successful download, PhotoRobot File Manager displays both downloads and uploads:
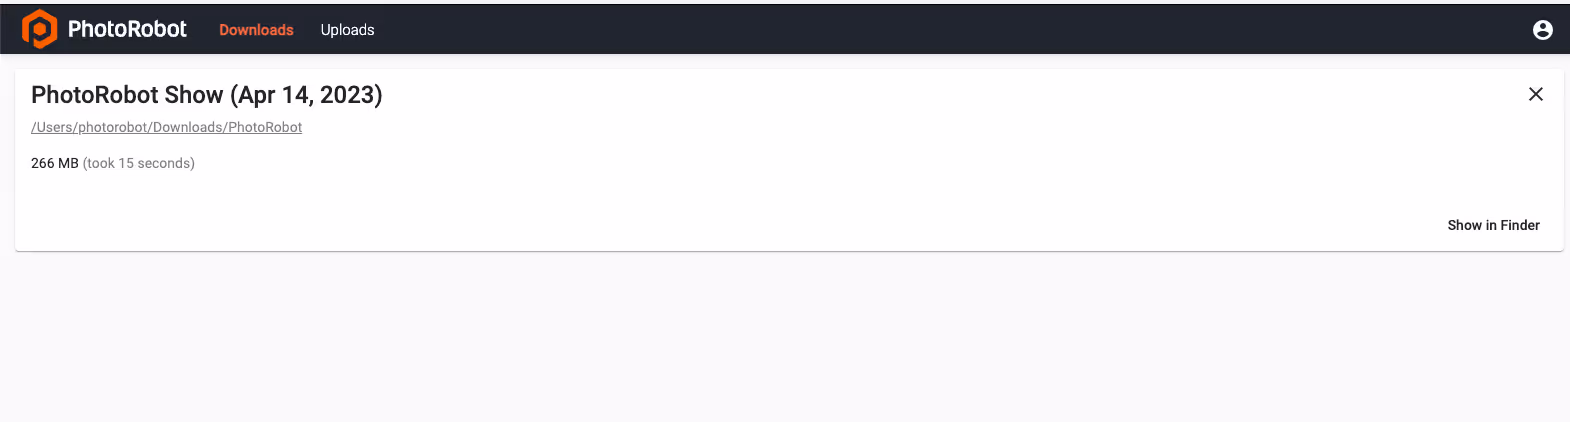
- Click Show in finder to open the folder containing the exported images.


EOS Rebel Series


EOS DSLR Series


EOS M Mirrorless Series


PowerShot Series


Close-Up / Handheld

The Canon EOS Rebel Series offers beginner-friendly DSLR cameras with solid image quality, intuitive controls, and versatile features. Ideal for photography enthusiasts, these cameras provide reliable autofocus, vari-angle touchscreens, and Full HD or 4K video recording.
Connection
Resolution (MP)
Resolution
The Canon EOS DSLR Series delivers high-quality images, fast autofocus, and versatility, making it ideal for both photography and video production.
Connection
Resolution (MP)
Resolution
The Canon EOS M Mirrorless Series combines compact design with DSLR-like performance. Featuring interchangeable lenses, fast autofocus, and high-quality image sensors, these cameras are great for travelers and content creators seeking portability without sacrificing image quality.
Connection
Resolution (MP)
Resolution
The Canon PowerShot Series offers compact, user-friendly cameras for casual shooters and enthusiasts. With models ranging from simple point-and-shoots to advanced zoom cameras, they provide convenience, solid image quality, and features like image stabilization and 4K video.
Connection
Resolution (MP)
Resolution
The Canon Close-Up & Handheld Cameras are designed for detailed, up-close photography and video. Compact and easy to use, they offer precision focus, high-resolution imaging, and versatile macro capabilities—perfect for vlogging, product photography, and creative close-ups.


