PhotoRobot - Broncolor Lights Management
This support manual describes the hardware and software components necessary for the management of Broncolor lights in the PhotoRobot ecosystem. It includes the hardware components, software tools, principle modes, and recommended settings for the Siros 400/800 WiFi/RFS2 series.

Note: Broncolor lights are managed directly in PhotoRobot _Controls App (further referred to as “CAPP”). CAPP ensures there is no need to install drivers for Broncolor hardware management on the customer side.
- For function management and flash intensity:
- There is no extra hardware necessary at the site of the computer.
- There is no extra hardware necessary at the site of the lights.
- For flash triggering:
- There is wireless or wire trigger connection to the camera.
Also note: The Siros L series has a built-in WiFi module. If using the module in Enterprise mode, you should set up your network to use the recommended WiFI settings.
Recommended WiFi settings include the following:
- Ideally use a separate subnet, tested with a Mikrotik router RB1100AHx4.
- Switch off WiFi Radio in the Mikrotik device; Broncolor lights do not function optimally with this on.
- Configure the router as follows:
- ether13 = WAN, DHCP client
- ether1 - ether12 = LAN, all ports in a switch
- Connect the WiFi module TP-link TLWR802N to any LAN port of the router.
- For WiFi module configuration, use:some text
- operation mode = Access Point
- wifi mode = 11bgn mixed
- channel = 9
- channel width = 20 MHz (40 MHz possible but check interferences)
- security = WPA2-PSK
- cipher = AES
( ! ) - When using the above configuration, please ensure the router and WiFi module are fully up and running before powering on the lights. The ideal configuration will run the router and the WiFi module continuously.
Hardware Components for Lights Management
Broncolor lights require no additional hardware components for connection to the computer or to the lights. All radio modules are also built-in, so there are no special drivers necessary for installation on the computer.
The only extra hardware component requirement is a flash trigger, which must be installed on the camera.
Radio component (2.4 GHz)
For the radio component, PhotoRobot recommends the Broncolor RFS 2.1 transceiver (2.4 GHz).

Software Tools
In CAPP, there is an application by the name of BronControl for management of lights directly in PhotoRobot software.
The application is downloadable for Mac, Windows, Android, and iOS directly from within CAPP via links in the Downloads section.
Principle Modes
With their built-in WiFi module, Broncolor lights can operate in two principle modes.
Private mode
In Private mode, WiFi is active on more than one monolight, with all units linking up automatically to the same studio address to form a private network. A smartphone or tablet must then be connected to this network in order to control it. To achieve this, activate the WiFi function on your smartphone or tablet. The device should automatically search for available WiFi networks. Then, connect the smartphone or table to the appropriate Bron-Studio network. The connection password is: bronControl. Next, start the “bronControl” app on your device. Add the appropriate studio number under “add new studio” and connect the app with this studio. For further instructions, it is also possible to use the help function “?” in the app.
Enterprise mode
If there is an existing WiFi network (router), the unit can be integrated into this network
using a smartphone or tablet. To achieve this, in the "bronControl" app, under settings, go
to "Network Settings" and enter your router’s settings in "enterprise" mode. Then, ensure
the units are set to the correct studio address. Siros saves the last type of connection, and
tries to connect to the last seen network when restarting next time.
Recommended Settings
PhotoRobot recommends using Enterprise mode for functional operation with Broncolor lights. The recommended steps are as follows.
1. Press the TEST button and hold it for 10 seconds to reset the whole light to factory settings. Also, ensure manually, using PC or mobile phone, that there is no available WiFi network with “SSID = Bron-Studio1”.
2. Power the light Off / On.
3. Press the rotary controller to enter the main menu. The main display (between MOD and TEST buttons) shows corresponding values to the selected menu item.
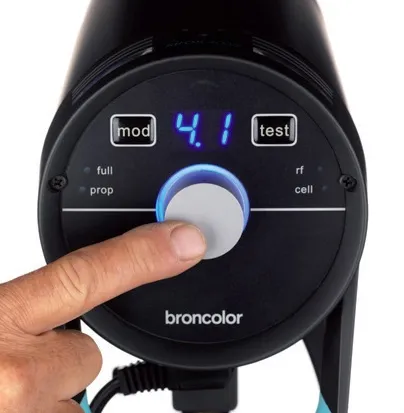
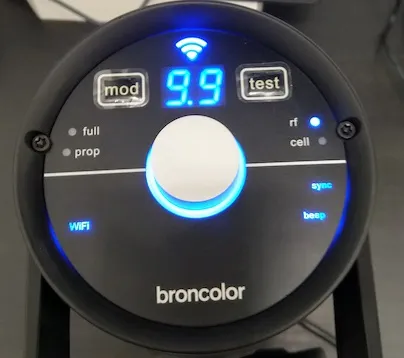
4. Turn the rotary controller unit until you reach the menu item “wifi”.
5. Press the rotary controller to confirm the operation with WiFi. The “wifi” display will begin to blink on success confirmation.
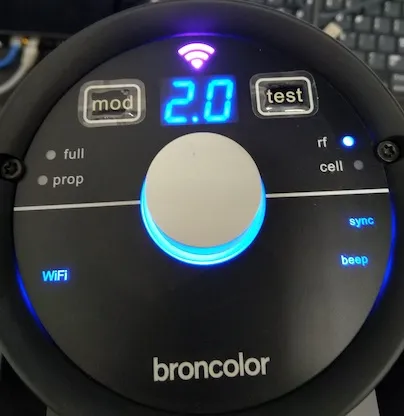
6. Turn the rotary controller until “SY” appears on the main display.
7. Confirm this selection by pressing the rotary controller. After this confirmation, the unit switches into WiFi private mode. Now, the light functions as a WiFi Access Point, with SSID=”Bron-Studio1”, password=”bronControl”.
8. Next, you need a client device with a WiFi module for PC / Mac / Android / iOS. Install the “bronControl” application to the client device based on its operation system. Note: the bronControl app is available for for Android and iOS in relevant App Stores, or you can download the application for Windows and OSX directly from the downloads section on Broncolor’s web. It is then possible to connect the client device on PC / Mac / Android / iOS to the Bron-StudioX SSID, password=”bronControl”.
9. Start the BronControl application, and choose studio “Bron-Studio1”.
10. Click on the cogwheel symbol in the upper-right corner of the BronControl app window.
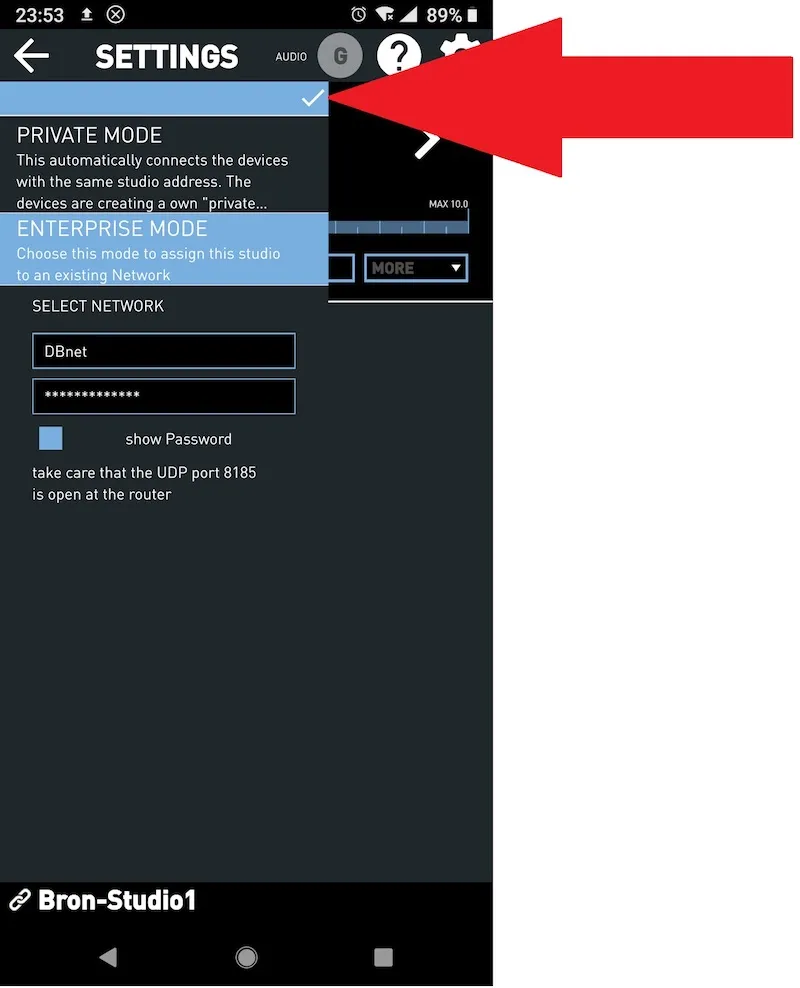
11. Click Network settings, then Enterprise mode, and Select network.
12. *If using the Windows operating system, in the first field of the “Select network” section, select the SSID of your choice from the list of available WiFi networks (typically, “PhotoRobotNet”).
13. *If using the Android operation system, manually enter the SSID into the first field of the “Select network” section (typically, “PhotoRobotNet”). Next, move the cursor into the second field “Password” and enter the wifi password (secretpass). For additional wifi settings, please take into account the recommended settings at the start of this manual.
14. *If using Windows or Mac, fill in the password (from step 13), and press the Enter key on your keyboard to confirm.
15. *For Android, fill in the password (from step 13), and click the tick mark to confirm.
16. When the WiFi symbol maintains a steady glow in magenta color, the Broncolor light has successfully connected to the desired WiFi network.
At this point, the WiFi symbol on the Broncolor light should change color from blue to magenta, and start flashing. If the Wifi symbol does not change color and remains blue, then return to step 5 and repeat all steps.
If you are connected to the light, you can then manage some of its functions, such as: Mod light, Test flash, Standby mode, and others.
The network-connected light is also now ready to control in PhotoRobot _Controls software.


EOS Rebel Series


EOS DSLR Series


EOS M Mirrorless Series


PowerShot Series


Close-Up / Handheld

The Canon EOS Rebel Series offers beginner-friendly DSLR cameras with solid image quality, intuitive controls, and versatile features. Ideal for photography enthusiasts, these cameras provide reliable autofocus, vari-angle touchscreens, and Full HD or 4K video recording.
Connection
Resolution (MP)
Resolution
The Canon EOS DSLR Series delivers high-quality images, fast autofocus, and versatility, making it ideal for both photography and video production.
Connection
Resolution (MP)
Resolution
The Canon EOS M Mirrorless Series combines compact design with DSLR-like performance. Featuring interchangeable lenses, fast autofocus, and high-quality image sensors, these cameras are great for travelers and content creators seeking portability without sacrificing image quality.
Connection
Resolution (MP)
Resolution
The Canon PowerShot Series offers compact, user-friendly cameras for casual shooters and enthusiasts. With models ranging from simple point-and-shoots to advanced zoom cameras, they provide convenience, solid image quality, and features like image stabilization and 4K video.
Connection
Resolution (MP)
Resolution
The Canon Close-Up & Handheld Cameras are designed for detailed, up-close photography and video. Compact and easy to use, they offer precision focus, high-resolution imaging, and versatile macro capabilities—perfect for vlogging, product photography, and creative close-ups.


