Getting Started - PhotoRobot User Support
PhotoRobot Controls App (further referred to as “CAPP”) is designed to automate content production processes (images, videos, 360s, and 3D models). This guide consists of 4 sections, each representing the process.
- SETUP - Create a workspace: cameras, hardware, and projects
- CAPTURE - Control PhotoRobot hardware and cameras, capture images and video
- EDIT - Post-process visual content
- PUBLISH - Generate output images in multiple formats, “manage profiles”
Installing PhotoRobot Controls App
To install PhotoRobot Controls App on your computer, log in to your PhotoRobot Account and go to PhotoRobot Downloads.
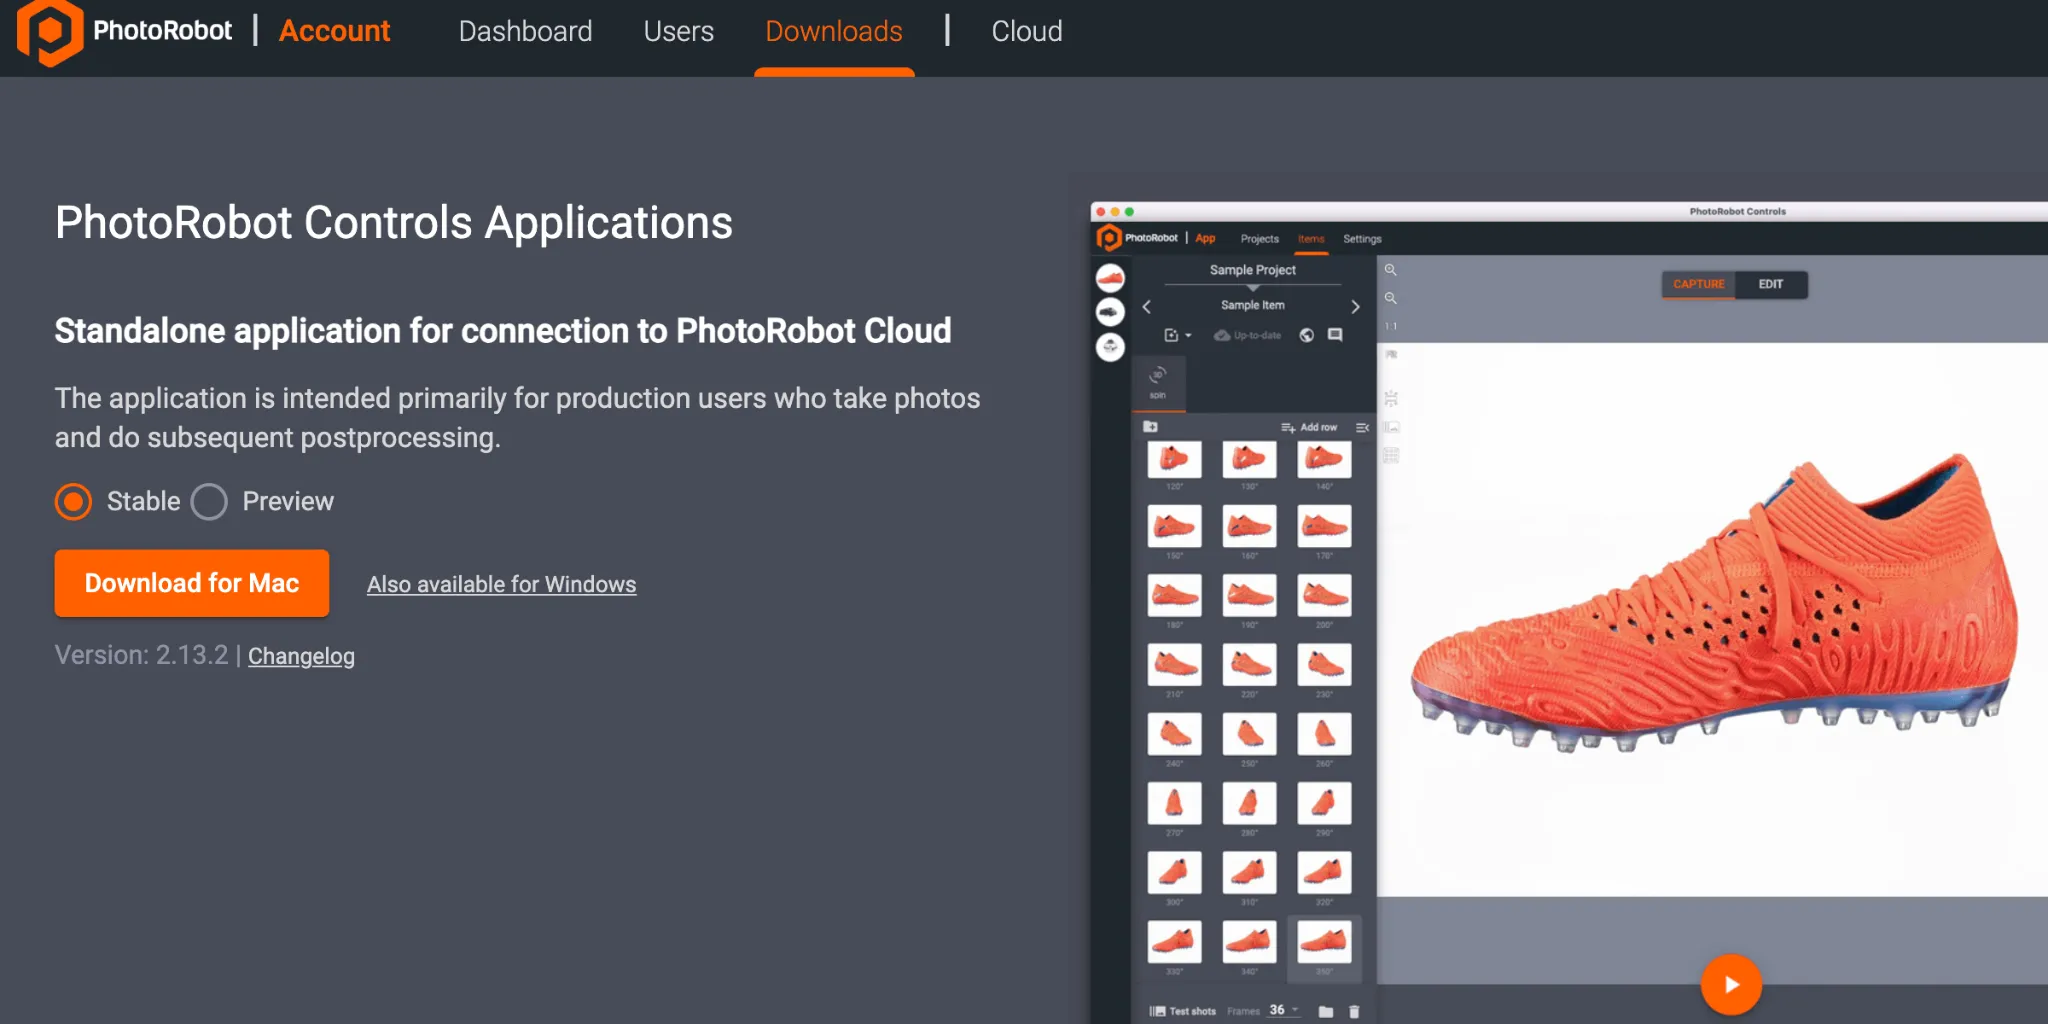
Note: Both the Stable version and a Preview version of CAPP are available for download via the installer wizard. The stable version contains the most recent version of CAPP, and receives frequent version releases. Meanwhile, the preview version of CAPP provides early access to the very latest features and fixes which transfer to the stable version within days of development. This allows users to test any issues that occur in the preview version before contacting support, as most reported issues on the stable version have already been resolved on the preview version. However, be aware that the preview version is not recommended for production use in which stability is a critical factor. The preview version is under active development, which may still include incomplete features or unresolved bugs.

Important: The older versions of CAPP are not intended for customer or public distribution due to the risk of database corruption. Older versions of CAPP are accessible only to authorized PhotoRobot technicians for internal development, or for extremely special use cases.
To find the latest stable version and preview version of CAPP, refer to CAPP Latest Download Versions.
Self-Installation Support & Troubleshooting
The installation process begins by downloading the installer file.
Note the requirements for installation of CAPP:
- The user must have administrator permission rights on the computer installing CAPP.
- The computer must meet all PhotoRobot system and hardware requirements.
- The computer must be running a supported operating system with the latest updates.
Important: Also note that CAPP consists of not only robotic control functions but also drivers for cameras, lights, and other peripherals. As a result, often the latest Mac OS version is not immediately supported. However, if this occurs, it is only temporary and until all relevant vendors release the compatible libraries.
While this might be inconvenient, it is far less inconvenient than compatibility issues when using CAPP. Downgrading is also even more complicated than avoiding a premature upgrade.
After meeting the OS and system requirements, installation then proceeds via the installer wizard. Log into the PhotoRobot account, and then proceed with setup by following the steps below.
Setup
User Consent Confirmation
When downloading CAPP, activation of a new user account requires user confirmation of the end-user license agreement (EULA) and other related documents.
After account activation, it is then possible to review your submitted consent information via the Cloud version of CAPP in the account profile settings.
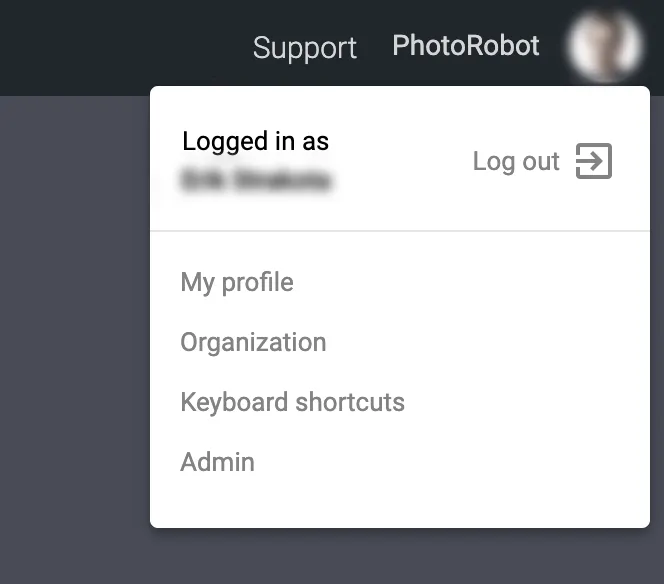
To check your consent information, open the cloud version of CAPP, and click on the user account icon in the top-right corner of the interface. Next, select My profile from the menu options.
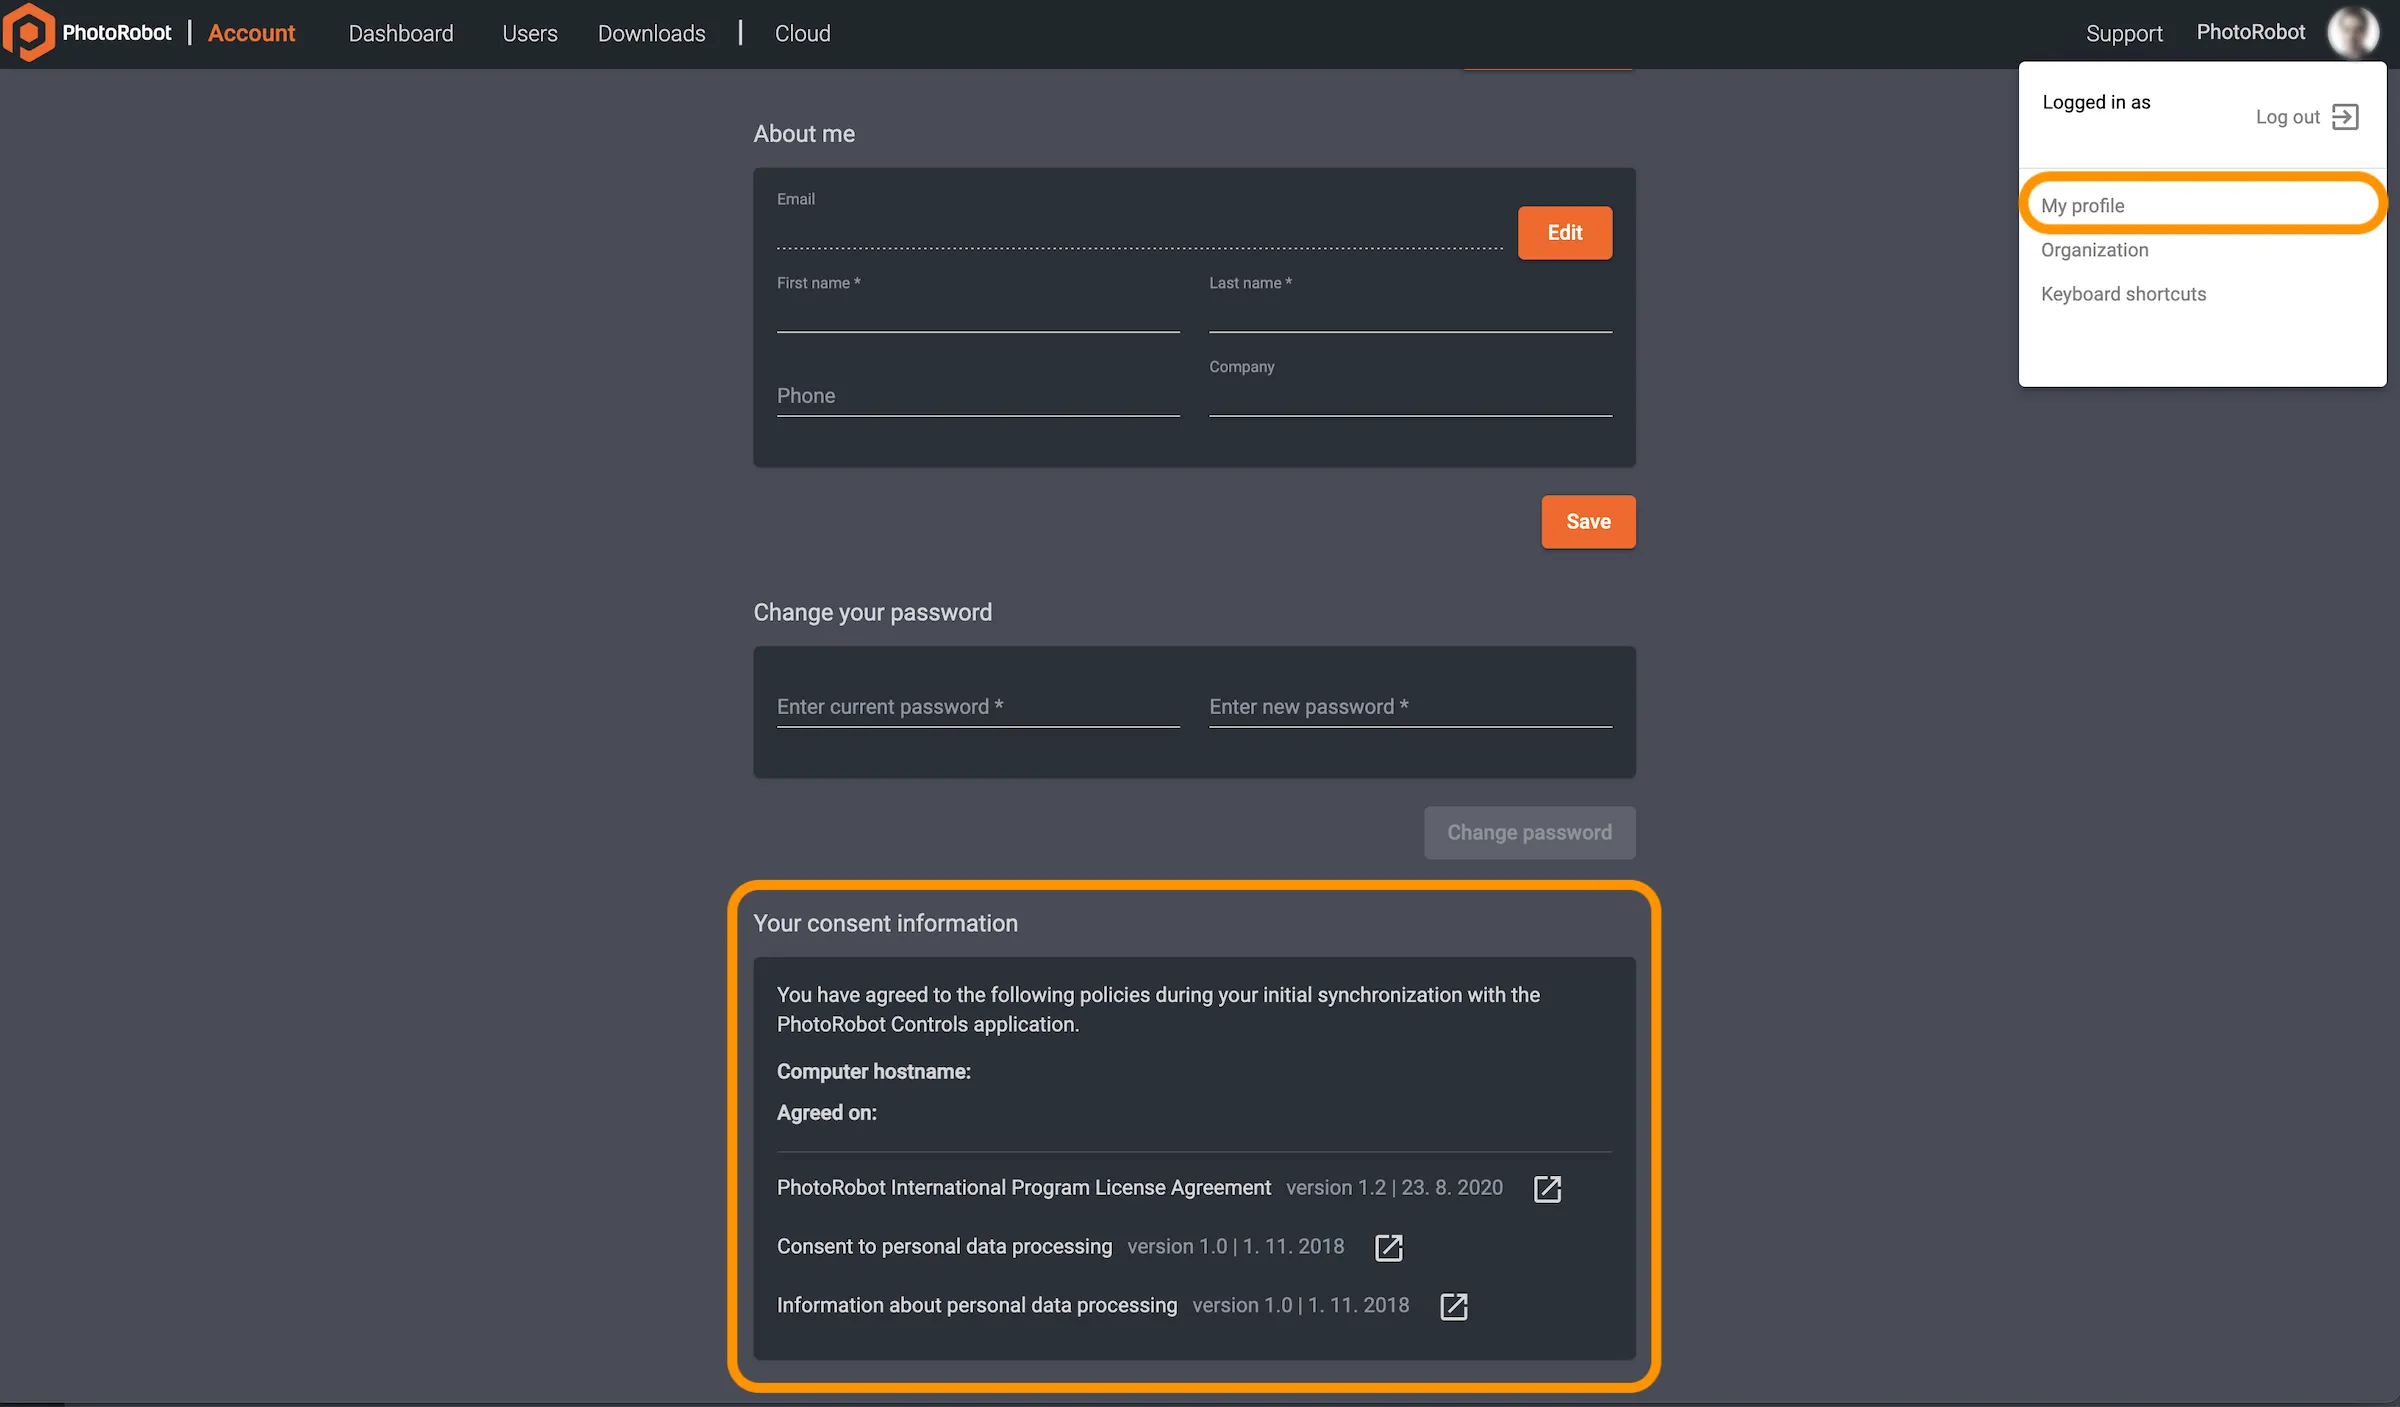
The profile menu will display the profile photo, general user information (name, phone, company), password settings, and the consent information. Consent information includes:
- Computer Hostname
- Agreed on Date
- PhotoRobot International Program License Agreement
- Consent to Personal Data Processing
- Information about Personal Data Processing
Compatible Cameras
Important: To ensure CAPP communicates with the camera properly, please close all other programs that connect to the camera. Also, be sure to use a compatible camera from the list of PhotoRobot compatible camera models.
Note: As of the release PhotoRobot Controls App 2.5.4, any camera can now be supported via third-party camera integration. However, for automated photography, the latest mirrorless Canon camera models are the most reliable and efficient.
Although it is possible to use PhotoRobot suggested handheld cameras over Wi-Fi or cable connection, doing so can create issues.
- There may be frequent Wi-Fi disconnections (primarily due to timeout). These require time-consuming reconnections to the system.
- If using a handheld camera via cable connection, there is the complication of cable lengths, and the risk to connections.
For iPhone connection via the PhotoRobot Touch App, note that none of these issues occur. The iPhone will be capable of handheld photography in a setup using continuous lighting. However, if flash photography is necessary, compatible handheld cameras can serve as an alternative to the recommended mirrorless cameras. Just keep in mind the issues that may arise with Wi-Fi and cabled handheld models.
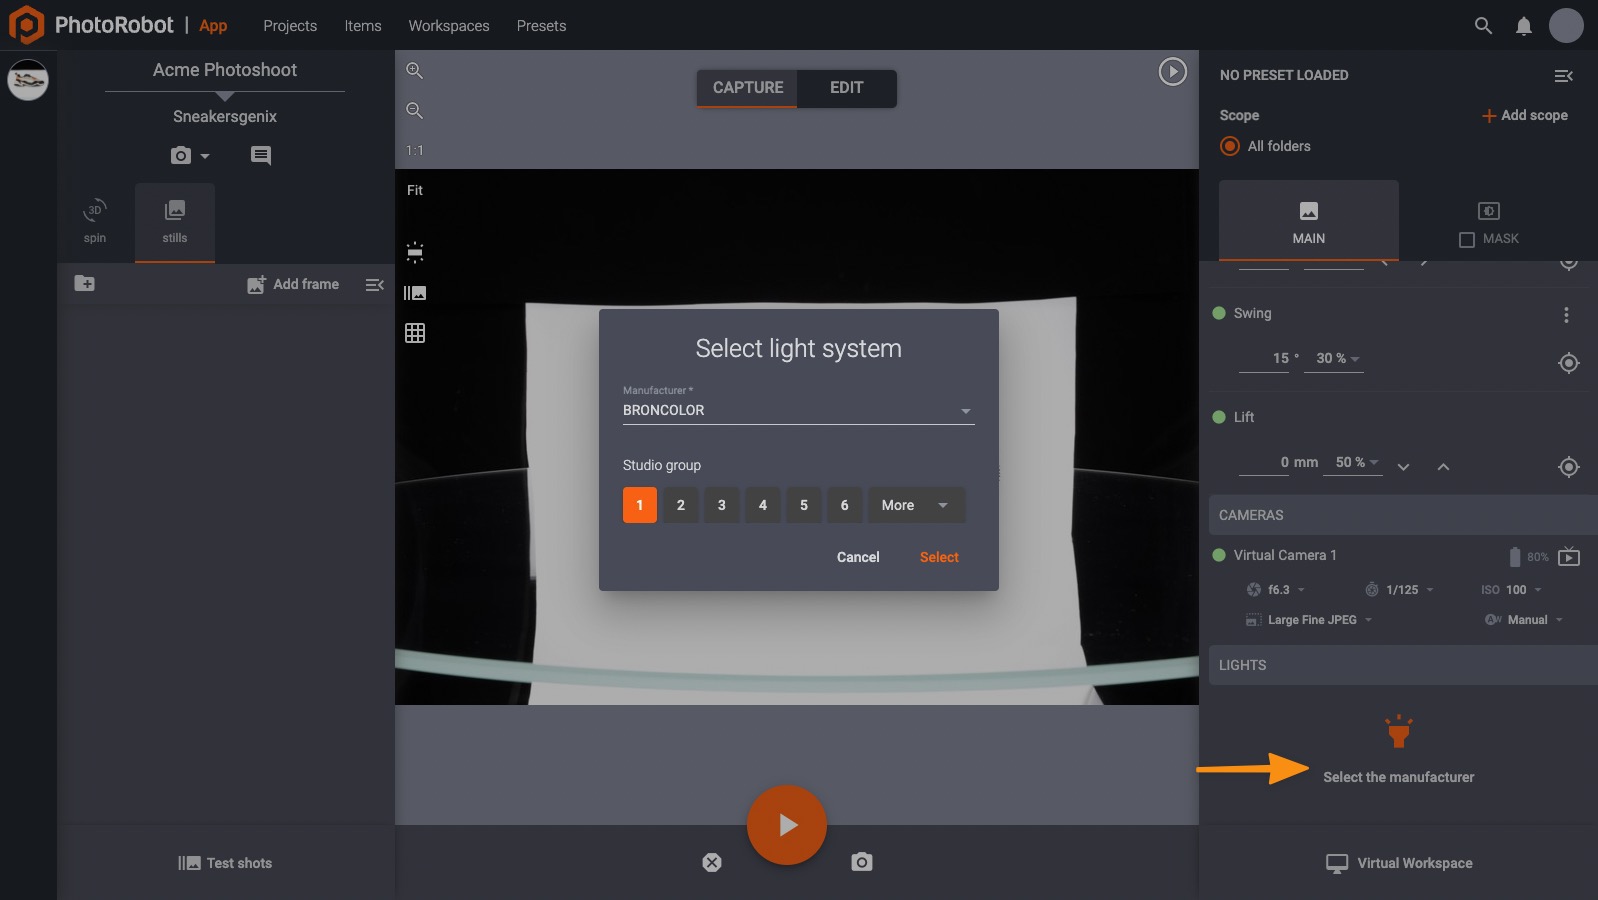
Compatible Lights
For CAPP to communicate with lighting, be sure to use PhotoRobot compatible studio lights. These include two types of lights: strobe lights from FOMEI and Broncolor, and any type of LED lights with DMX support.
Remote Support Setup
Immediately after installing PhotoRobot Controls, it is recommended that the user download and install the Splashtop SOS (EU-region) app. Splashtop SOS (EU) allows PhotoRobot technicians to access a customer’s computer and provide technical assistance after the user grants permission for a specific case.
Downloading Splashtop SOS at the same time as PhotoRobot Controls will help to avoid any delays for remote technical support requests. Take for example when a user does not have sufficient rights to install the application. After installing Splashtop, our technicians are then able to instantly use Splashtop Business to access the computer with the technical support request.
However, be aware that the user must download the EU-region version of the Splashtop SOS app. The US-region version app does not allow our technicians to access your computer.
Thus, please ensure you are using the following EU-region link to download Splashtop SOS:
Note: For more information on setting up remote support for PhotoRobot systems, refer to PhotoRobot Remote Support Setup.
Creating a Workspace
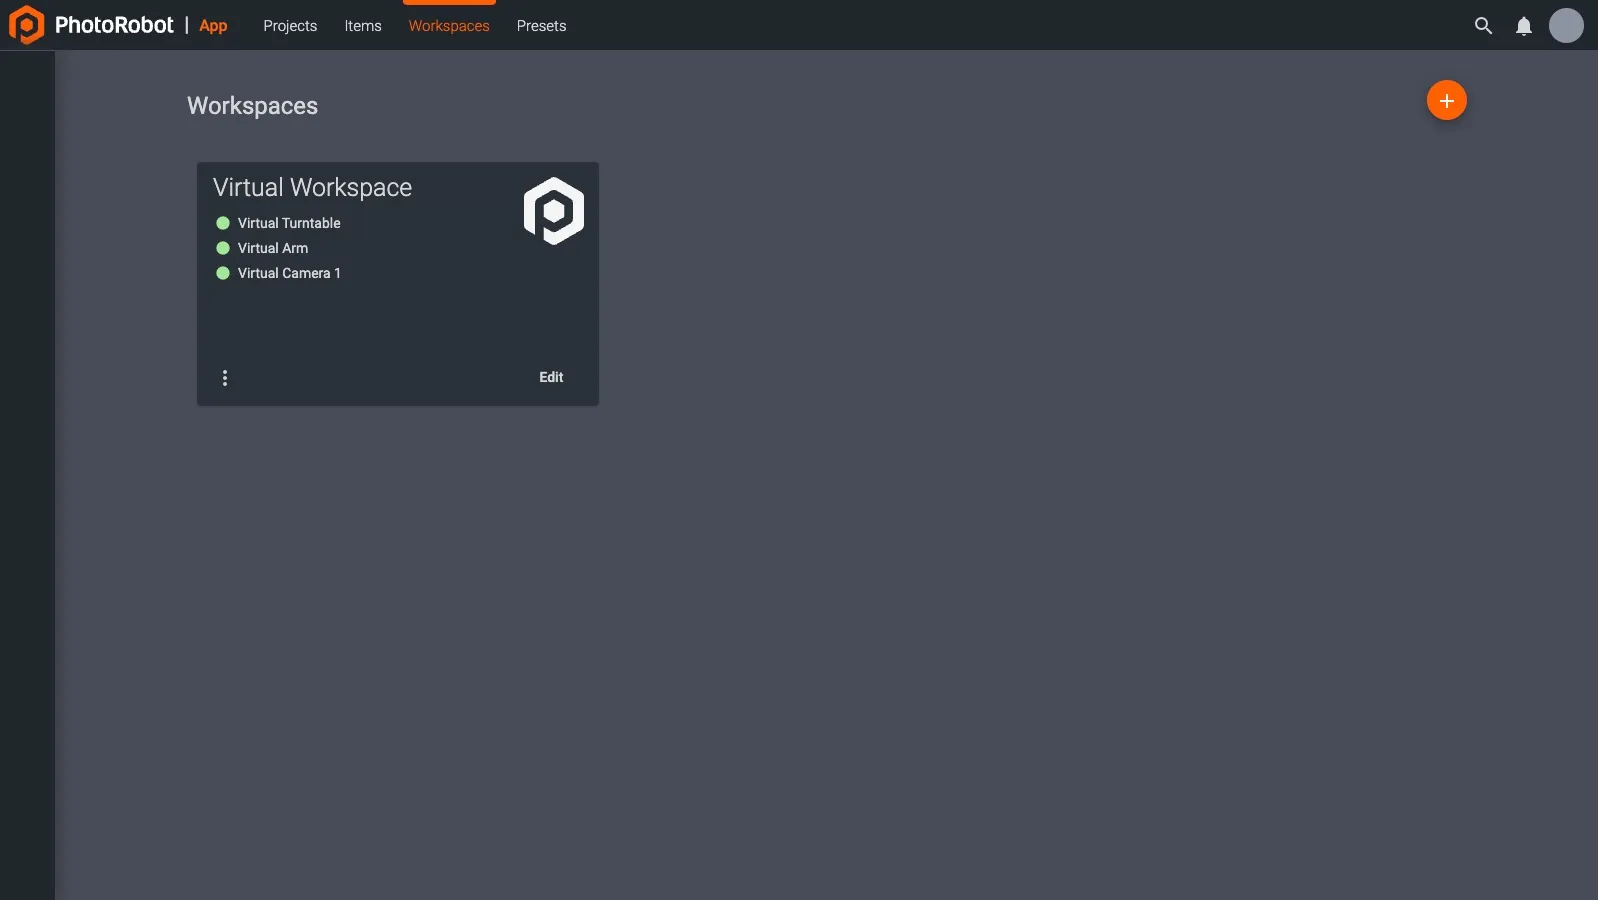
After opening CAPP, typically the first thing a user does is create a workspace. A workspace is a list of hardware that is being used for a particular photoshoot. It can include various PhotoRobot modules, cameras, lights, and other accessories.
For demo purposes, users can work with a predefined, Sample Workspace, which is configured to use virtual hardware. In this way, users can still experiment with various features of CAPP by selecting virtual robots and cameras.
Connecting Hardware
To start using actual (as opposed to virtual) hardware, first ensure the hardware is connected to the same computer network (or a sub-network) as the computer you are using to control your PhotoRobot.
Note: As of PhotoRobot Controls version 2.5.4, any camera can now be supported through third-party camera integration. Meanwhile, compatible cameras include a range of Canon camera models, our recommended Wi-Fi-enabled Canon cameras, and also iPhone cameras if using the PhotoRobot Touch App.
Important: For automated photography by robotic workstation, the PhotoRobot recommended mirrorless Canon Camera models are the most reliable. While there is support for handheld cameras over Wi-Fi or cable connection, their use can create issues. These include frequent Wi-Fi disconnections (primarily due to timeout), complications with cable lengths, and the risk to connections.
To connect a camera, it must be connected to the same local computer network as the robot in one of three ways:
- Direct connection via USB to the local area network;
- Connection of a recommended handheld camera via special Wi-Fi protocol (accessible in Canon’s Tool application on the Canon Developer Page);
- Integration of one or multiple iPhones via the PhotoRobot Touch Application. (For instructions on using an iPhone with PhotoRobot, see the iPhone Touch App User Manual.)
After connecting a piece of hardware (or camera) to a workspace, you can then check whether it is online (recognized by CAPP). To do this, inspect the dot to the left of the name of the given piece of equipment. If the device is recognized, there will be a green dot.
A gray dot next to the device name signals that the hardware was not recognized or is not turned on. If there is a red dot, there is an error, such as the user not switching the camera into manual mode for example. To identify the cause of the error, hover the mouse over the red dot to display a tooltip with a description of the error occurring.
For the complete step-by-step walkthrough of connecting hardware to set up a workspace, refer to Setting Up a PhotoRobot Workspace.
If experiencing issues, please refer to PhotoRobot Troubleshooting for common problems and their solutions.
Robot Arm Height Setup
If using a Robot Arm in the workspace, note that there will likely be additional setup required. This is because the robotic arm is an independent machine, and one of the functions of controlling it via CAPP is that the elevation movement aligns the rotation axis to the midpoint of the photographed object’s height.
The height of the robot arm’s rotational axis is determined by the workstation machine type, and at the same time by the adjustment of the leveling feet, which compensate for any unevenness of the floor. If everything is set up correctly, the machine is level, and the rotation center is at a specific height above the floor. However, the total height will also depend on the height of the turntable surface, which varies between different robots. This means that there might be a discrepancy in the height reference, as there is a height adaptor under the column of the robot arm so that it roughly aligns.
To ensure perfect alignment, it then becomes necessary to enter the height difference between the arm and the turntable into CAPP. The height difference measures the exact distance between the robotic arm’s rotation axis and the height at which the turntable surface is positioned (including any additional board placed on top of it). This provides the exact dimensions from which the system calculates half of the object’s height, and the position where the arm should move. It also ensures the system is set to automatically and correctly operate.
Also note: The system is set to reject values that fall outside the valid range for a given setup.
Set Robot Arm Elevator to Zero Level
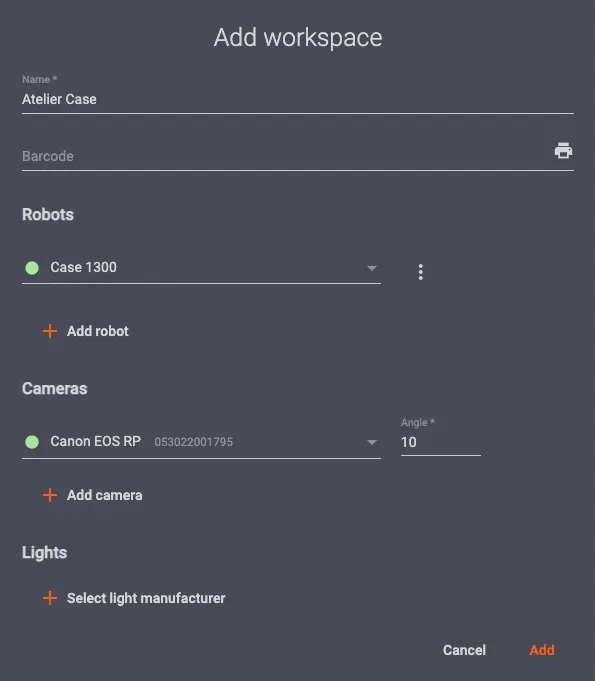
In order to set the Robot Arm elevator to zero level, first open the local version of CAPP, and access Workspace settings in one of two ways:
1. Open the local version of CAPP, click Settings at the top of the interface, and select Workspaces from the left-hand menu options. In this menu, find the workspace in operation, and click the edit icon next to the workspace title to open the Edit workspace settings:

2. Alternatively, it is possible to access the Edit workspace menu by opening an Item in Capture mode in the local version of CAPP, and then clicking the edit icon next to the Workspace title on the right side of the interface:
Either method will open the Edit workspace settings. Then, to configure the Robot Arm, find the device under the Robots menu, and click the 3 vertical dots next to the Robot Arm name.
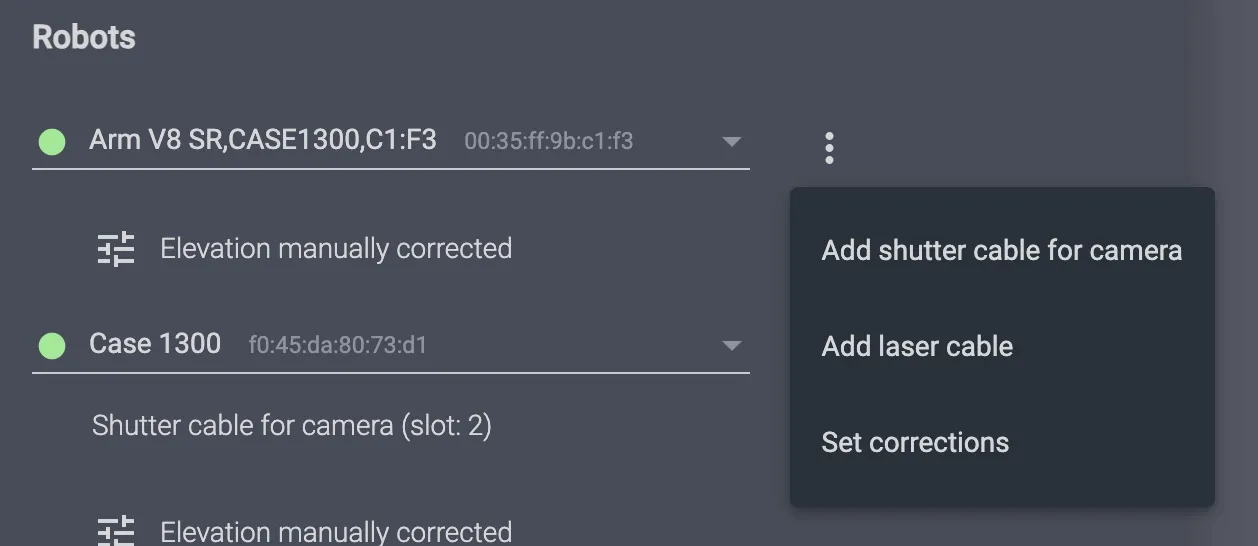
Next, select the menu option Set corrections to open the Set elevator correction function:

In the Set elevator correction menu, adjust the number in the top field Elevator deviation (mm) to set the elevation of the camera to the appropriate zero level. For example, if the camera is off center by 10 mm above the table, set Elevator deviation to -10 mm to center the camera.
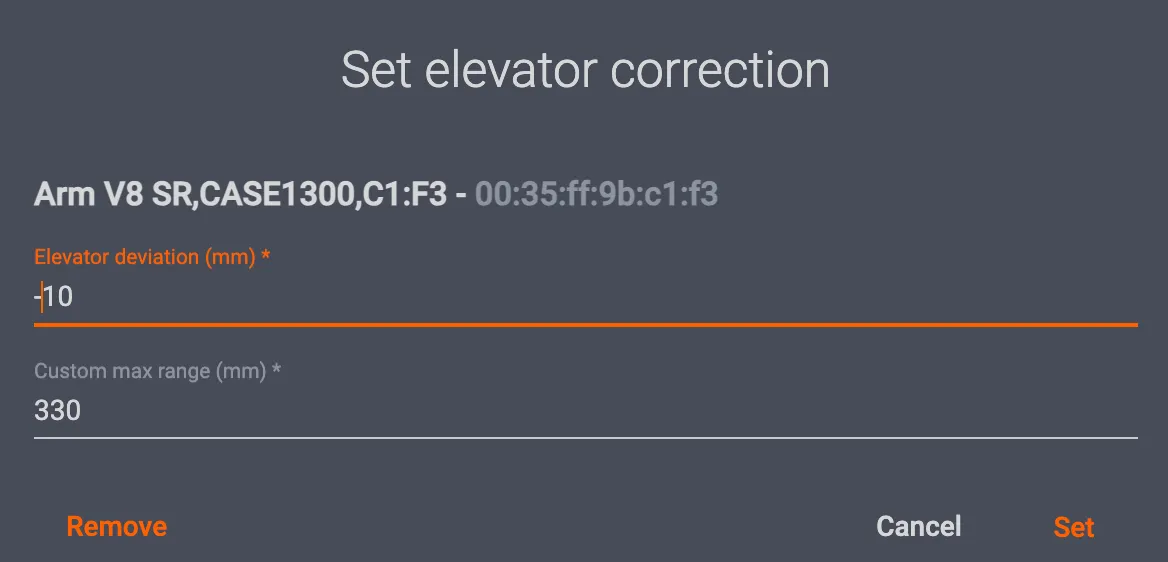
If the camera is off center by 10 mm below the table, set Elevator deviation to +10 mm. This will correctly align the elevation of the mounted camera on the Robot Arm to the appropriate zero level in the software.
Note: The lift can reach a maximum of 330 mm. Thus, if adjusting the zero level by +30 mm, the maximum lift can only reach 300 mm. This means the system will only be able to capture products that are smaller by this margin, 30 mm or less.
Managing Files - Projects, Items, and Folders
In CAPP, images are organized into projects, items, and folders.
- A project is the highest-level data entity. Typically, a project will include items from a single photoshoot or perhaps a single shooting day/week.
- Projects consists of one or more items. A single item will typically be a specific, photographed object.
- An item includes one or more folders. In CAPP, you can have multiple folders in a single item in order to keep different kinds of images separate. A very common example is to have one folder for a 360° rotating presentation (called “spin”), while using another to store still images (“stills”).
To start shooting, you must first add a new project (unless you already have one that you would like to use), as well as at least one item.
( ! ) - If experiencing issues, find additional support for connecting cameras, robots, lights, and editing in the PhotoRobot Troubleshooting Manual.
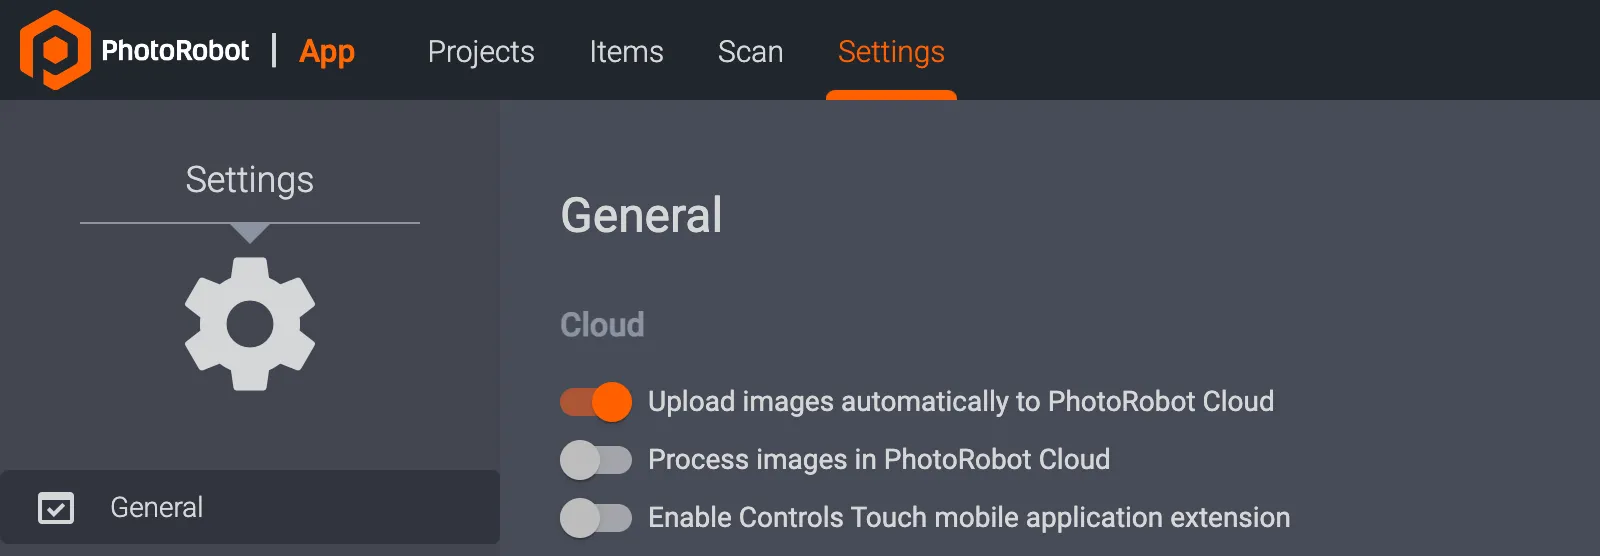
General Settings - Cloud Auto Backup, Processing, Touch App
In the local desktop version of CAPP, there are 3 general settings to toggle on or off:
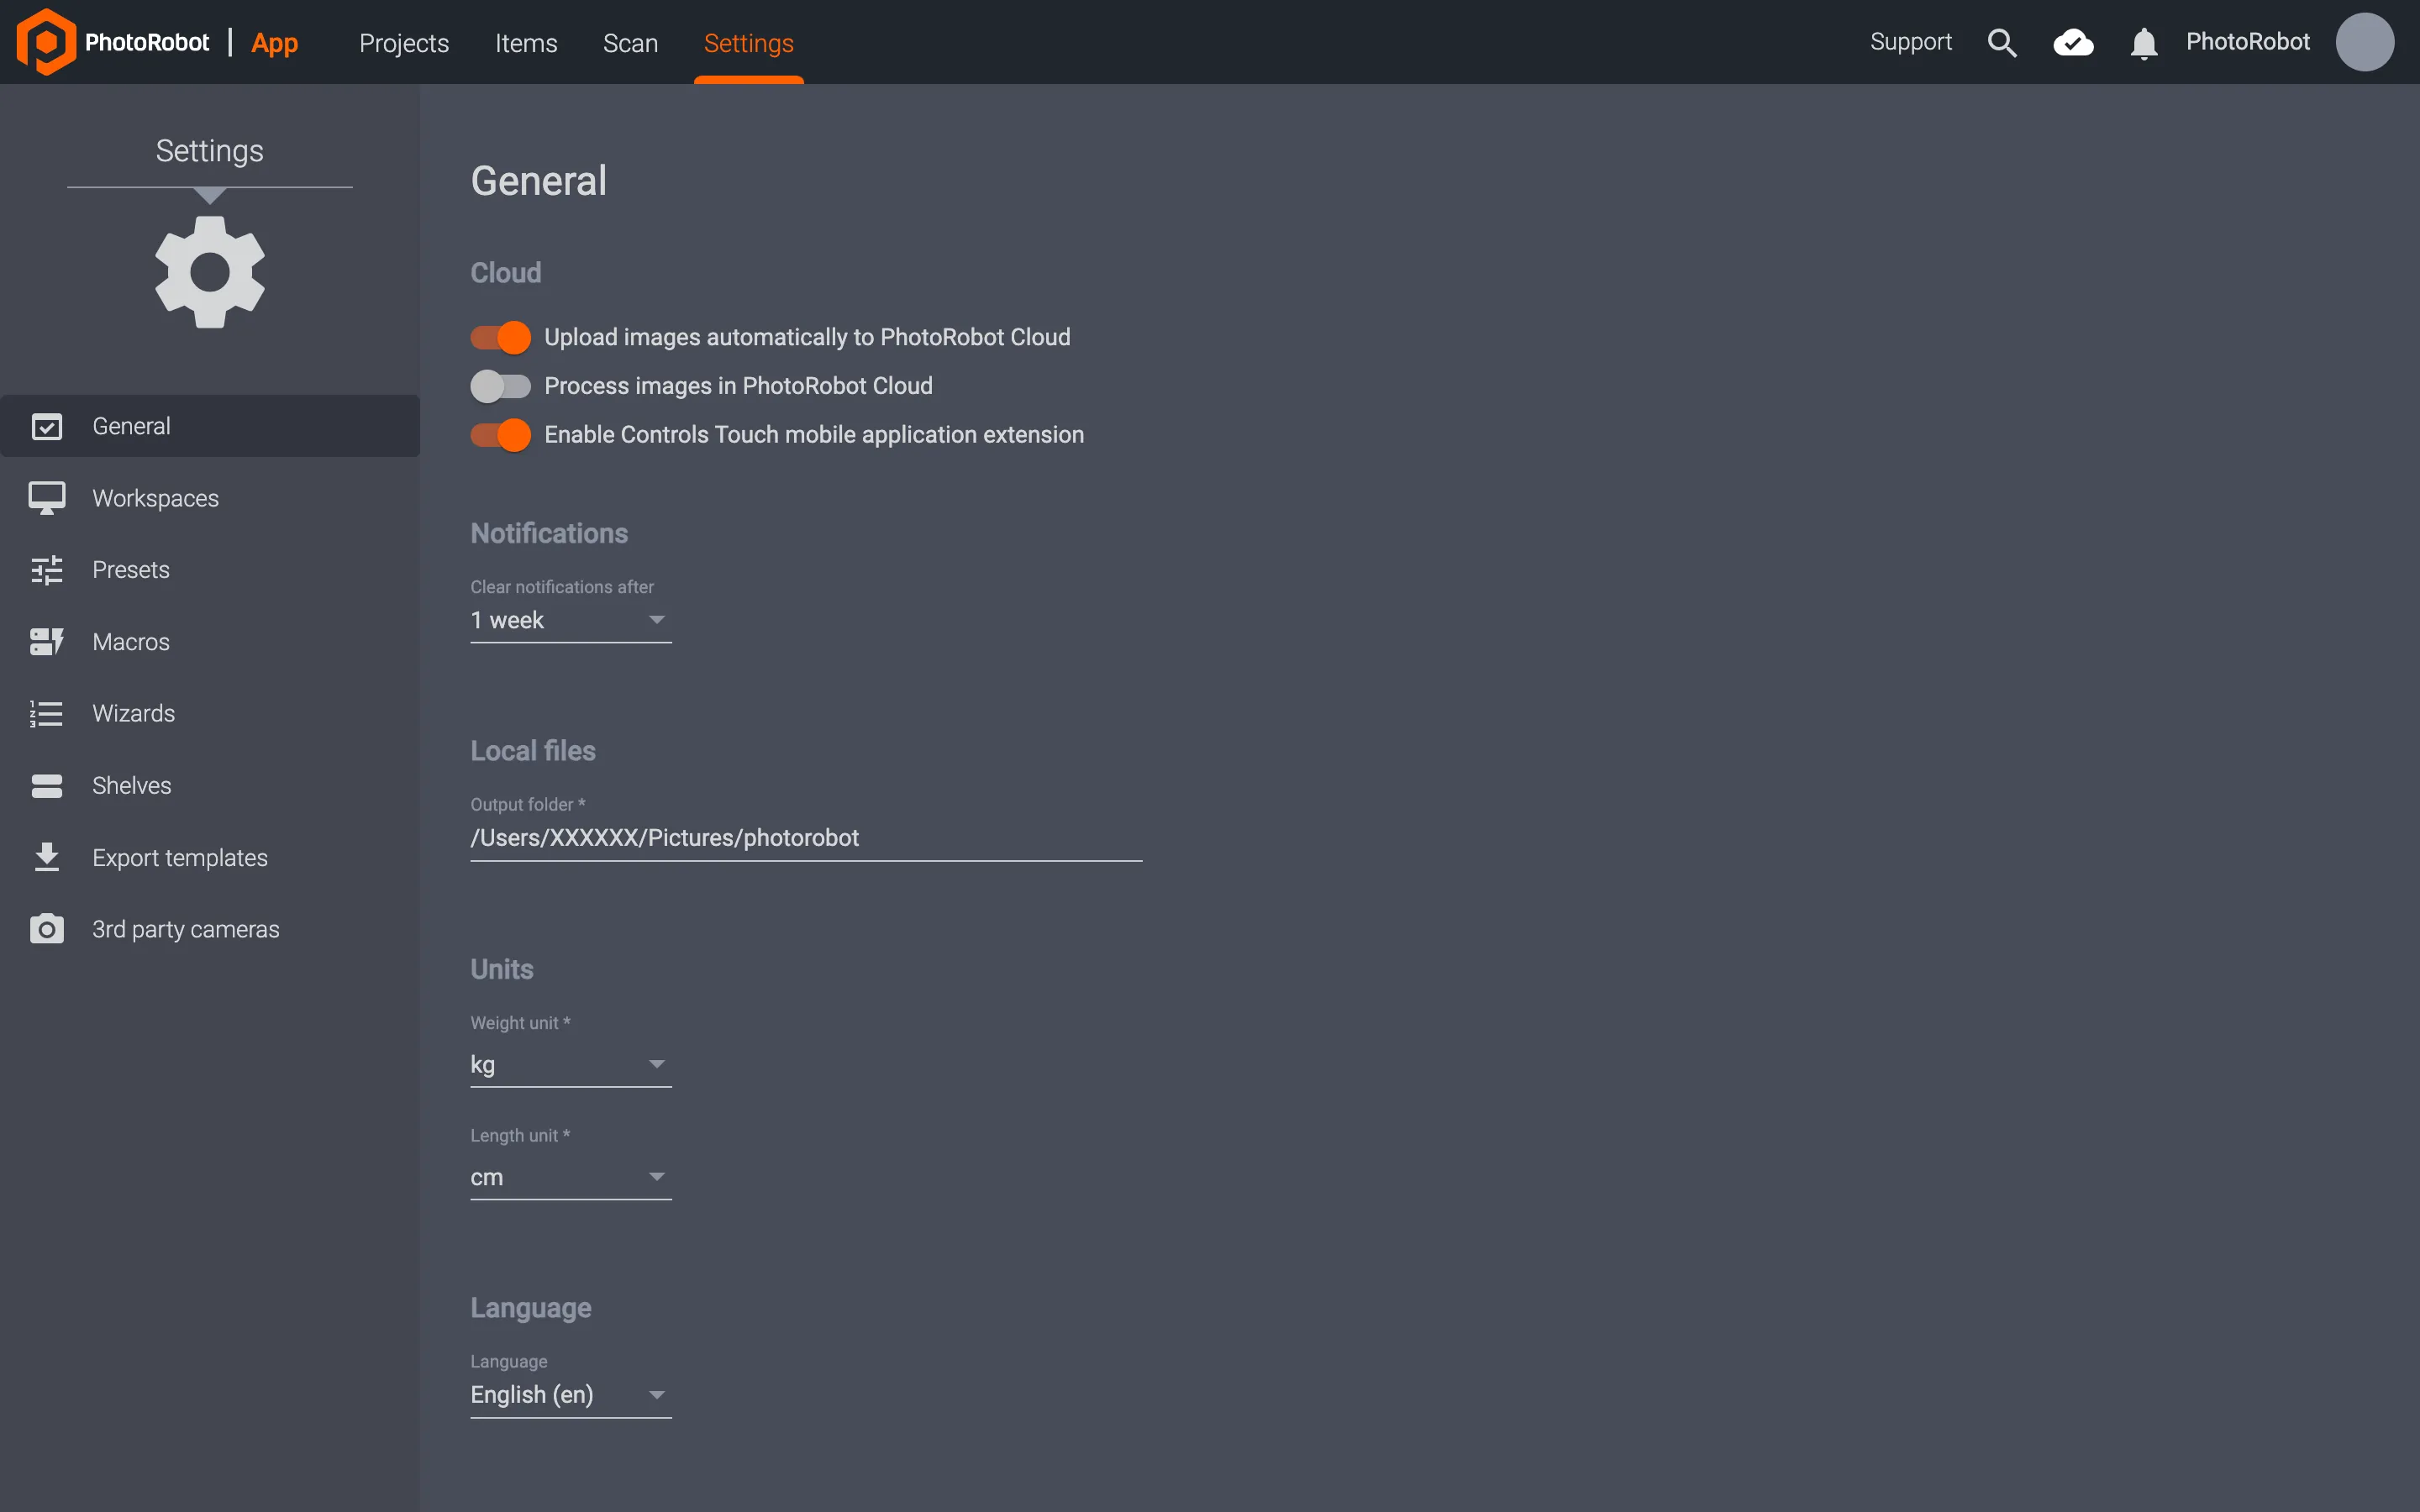
- Upload images automatically to PhotoRobot Cloud
- Process images in PhotoRobot Cloud
- Enable Controls Touch Mobile Application Extension
By default, the local app will be set to Upload images automatically to PhotoRobot Cloud. This feature automatically saves a backup of captured images to your cloud server for later export.
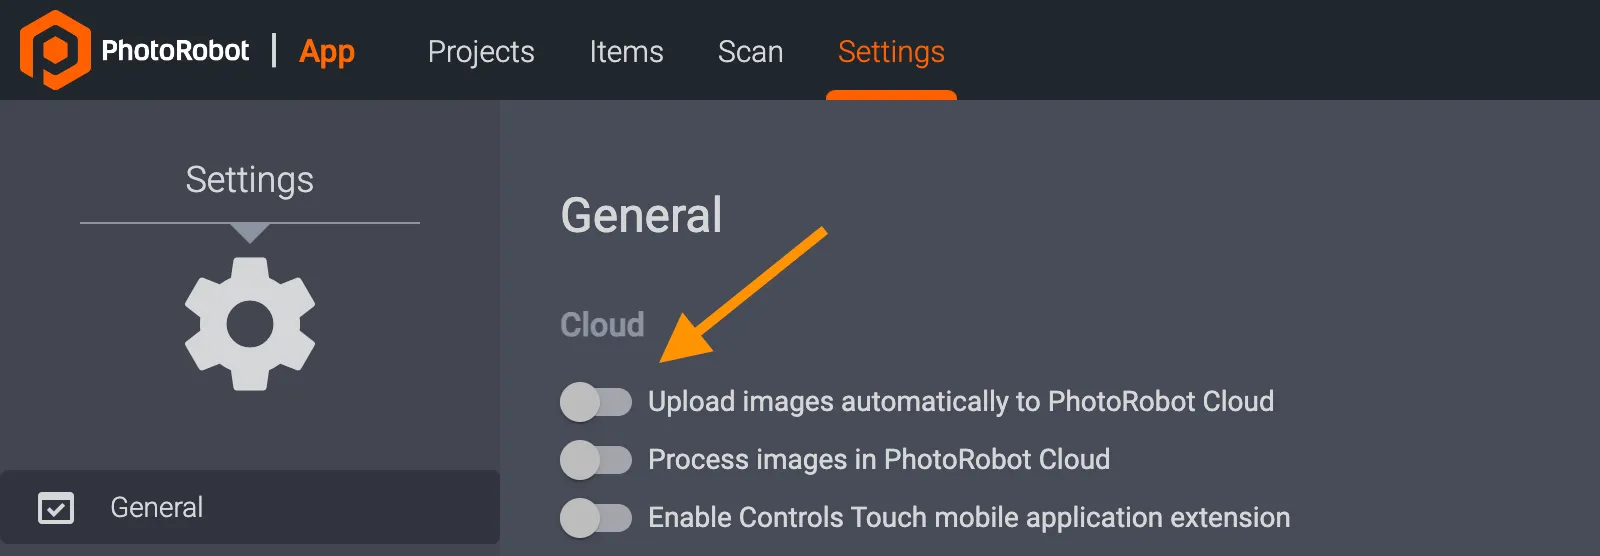
To disable Upload images automatically to PhotoRobot Cloud, toggle the option off in the local version of CAPP’s General Settings. This will instead save captured items to your local app or to your own cloud account.
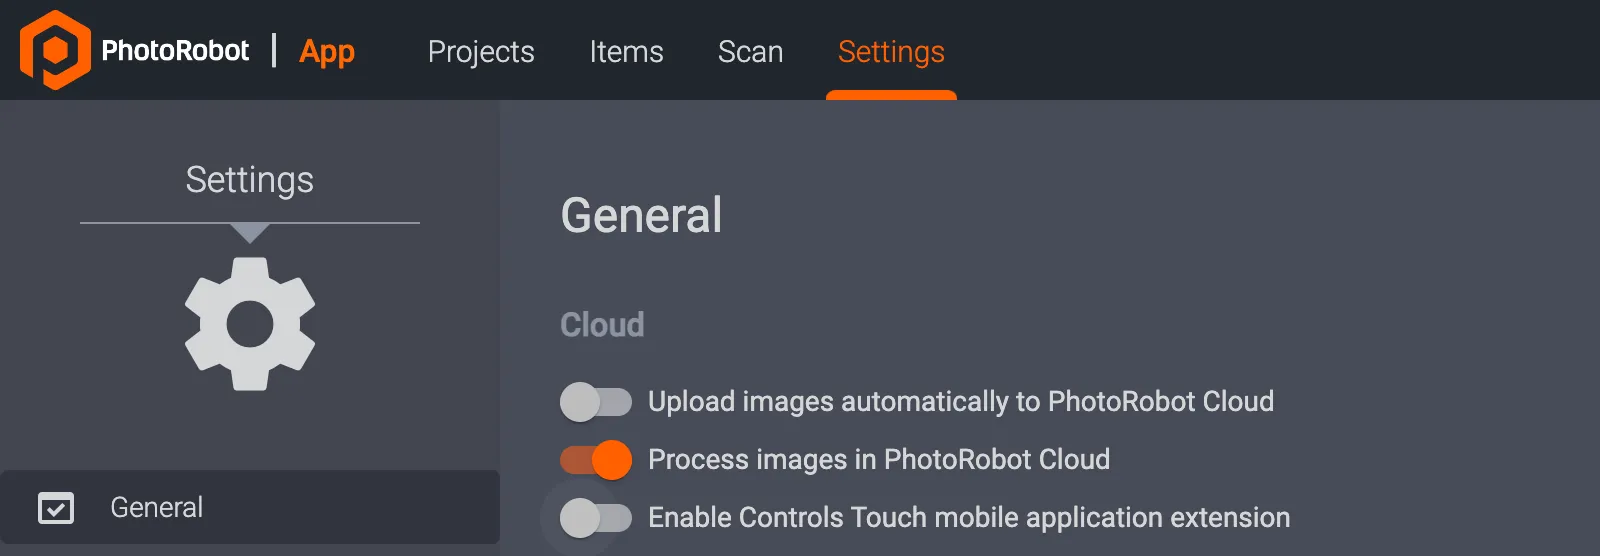
Use the toggles also to enable or disable the Process images in PhotoRobot Cloud feature. When on, this feature automatically post-processes images according to presets in the PhotoRobot Cloud after capture.
If using the PhotoRobot Touch Mobile Application for iPhone, toggle on Enable Controls Touch Mobile Application Extension.
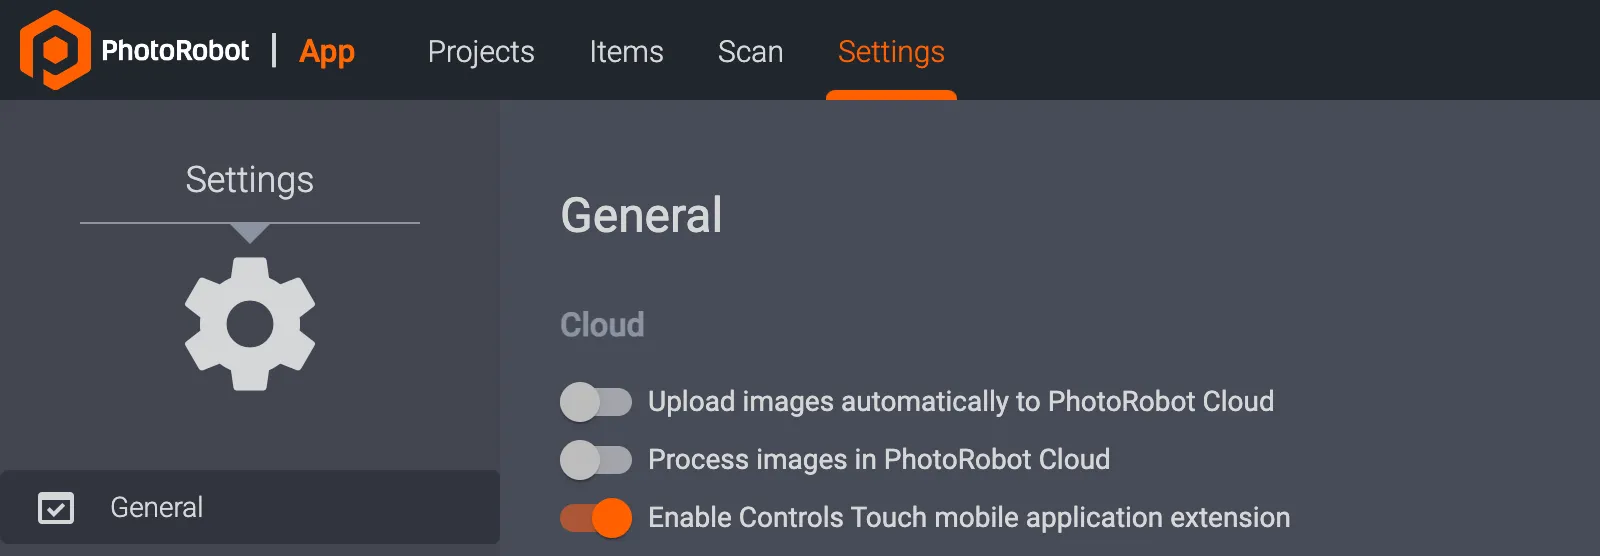
Note: For technical instructions on the installation and operation of PhotoRobot Touch, see the PhotoRobot iPhone Touch App User Manual.
General Settings - Auto Create New Item
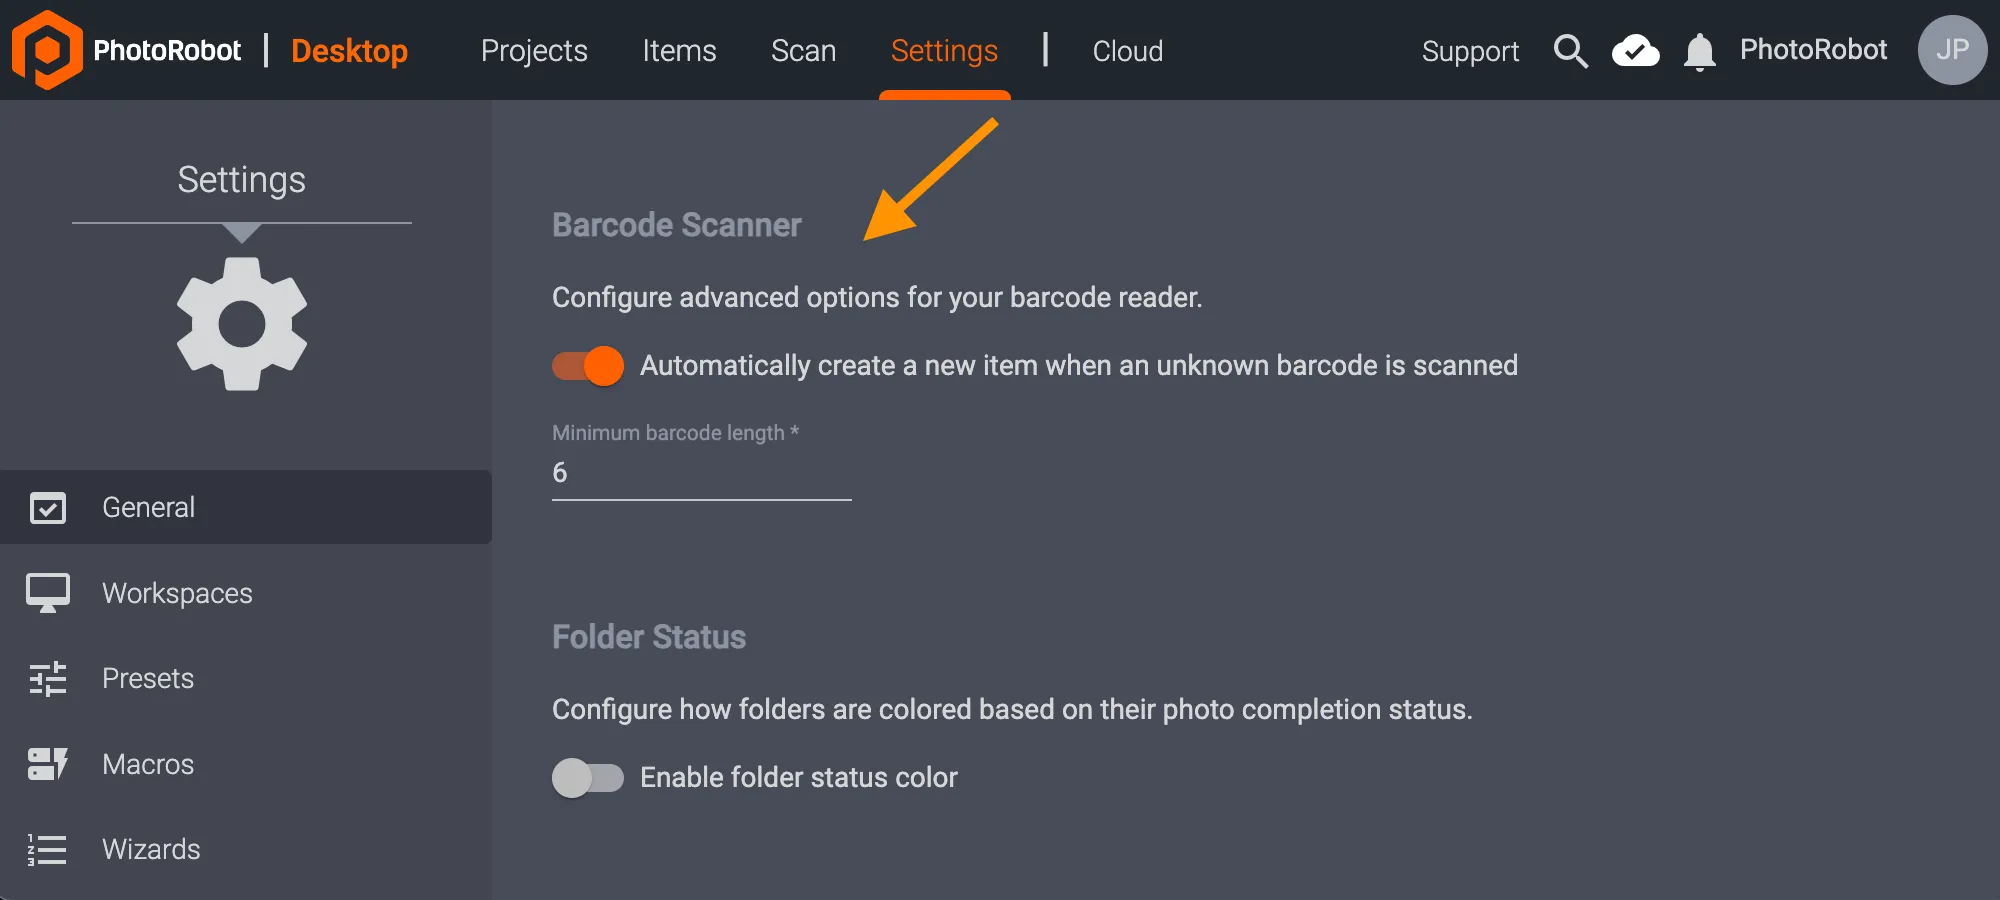
Additionally, in the General Settings in the local desktop version of CAPP, there are the Barcode Scanner settings which enable configuration of advanced options for the barcode reader. Use the toggle to the left of Automatically create a new item in the system when an unknown barcode is scanned to enable or disable auto item creation.
When active, the setting will function as an alternative to manual item creation. It enables identification of an item at the point of capture (typically via barcode or QR code). An operator simply scans an unknown code, and a new item is automatically created in the project. The item naming will be according to the scanned string and in the item’s identifier field. Then, the operator photographs the item.
This way, there is no need to perform any inventory-related operations within the studio software. For example, it is enough to scan a new item and subsequently scan a preset (shelf) code for the photography (e.g. for white, dark, or colorful items). The system will then automatically and immediately deliver a complete set of photographs, post-process them fully, and distribute them with automatic naming to the target system.
Further, as of CAPP version 2.13.beta58, there is now the option to configure the minimum string length for barcodes. Previously, the minimum barcode / QR code length was 6 characters (to avoid dual interpretations of the scanned string among other issues). Now, the Minimum barcode length setting is adjustable to allow, for example, four-character identifiers to work without the need for further adjustments.
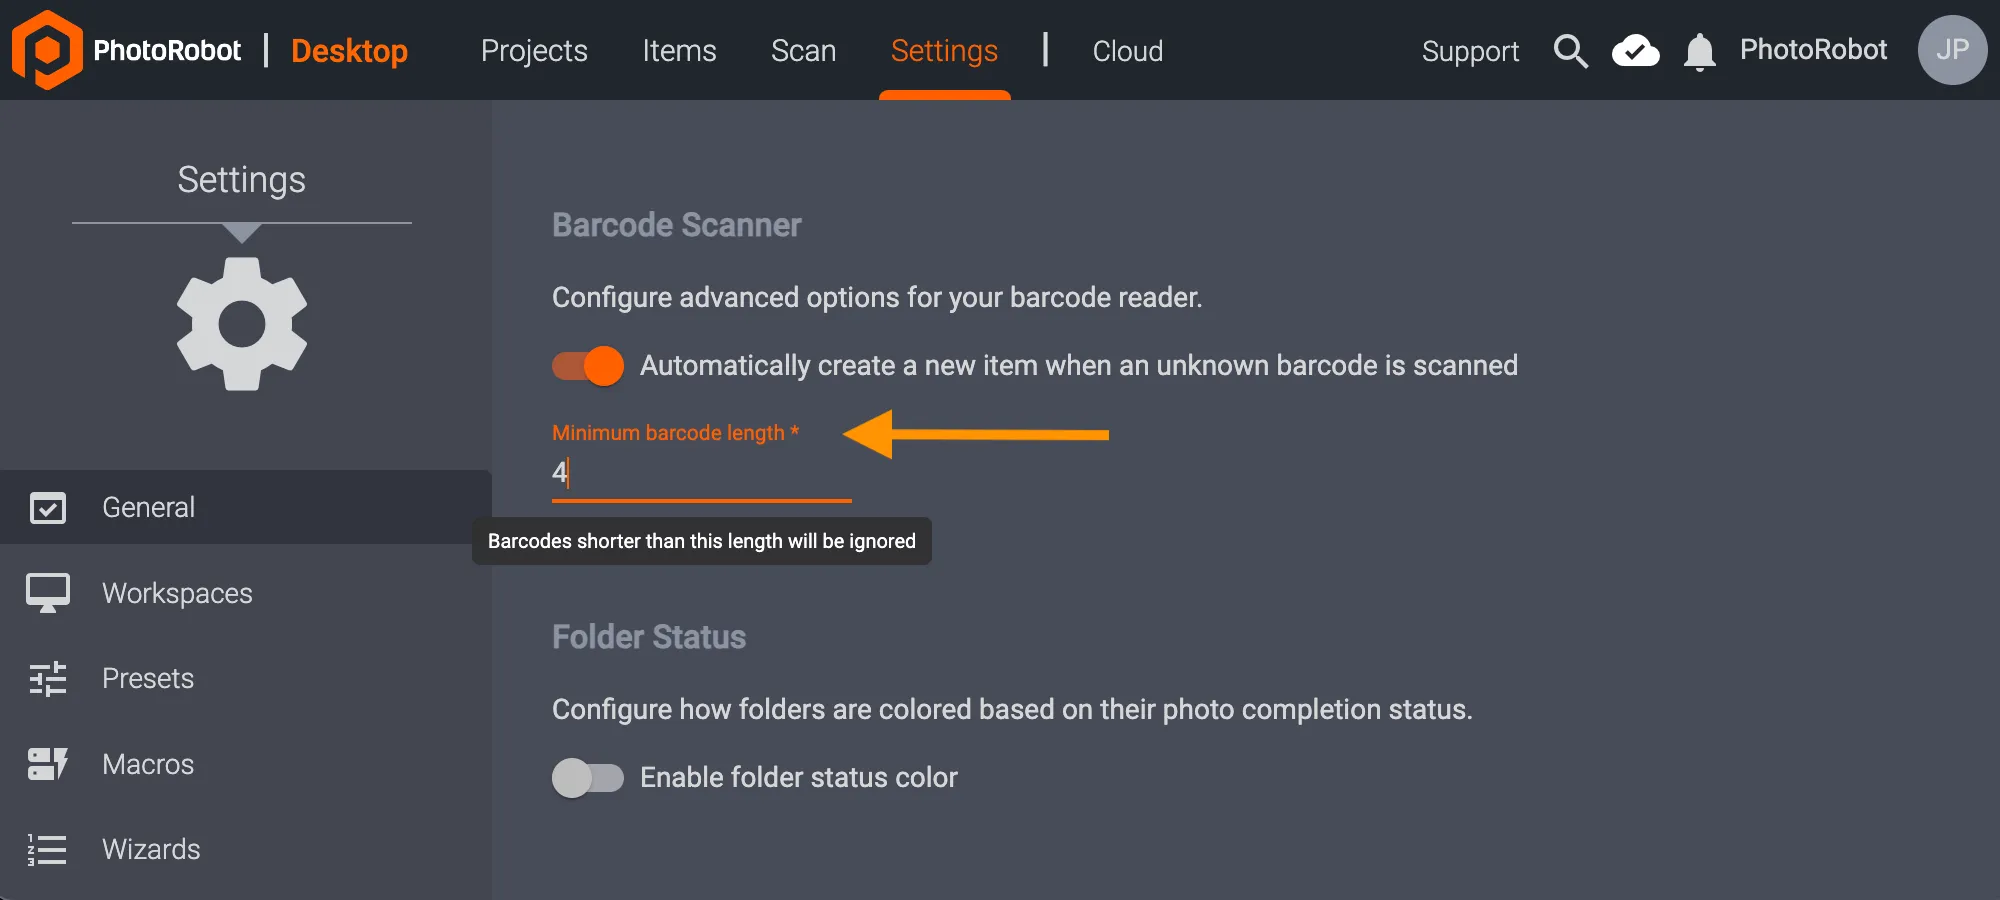
To adjust the minimum string length for barcodes / QR codes, configure the Minimum barcode length also in the local version of CAPP in General Settings - Barcode Scanner. Barcodes shorter than the length input will then be ignored by the system.
Note: After an Item has been assigned a barcode in the system, the barcode will also be accessible directly in the Capture mode interface in the Item information area via a barcode button.
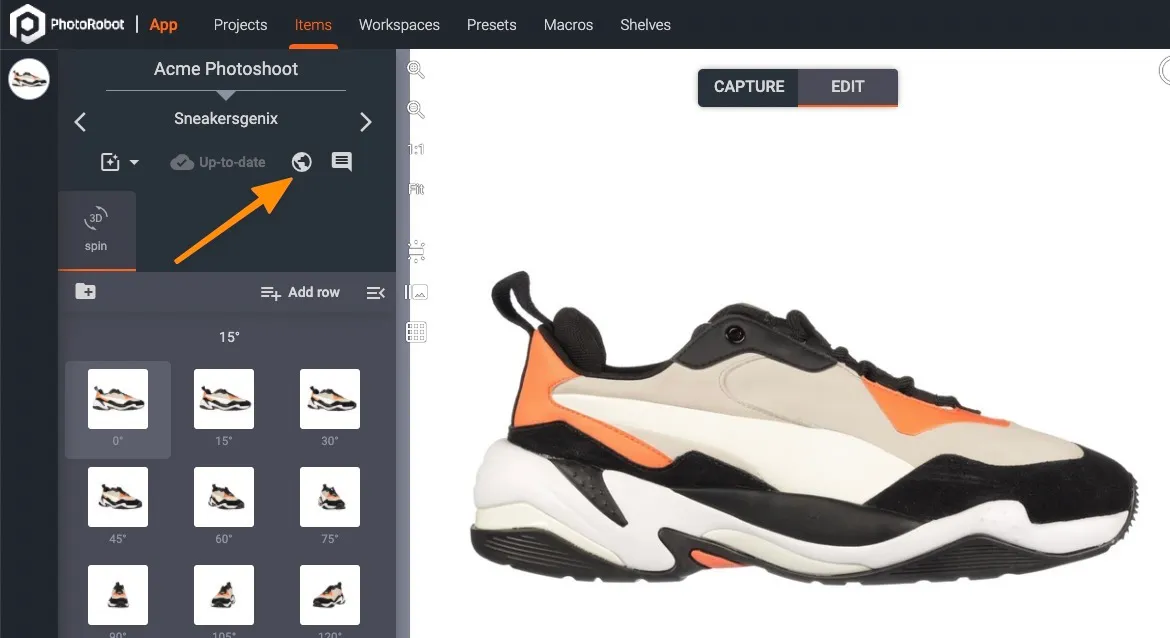
Granting Customer External Access to Project Data
To work with customers outside of the organization of a paid CAPP account, an administrator of the account is able to create client accounts free of charge. Client accounts enable an external customer to view project data, participate in quality assurance through review and comments, and to access project assets for download. This feature is intended for situations in which a photo studio is working with an external customer who requires access to specific jobs.
In order to share a project with a customer outside of your organization, first ensure you log into the cloud version of CAPP using a user profile with administrator privilege.
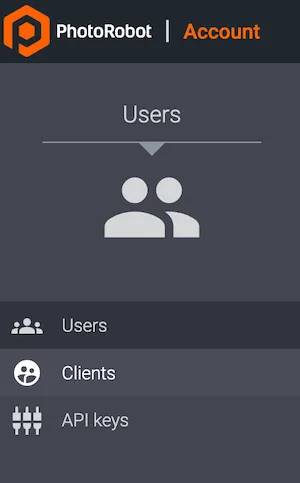
1. Log into the cloud-based app using a paid CAPP account profile with administrator privilege, and click on the user profile menu icon in the top-right corner of the dashboard. Then, click Organization to access the administration panel.
2. Next, from the Organization administration panel, click Users from the account options at the top of the user interface.

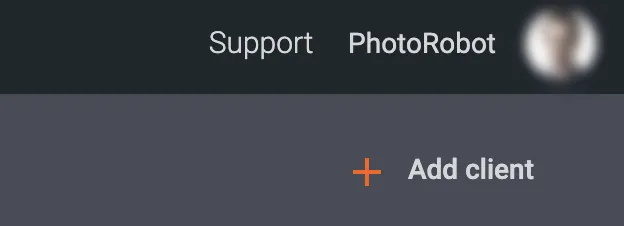
3. Click Clients to create a new user option to access the add clients feature from the account interface. The + Add clients button will appear at the top-right of the dashboard under the user profile icon.
4. Click + Add client under the user profile icon.
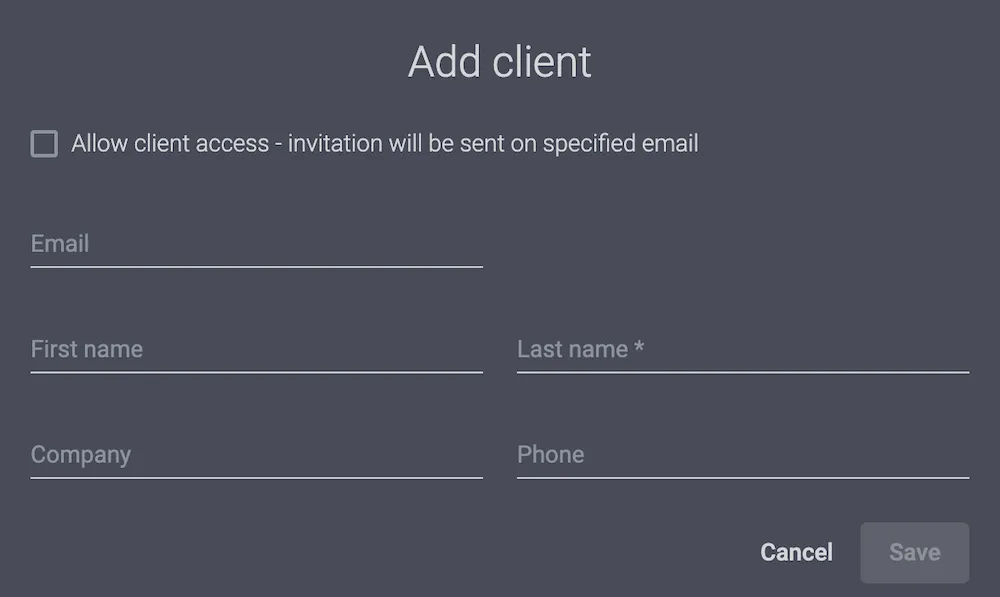
5. Complete the fields for the client’s information (email, name, company, phone), and check the box Allow client access. Review the information for accuracy, and click Save to add the client to CAPP.
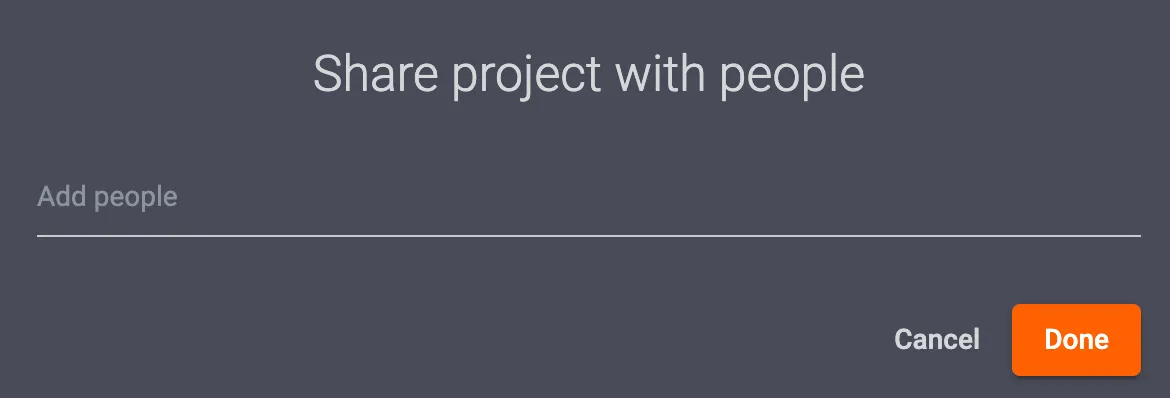
6. Open Projects in the cloud version of CAPP, find the project you want to share with the saved client, hover the mouse over the project bar, and click the share icon to the right of the project details.
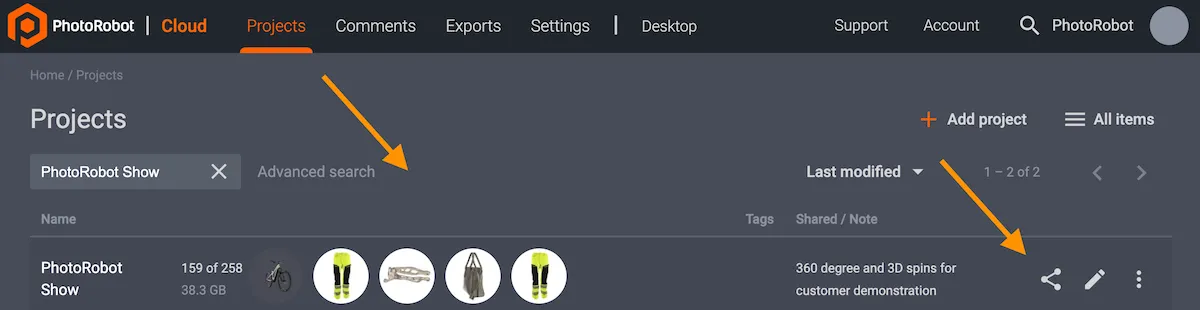
7. Click the share icon on the right side of the project bar to open the Share project with people feature, select saved clients, and click done. The project is now shared with the client, allowing them to view the job and comment in CAPP for quality assurance and additional instructions if necessary.
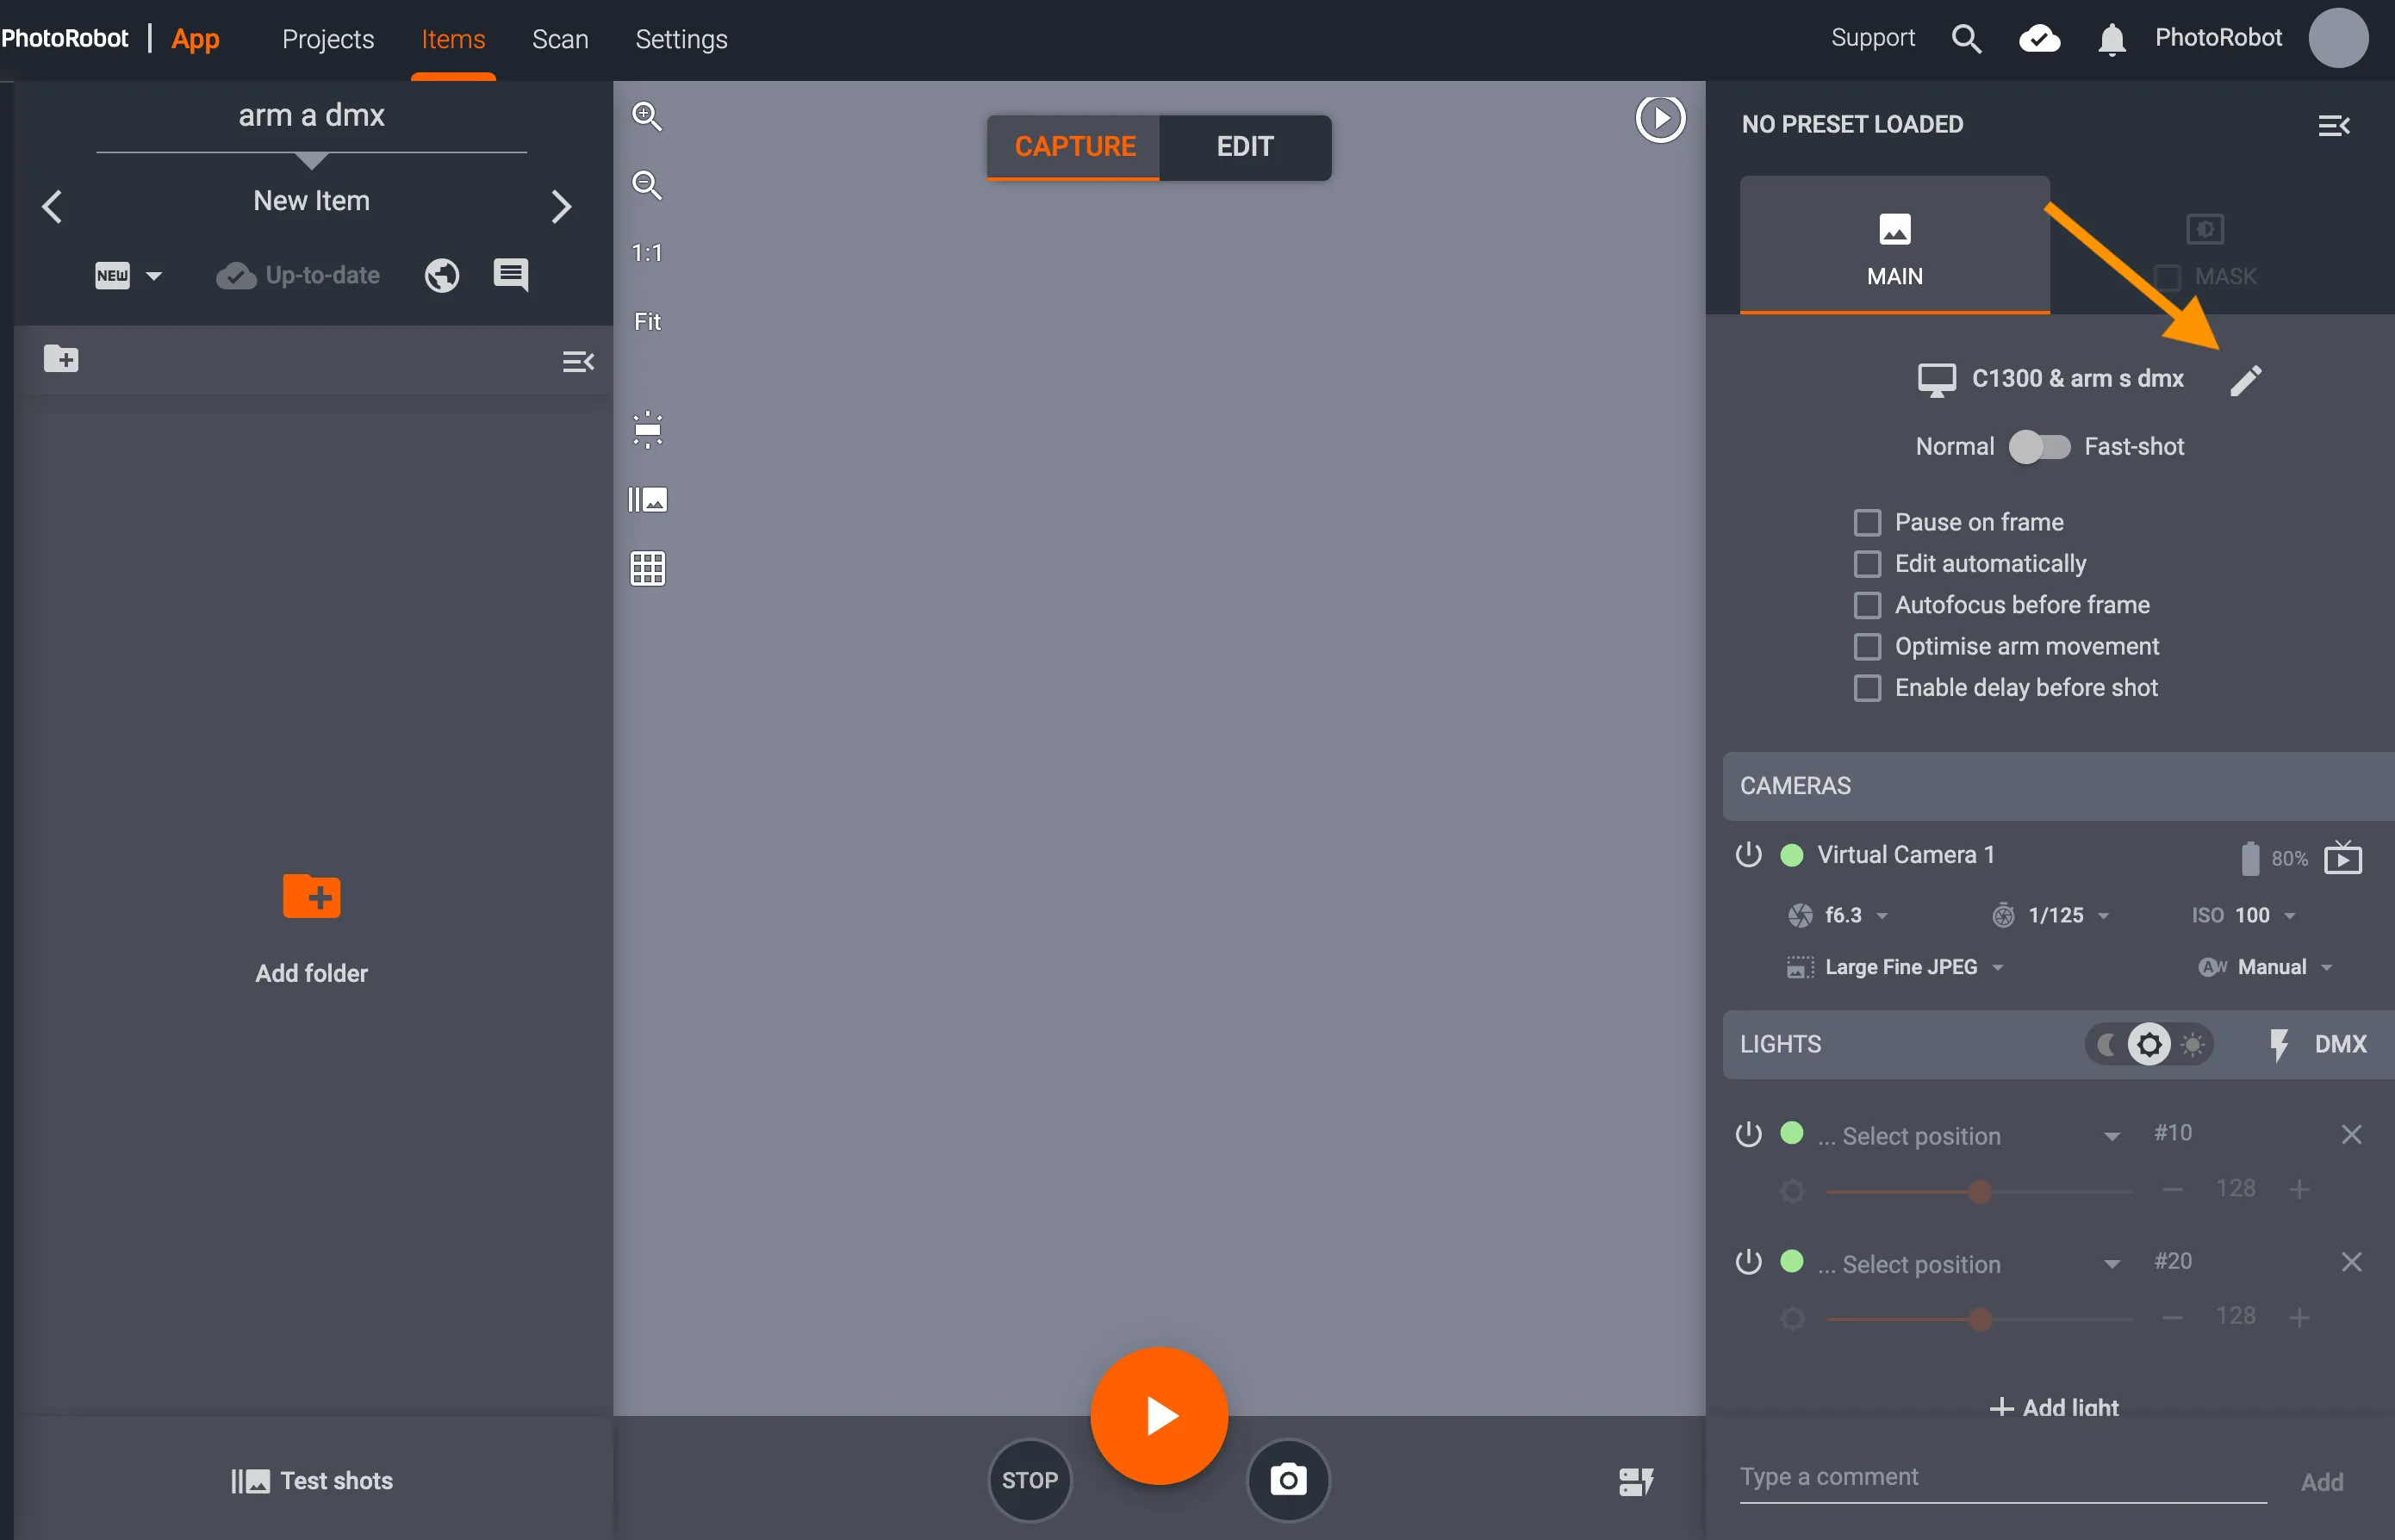
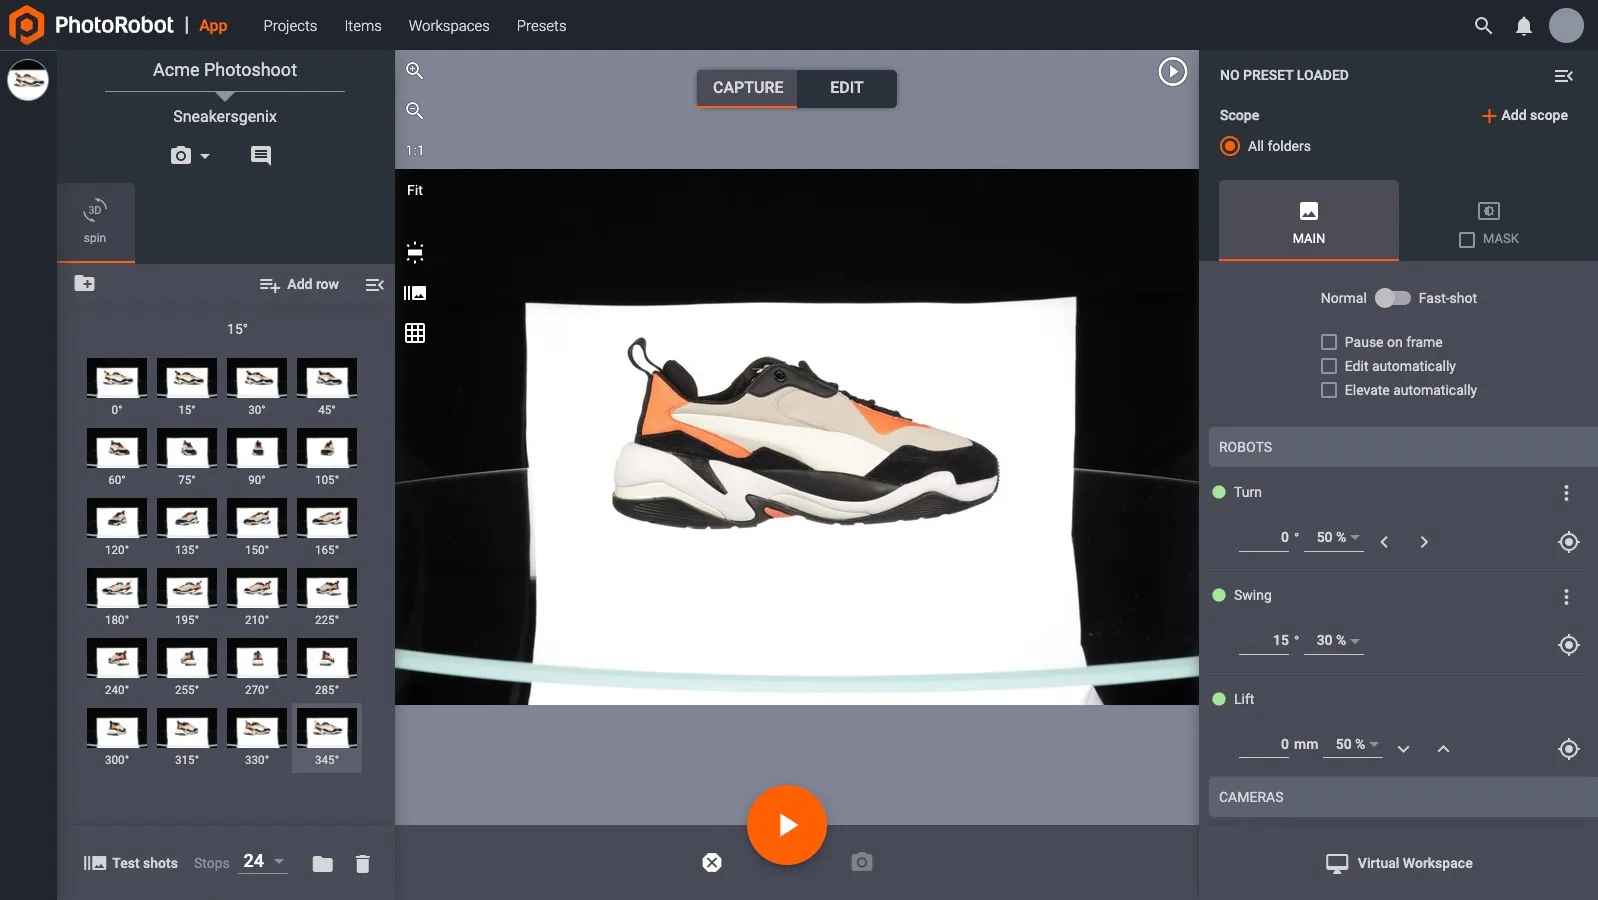
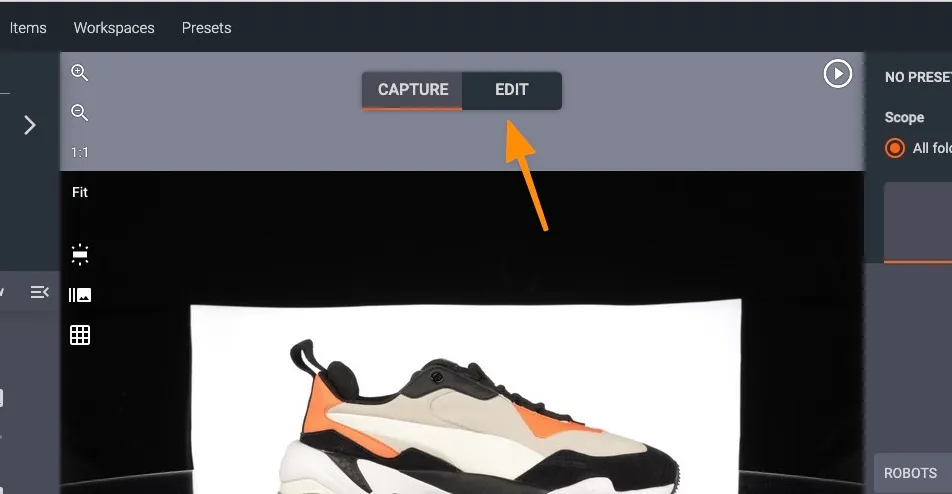
Capture Mode Interface
After clicking on an item, you will be taken to a capture/edit interface. The controls available to you change based on whether the capture mode is active, or the edit mode. The capture mode is used to control the photography sequence, while the edit mode controls all post-processing performed within CAPP. The active mode will be highlighted at the top of the screen:
Adding a Spins, Stills, or Video Folder
Before any photoshoot, you must create at least one folder. The main types of folders are spin (used for 360° presentations), stills (for still images), and video (for videos).
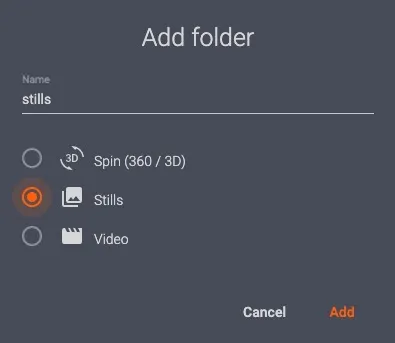
Creating a Spins Folder
When adding a spin folder, CAPP will automatically add stops (also called “frames”) based on how many images per spin you select. The default number is 36, and this can be changed in the bottom left corner. With a higher number of stops, the rotation will be smoother, but it will also take up more storage space.
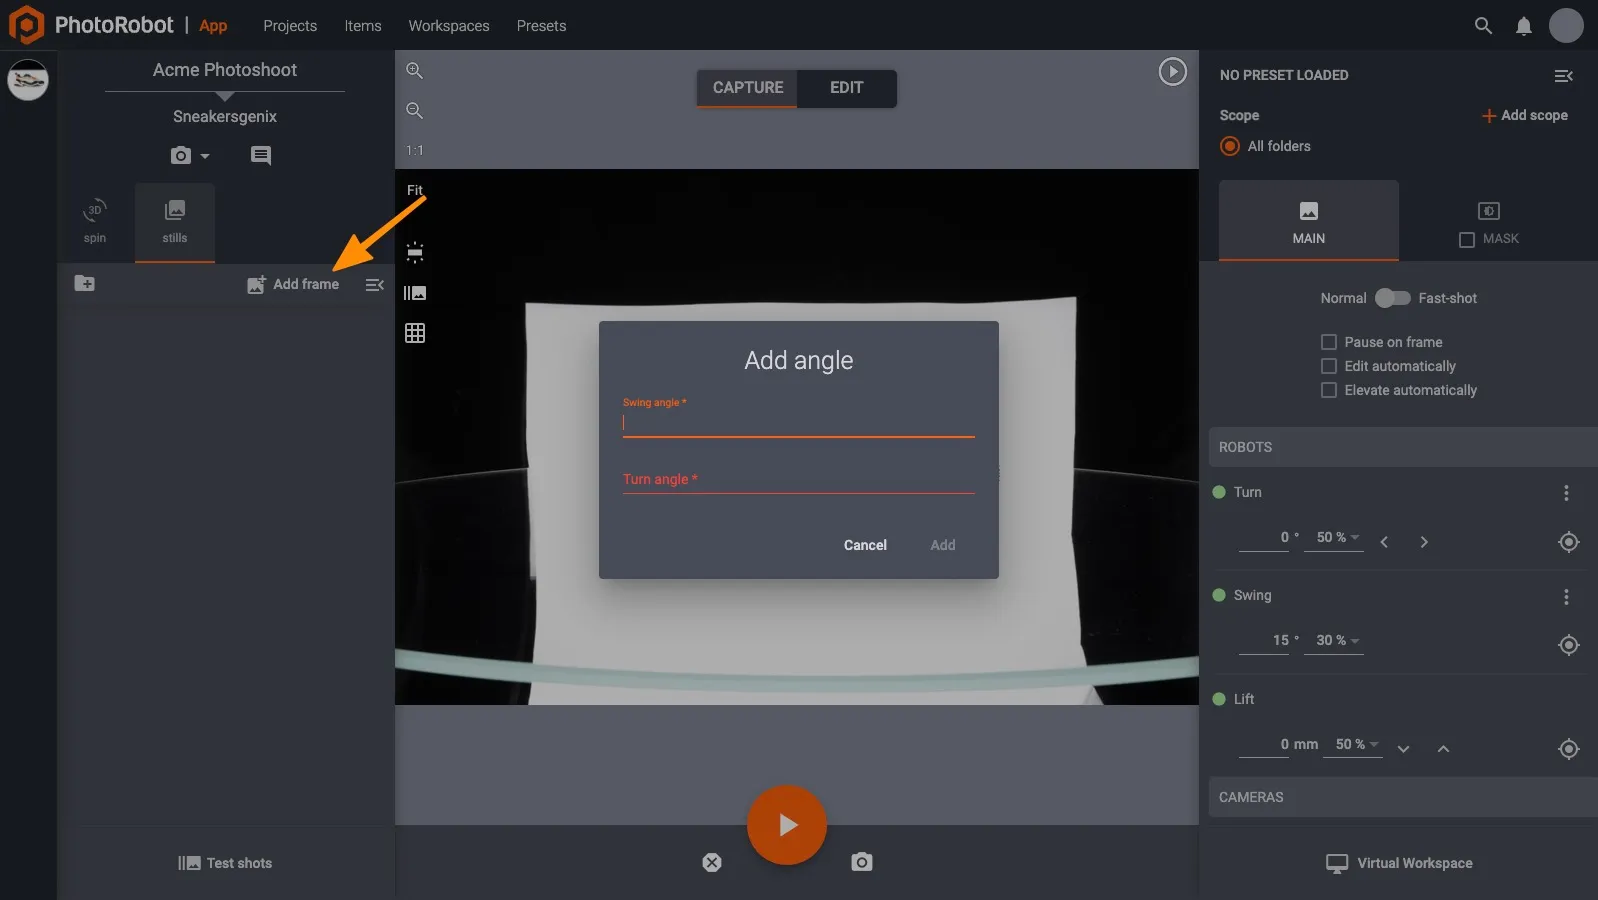
Creating a Stills Folder
If you select a stills folder, you must add your stops manually. This will include a turn angle (the rotational angle) and a swing angle (the vertical position of the camera along a circular trajectory). The swing angle is important if you are using our Robotic Arm or another module that can change the horizontal position of the camera.
Import Images
In some cases, you may want to import images into a new or existing folder in CAPP. Take for example importing handheld photos, detailed shots, or other miscellaneous images.
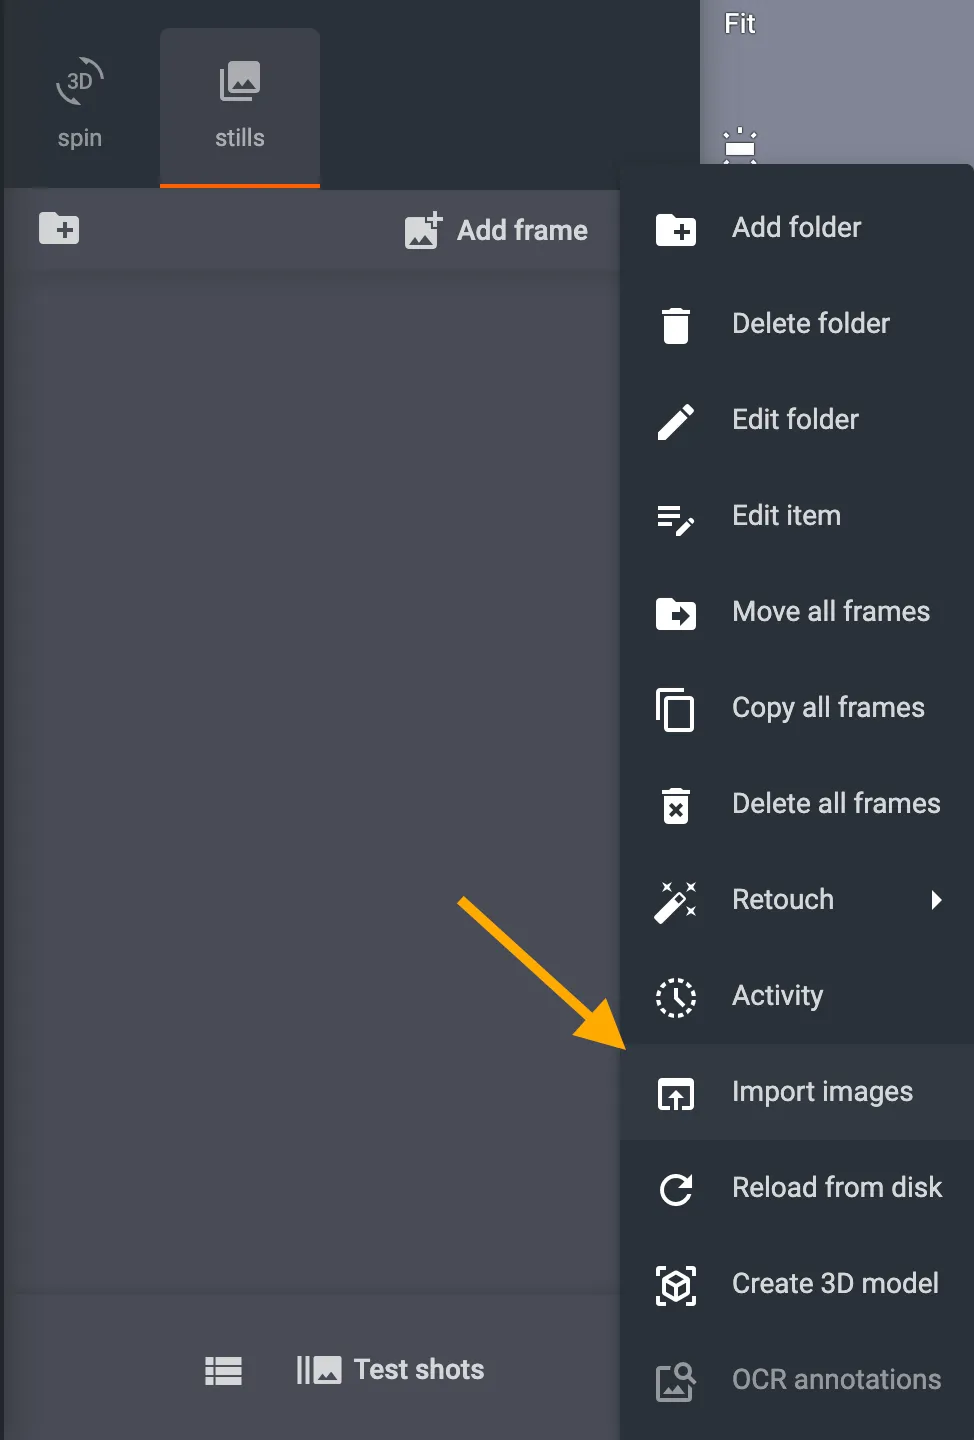
To import images into CAPP, first open a new or existing item in the Capture mode interface in CAPP. Next, click the icon for the folder operations menu in the top-right corner of the folders interface.
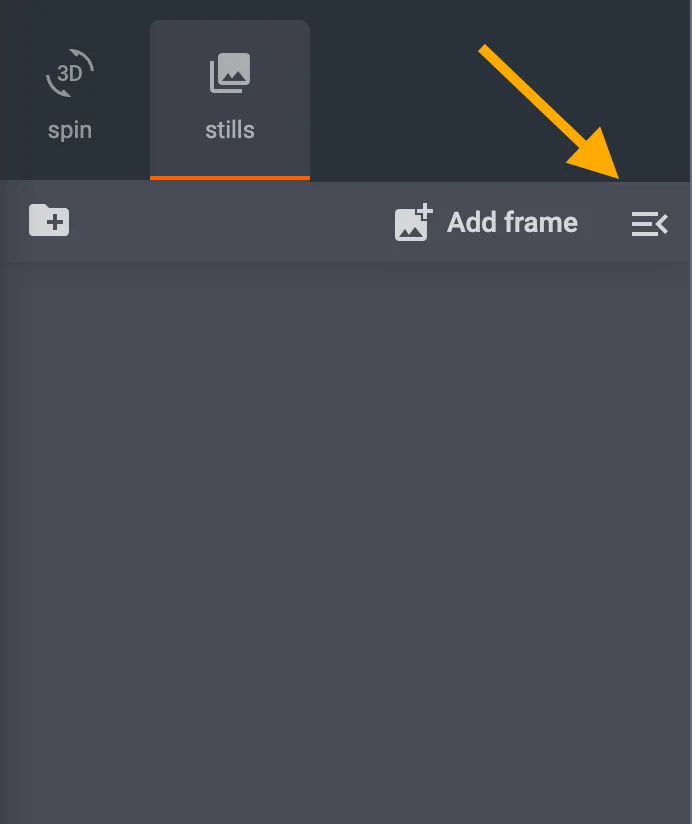
Then, in the folder operations menu options, find and click Import images from the list.
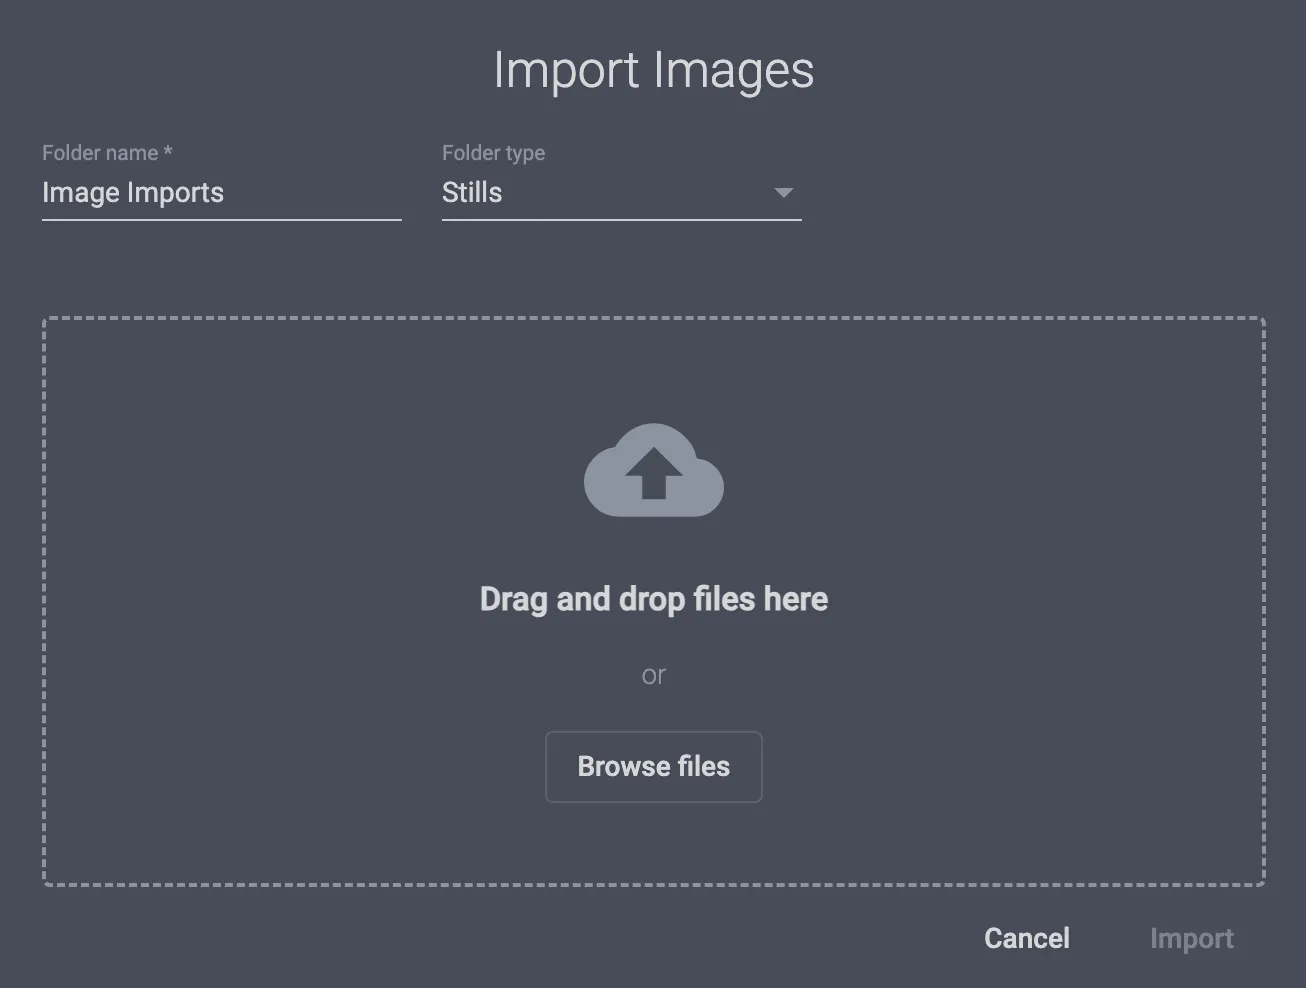
Clicking Import images will open a pop-up window that enables image import by drag-and-drop, or by browsing local files. At the top of the window, it is also possible to configure Folder name and Folder type for the imported images.
Control Compatible Lights
When using lights compatible with CAPP, you are able to select lights in the bottom right corner of the edit mode window.
Capture Mode Interface Overview
The central part of the capture mode interface includes the preview window, which either displays the currently selected image (if you have already taken some) or the live view streamed from the camera.
Live View, which is useful if you want to check composure and focus, can be toggled in the camera control area in the central part of the control bar on the right-hand side of the screen.
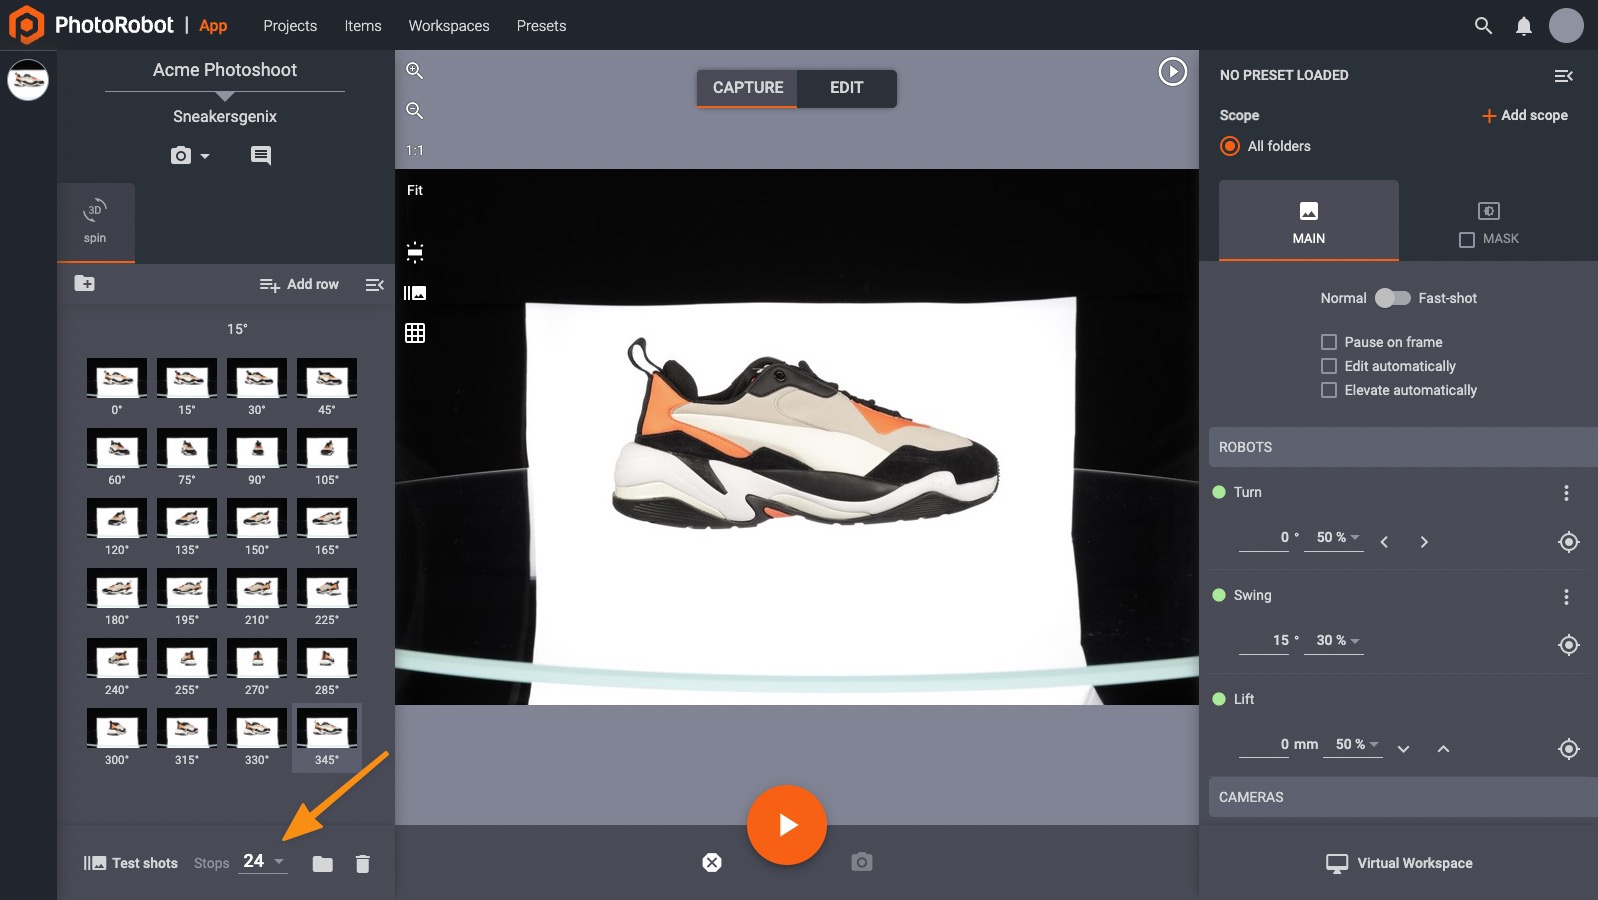
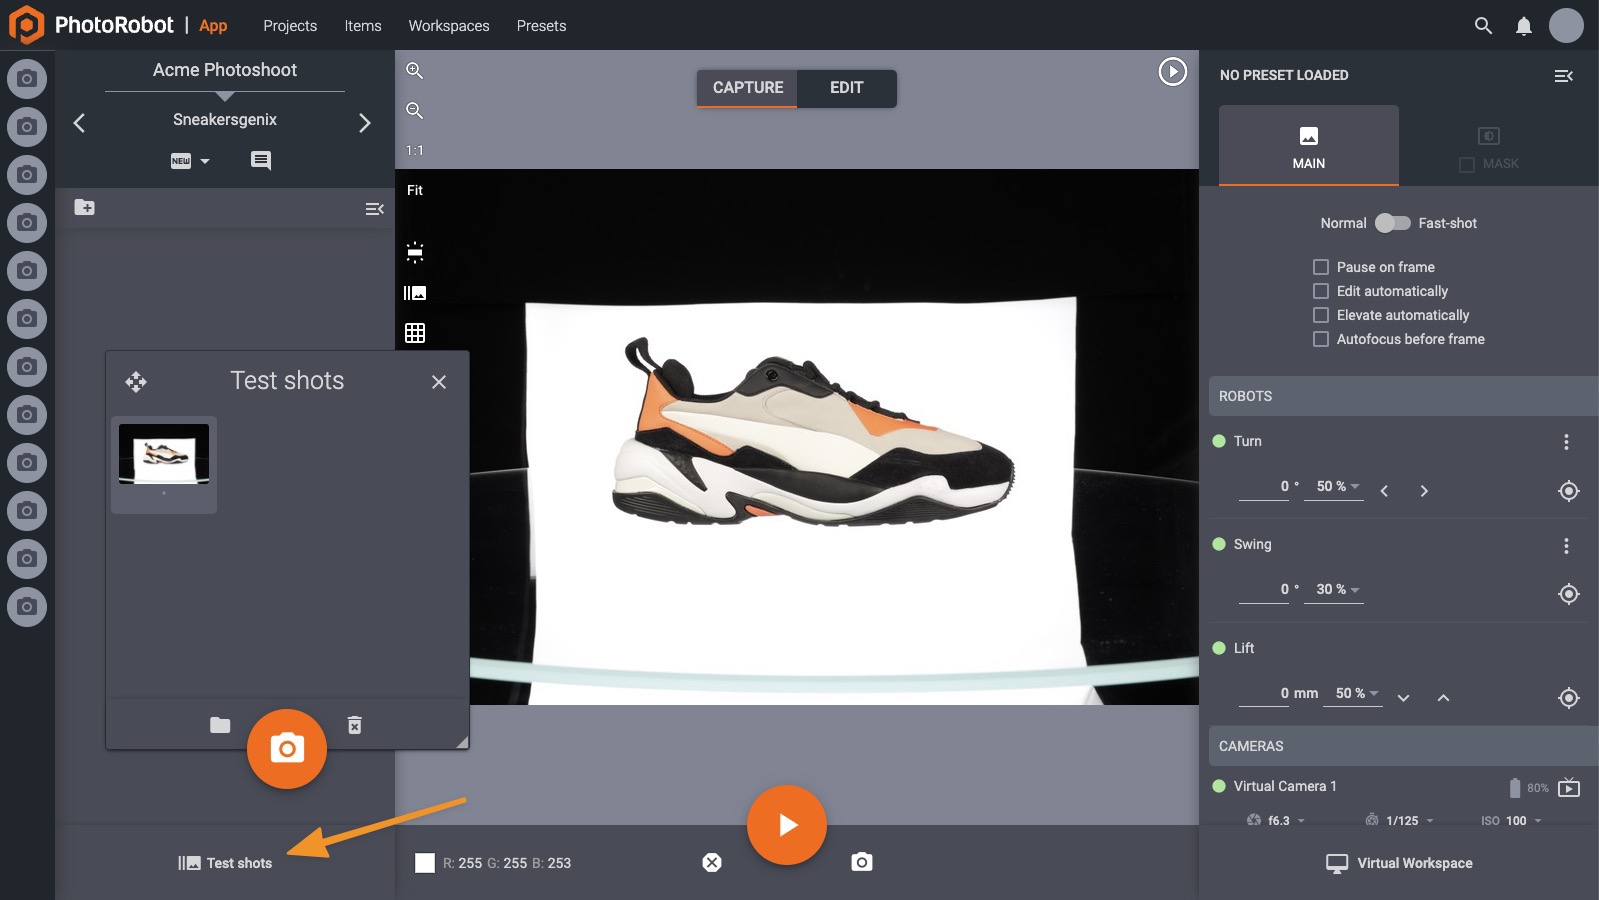
Taking Test Shots
Before taking final images, it is a good idea to take one or more test shots. The easiest way to do this is by pressing the T key on your computer keyboard. This will help you check whether you should change the settings of your lights, camera, etc. Test images are stored in the “test shot” folder, which you can access in the bottom left part of the screen.
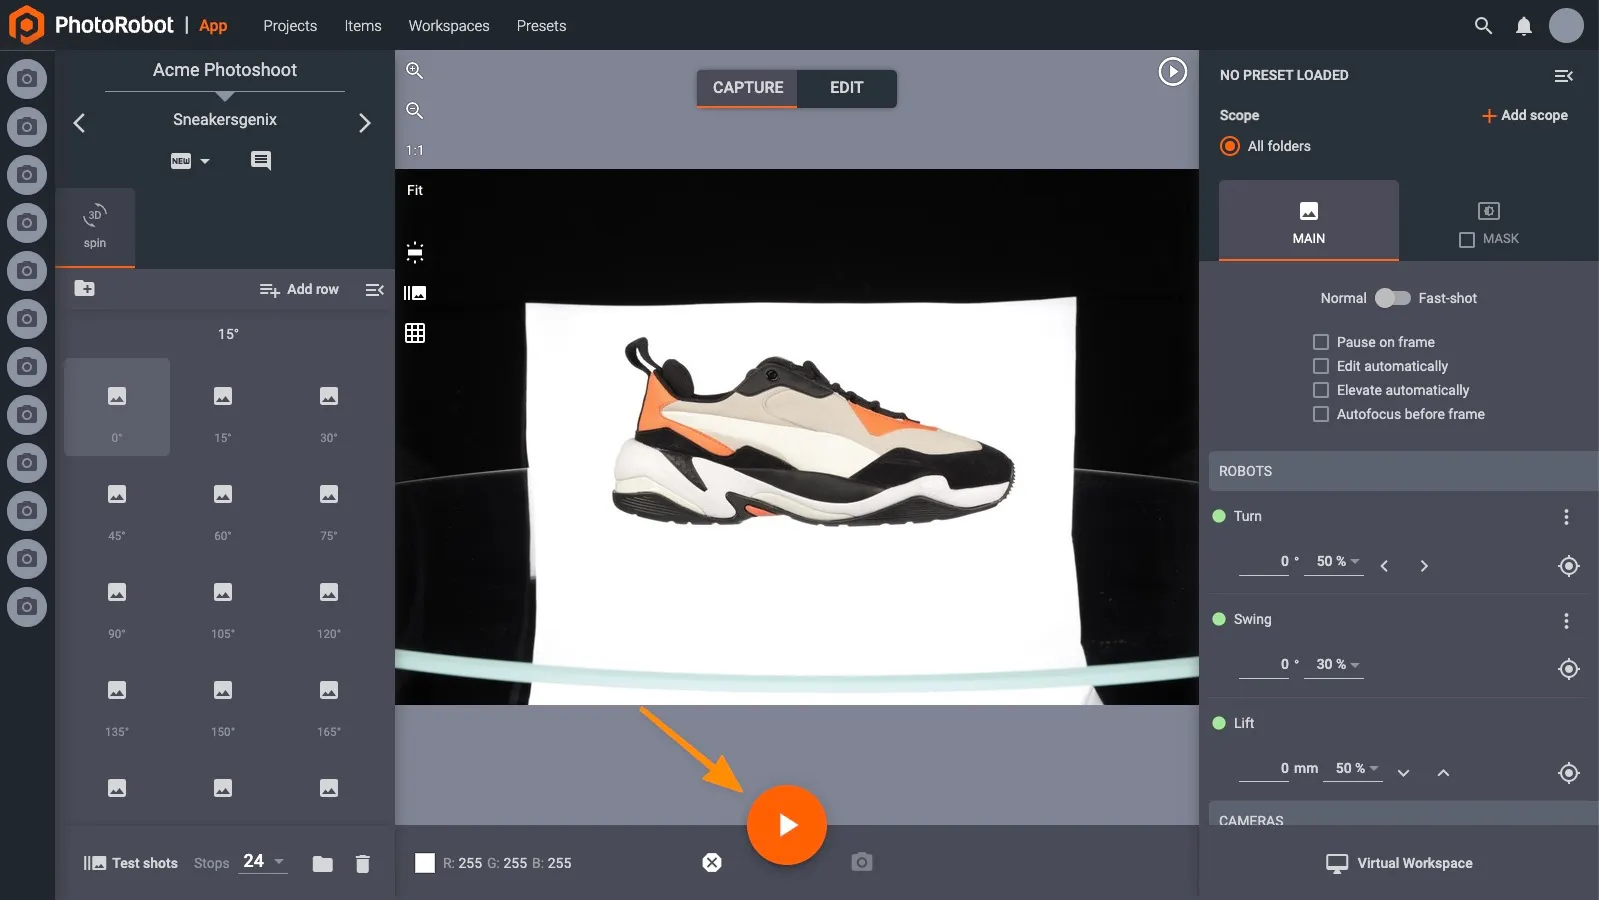
Starting a Photography Sequence
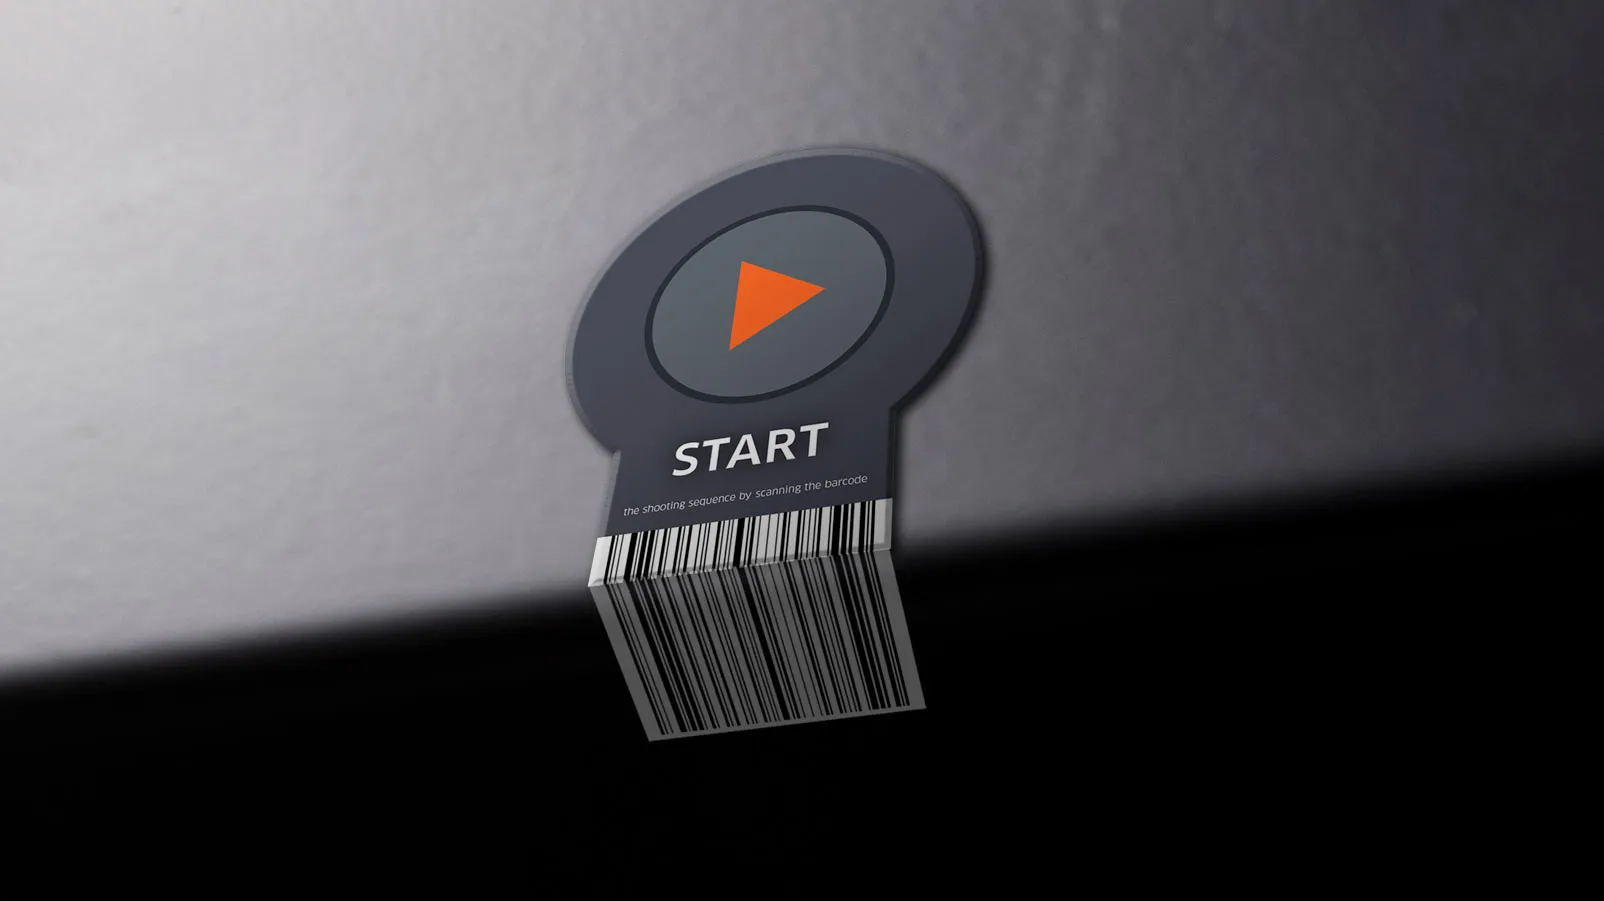
When satisfied with the settings, which were verified by taking a test shot, it is time to run the photography sequence. This can be triggered by pressing the space bar on your keyboard or by clicking the “start” button shown in the picture below.
If you have a barcode scanner, you can also trigger the sequence by scanning a special “start” bar code. Download the PhotoRobot "start" barcode online, and print it out to use this feature.
You will know that the sequence has finished successfully if all thumbnails on the left-hand side have been filled with images. It is a good practice to pay attention to any potential misfires of the strobe lights.
If any of the thumbnails are darker compared to the others, lower the rotation speed or, if necessary, check the condition of your lights. You can then mark these images and reshoot them without having to run the entire sequence again.
Once the capture sequence is complete, you can switch to edit mode, which is where you will perform post-processing.
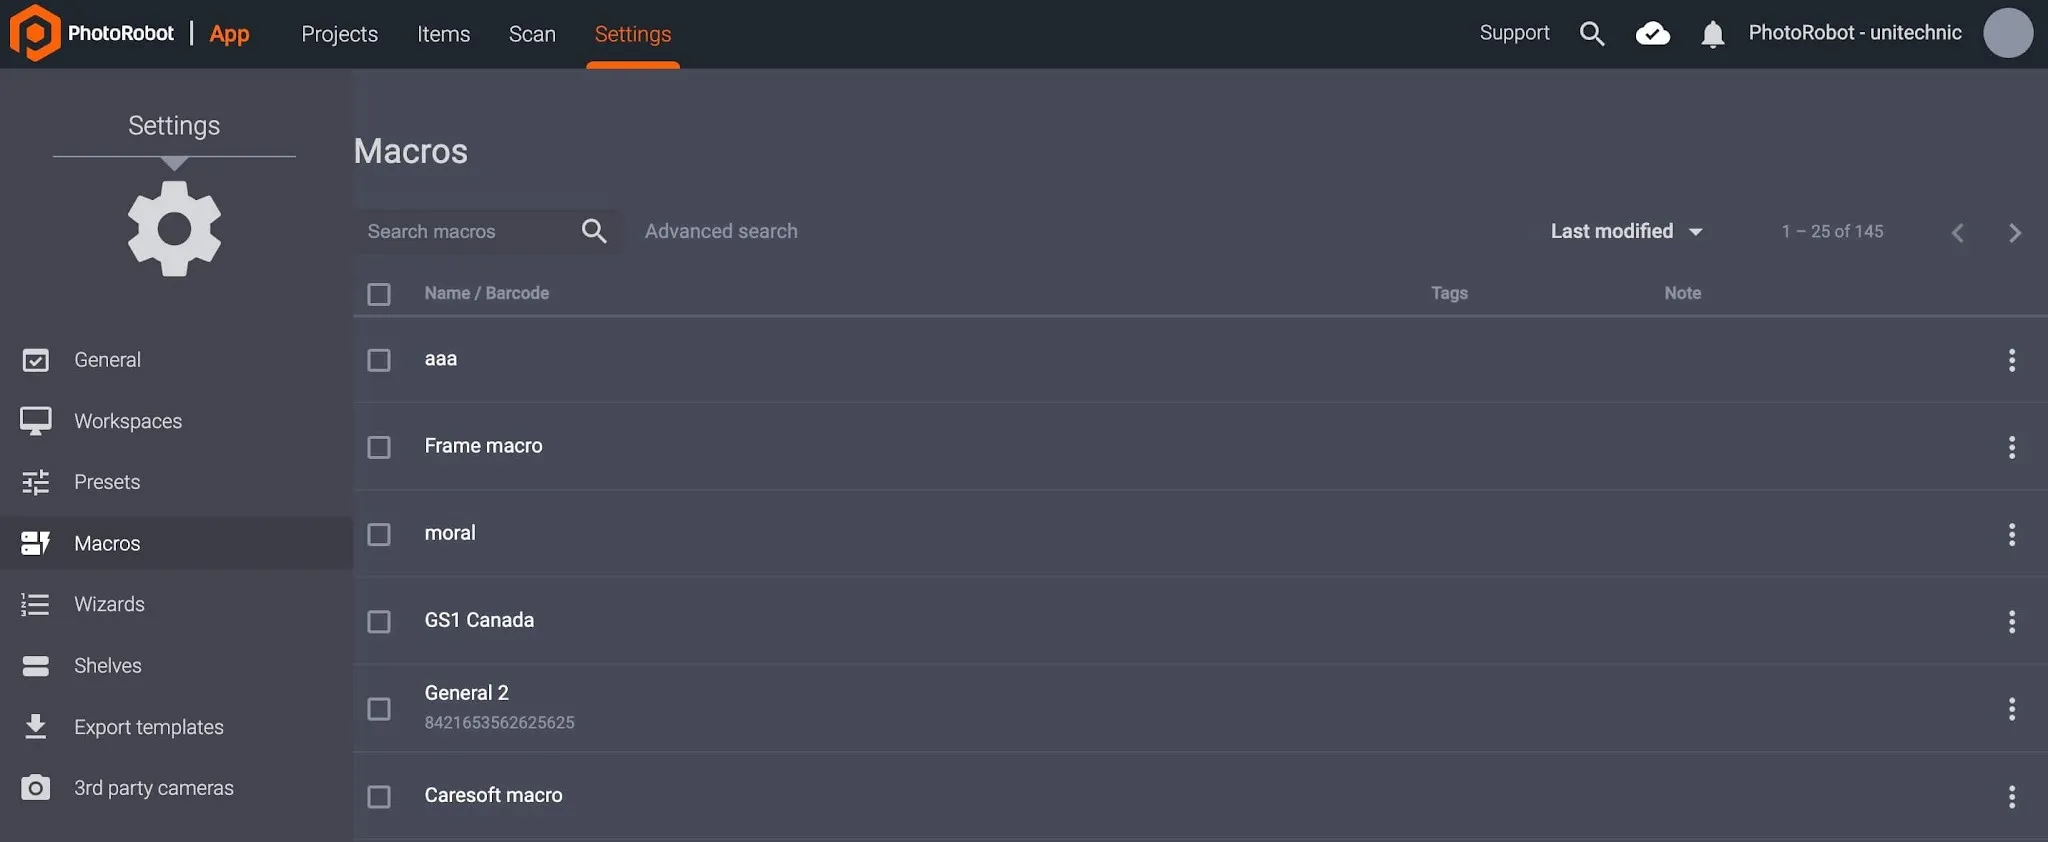
PhotoRobot Macros
Macros in CAPP enable users to define commands for the capture process of an item and its folders (spin, stills, etc). Commands can apply to individual or multiple folders, run sequences, image edits, workspaces, presets, copy image settings, and move image settings. Users can also further customize macros by name, barcode, tag, or notes.
Note: For detailed instructions on the configuration and use of PhotoRobot Macros, refer to the PhotoRobot Macros User Guide. Find out how macros enable photography automation magic across multiple folders and components, with the automatic processing of complex tasks.
PhotoRobot Wizards Mode
Wizards mode in CAPP functions as an alternative to manual hardware, camera, and sequence configuration. In use, Wizards mode enables an administrator or photographer to create different Wizards to simplify capture mode for production-line operators. An operator is then able to start CAPP in Wizards mode, which functions as an extremely simple interface with wizard-guided steps. There are also limited controls for ease of use and onboarding.
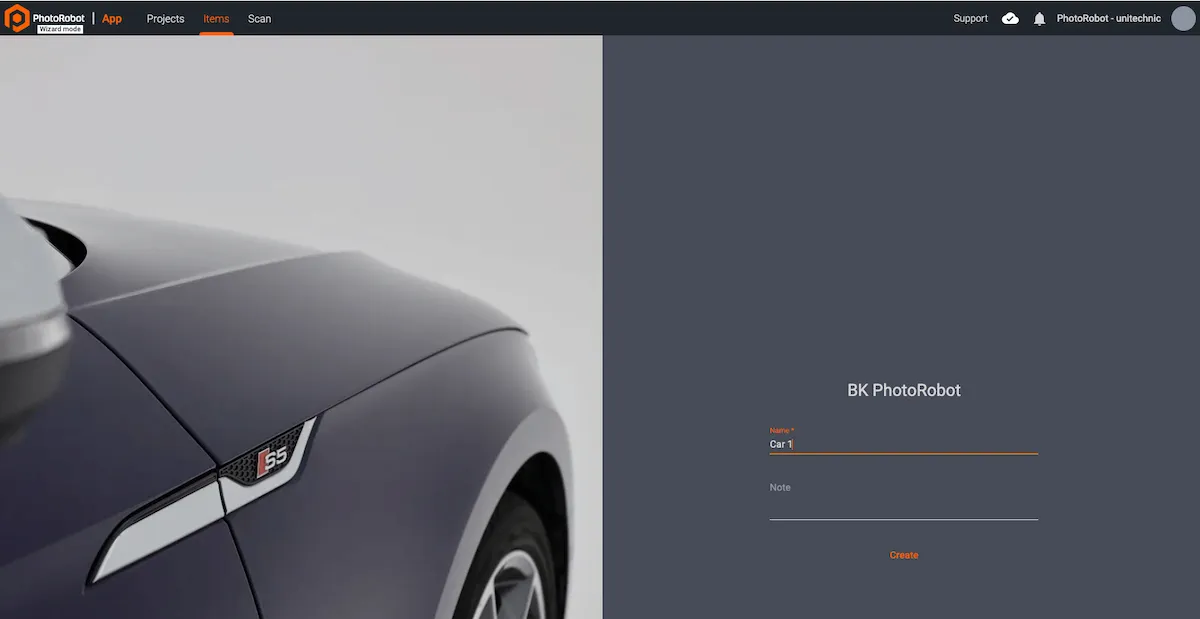
After creating a wizard, it stores Presets and Workspace configurations, as well as predefined steps operators must follow. Operators cannot adjust any settings, and they must complete the instructions in each step before they can move onto the next process.
Note: Wizard steps are defined in a JavaScript-like language format, and scripted by PhotoRobot consultants for custom functionality. Users can also script basic functions for initial experiments or simple setups. For documentation on the technical configuration and operator use of wizards, refer to the PhotoRobot Wizard Mode User Manual.
Edit Mode Interface
On the right side of the screen, you can add any number of editing operations:
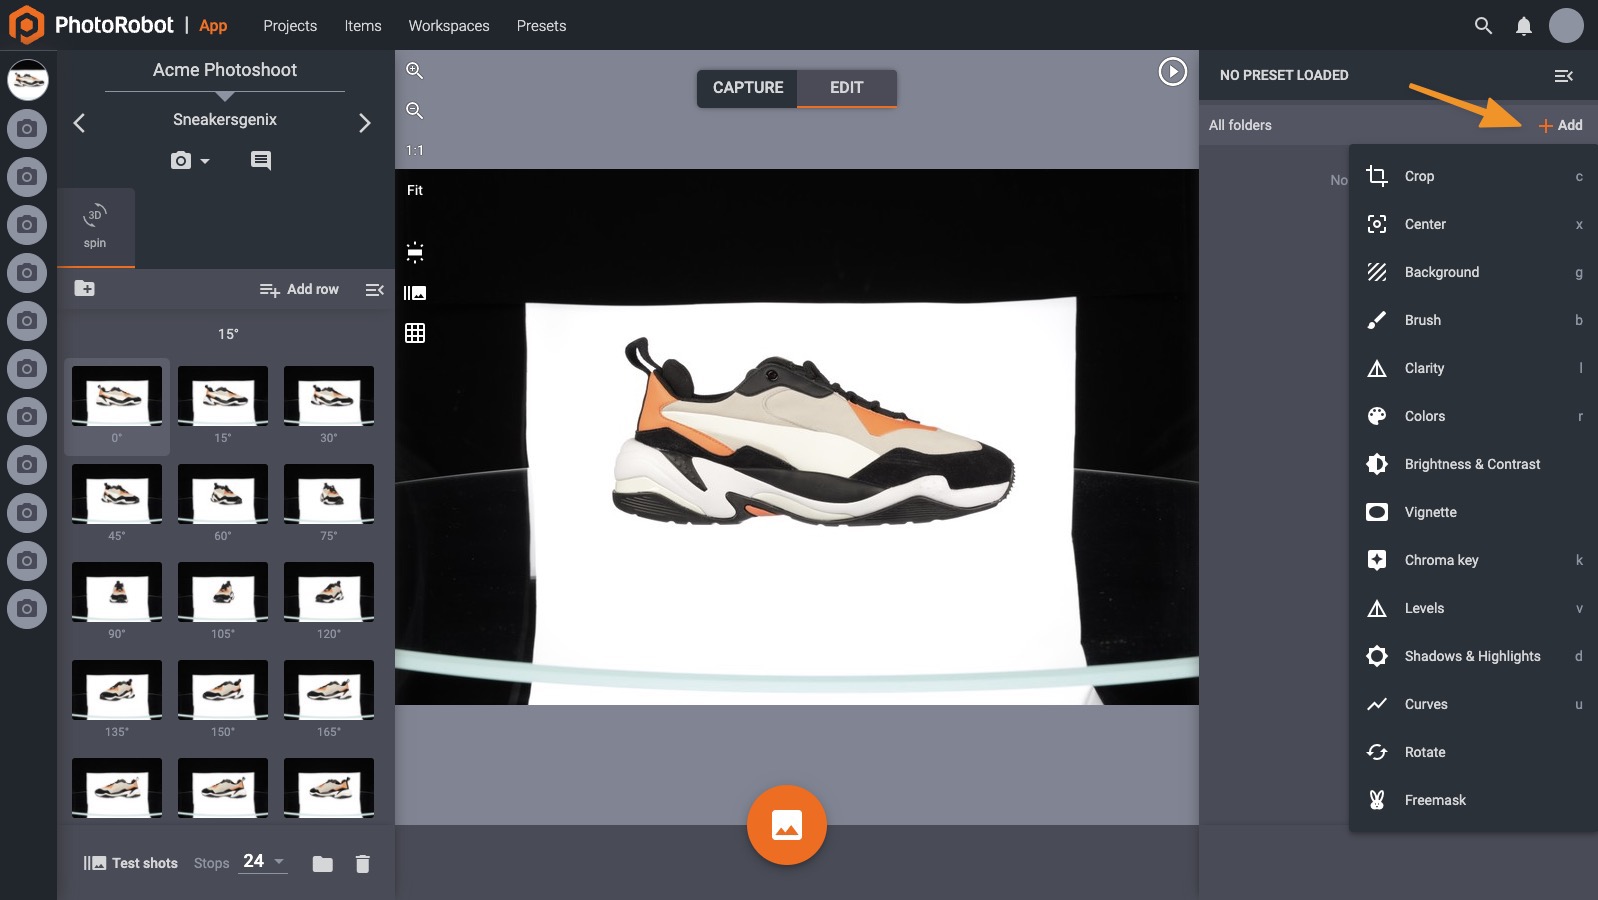
Some of the most common editing operations are listed at the top: crop, center, and background.
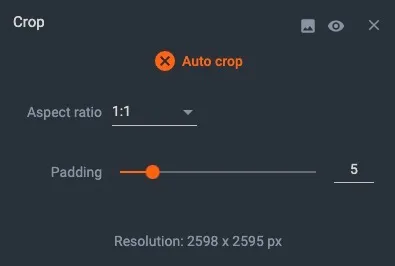
Automatic Crop
Crop - when cropping images, there are three main controls: the toggles for automatic cropping, aspect ratio, and padding (which controls how much space there is around the photographed object).
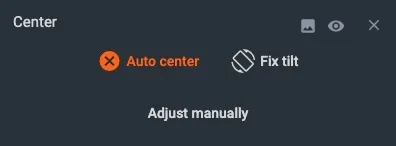
Auto Center
Center - even though most PhotoRobot machines are equipped with lasers that help with positioning objects on the surface, most images will need additional software centering. This is especially important for 360° spins. When getting started, it is recommended to keep the “auto center” function on, as seen in the picture below:
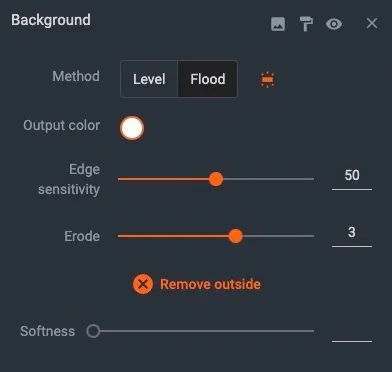
Background Removal
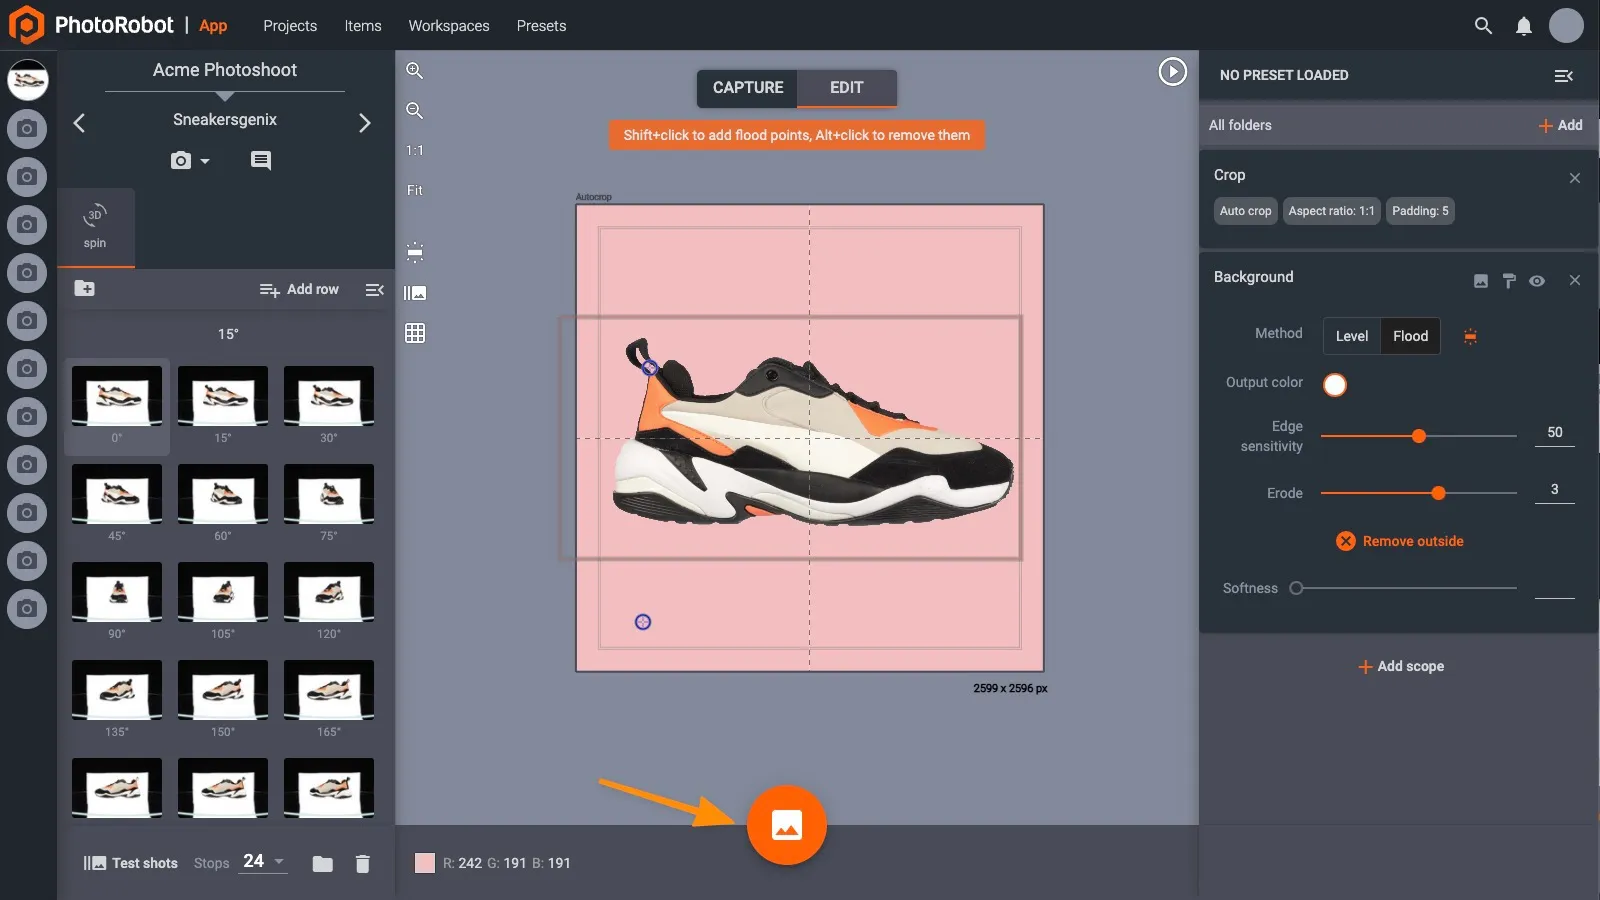
The Background operation will adjust the background of an image or image set, completely removing the background if desired. Different results can be achieved by the three different background removal methods in CAPP. There is background removal by level, background removal by flood, and by freemasking.
- Background removal by level uses software analysis of RGB color levels and brightness values to identify the background and foreground. This is advantageous when photographing bright or white items, and when using a white backdrop. Adjust levels in the software to make the background brightness higher in intensity until it becomes pure white. It is then possible to make the background transparent, or to swap in different color backgrounds.
- Background removal by flood functions by similar principles to by-level background removal, and is most often useful when photographing darker items. Removing the background by the flood operation makes the background brightness more intense until it becomes pure white around the item. However, instead of adjusting levels, the tool uses a selected point to identify the background and then “floods” that area. Users simply click a point outside of the photographed object. The software then detects the edges of the object, and applies flooding to fill in the available space around it.
- Freemasking background removal requires more configuration than using levels or flood, but it can be one of the most precise and quickest methods. This method uses a cut-out mask image and a main image of the product, compositing the two images to remove the background. Sometimes, this is the only efficient way to remove the background around more “difficult” objects. Take for example reflective items, or objects that contain areas with empty space. Freemasking identifies the object versus all empty space, while removing the background around the item and inside it if necessary. The method does however require additional configuration of studio lights in order to create the main and mask images for background removal.
Note: Remember that whether or not CAPP will be able to remove the background depends mainly on how the scene is lit. If you are unable to find settings that work to satisfaction, reshoot the images with different light settings.
When you are satisfied with your edit settings, apply the parameters by clicking the “apply” button, located where previously the “start” button appeared.
Publishing Images
Once the progress bar reaches its end, your edits have been successfully applied to your images. If you are using CAPP without PhotoRobot Cloud services, your resulting images are stored in a folder structure on your local drive.
If using PhotoRobot Cloud hosting, files can also be found in the PhotoRobot cloud storage. To access these, click Open in the cloud in the Photos section at the top-left part of the screen.
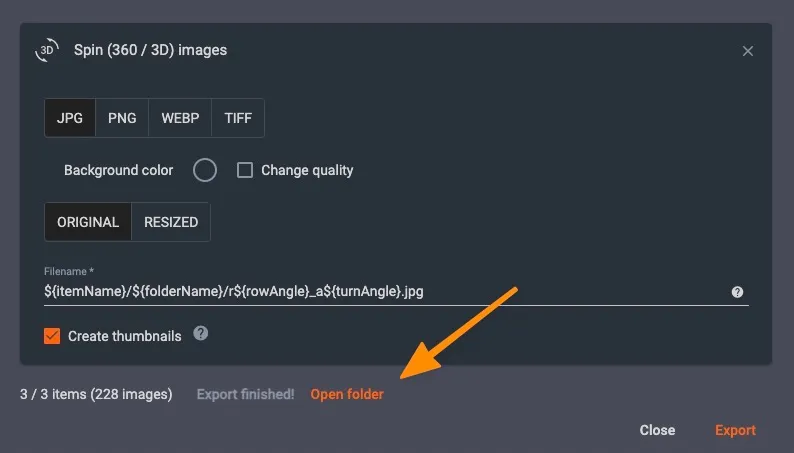
Exporting Images
To export an item from CAPP, users can export to a local disk, or export to the PhotoRobot Cloud. Item export makes it possible to define items with custom naming conventions, specify image format, resolution, and various filename template variables.
To access Item export settings, go to the Items section, and click Export in the menu above the item list:
The following window will open, allowing you to change export settings:
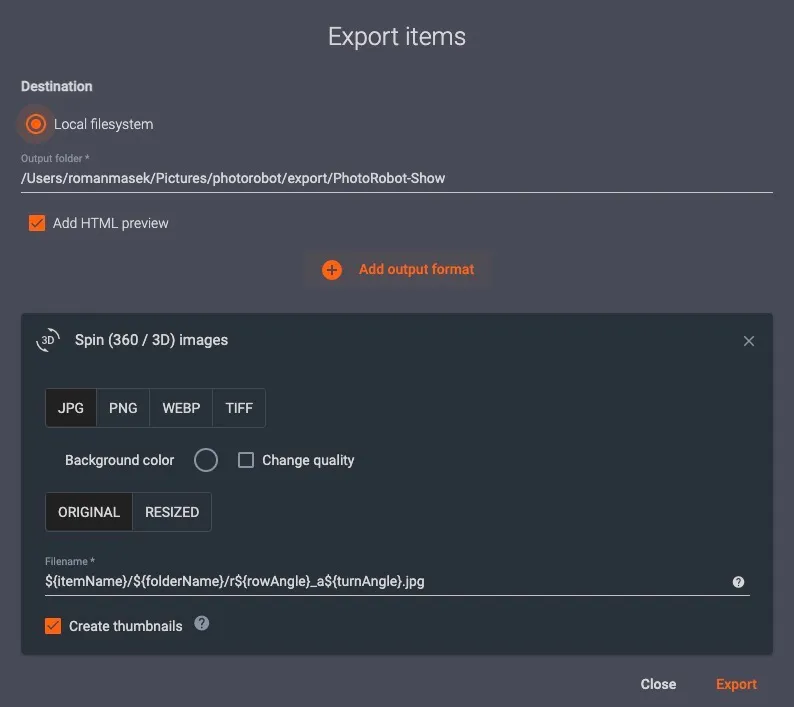
Run the export process by clicking the Export button in the bottom right corner of this window.
When the export progress bar has reached its end, you can click Open folder to access your exported images.
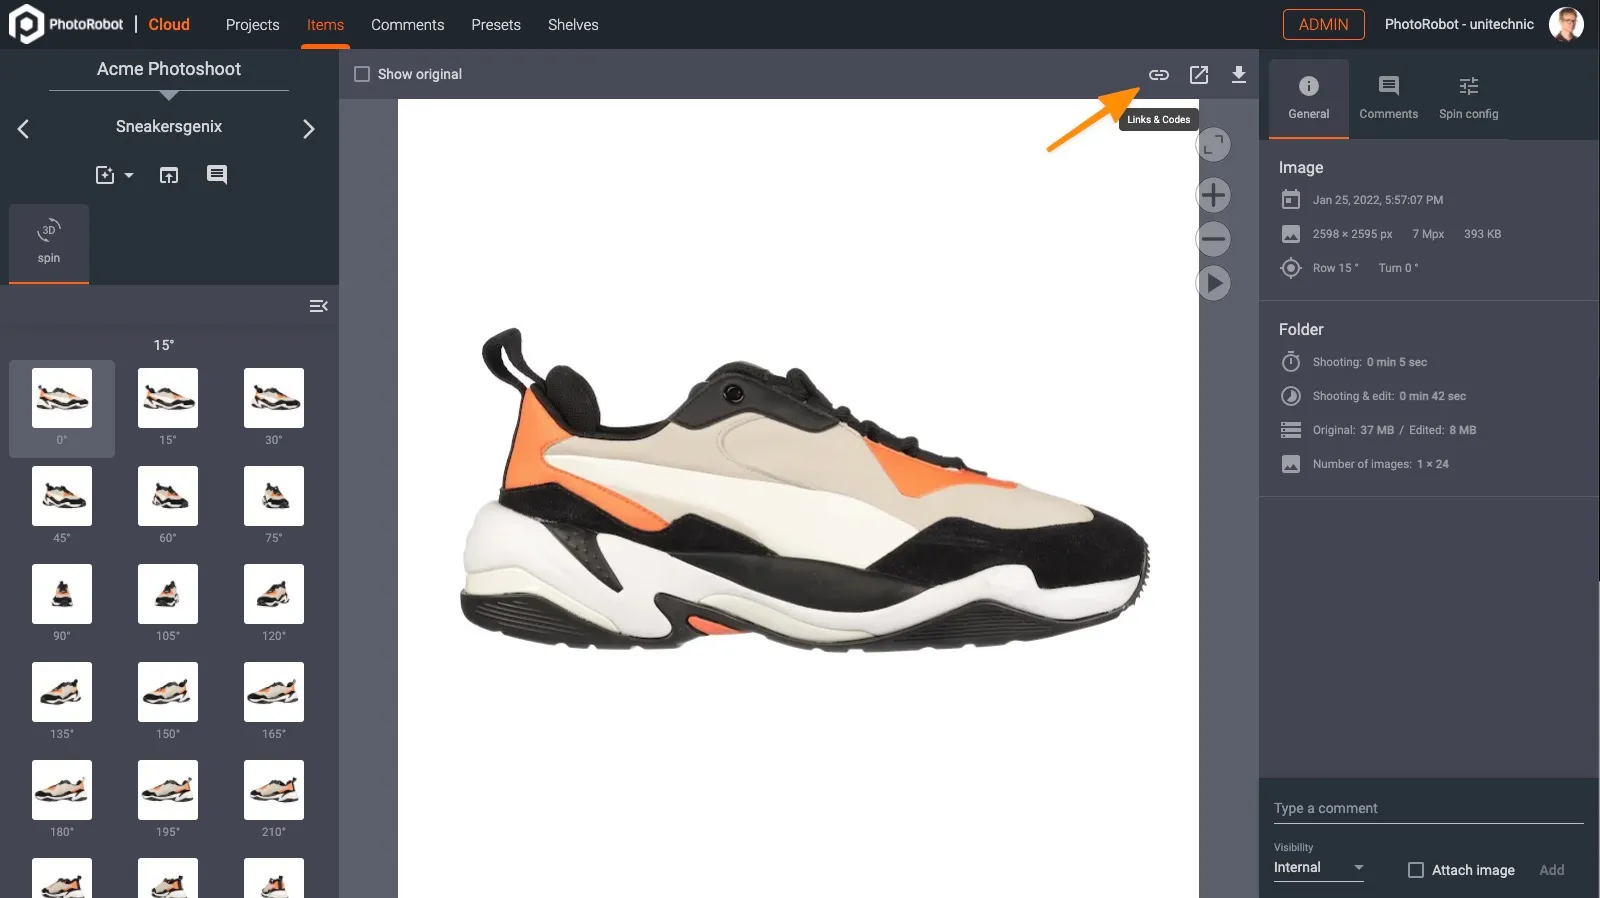
Publish via Cloud
If publishing via PhotoRobot Cloud services, first open the item in the cloud. The interface displays the captured image. Click Codes & Links button:
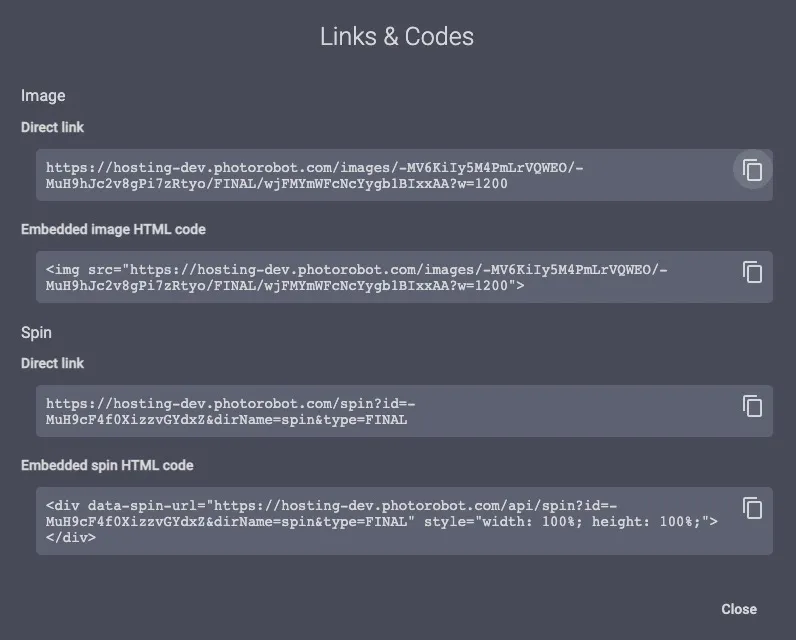
Copy the Direct link and paste it into your browser to view the image or spin. If satisfied, copy the Embedded spin HTML code. Paste this code onto your page to embed the spin for display.


EOS Rebel Series


EOS DSLR Series


EOS M Mirrorless Series


PowerShot Series


Close-Up / Handheld

The Canon EOS Rebel Series offers beginner-friendly DSLR cameras with solid image quality, intuitive controls, and versatile features. Ideal for photography enthusiasts, these cameras provide reliable autofocus, vari-angle touchscreens, and Full HD or 4K video recording.
Connection
Resolution (MP)
Resolution
The Canon EOS DSLR Series delivers high-quality images, fast autofocus, and versatility, making it ideal for both photography and video production.
Connection
Resolution (MP)
Resolution
The Canon EOS M Mirrorless Series combines compact design with DSLR-like performance. Featuring interchangeable lenses, fast autofocus, and high-quality image sensors, these cameras are great for travelers and content creators seeking portability without sacrificing image quality.
Connection
Resolution (MP)
Resolution
The Canon PowerShot Series offers compact, user-friendly cameras for casual shooters and enthusiasts. With models ranging from simple point-and-shoots to advanced zoom cameras, they provide convenience, solid image quality, and features like image stabilization and 4K video.
Connection
Resolution (MP)
Resolution
The Canon Close-Up & Handheld Cameras are designed for detailed, up-close photography and video. Compact and easy to use, they offer precision focus, high-resolution imaging, and versatile macro capabilities—perfect for vlogging, product photography, and creative close-ups.


