User Support Guide to the PhotoRobot Touch Application
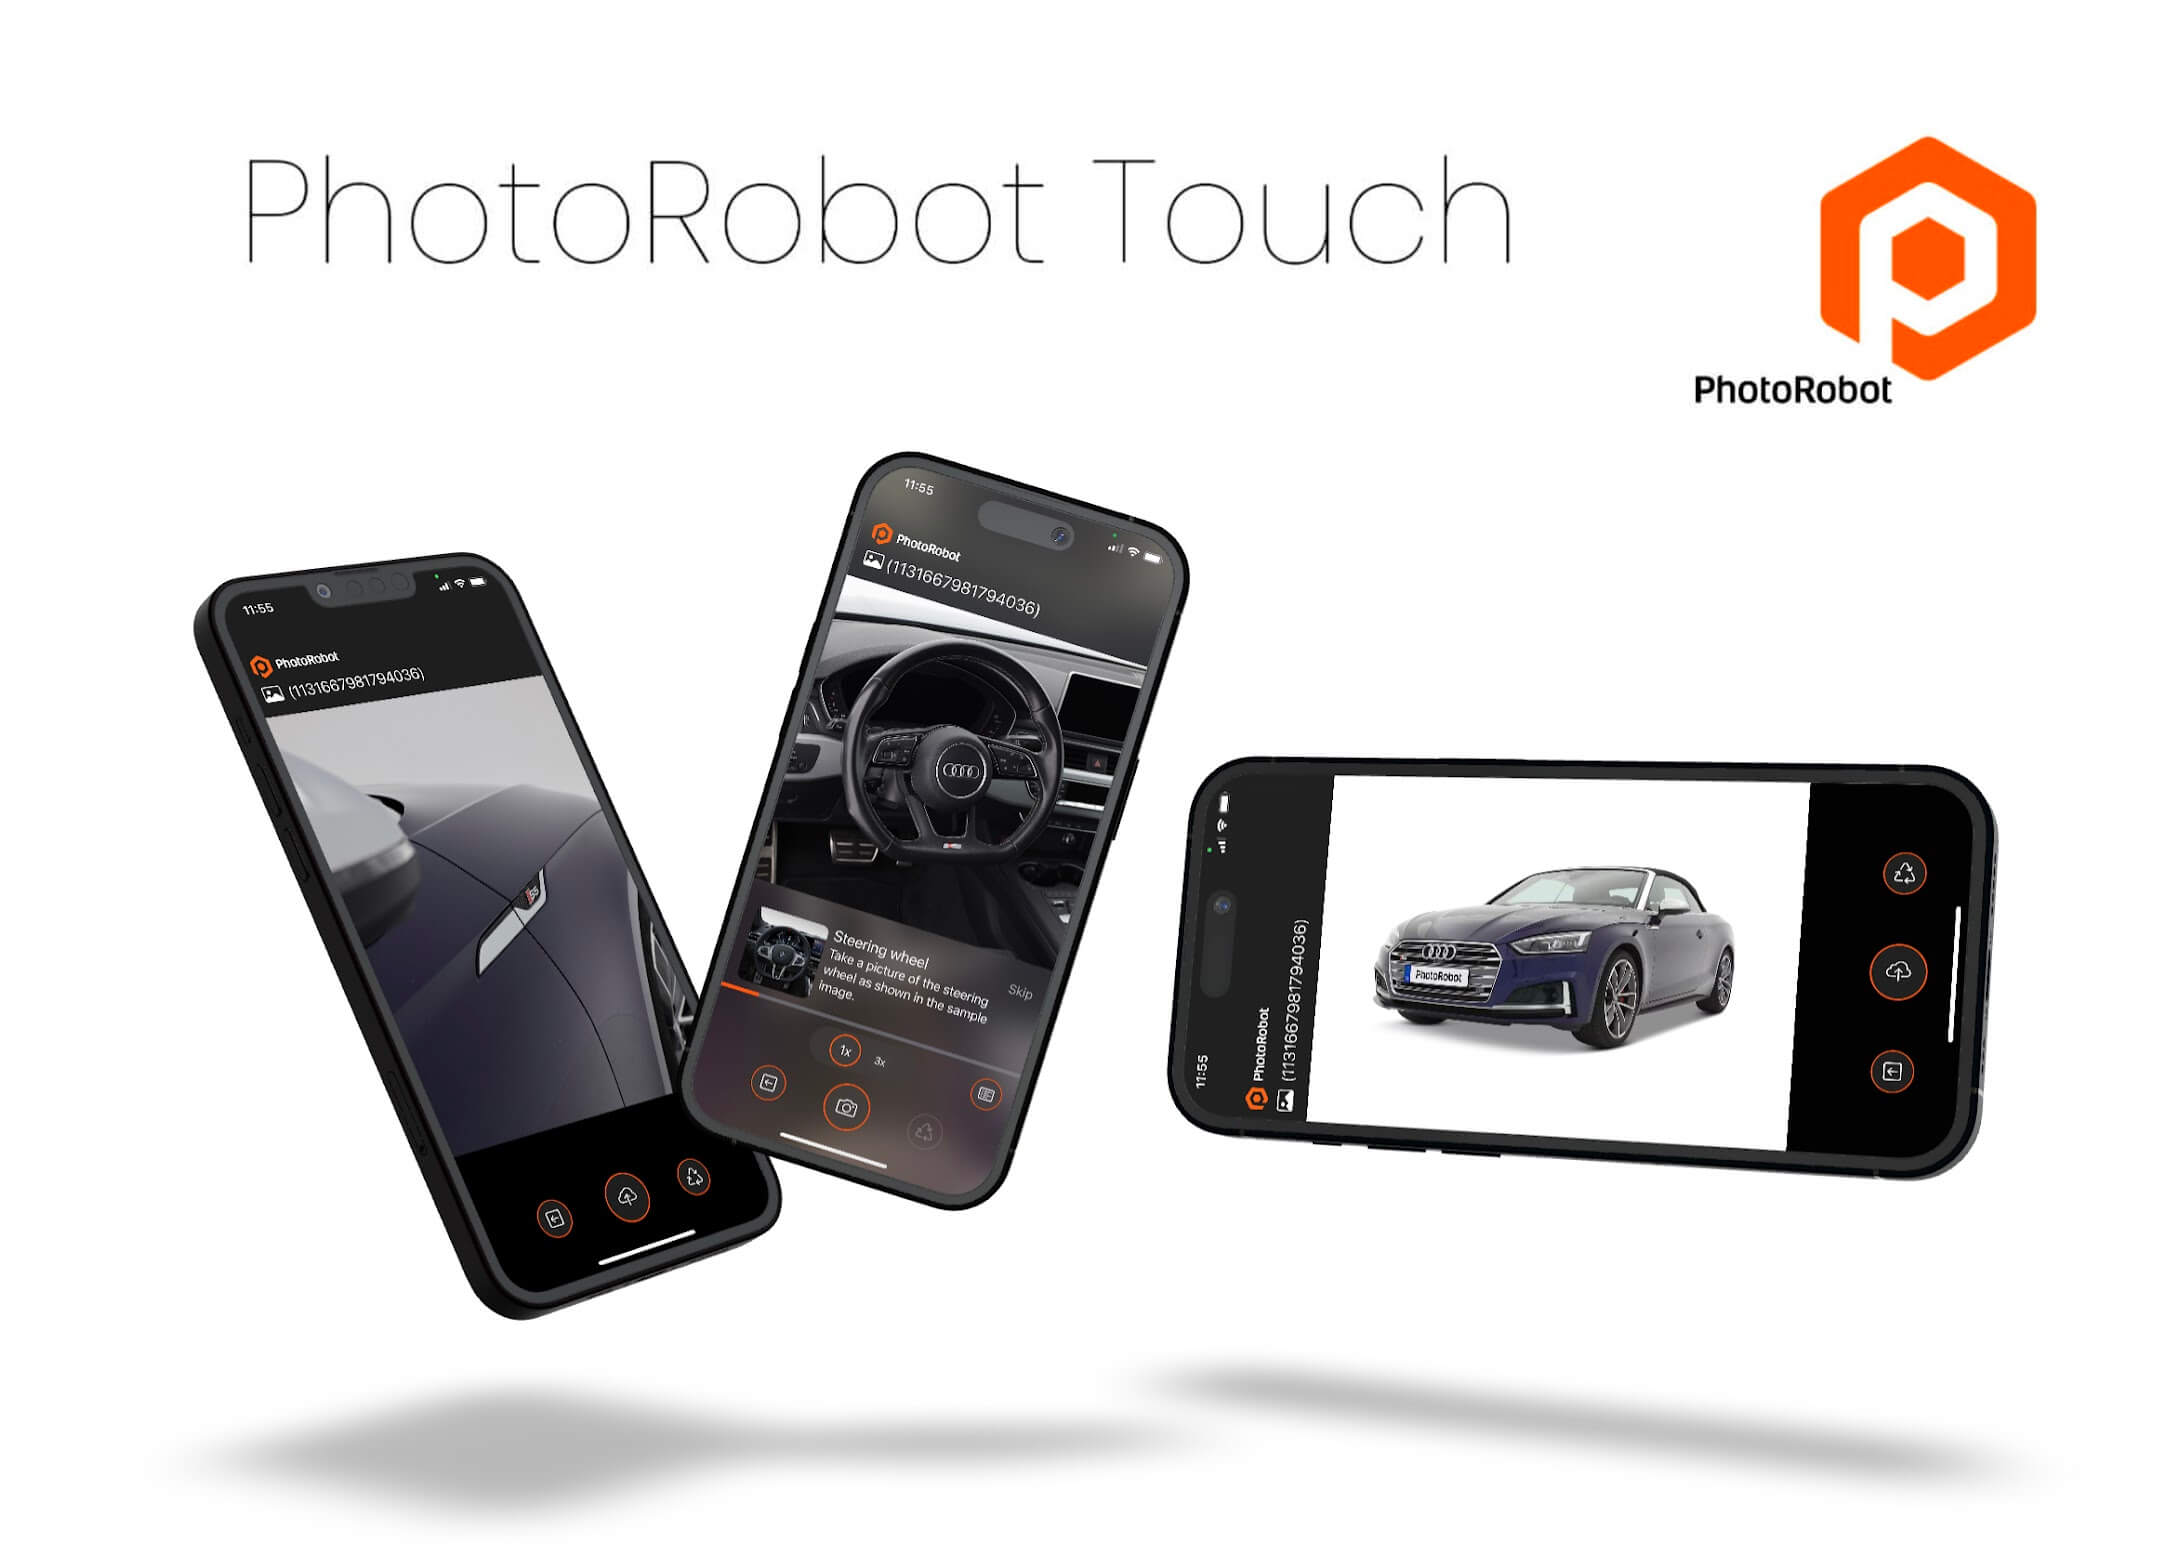
This PhotoRobot User Support Manual describes the installation, requirements, and functionality of the PhotoRobot Touch App. PhotoRobot Touch is an iOS application that connects to PhotoRobot Controls App (further referred to as “CAPP”). Touch enables the use of an iPhone as an external wireless camera for handheld product photos. That, or the tethered shooting of 360 product spins. It supports batch handheld product photography in unrestricted or template-based capture modes, and features automatic upload to the Cloud version of CAPP for PhotoRobot automated post-processing and publishing.
Note: PhotoRobot Touch functions in the Cloud version of CAPP only, and does not function with the local version of CAPP. Connected iPhones must communicate with the software through the Cloud. Although, using the Cloud version of CAPP will still automatically transfer data to the local computer. For example, thumbnails synchronize automatically. However, full resolution outputs must be downloaded in the local version of CAPP by clicking a download button.
Installation of the PhotoRobot Touch App
To start using the iPhone application, first download PhotoRobot Touch (available only on the App Store).

Note: For first-time app users, there is an in-app license purchase for the Touch application to unlock the full user experience. Also, users should have an active PhotoRobot Controls App (CAPP) account.
Then, it is still easily possible to test the app without purchasing a Touch license. To experiment in the app without purchasing a Touch license, the app enables users to take 3 test images. Photos are available in full resolution, and post-processing occurs in PhotoRobot _Controls App. After taking the test images, users can then restart the app to reset the counter. This allows for taking another 3 test shots without charge. If more testing is necessary, then the best way is to purchase a monthly subscription for the Touch application.
Touch App License Requirements
Keep in mind, an active CAPP account as well as a Touch license is required to fully take advantage of PhotoRobot Touch. This is because Touch functions only as a remote camera interface with touchscreen control.
All configuration of folders, workflows, thumbnails, and other settings is within PhotoRobot _Controls App. That includes the selection of which folders that will appear in the Touch app when active. Users must add a specific flag in CAPP which in turn makes the folder visible in the Touch App. Additionally, CAPP is necessary to create explicit folders such as for workflows, spins, detailed shots, and miscellaneous images.
For users with an active PhotoRobot license, the “Power User” subscription level is necessary for the account that connects to Touch and the iPhone. This is because the iPhone uses internet connectivity to upload images to the Cloud in real-time, over a WiFi or cellular connection.
In other words, to use Touch, users must have two licenses: the Touch license as well as the “Power User” license in the PhotoRobot Cloud version of CAPP.
PhotoRobot Touch Functionality
The PhotoRobot Touch app for iPhone can operate in 3 modes:
- Free mode (for unrestricted, handheld photography with wireless shooting)
- Spin mode (for the tethered shooting of automated spin photography)
- Wizard mode (for template-based workflows with steps consisting of names, descriptions, and sample images of photos to capture)
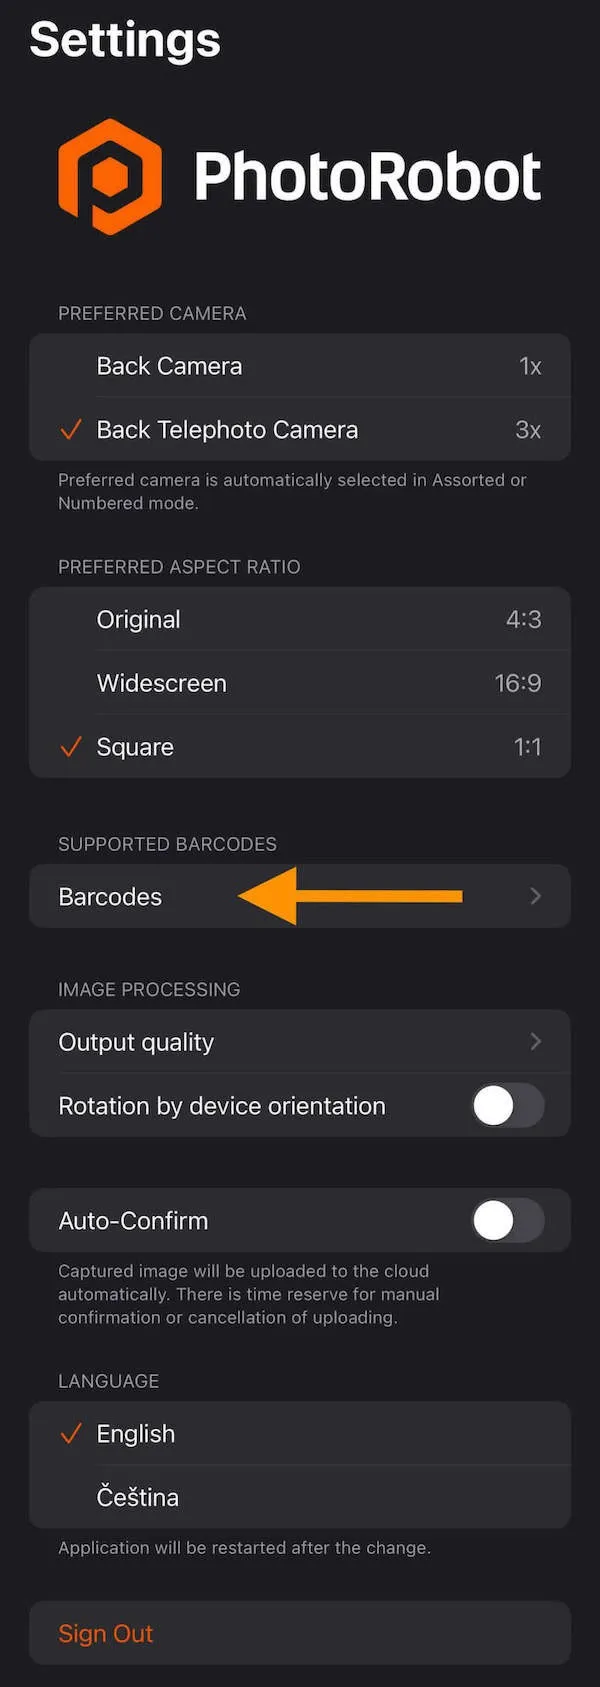
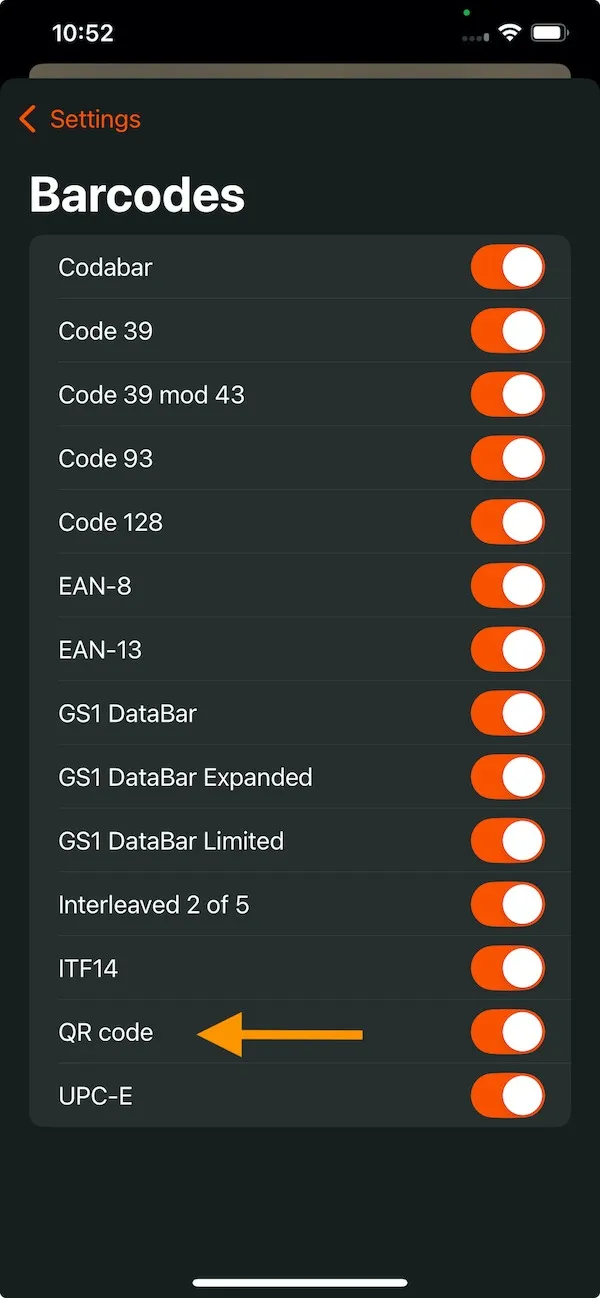
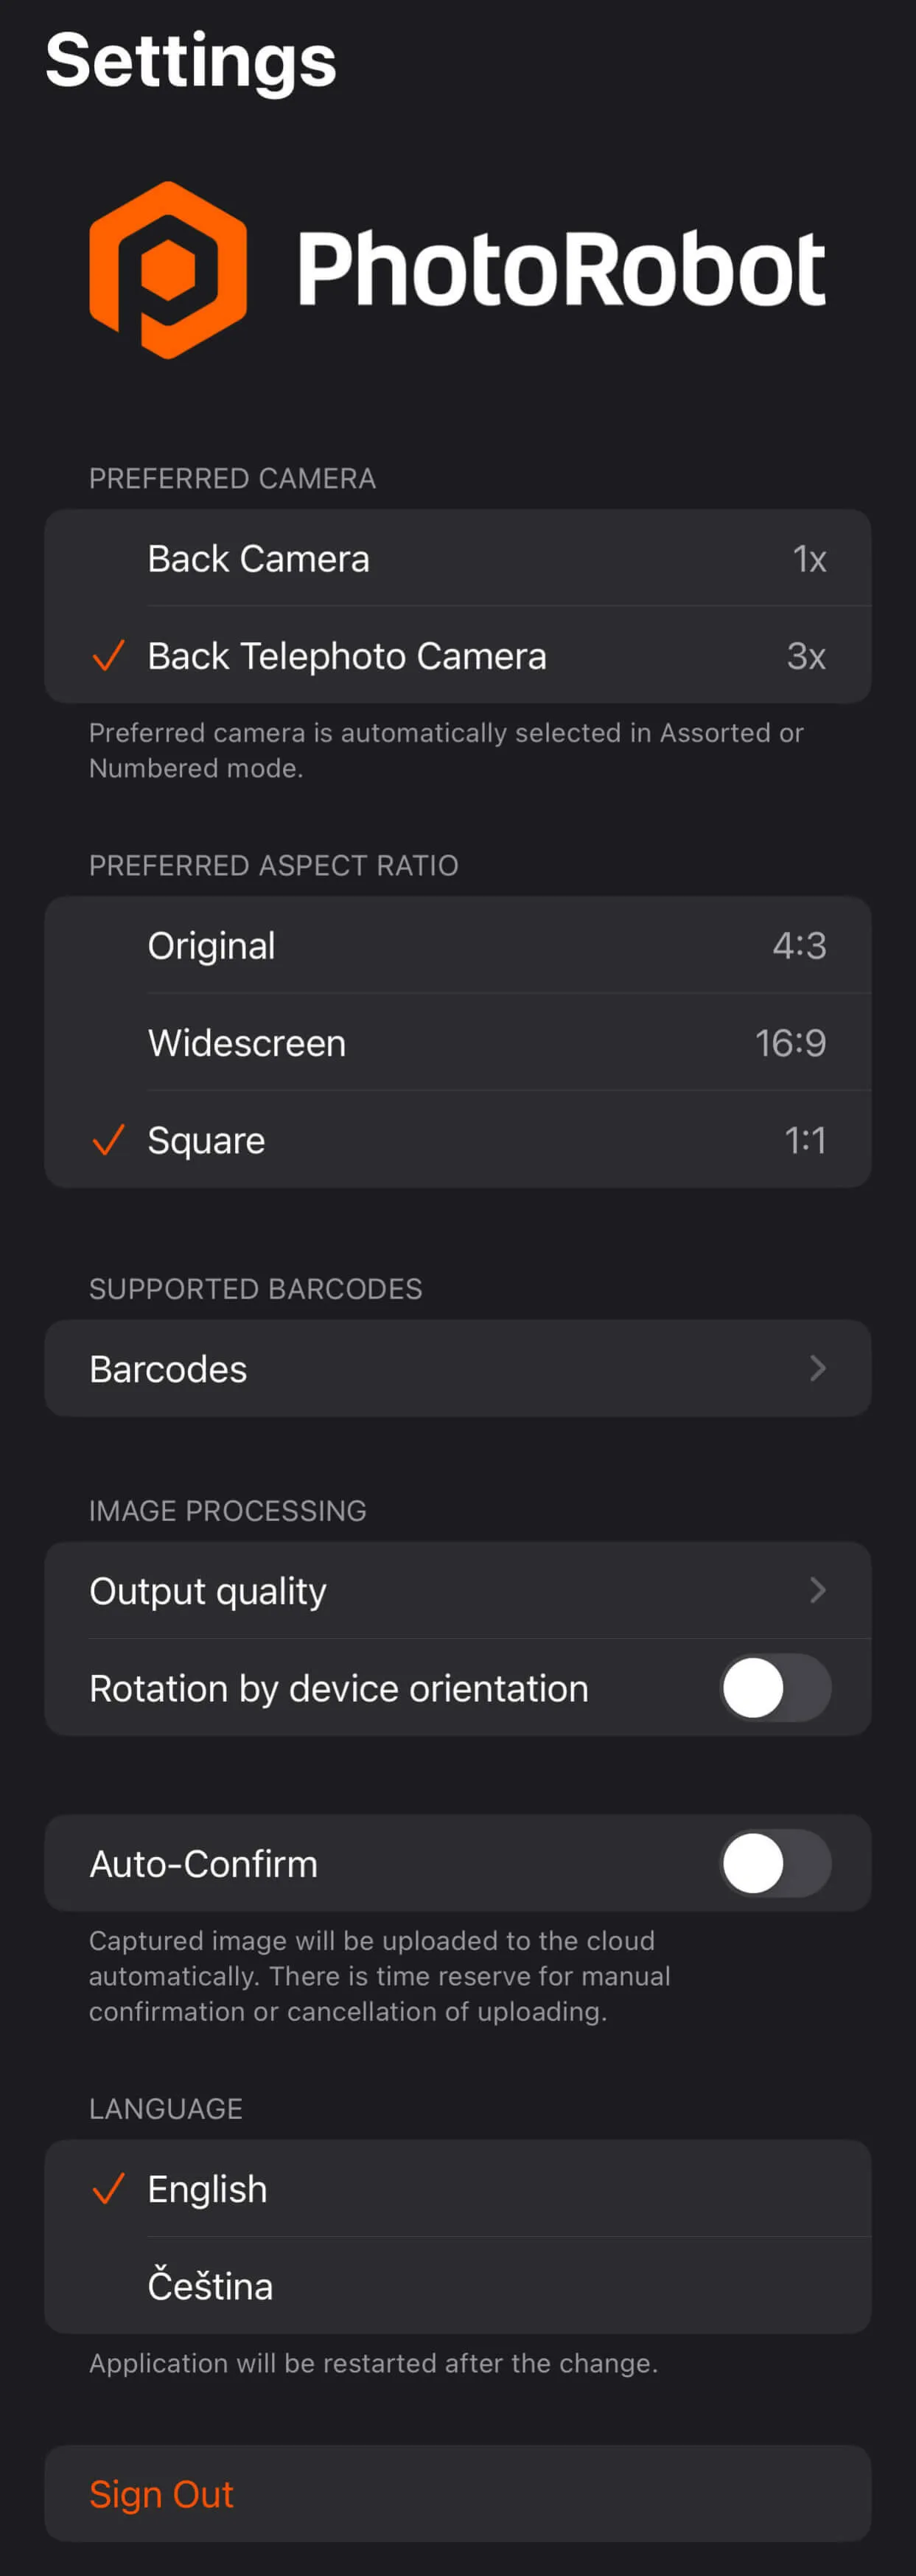
Additionally, PhotoRobot Touch functions as a powerful barcode and QR scanner, with selection or deselection of codes for faster recognition. If using PhotoRobot Touch as QR code scanner, open the Settings in the PhotoRobot Touch App, select Barcodes, and toggle ON the QR code setting to enable QR code support.
Free Mode
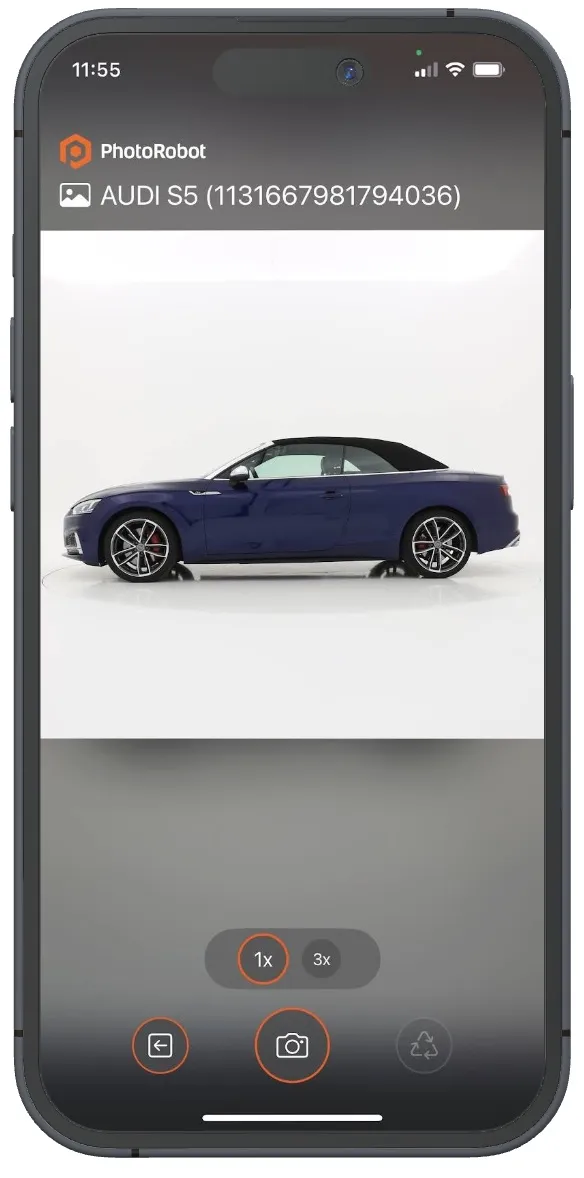
The use of PhotoRobot Touch in Free mode allows operators to capture unrestricted, batch handheld photography.
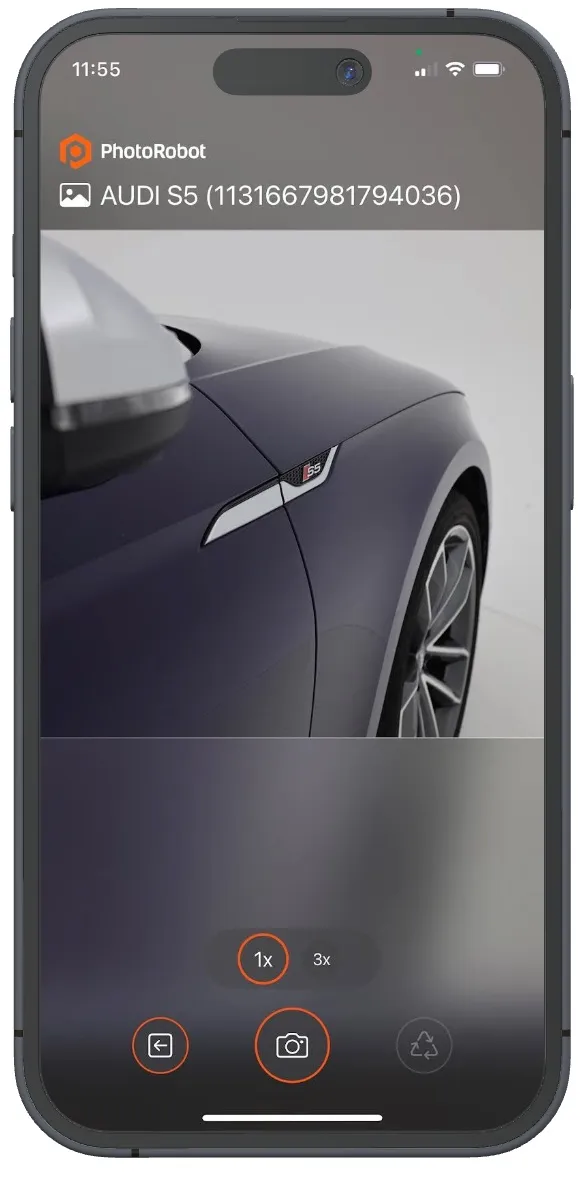
Free mode is advantageous when there are no guidelines on how many or what type of images to capture. Instead, the operator captures images as necessary, and then confirms each in the application:

- Note: After confirmation, the app automatically uploads the images to a predefined folder, and runs any preset operations.
PhotoRobot Touch presets are configurable for various post-processing operations, automatic file naming conventions, and auto upload to the appropriate storage folder. They enable users to choose aspect ratio, pre-selected cameras, auto-confirm, and barcode styles:
Spin Mode
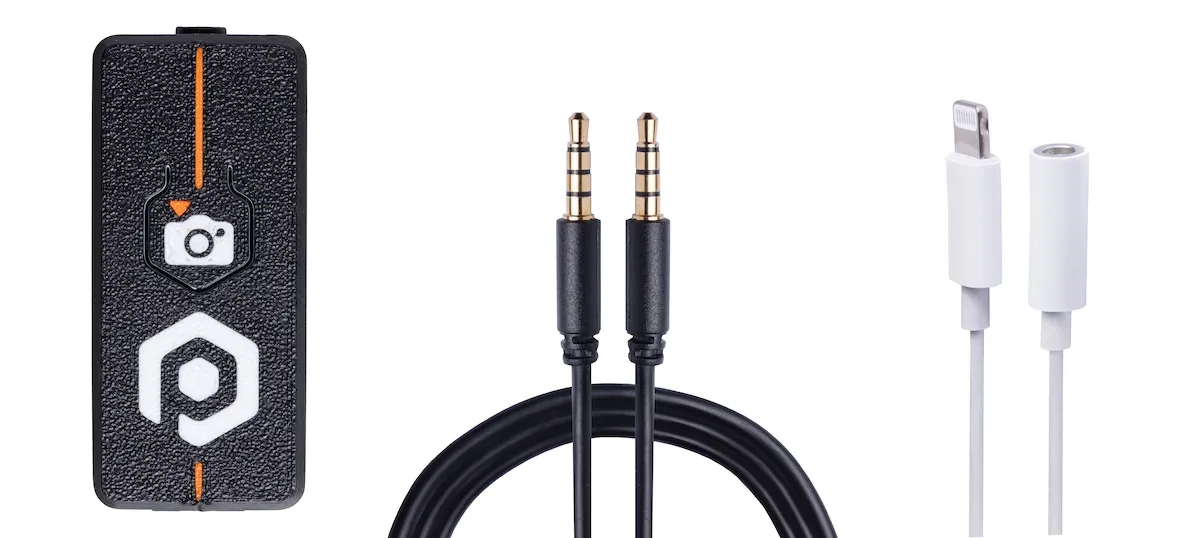
In PhotoRobot Touch Spin mode, camera shutter control is via wire-shutter, and the iPhone functions as a remote camera to automate spin photography. This requires special wiring (provided by PhotoRobot), using a lightning or USB-C stereo-jack Apple original converter, a special triggering box for manual capture, and a cable for the control unit.
Note: It is not possible to synchronize iPhone cameras to strobe lighting. The iPhone requires continuous still lights, and captures spins mostly in a slow, non-stop rotation. This makes Spin mode advantageous when capturing a relatively limited number of images, such as a 1 x 36 image spin. That, or when photographing for example in the car industry, where delays from start-stop mode are not that significant. In these cases, the iPhone can be the operator's only camera on the floor, for capturing both spins and handheld images.
For advanced spin photography with a larger number of images, a DSLR camera with strobes and PhotoRobot systems remains faster and more efficient. PhotoRobot Touch can then be used to photograph only stills and details in free or wizard mode, while spins are taken separately or simultaneously at the robotic workstations.
Wizard Mode
The use of Wizard mode enables the configuration of template-based production workflows, and is a tool unique to PhotoRobot.
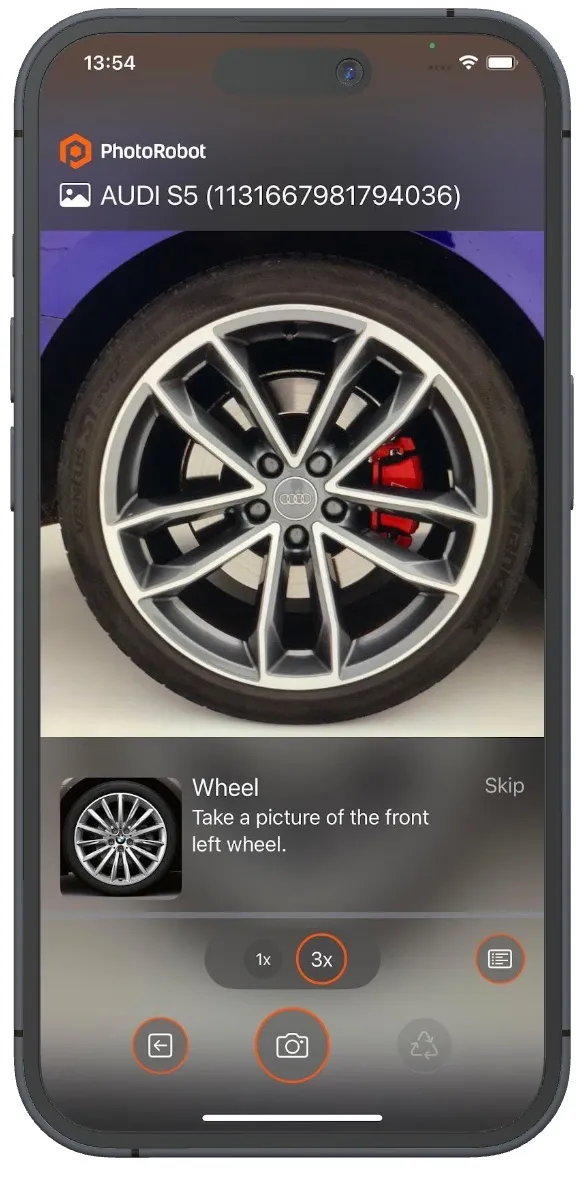
Wizard mode provides ordered steps for operators to follow: including names, descriptions, thumbnails, labels, and sample images of photos to capture. It functions as visual, step-by-step guidelines for production, with detailed instructions for each required photograph.
For example, Wizard mode can store hundreds of steps with related photos for an operator to produce. This not only drastically reduces operator training requirements. It can considerably speed up handheld still and detailed photography workflows.
In CAPP, it is also possible to specify preset conditions and an output file format for the ready-made post-processing of images.
Operators in Touch can then capture, skip, or re-capture photos, and add notes for additional post-processing, retouching, or publishing requirements.
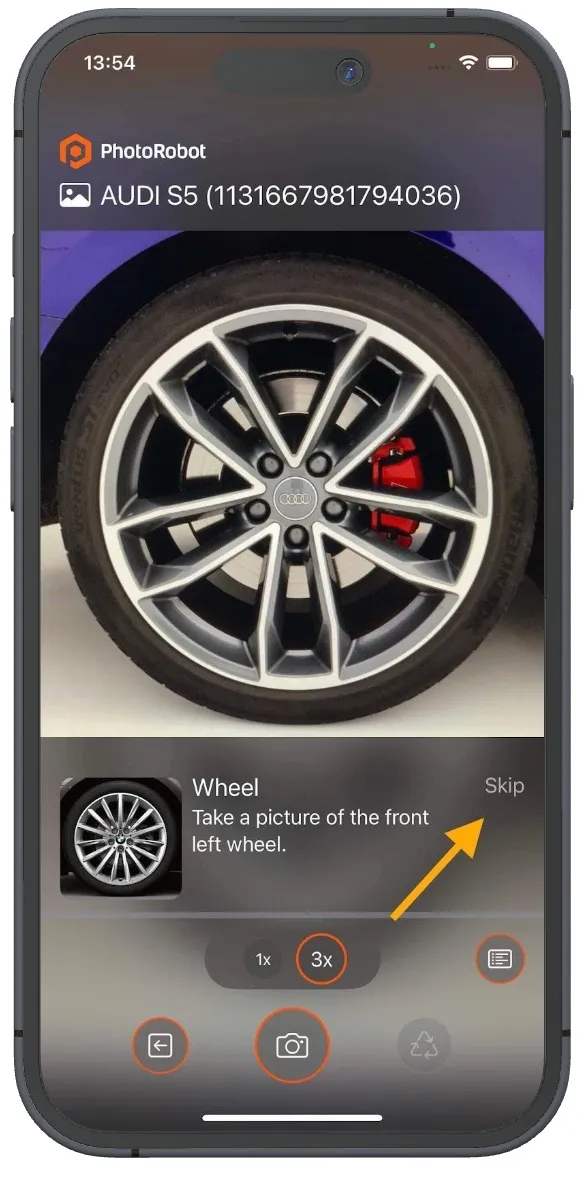
- Find the Skip button in the top-right corner of any workflow step, next to the instructions. For example, skip the workflow step if you are not able to capture the required photo at the time, and want to return to it later.
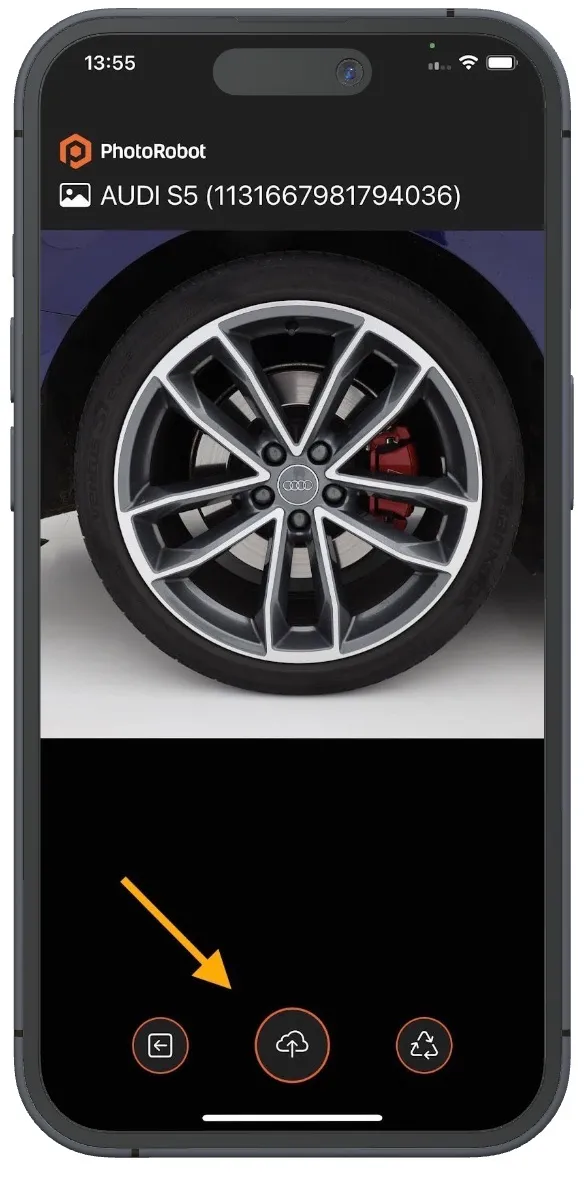
- Use the middle Confirm button to confirm the image and upload it to the appropriate storage folder. Note: Users can also configure auto-confirm to automatically upload images after a certain time has passed and it has not been rejected by the user.
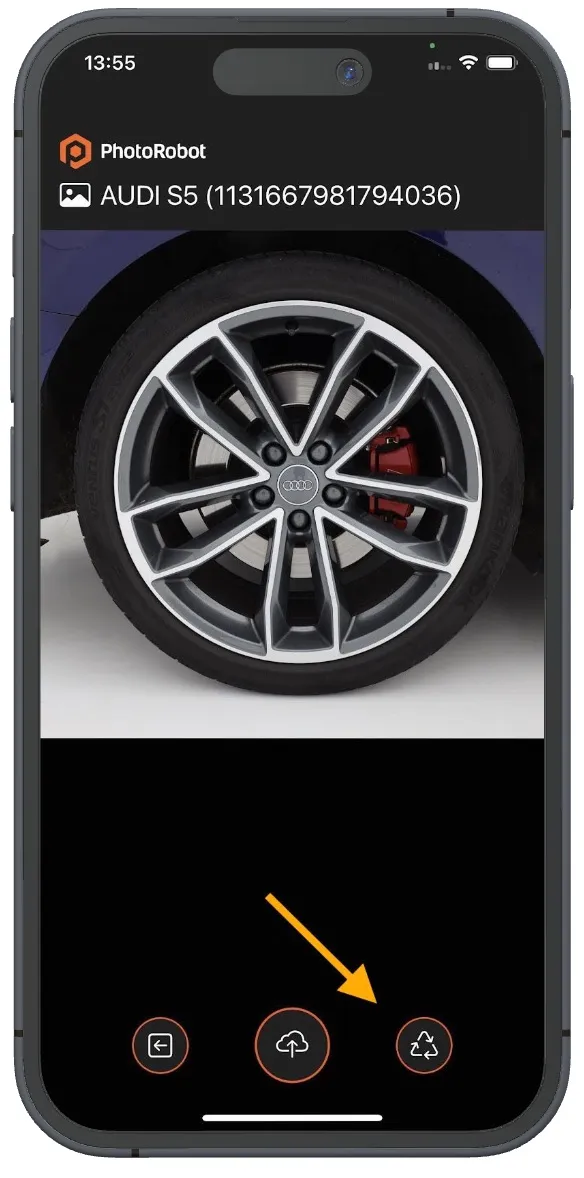
- Find the Recapture icon on the right of the capture options to take a photo again, for example if the output results are not satisfactory.
How to Launch PhotoRobot Touch App
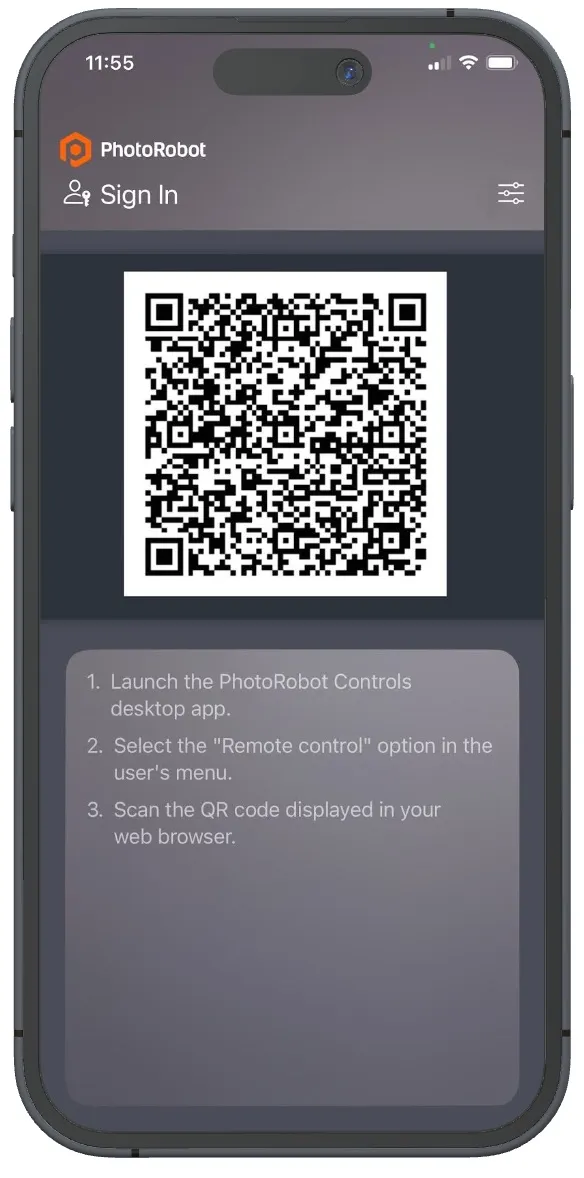
When launching the Touch App, the first step is to connect Touch to the Cloud by scanning the QR code. This QR code connects the iPhone to Touch, and frictionlessly logs into the system.
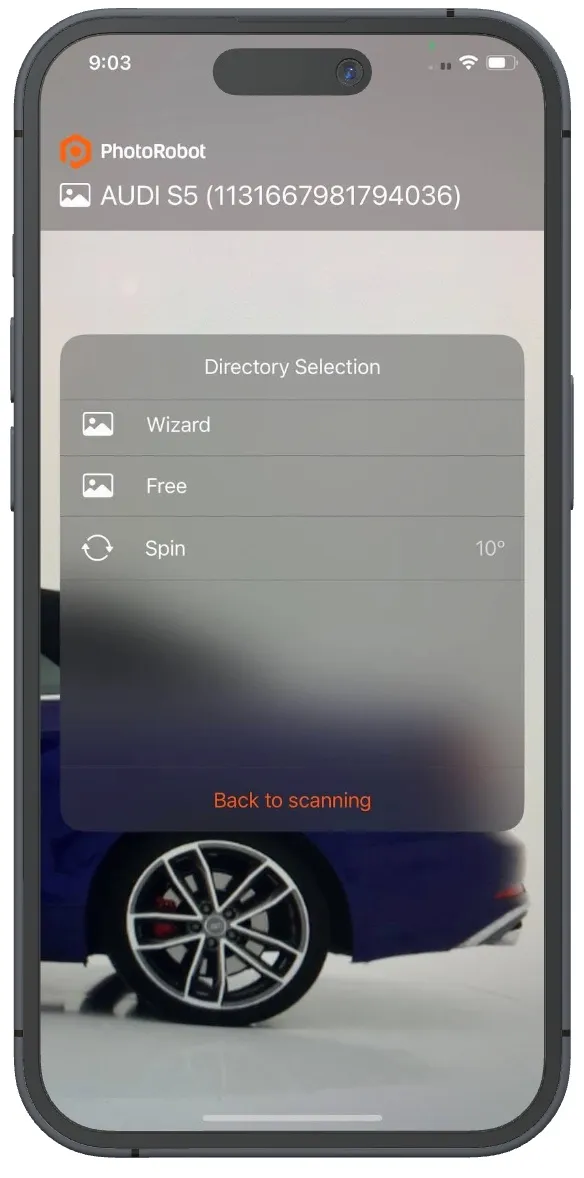
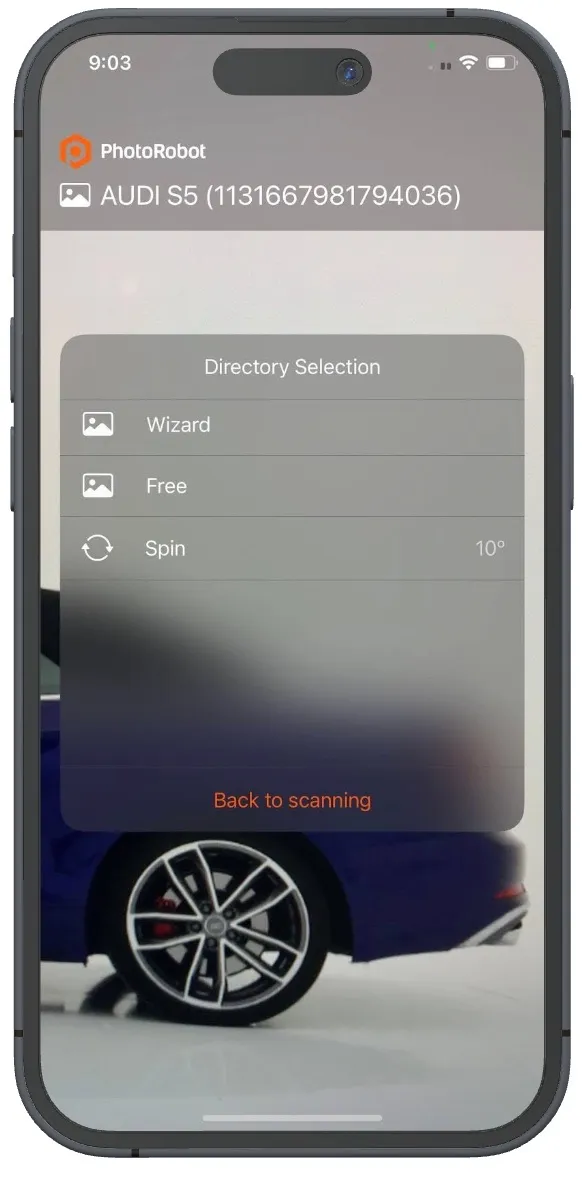
On successful connection, the next step is to scan the barcode of the item to be photographed. This will connect the phone to the item’s directory.
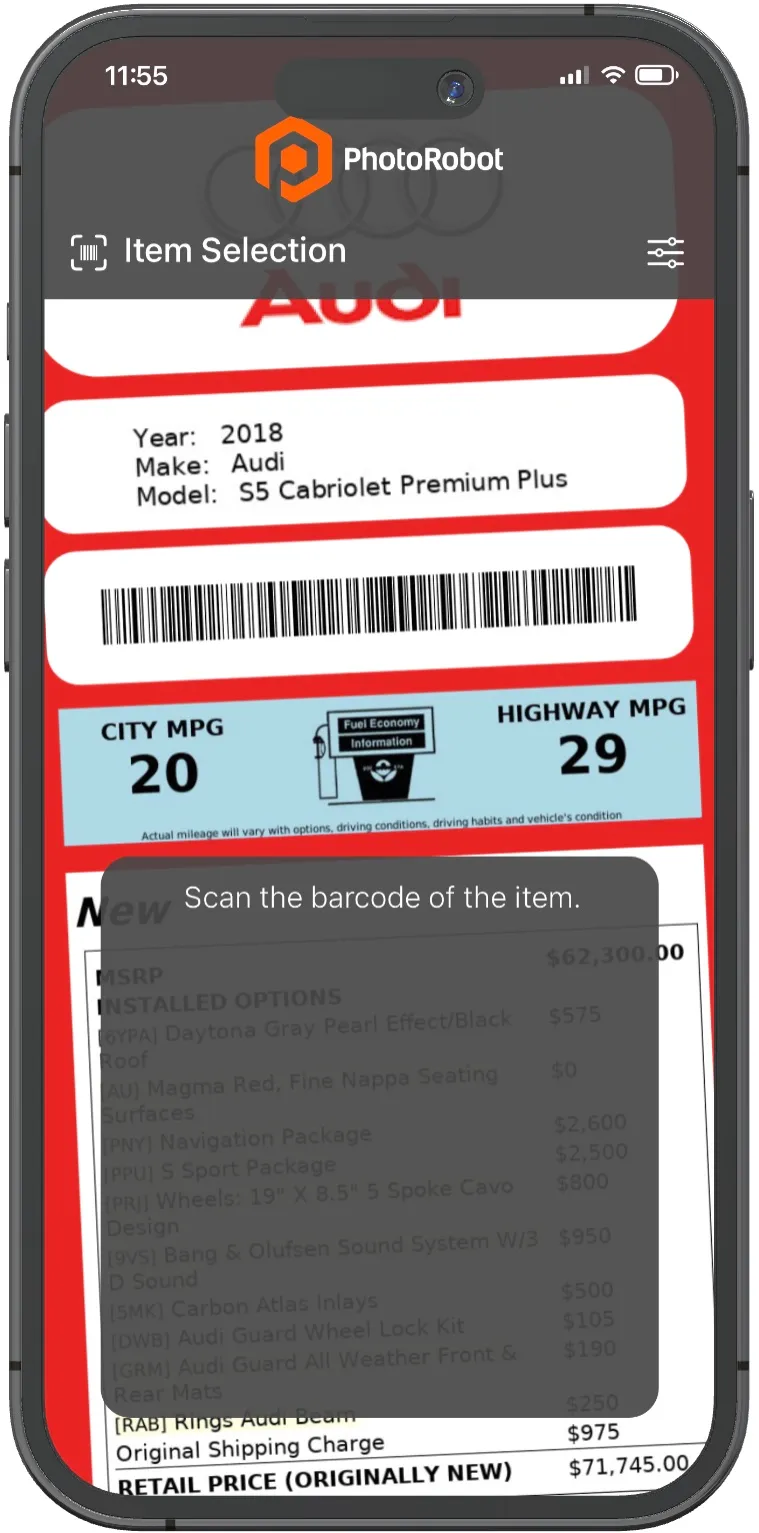
Note: If the item contains several folders, the directory displays each folder for operators to work with different content: Free, Spin, and Wizard. Select the appropriate directory folder, and then photograph the item. If the image is satisfactory, clicking confirm will automatically upload the image to the folder:

Repeat this process until complete, following the wizard mode steps in order. Afterwards, returning to the Wizard start screen will direct users to any remaining tasks / folders (if any exist).
Note: It is possible to exit Wizard mode and return to the step in progress at any time. All it takes is scanning the Start barcode, and then the item barcode to begin again. This way if users want (or need) to log into the program using a different iPhone, it takes only two scans and no further configuration of settings. It also enables larger companies with batches of iPhones and charging stations to simply swap one iPhone for another when batteries are low.
Camera Controls
The following applies to the use of the iPhone as a camera and configuration of its settings:
- Touch supports wireless shooting over WiFi and cellular connection, or the camera can be triggered via wire-shutter for tethered shooting using special adaptors and connection.
- Presets enable users to choose aspect ratio, pre-selected camera, auto-confirm, and barcode styles.
- The iPhone touch display functions for interaction with the camera, previewing images in good resolution, and displaying content in Wizard mode.
- Settings and presets are all easily configurable on desktop, while the iPhone functions as the camera only.
- Operators can manually confirm captured images, or set images to auto-confirm (after a given time) to upload images to the appropriate folder.
CAPP Desktop / PC Software Settings
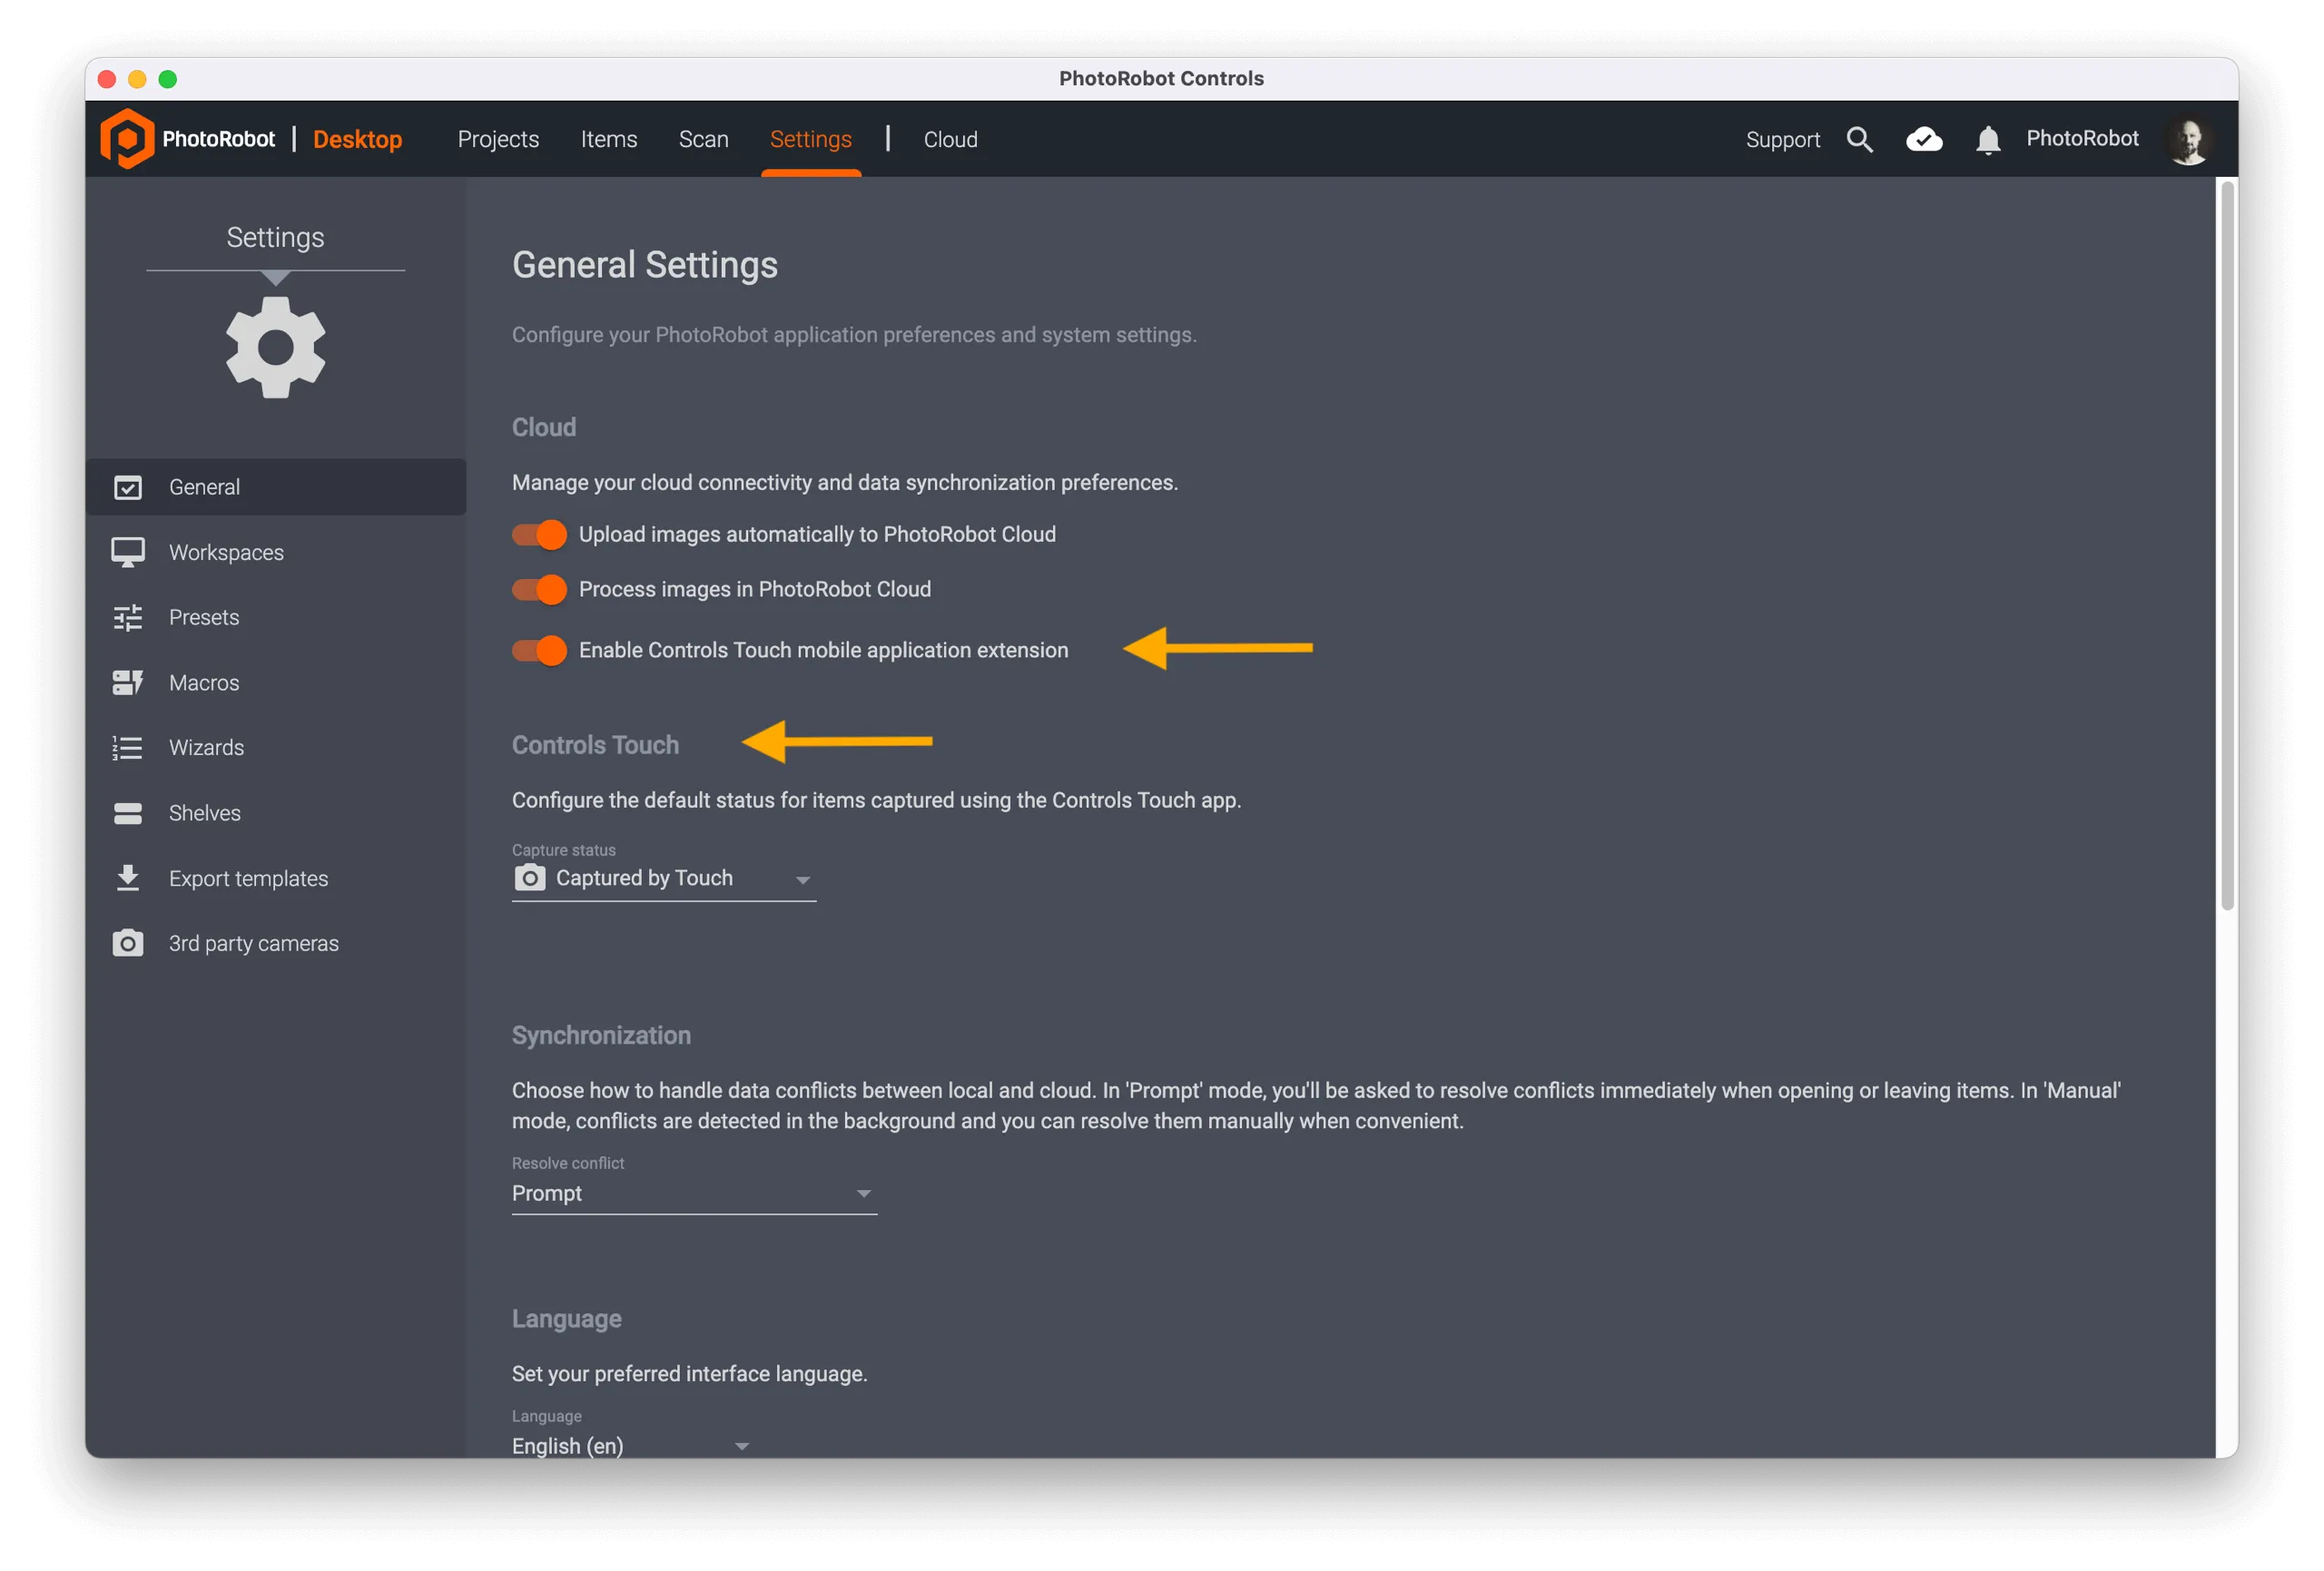
In order to support PhotoRobot users that do not use the iPhone, it is necessary to enable Touch support in CAPP. To do this, access Settings in CAPP, and then click General, and toggle on the option Enable Controls Touch mobile application extension.
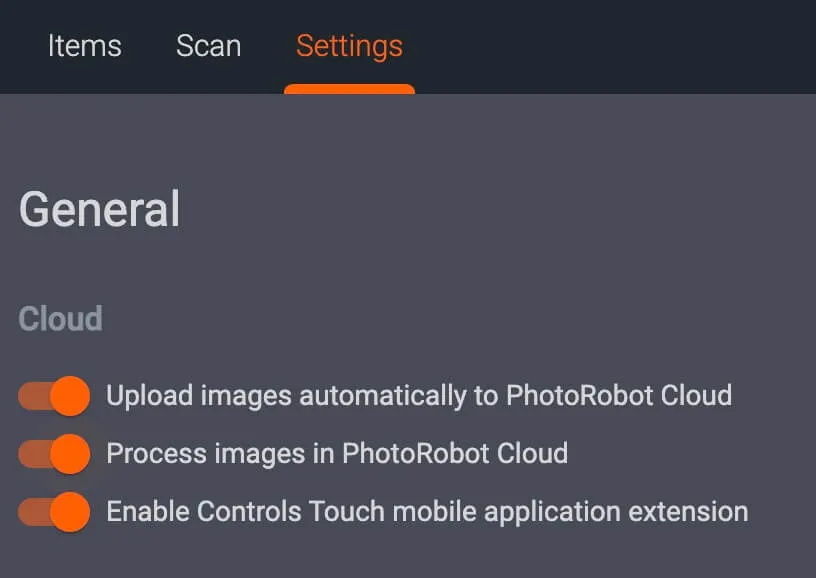
- Note: Touch does not function in the local version of CAPP, as the iPhone communicates in the Cloud only.
Controls Touch Captured Status Settings
After toggling on Enable Controls Touch in the General Settings of the desktop version of CAPP, users can configure Capture status settings for the Touch app.
The Captured status in PhotoRobot plays a key role in tracking the progress of items through the content production workflow. It indicates that the initial photography has been completed, and the item is ready for the next stage – such as editing, verification, or publishing.
With the Controls Touch mobile app, this makes it possible to configure how items are marked as Captured directly from the capture device. This helps to provide flexibility and more clarity in all workflows.
Additionally, this feature ensures that items photographed via the Controls Touch app are properly tracked and marked in the workflow. It helps to:
- Easily identify items already captured using the Controls Touch app.
- Configure whether items should be marked automatically, manually, or not at all.
- Maintain consistency across team workflows using mobile or desktop applications.
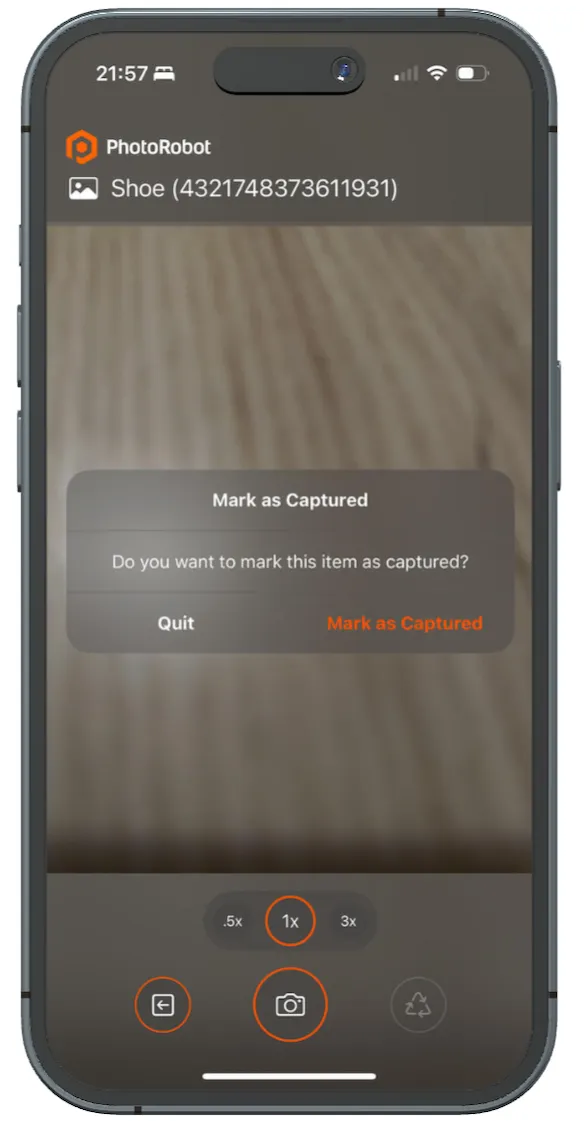
In operation, after capturing at least one photo in a folder and exiting the item, the app prompts the user to confirm whether to set the item status to Captured.
This behavior depends on the Mark as Captured mode, which can be configured in the app settings also directly on the device.
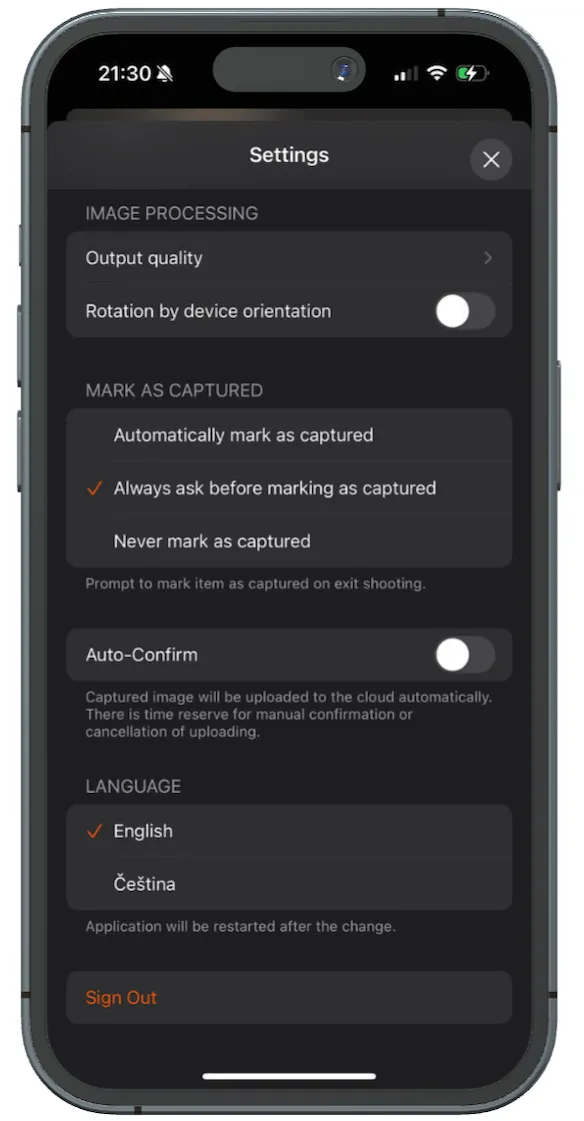
- Automatically mark as captured by Touch - Items are automatically set to Captured by Touch upon leaving after capturing.
- Always ask before marking as captured - A confirmation dialog appears when you exit, allowing you to choose whether to set the status.
- Never mark as captured - The item status remains unchanged regardless of capture activity.
Note: In the desktop version of CAPP, the default Touch capture status setting is Captured by Touch when marked via the mobile app. To customize this status, users must configure settings in the desktop app. Find this option in Settings under the General tab, and beneath Enable Controls Touch when active. Clicking Capture status will then display the setting options.
In function, the Captured status is part of a larger customizable workflow, typically moving through these stages: New, Captured, Edited, Verified. By filtering items with the Captured status, teams can quickly focus on items needing further review, editing, or export.
Touch-specific status management enables teams to distinguish between items captured manually, automatically, or from different sources—enhancing traceability and accountability.
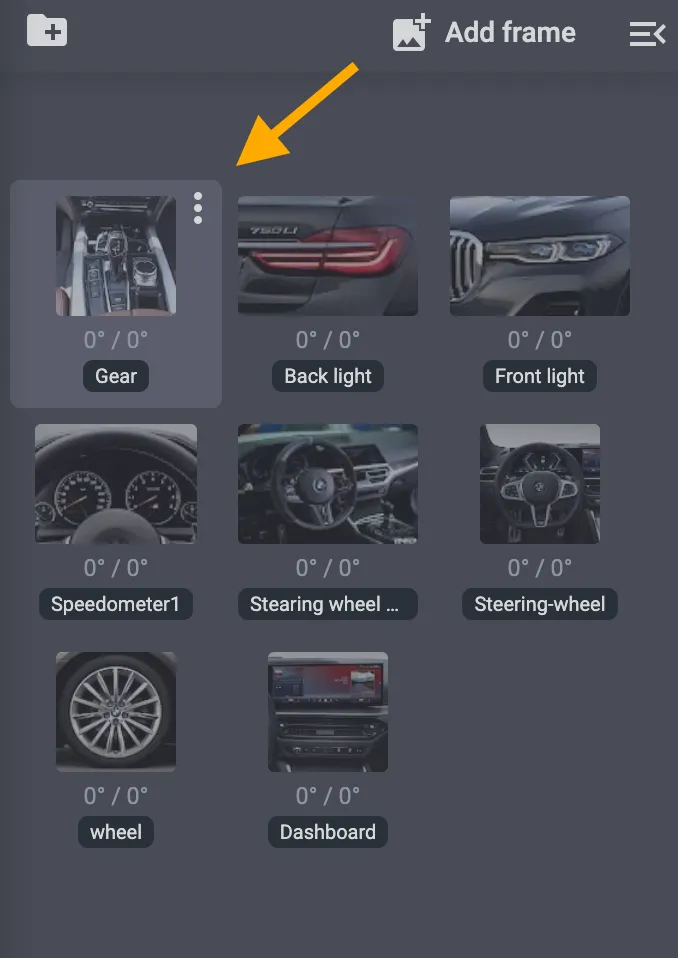
Configuring Controls Touch Menu Items & Touch Folders
Next, when the Touch app is operational, there are then new menu items available for each folder in CAPP. This includes the options to access Controls Touch folders, or to Exclude a folder from Controls Touch.
To Exclude a folder from Controls Touch, click the options icon in the top-right corner of the desired folder, and select Edit folder from the operations menu.
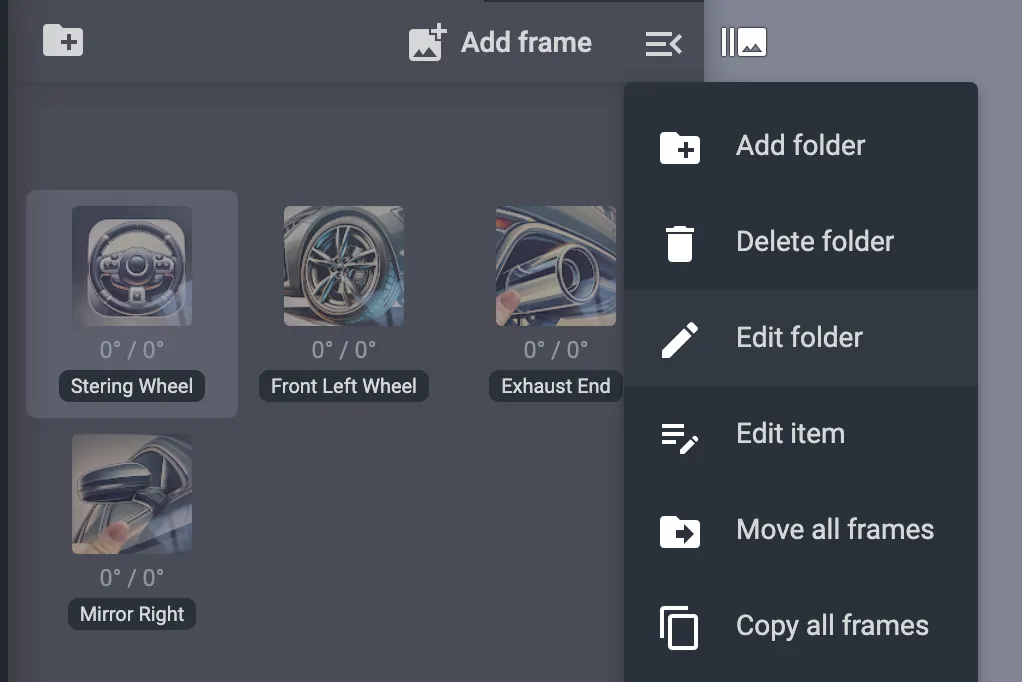
Clicking Edit folder will open the folder settings, which include the option Exclude from Controls Touch at the bottom of the folder options. Click the box to the left of the setting to toggle it on, removing the specified folder from view in the Touch App.
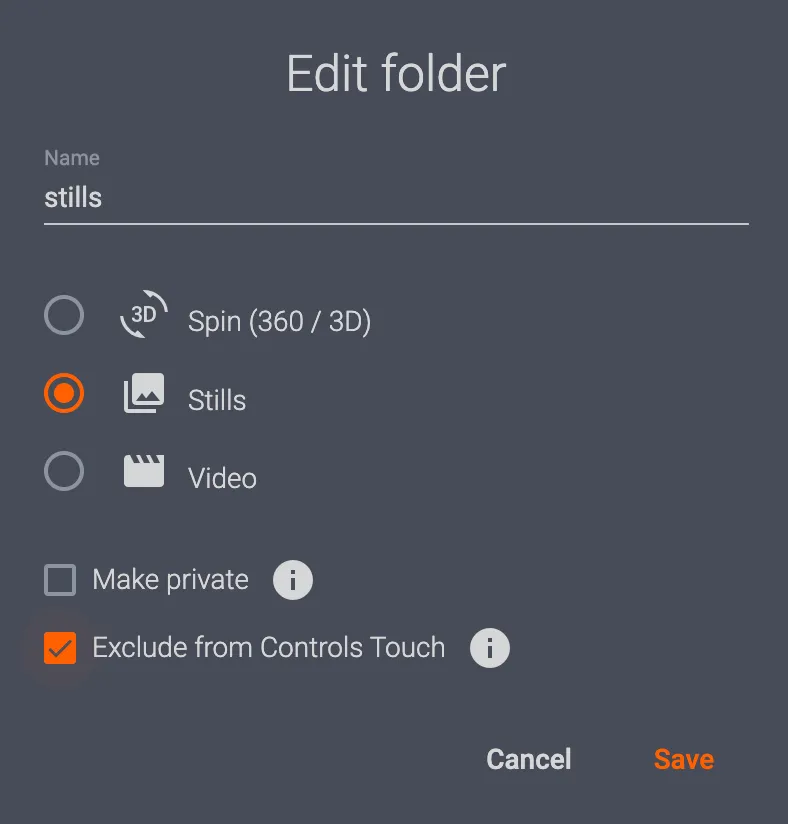
- Remember: It is necessary to configure all settings for Touch in the cloud version of CAPP.
- The option to Exclude a folder from Controls Touch will also be available when adding new items in CAPP.
- Each folder that should appear in Touch will have a specific flag in CAPP that makes it visible (or invisible) on Touch when operational.
- Users configure settings in CAPP to create Touch folders for workflows, thumbnails, instructions, spins, detailed shots, miscellaneous images, etc.
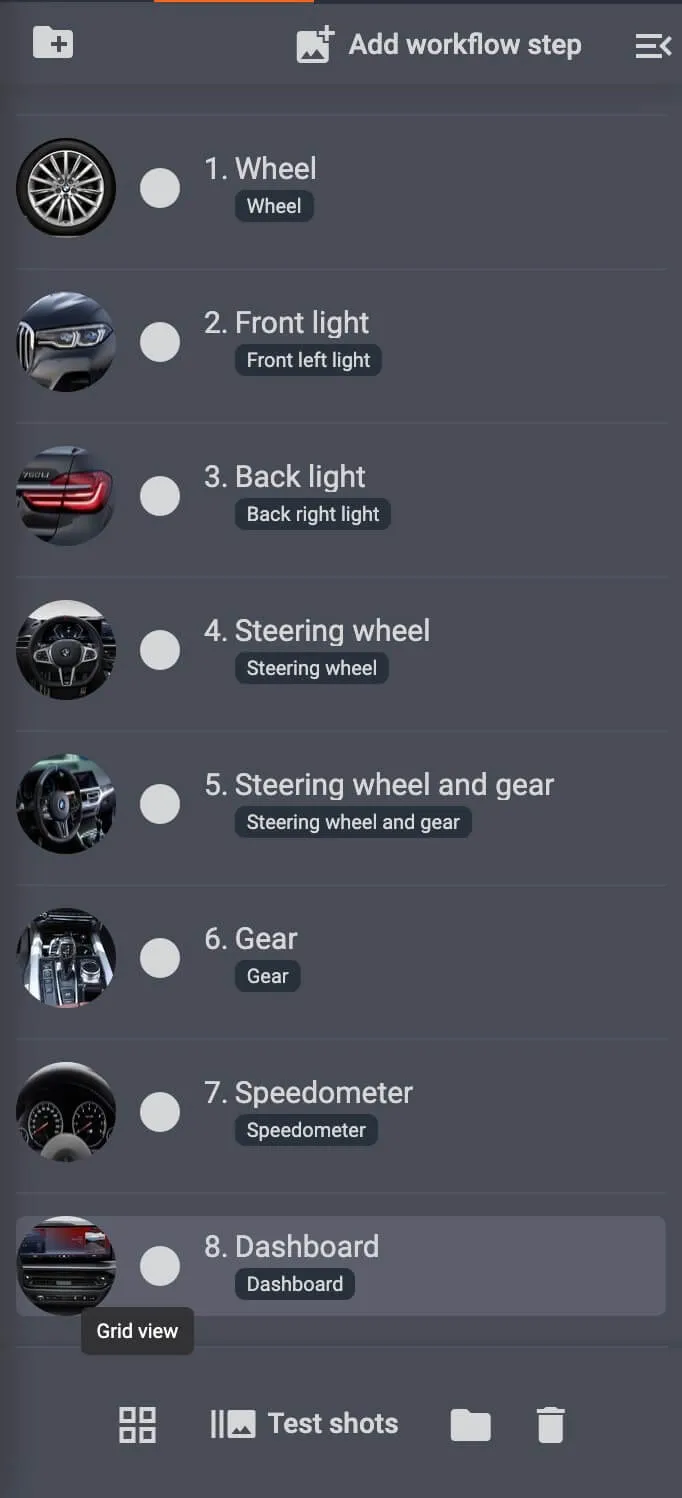
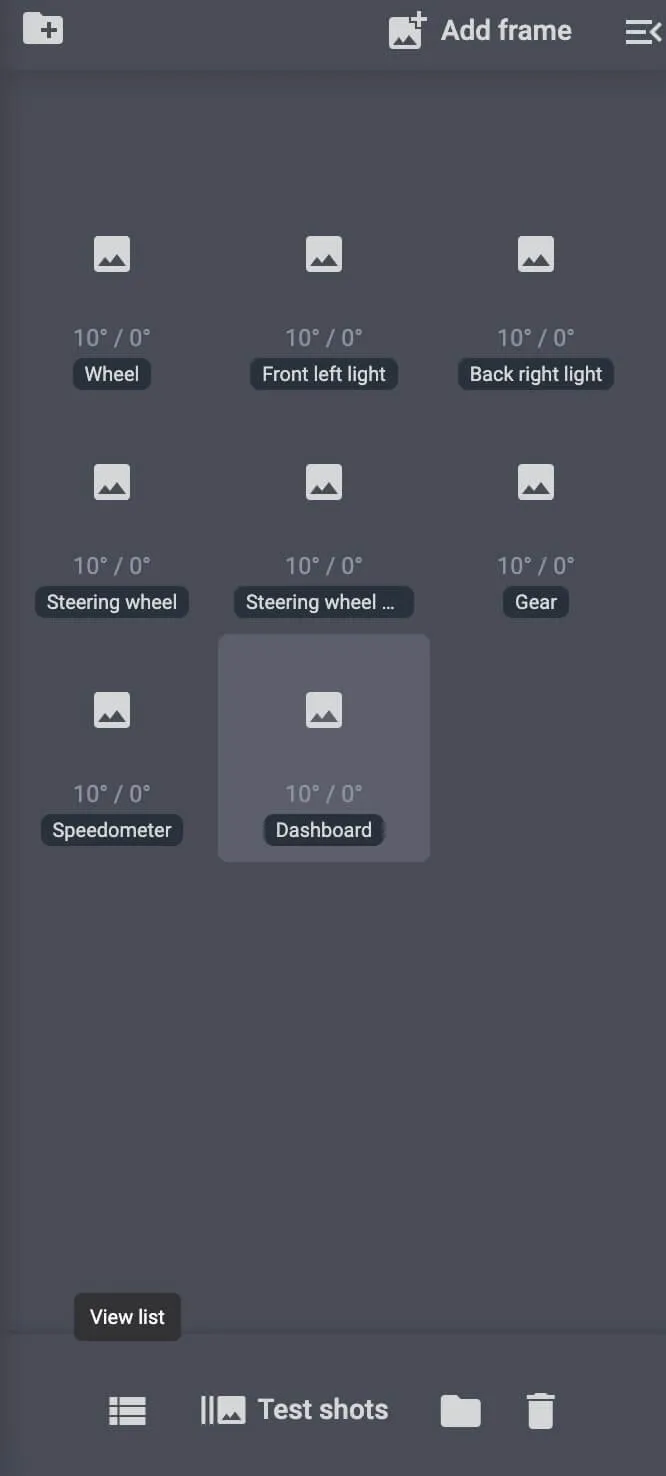
For any new content in a folder, it is then displayed in either grid or list format. List format makes it easy to reorder workflow steps by drag-and-drop. It is also possible to create a new step at the position of the cursor, simplifying cases when working with 100s of steps in order.
Customizing Controls Touch Workflow Steps
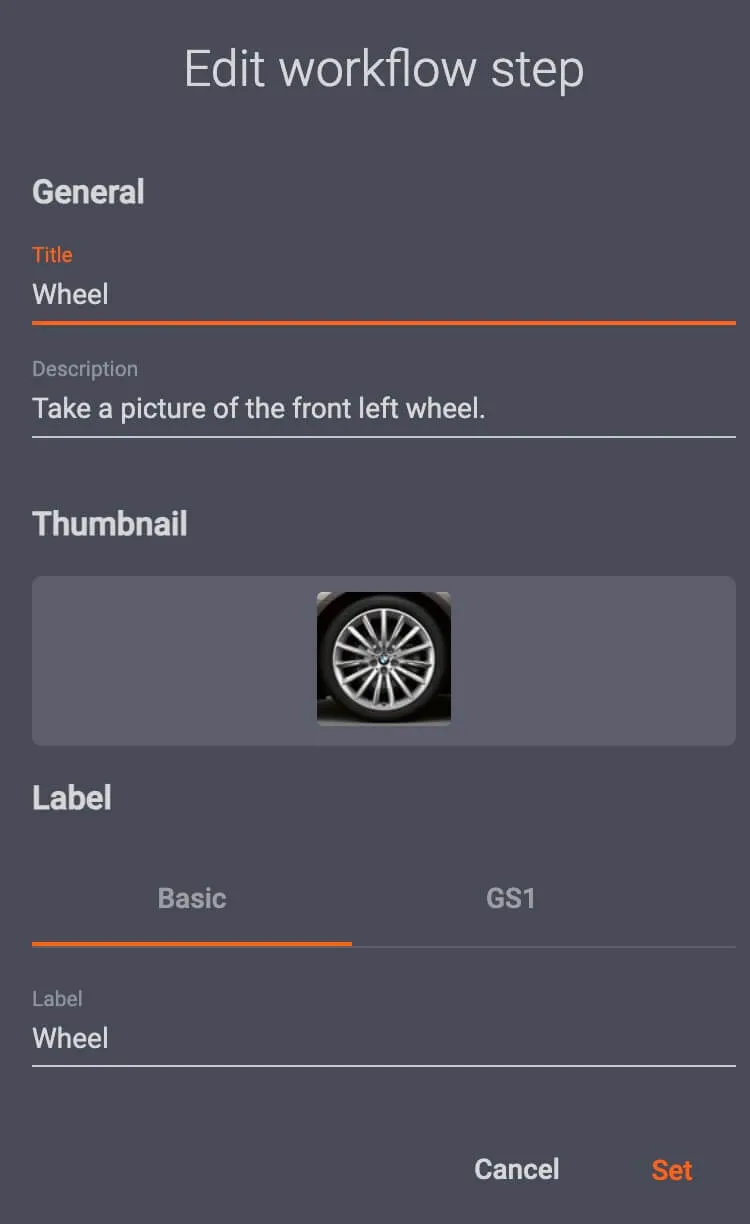
Finally, each workflow step is configurable by various details. Settings enable users to configure each workflow step’s title, description, thumbnail, labels, and a sample image of the required photo to capture.
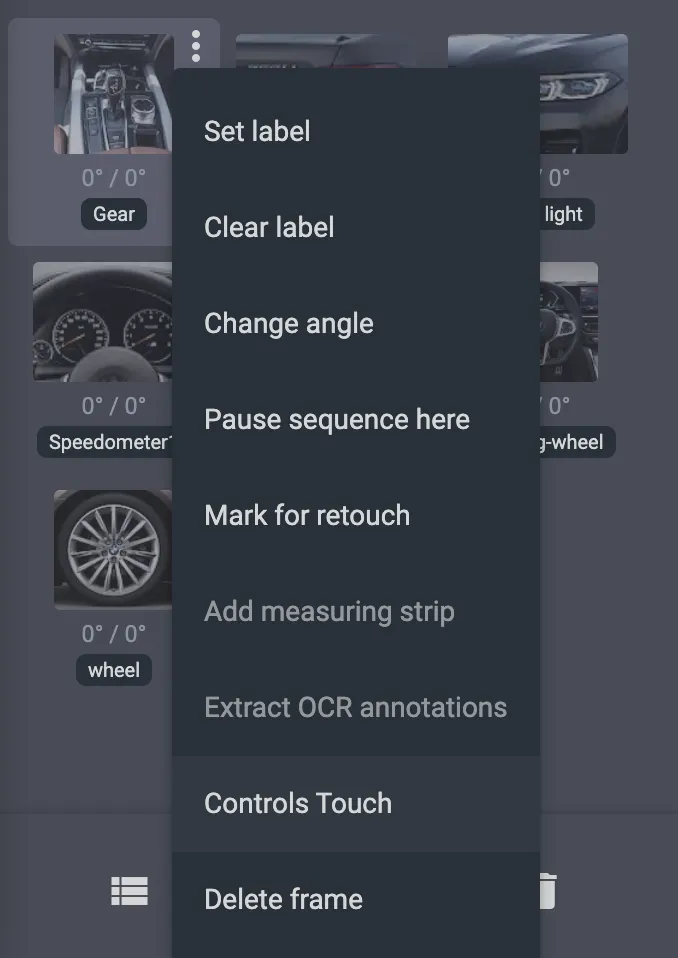
In order to access Controls Touch settings, click the three vertical dots to the right of any individual image, and then select Controls Touch from the options. This will open the Edit workflow step interface.
All images in use for Sample images in the workflow are saved as a separate Item / image. To view the image, use the Download button.


- Note: In some cases, such as connecting to another computer (and designing the workflow again), sample images may not be available. However, when uploading sample images in the Cloud, there is often no issue. If the issue does occur, simply go to the item with sample images and click Download there. The Wizard editor will then work with local copies.
After setup, standard post-processing operations will then apply to captured photos, including commands for automatic image delivery. The Wizard will then be stored as an image Preset, so that every new item created with this preset contains its predefined folders and workflow.


EOS Rebel Series


EOS DSLR Series


EOS M Mirrorless Series


PowerShot Series


Close-Up / Handheld

The Canon EOS Rebel Series offers beginner-friendly DSLR cameras with solid image quality, intuitive controls, and versatile features. Ideal for photography enthusiasts, these cameras provide reliable autofocus, vari-angle touchscreens, and Full HD or 4K video recording.
Connection
Resolution (MP)
Resolution
The Canon EOS DSLR Series delivers high-quality images, fast autofocus, and versatility, making it ideal for both photography and video production.
Connection
Resolution (MP)
Resolution
The Canon EOS M Mirrorless Series combines compact design with DSLR-like performance. Featuring interchangeable lenses, fast autofocus, and high-quality image sensors, these cameras are great for travelers and content creators seeking portability without sacrificing image quality.
Connection
Resolution (MP)
Resolution
The Canon PowerShot Series offers compact, user-friendly cameras for casual shooters and enthusiasts. With models ranging from simple point-and-shoots to advanced zoom cameras, they provide convenience, solid image quality, and features like image stabilization and 4K video.
Connection
Resolution (MP)
Resolution
The Canon Close-Up & Handheld Cameras are designed for detailed, up-close photography and video. Compact and easy to use, they offer precision focus, high-resolution imaging, and versatile macro capabilities—perfect for vlogging, product photography, and creative close-ups.


