PhotoRobot Controls App - Wizard Mode and Kiosk Mode
This user manual provides technical instructions on the configuration of operator steps and their use in PhotoRobot Wizard mode. In PhotoRobot Controls App (further referred to as “CAPP”), Wizard mode utilizes a series of wizard steps to guide users through various tasks. These steps are defined in a JavaScript-like language format, and can be scripted by PhotoRobot consultants for custom functionality. Users can also script basic functions for initial experiments or simple setups.
Note: The following information provides technical instructions on creating scripts for custom wizards and their operator steps. This includes how to access and launch wizards after their creation as a simplified user interface in Kiosk mode in CAPP. For information to facilitate the general understanding and first use of CAPP, refer to the PhotoRobot Getting Started User Manual.
1 - PhotoRobot Wizard Mode Overview
PhotoRobot Wizard mode enables users to create a configuration of a series of steps which an operator will later follow to capture a product. After configuring a wizard, operation of PhotoRobot is then possible in Kiosk mode, which functions as an extremely simplified user interface.
Wizards and Kiosk modes support businesses who want to hide complex controls in the background, making machine operation nearly fool-proof. They provide operators with an extremely user-friendly alternative to the traditional controls interface.
In most cases, both modes are set up during machine installation, or customized by a photographer or studio manager. This allows for taking advantage of pre-programmed automations, including presets and wizards that disappear into the background for machine operators.
2- Kiosk Mode Overview
In practice, Kiosk mode locks down the UI to show the user only what the administrator explicitly allows them to access. For example, a user in Kiosk mode will typically only be able to take a photo and move to the next step.
The steps the operator follows are according to the specific wizard in use. At the same time, the operator will not be able to access or even need to worry about any adjustable settings. This helps to dramatically reduce learning curves and onboarding requirements.
It is even possible to simplify machine operation down to only a start button, or a quick scan of a barcode. Thus, studios can employ warehouse workers with very little training, including outsourced talent, freelancers, and student interns for example.
3 - How to Access PhotoRobot Wizard Mode
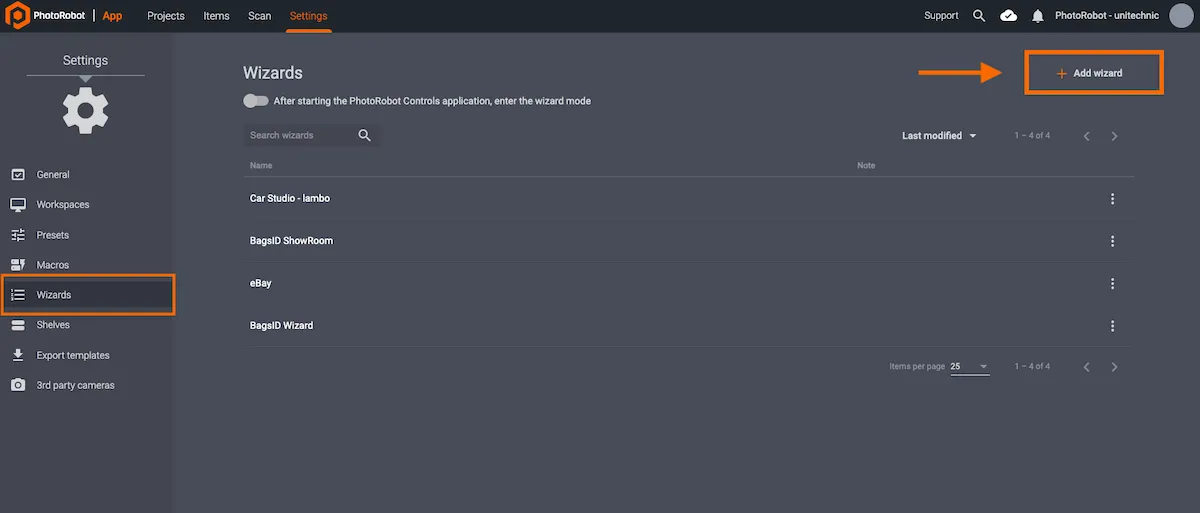
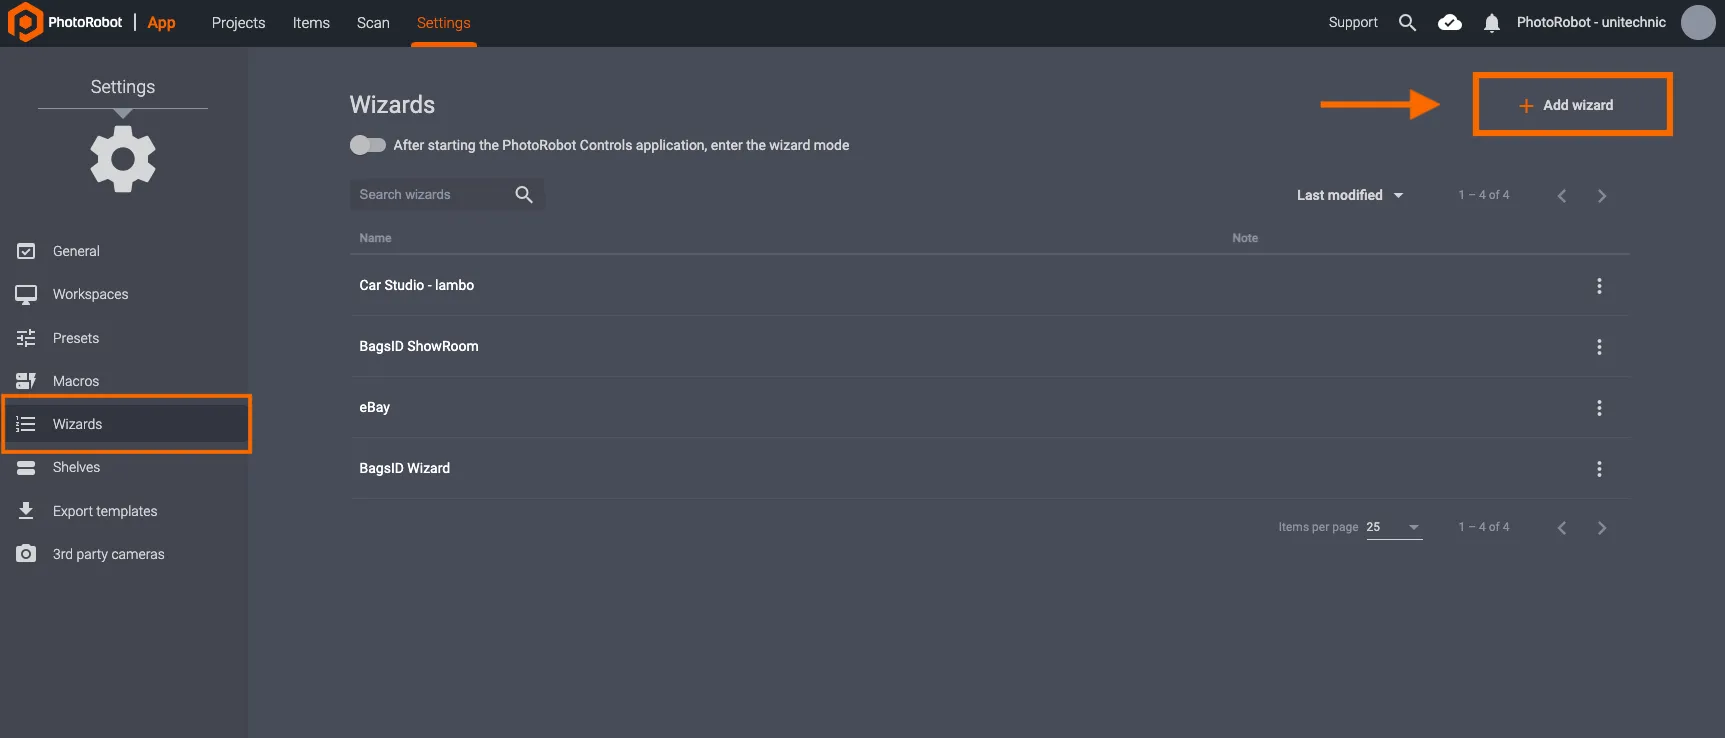
To access Wizards mode, open the Settings menu in the local app. Here, users can load Wizards via the left-hand side menu, or create a new wizard using Add Wizard in the top-right part of the interface:
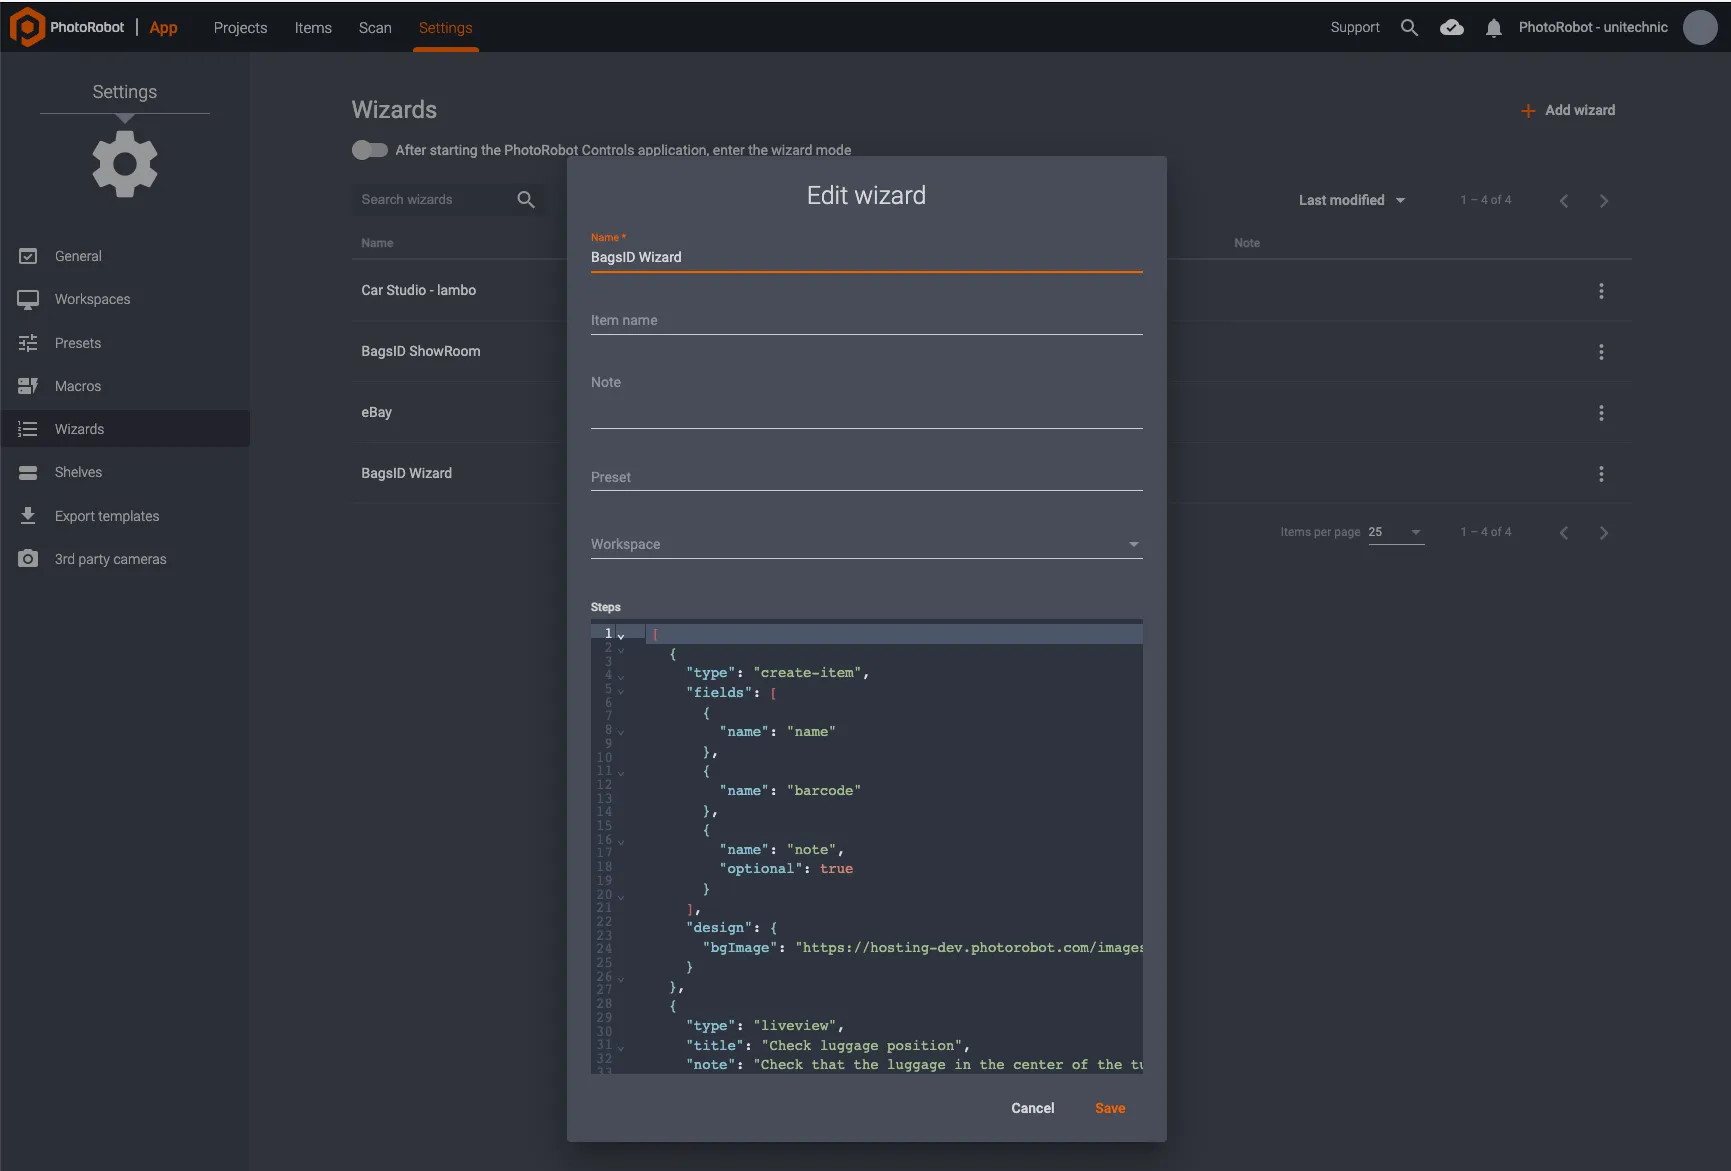
Options to create, edit, or customize a Wizard include Wizard name, Item name, Notes, Presets, Workspace, and Wizard steps:

Note: In order to launch a Wizard, it must contain valid Presets, all Workspace configurations, and most importantly the number and names of directory folders. Each of these will then have to match the steps defined in the Wizard for its proper operation.
4 - Create New Wizard
To create a new wizard mode, open the Settings menu in the local app, and use Add Wizard in the top-right part of the interface:
In this menu, there are options to create, edit, and customize wizards:
- Wizard name
- Item name
- Notes
- Presets
- Workspace
- Wizard steps
Note: In order to launch a Wizard, it must contain valid Presets, all Workspace configurations, and most importantly the number and names of directory folders. Each of these will then have to match the steps defined in the Wizard for its proper operation.
5 - Wizard Steps
Each Wizard contains a list of steps. The following step types are available:
- create-item
- select-item
- capture-folder
- import-images
- liveview
6 - Detailed Step Descriptions
create-item
Description
The create-item step enables the user to create a new item. Users define items as follows and with the following objects.
- type: "create-item"
- fields: This array of objects defines the fields for item creation. Fields can include "name", "barcode", "trackingCode", "link", "note", "tags", "workspace". Each field can also be marked as optional.
- design: This object specifies design aspects like “bgImage” (background image URL) and “bgColor” (background color).
Example
JavaScript:
{
"type": "create-item",
"fields": [
{
"name": "name"
},
{
"name": "note",
"optional": true
}
],
"design": {
"bgImage": "https://hosting.photorobot.com/images/-ML2QkR2lrhwn5SVMaEu/-NMSZjM-bdArdYcaa9XJ/NORMAL/c3o4fsHCXth55bOAZZNk8A?w=1920"
}
}
select-item
Description
The select-item step enables the user to select an existing item. Users will typically enable this step when the list of items has already been created, for example after importing from CSV.
- type: "select-item"
- design: This object specifies the design aspects, similar to create-item.
Example
JavaScript:
{
"type": "select-item",
"design": {
"bgImage": "https://hosting.photorobot.com/images/-ML2QkR2lrhwn5SVMaEu/-NMSZjM-bdArdYcaa9XJ/NORMAL/c3o4fsHCXth55bOAZZNk8A?w=1920"
}
}
capture-folder
Description
The capture-folder step allows the user to capture a folder.
- type: "capture-folder"
- title: Title of the step
- note: Description or instructions for the step.
- dirName: Name of the directory where images will be stored.
- optional: If true, this step is optional, and the user can skip it.
- copy (optional): Copy captured images into another folder.
- copy toDir: Target folder
- copy filter: Optional filter, only images matching “swingAbs”, “turnAbs” or “label” will be copied.
Example 1 - Simple folder capture
JavaScript:
{
"type": "capture-folder",
"title": "Capture interior",
"note": "Capture interior with handheld camera.",
"dirName": "details"
}
Example 2 - Capture folder and copy selected images into another folder
JavaScript
{
"type": "capture-folder",
"title": "Capture spin",
"dirName": "spin",
"copy": {
"toDir": "stills",
"filter": [
{ "swingAbs": 10, "turnAbs": 0 },
{ "swingAbs": 10, "turnAbs": 45 },
{ "swingAbs": 10, "turnAbs": 180 }
]
}
}
import-images
Description
The import-images step allows the user to import images from the disk. Objects within this step include the following.
- type: "import-images"
- title: Title of the step
- note: Description or instructions for the step
- dirName: Name of the folder where the images will be stored
- optional: If true, this step is optional, and the user can skip it
Example
JavaScript:
{
"type": "capture-folder",
"title": "Capture interior",
"note": "Import images taken with a handheld camera.",
"dirName": "interior"
}
liveview
Description
The liveview step turns on the camera liveview. Users will typically enable this to check the position of the object.
- type: "liveview"
- note: Description or instructions for the step
- cameraAngle (optional): Specifies the camera angle for live viewing
Example
JavaScript:
{
"type": "liveview",
"title": "Check position",
"note": "Check the position of the object and make sure it is centered."
}
7 - Example Usage
The following example creates a wizard step for item creation, using fields for name and notes (optional), and a design featuring a background image and color.
JavaScript:
[
{
"type": "select-item",
"fields": [
{
"name": "name"
},
{
"name": "note",
"optional": true
}
],
"design": {
"bgImage": "https://hosting.photorobot.com/images/-ML2QkR2lrhwn5SVMaEu/-Nehz_ciyDihw90EgNuy/FINAL/tqZxrqbKZ4exH6y2LFPWUw?w=1200"
}
},
{
"type": "liveview",
"title": "Check the position",
"note": "Check that person is in view.",
"cameraAngle": 15
},
{
"type": "capture-folder",
"title": "Capture spin",
"dirName": "spin"
},
{
"type": "capture-folder",
"title": "Capture stills",
"dirName": "stills"
}
]
Note: This is a generic code to allow initial experiments and simple script setup by PhotoRobot users. Use it to test Wizards functionality, and to run a basic script for experimentation.
8 - Launching Wizards
To start a Wizard, first assign it to a Project and click Save:
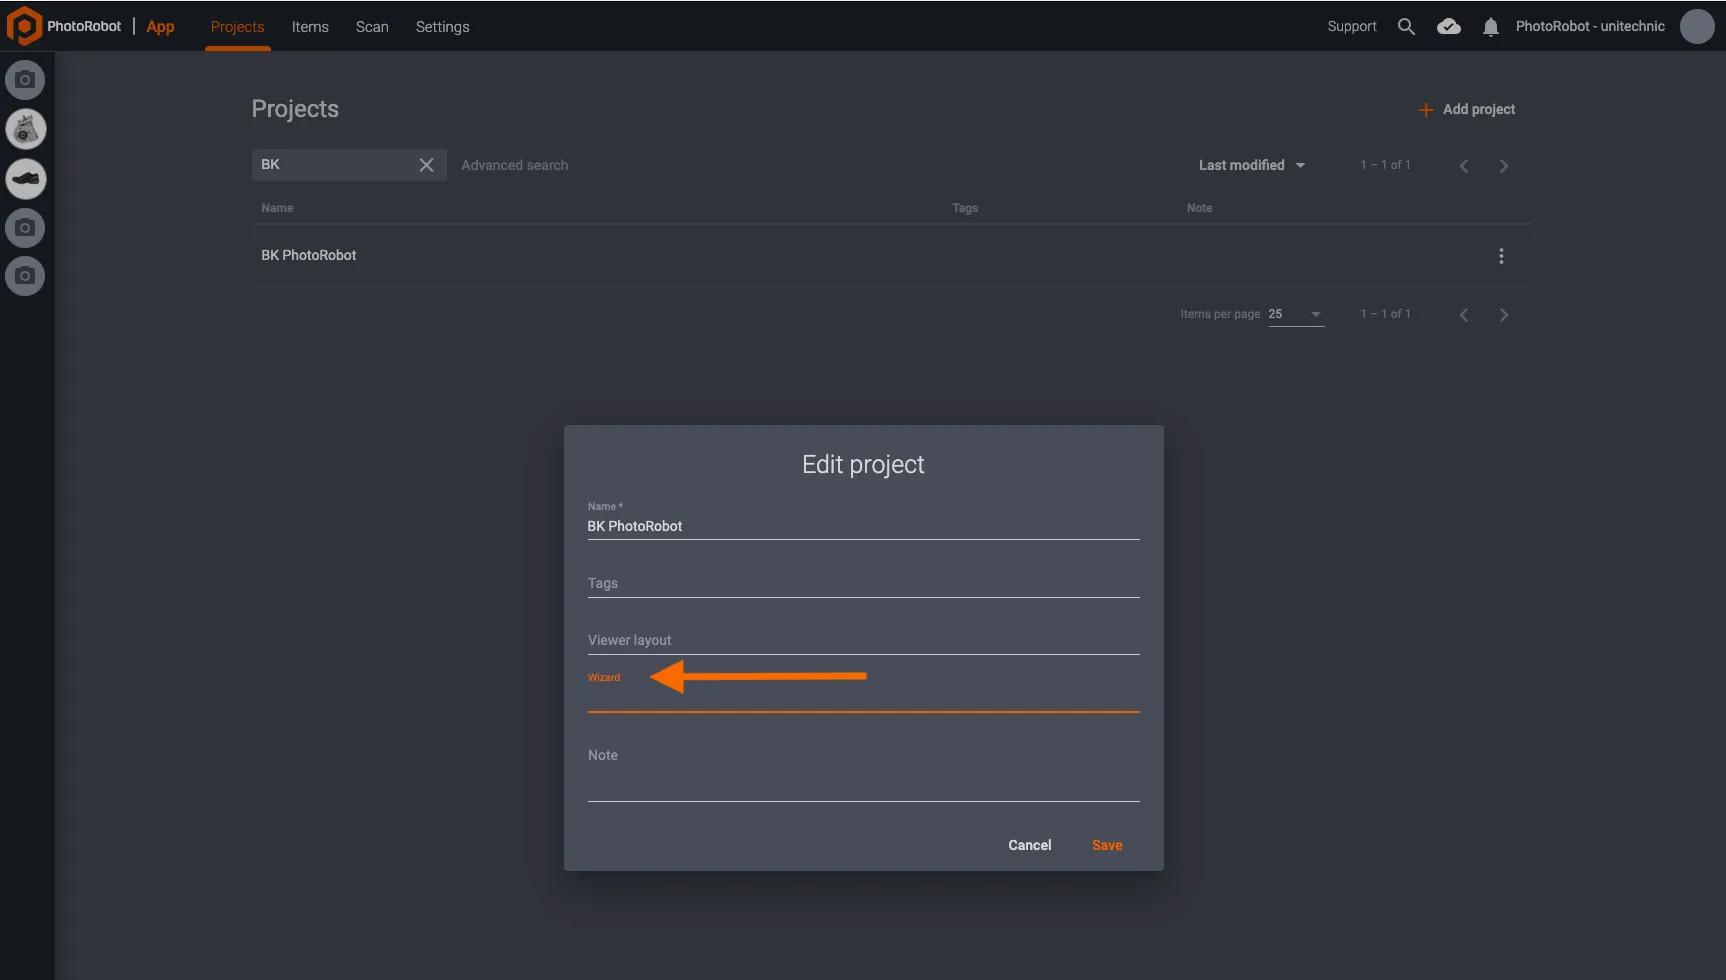
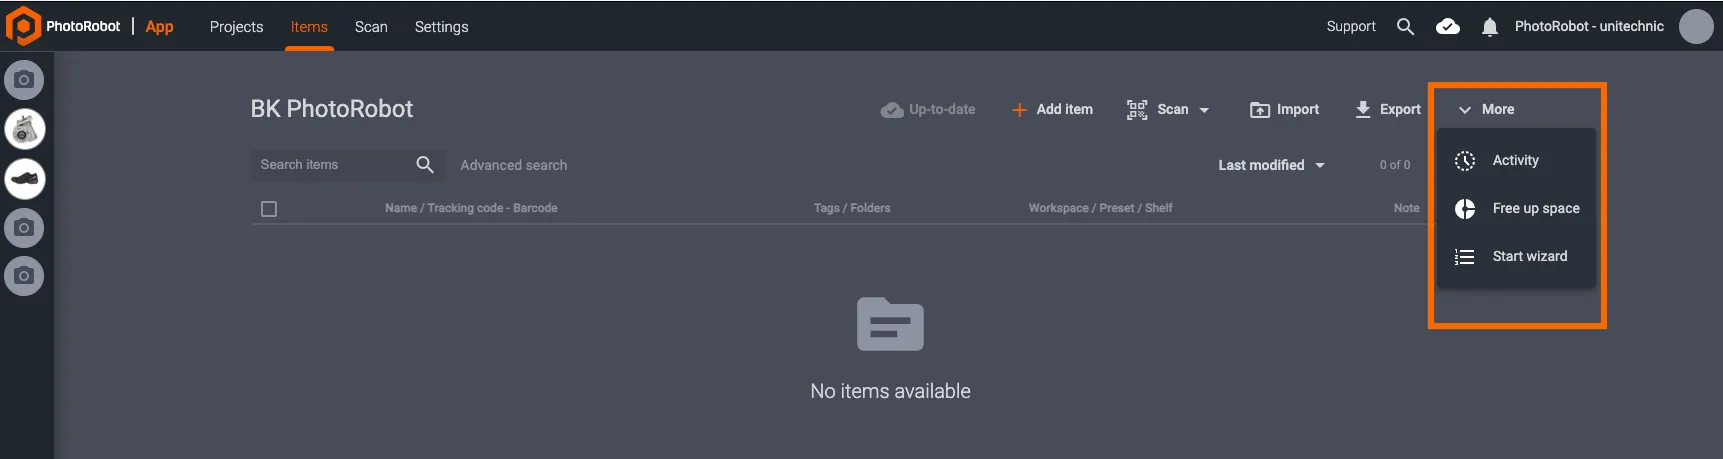
After assigning the Wizard to a Project, it is possible to launch the Wizard in 2 ways:
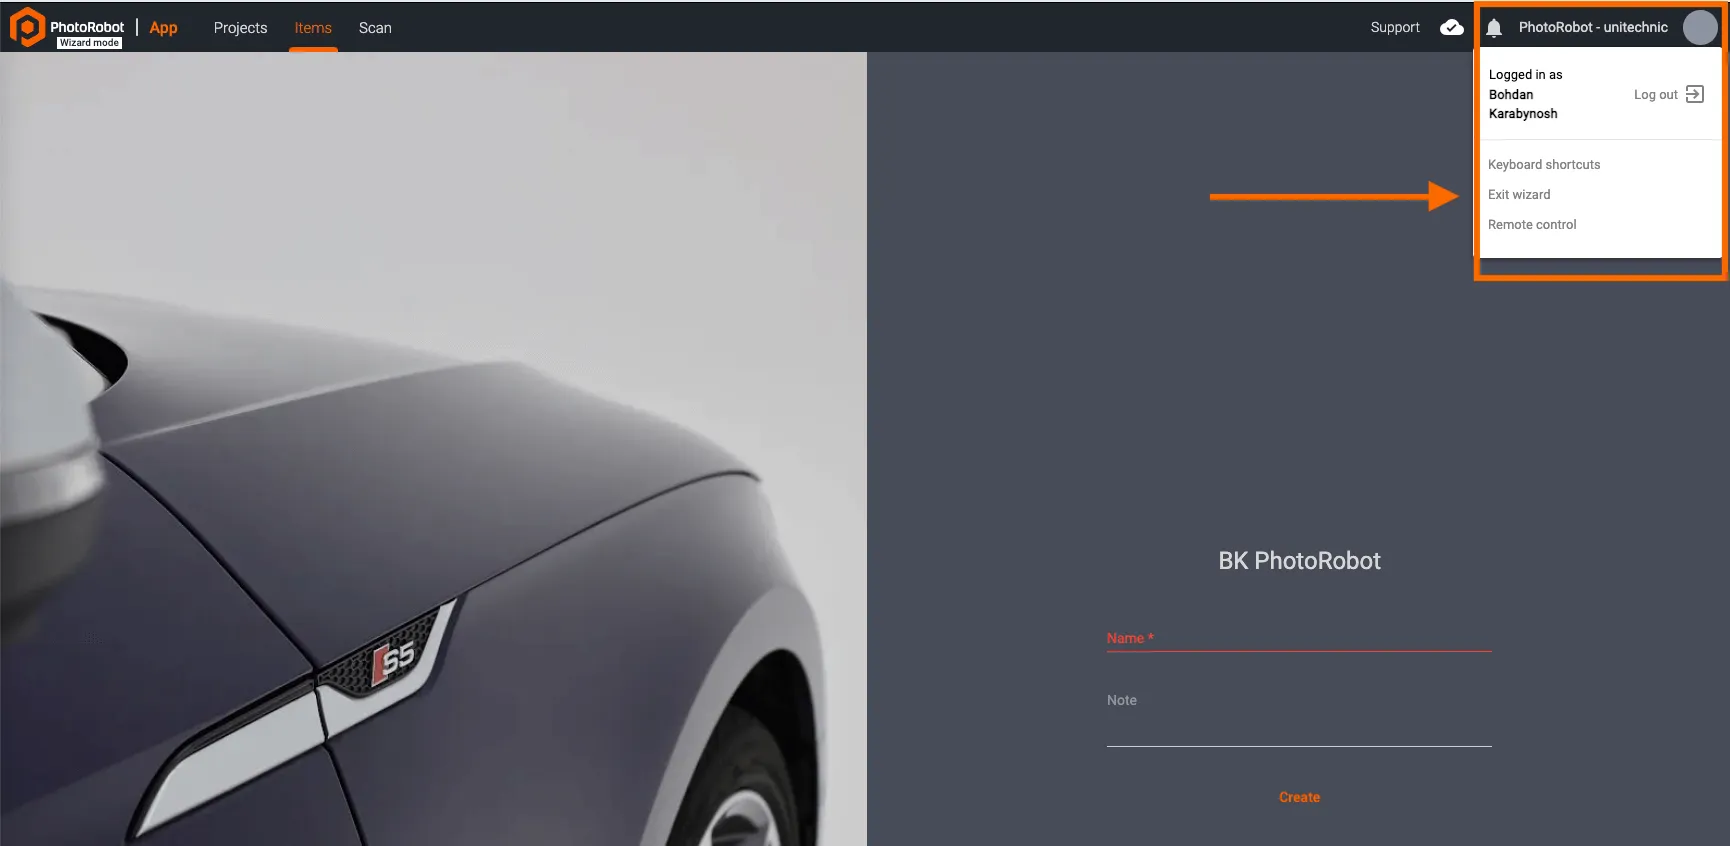
- In the top right part of the interface, click More and Start wizard, or;
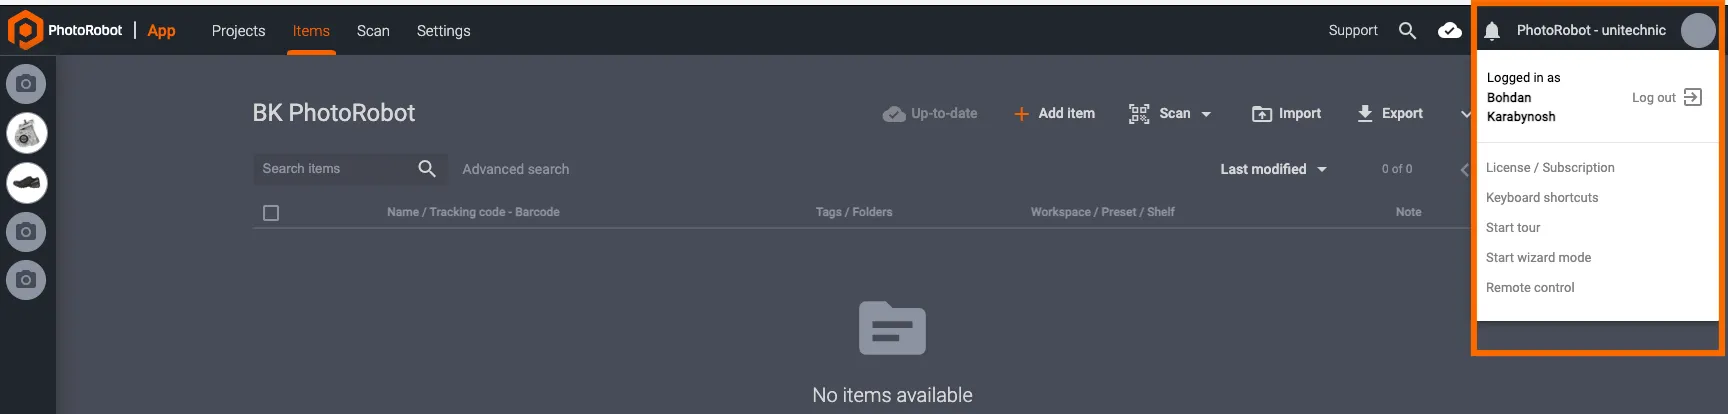
- Click on the User Account icon, and click Start wizard mode:
9 - Wizard-Guided Operator Steps in Kiosk Mode
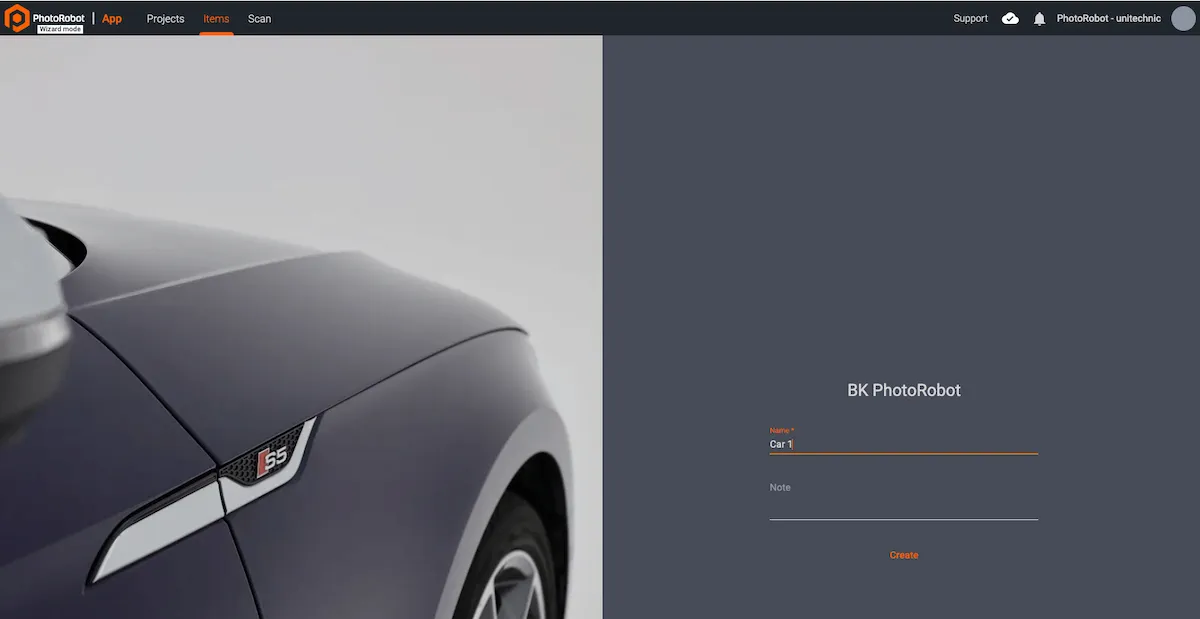
On successful launch of a wizard, the interface opens in Kiosk mode and displays the Project name at the top, and the Wizard name below. Click Create to launch the wizard in Kiosk mode:
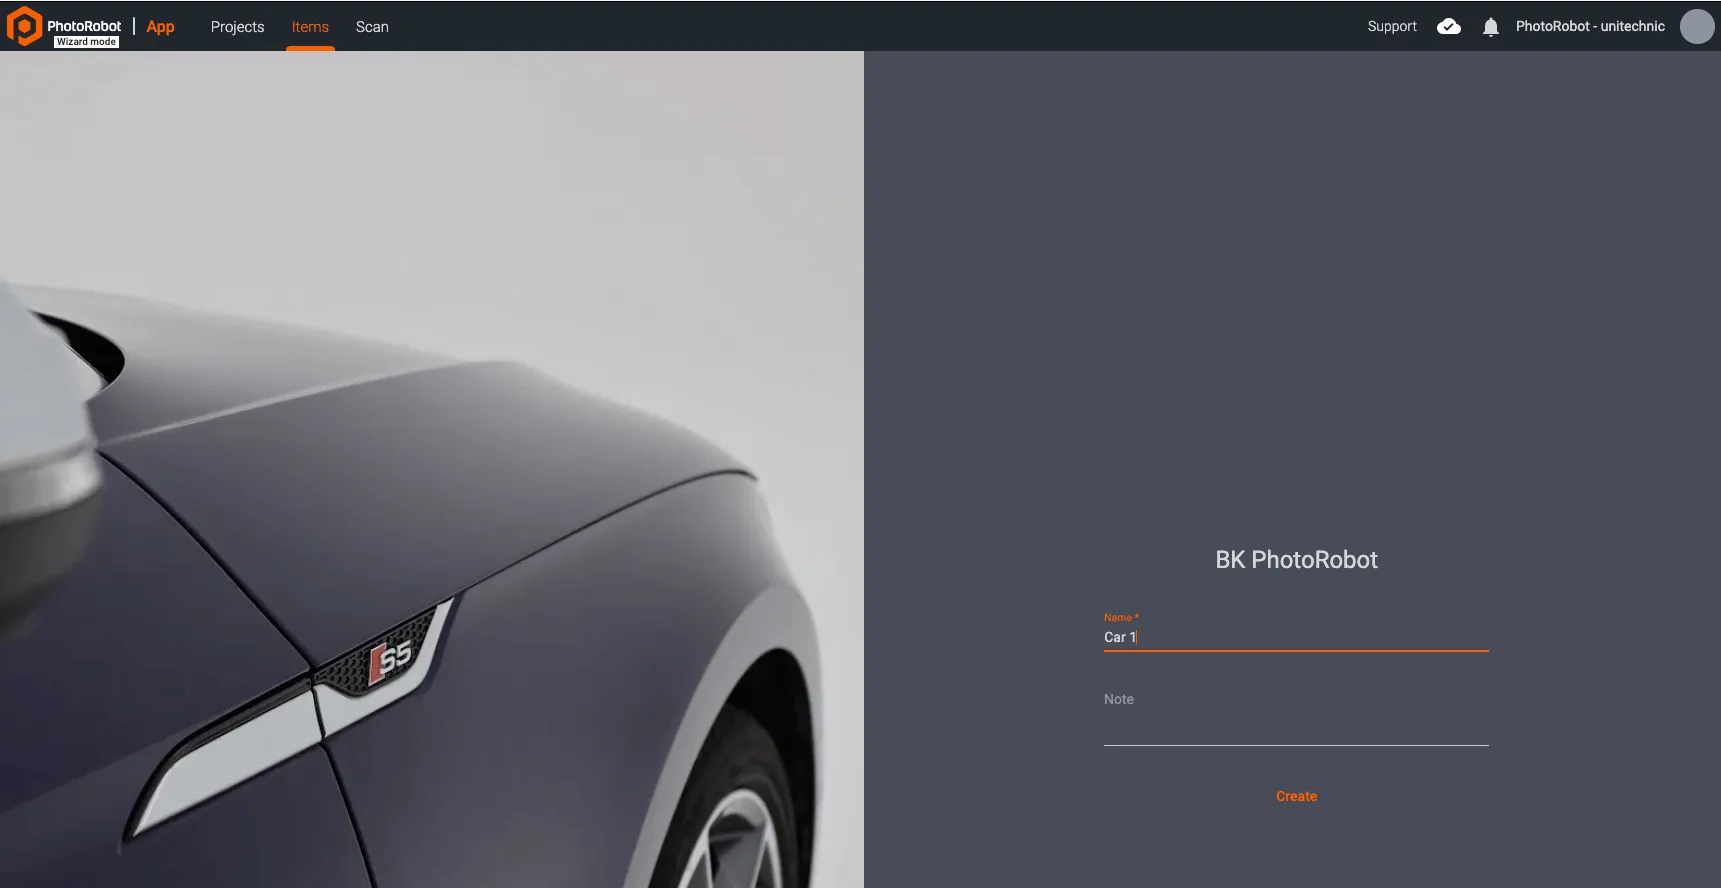
After the start screen, the simplified Kiosk mode user interface will display the first stage in the predefined operation steps. From this point on, the operator must complete instructions for each stage of capture, and click Next at the bottom of the Kiosk mode interface to move onto subsequent steps:
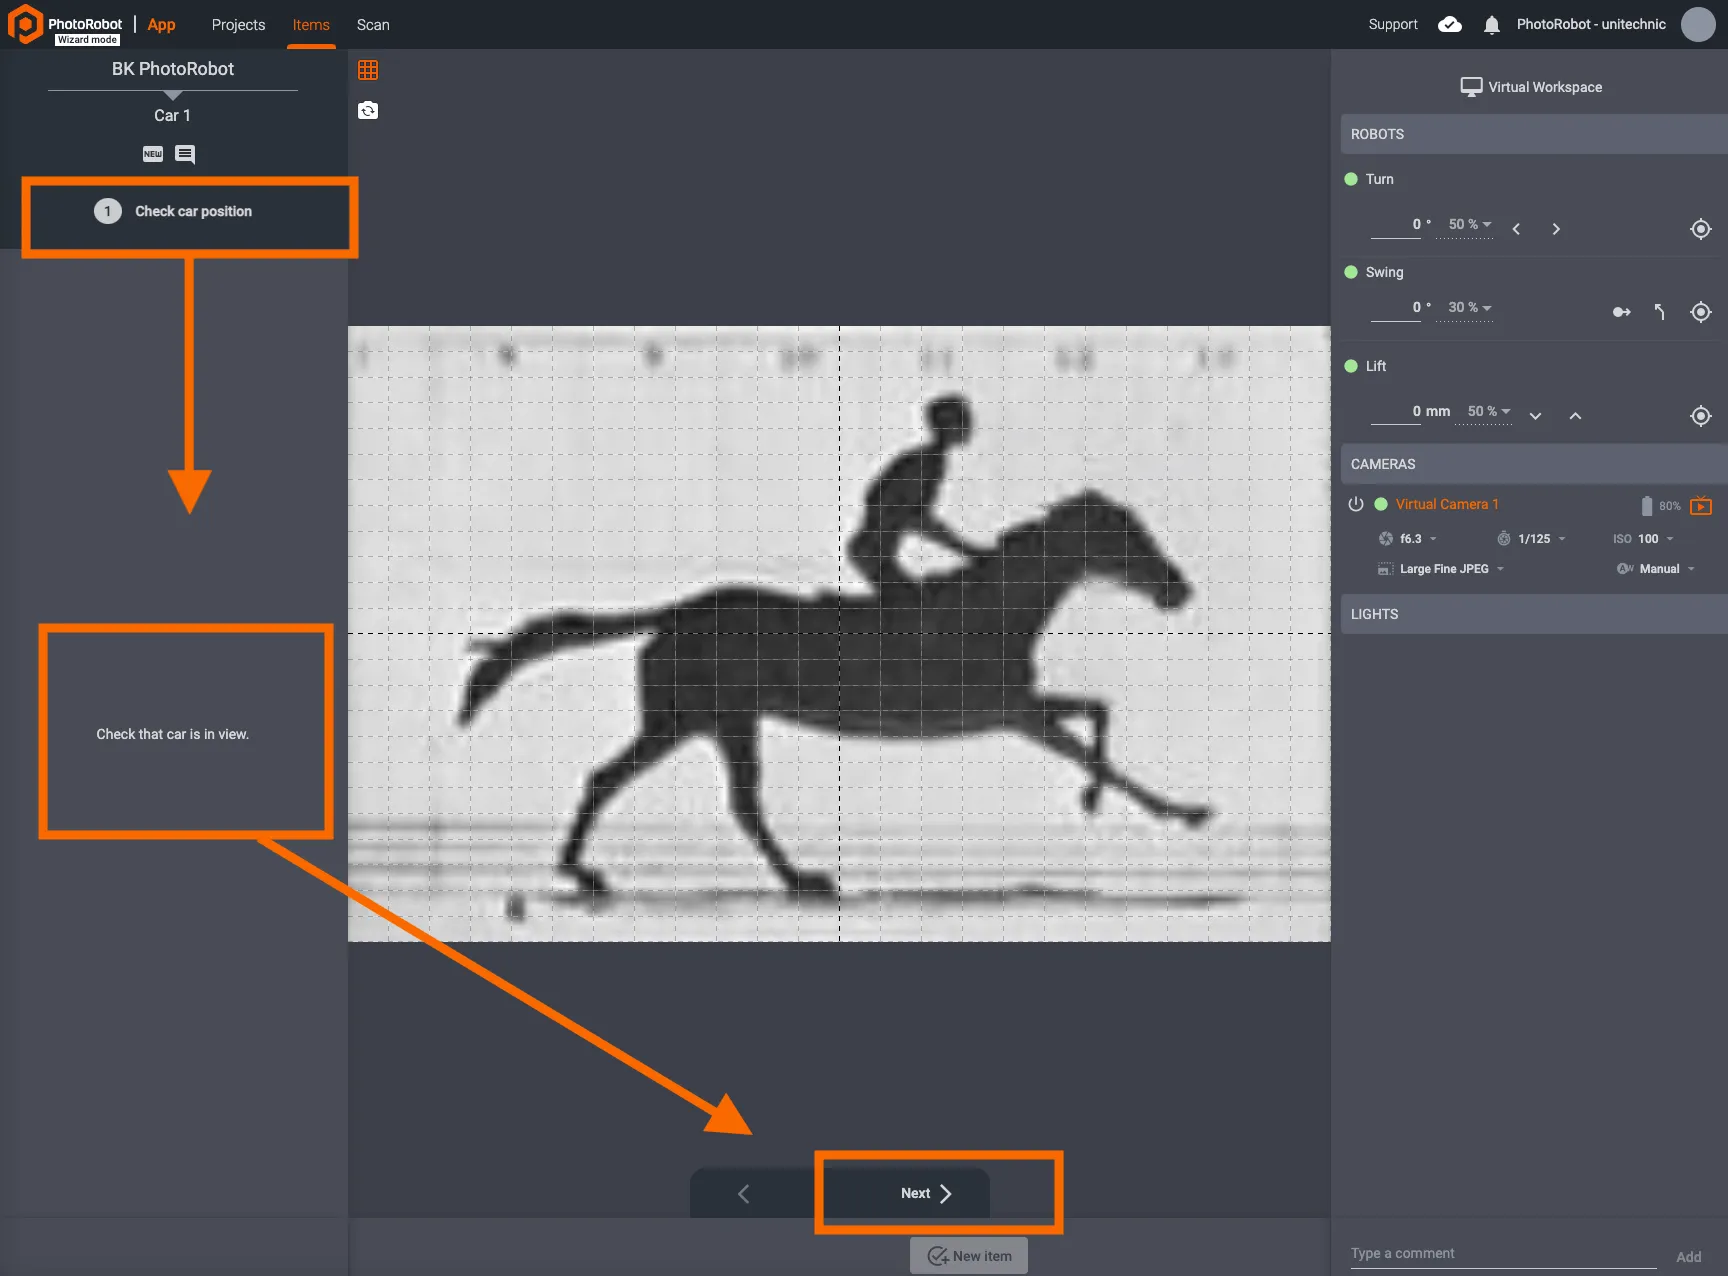
Usually, the first step will instruct the operator to configure the camera (or cameras) that will be in use. Here, the operator also checks that the product is positioned correctly and in view of the camera(s).
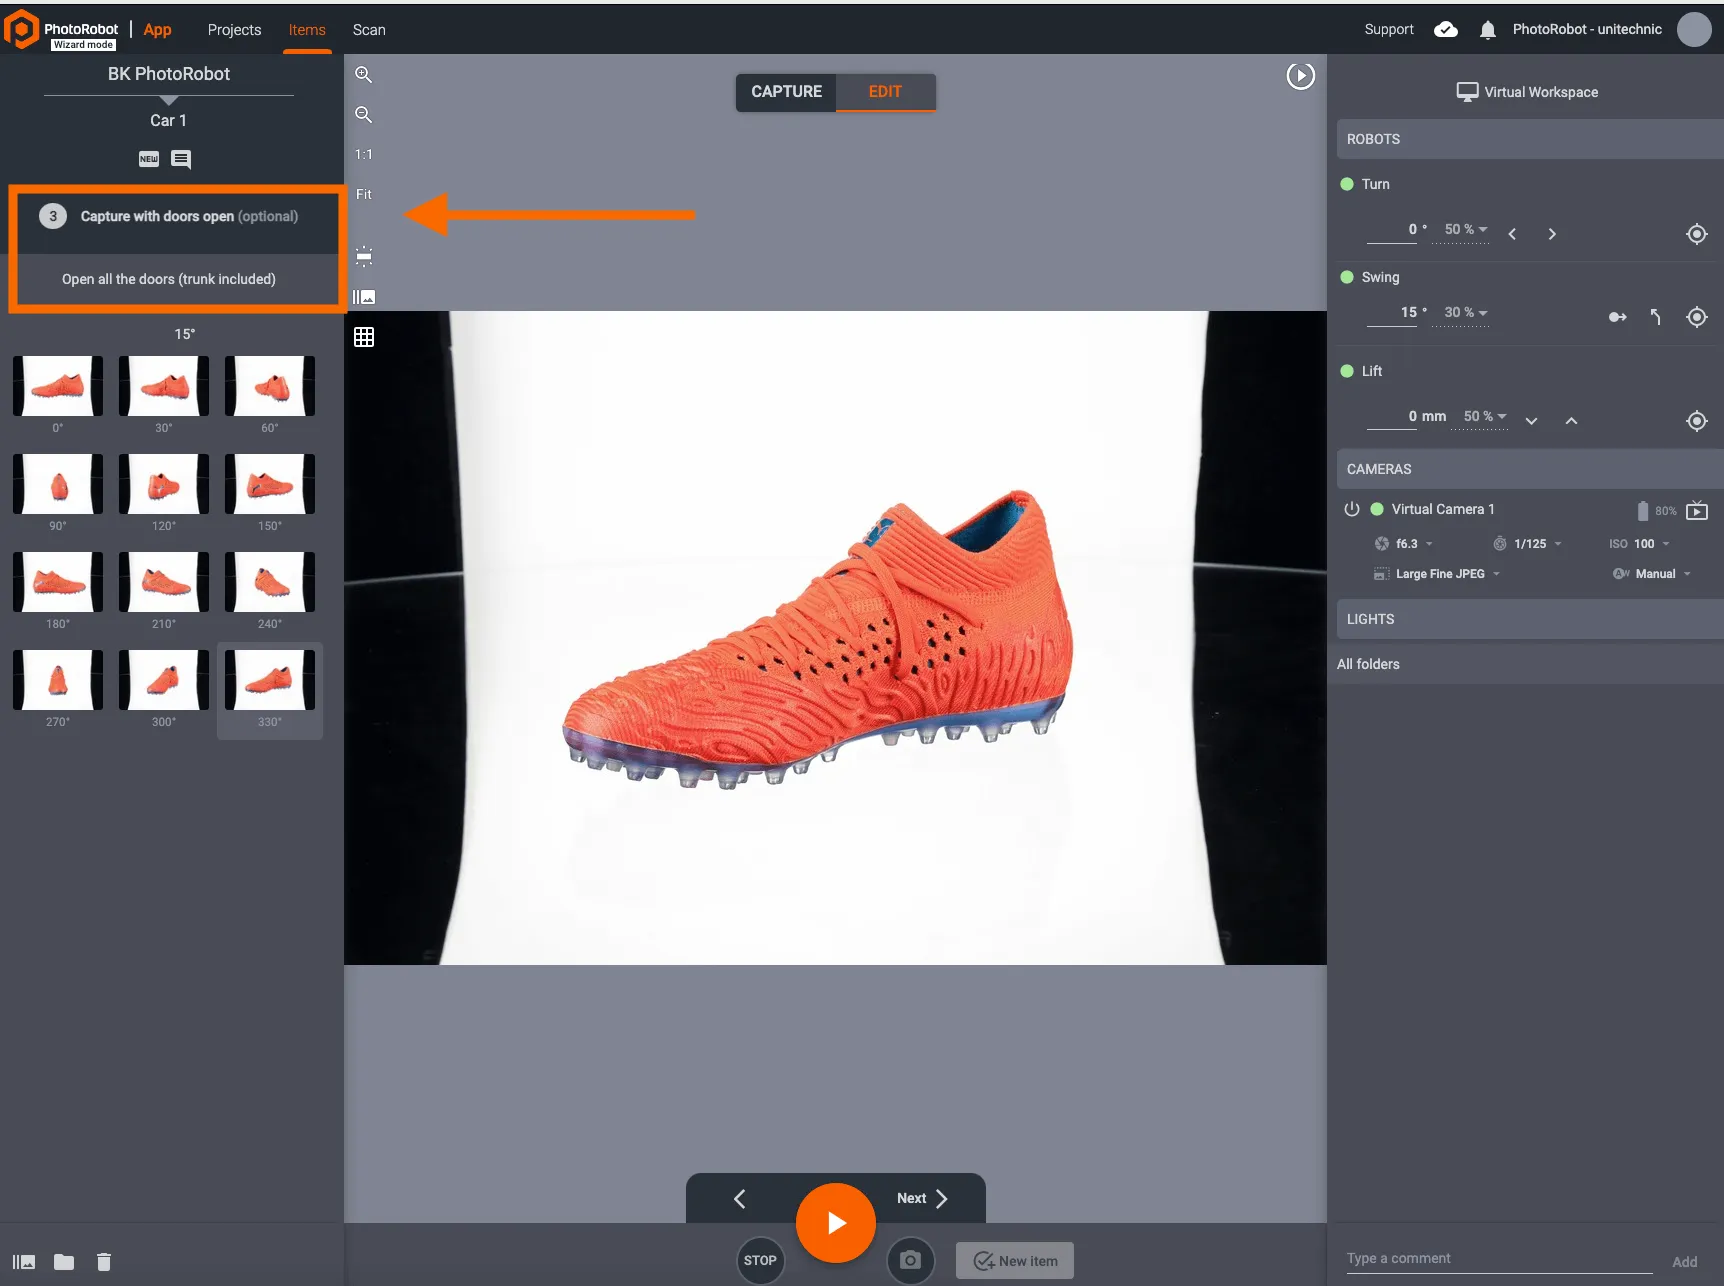
Subsequent steps then direct the operator according to presets to capture given angles into a specific folder. These steps may also include instructions to photograph different product configurations, such as a car with its doors open, closed, or shot from the interior:

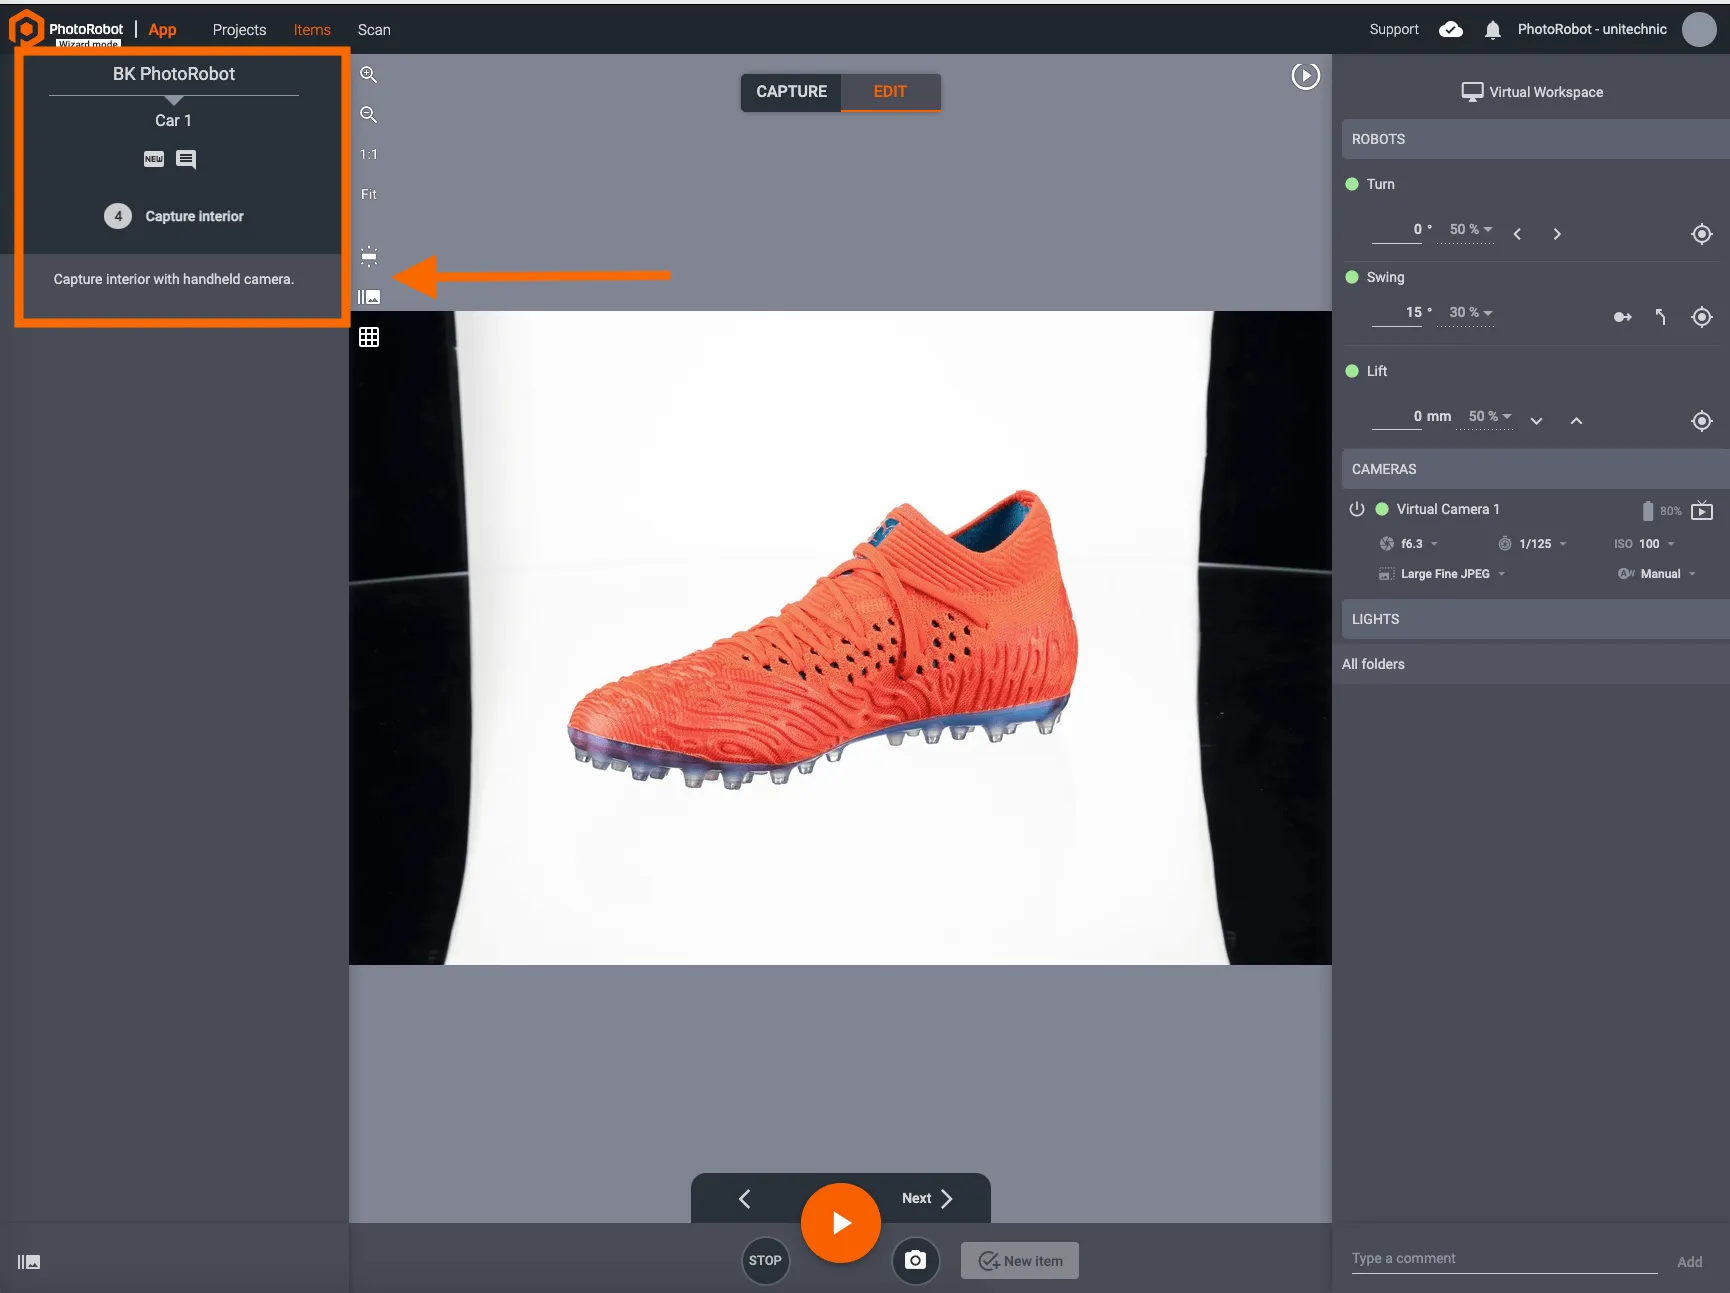
Further, the Kiosk mode can display notes from the wizard steps for clearer explanation of individual stages. Notes are located on the left-hand side of the Kiosk mode interface, below the step title:
In some cases, the wizard guiding Kiosk mode may also instruct the operator to take photos for example with a handheld camera, and then import the images before the Next option is available.
When complete with each stage, clicking New item at the bottom of the interface completes the wizard-guided Kiosk mode:
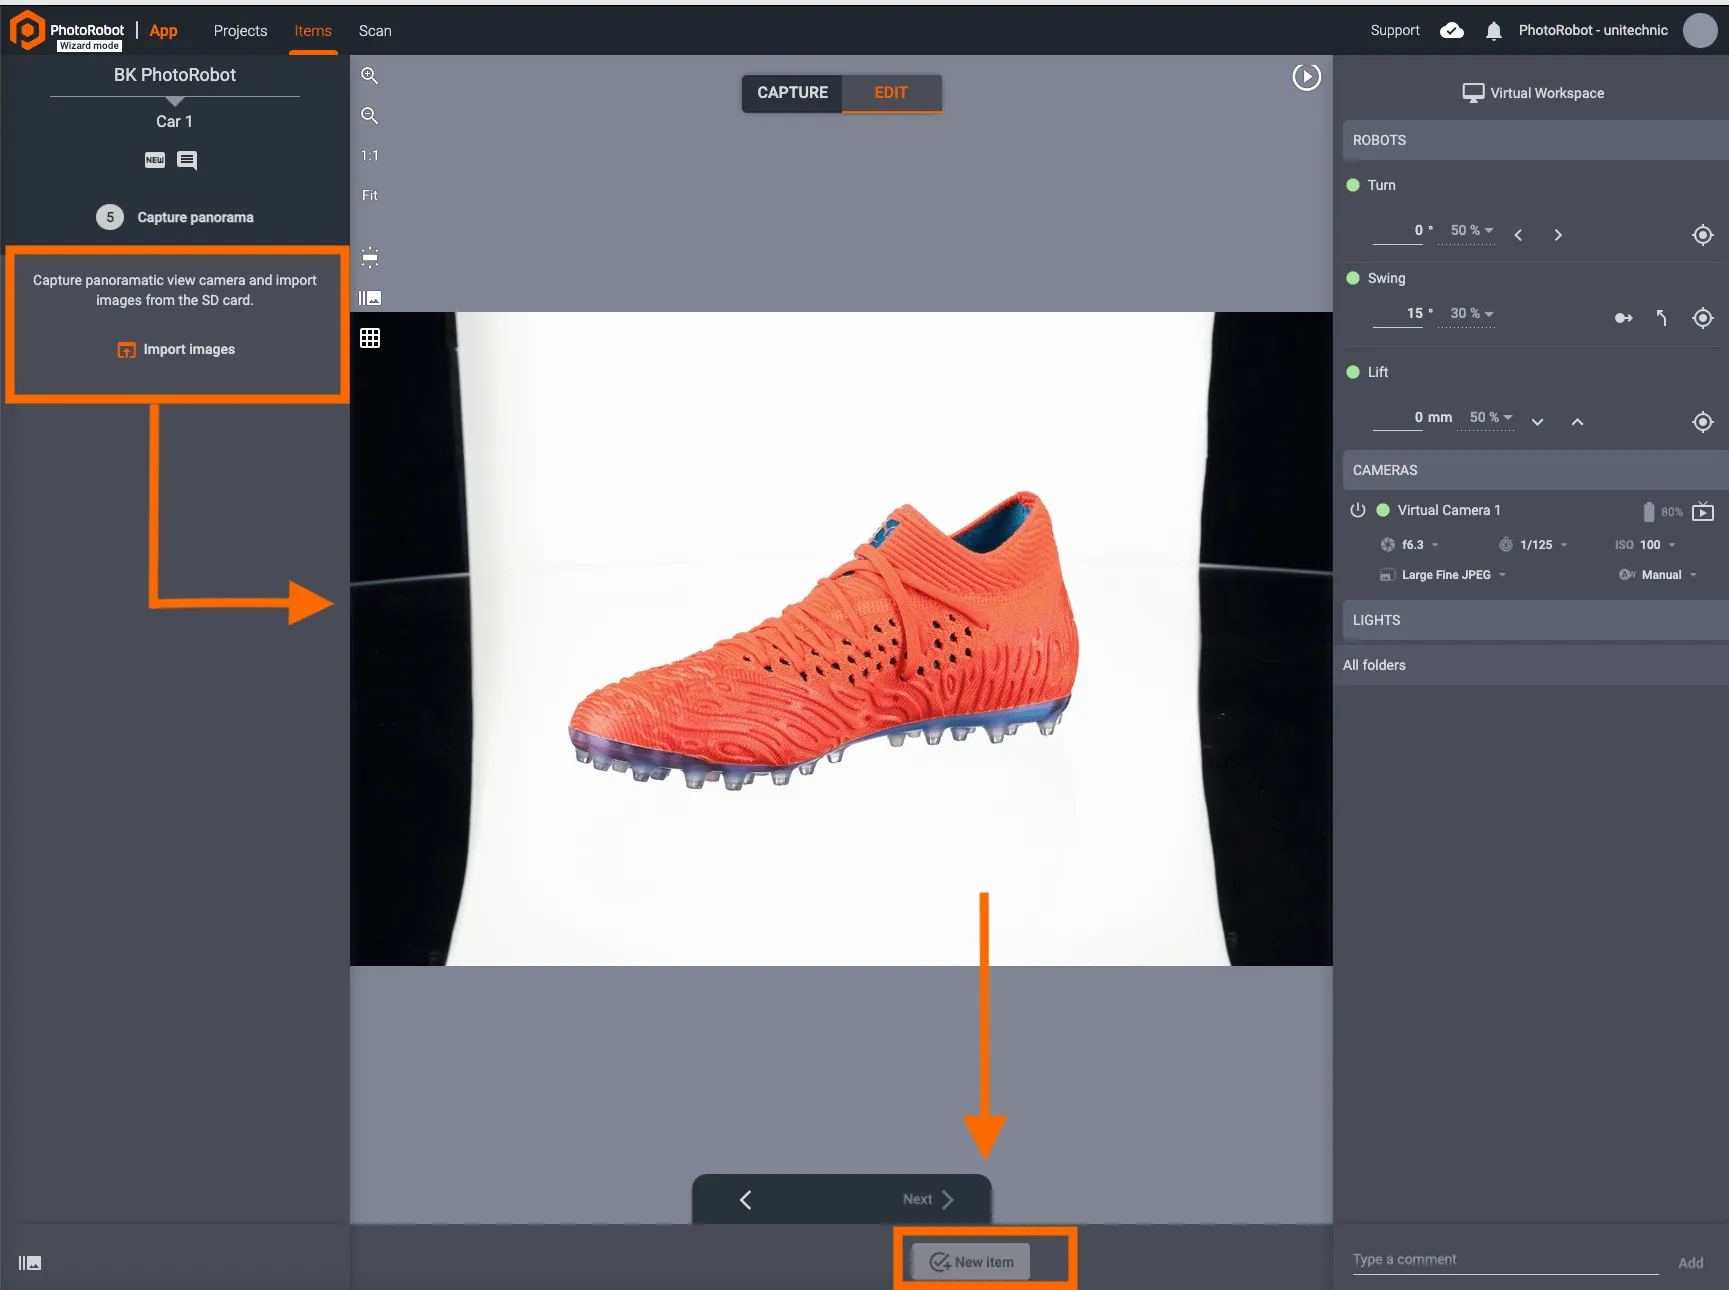
After clicking on New item, the user is returned to the Wizard start page. Here, it is possible to exit the Wizard being used for Kiosk mode, or continue to the next item.
To exit the Wizard, click on the Account Icon in the top-right part of the interface, and click Exit wizard:
If continuing to another item existing in the system, it is also possible to load items to capture via Wizard settings by changing the first step to “type”: “select-item”:
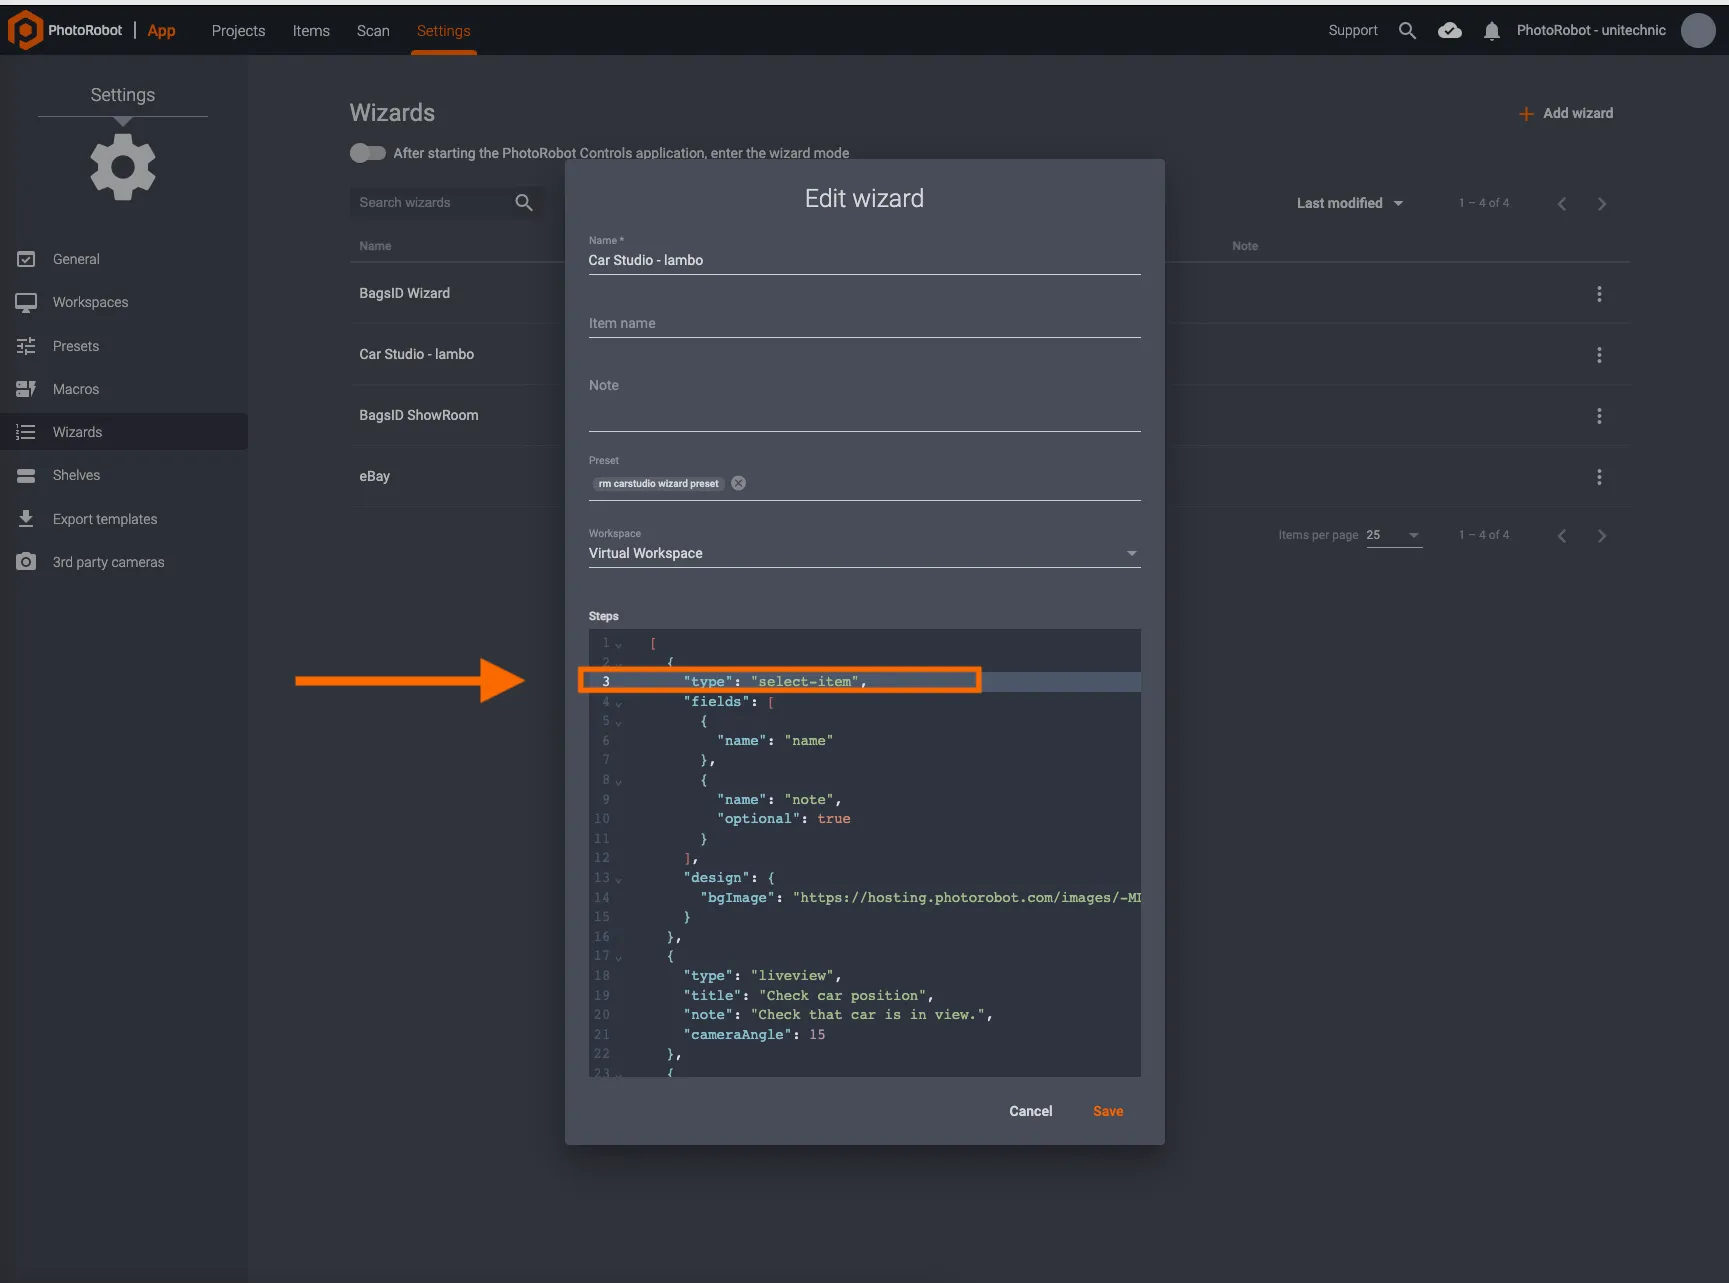
After configuration of “type”: “select -item”, users can then select items by entering the item name on the Kiosk mode startup screen for that wizard:

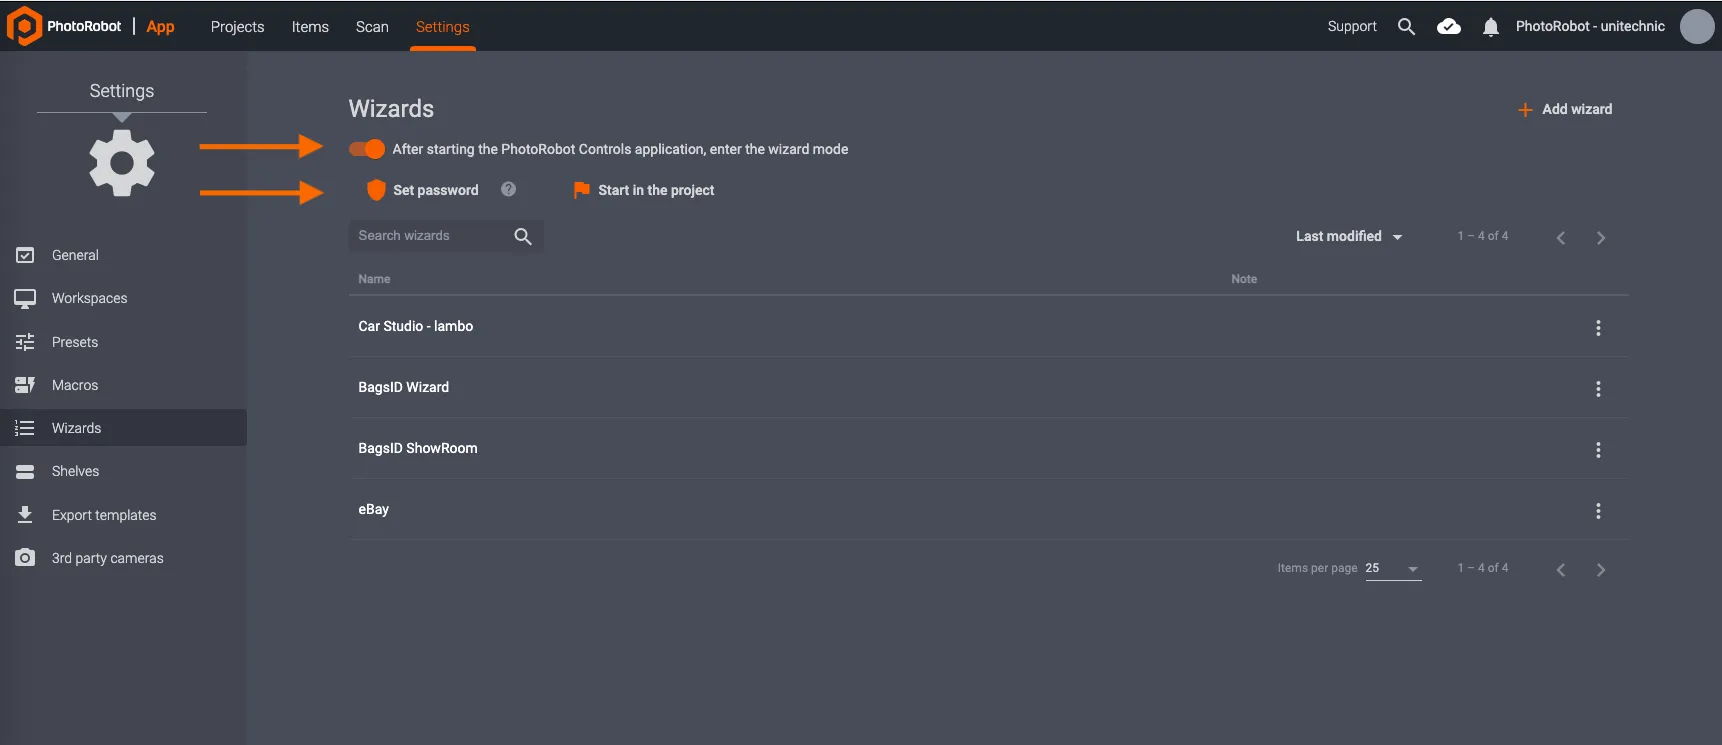
Finally, it is also possible to enable password protection for Wizards mode, or to designate a Project that will start by default in a wizard-guided Kiosk mode. Find these options on startup of CAPP by navigating to Settings, and clicking on Wizards.
The top of the menu options provide a toggle ON / OFF to enter Wizard / Kiosk mode automatically after starting CAPP. Below this, users can click Set password to enable password protection.


EOS Rebel Series


EOS DSLR Series


EOS M Mirrorless Series


PowerShot Series


Close-Up / Handheld

The Canon EOS Rebel Series offers beginner-friendly DSLR cameras with solid image quality, intuitive controls, and versatile features. Ideal for photography enthusiasts, these cameras provide reliable autofocus, vari-angle touchscreens, and Full HD or 4K video recording.
Connection
Resolution (MP)
Resolution
The Canon EOS DSLR Series delivers high-quality images, fast autofocus, and versatility, making it ideal for both photography and video production.
Connection
Resolution (MP)
Resolution
The Canon EOS M Mirrorless Series combines compact design with DSLR-like performance. Featuring interchangeable lenses, fast autofocus, and high-quality image sensors, these cameras are great for travelers and content creators seeking portability without sacrificing image quality.
Connection
Resolution (MP)
Resolution
The Canon PowerShot Series offers compact, user-friendly cameras for casual shooters and enthusiasts. With models ranging from simple point-and-shoots to advanced zoom cameras, they provide convenience, solid image quality, and features like image stabilization and 4K video.
Connection
Resolution (MP)
Resolution
The Canon Close-Up & Handheld Cameras are designed for detailed, up-close photography and video. Compact and easy to use, they offer precision focus, high-resolution imaging, and versatile macro capabilities—perfect for vlogging, product photography, and creative close-ups.


