Ghost Mannequin Photography of a Spaghetti Dress
Expand your skill set with this fashion photography tutorial on how to photograph a spaghetti dress on a ghost mannequin.
How to Photograph a Spaghetti Dress on a Ghost Mannequin
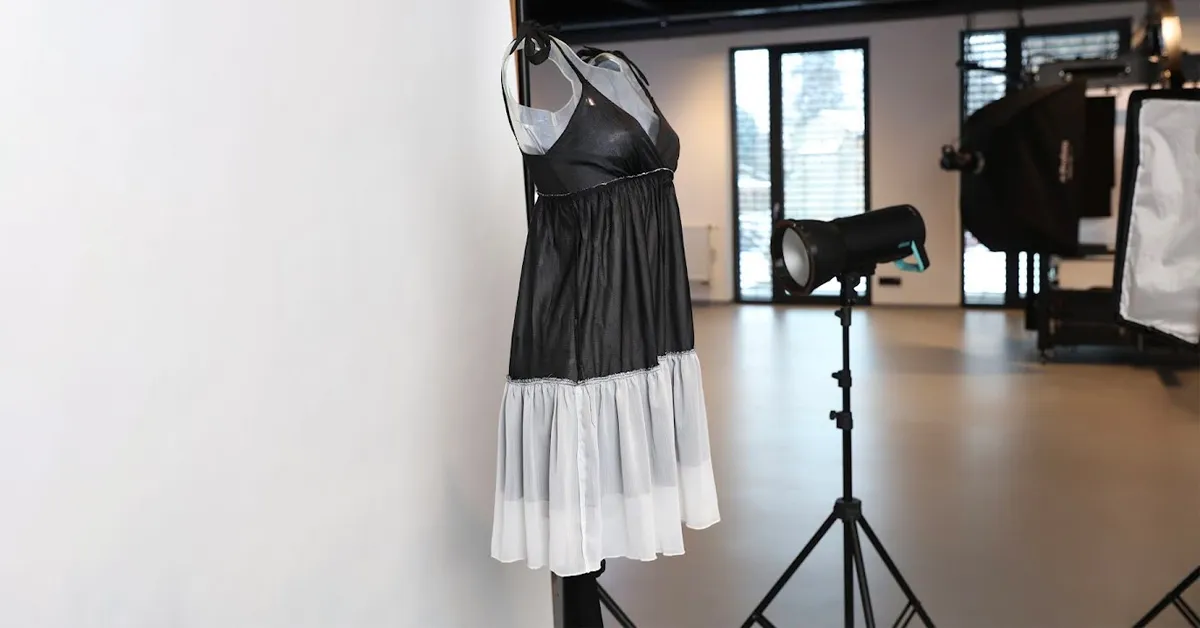
In this fashion photography tutorial, we demonstrate how to photograph a spaghetti dress using a premium-quality invisible ghost mannequin with PhotoRobot. These special modular mannequins have removable pieces so photographers can photograph clothes as if an invisible model is wearing them.
While you can photograph sleeveless strap dresses on a hanger, a ghost mannequin will achieve a more true-to-life 3D effect. This is not only more effective for online presentation, it makes your fashion brand look more professional and committed overall.
Thankfully, PhotoRobot makes it easy even for amateur photographers to master ghost mannequin photography. Using the_Cube, our modular mannequin, and PhotoRobot software, our setup simplifies and streamlines workflows.
Ready to discover the secret for yourself? This fashion product photography tutorial will guide you through the process. We share how to photograph a spaghetti dress on a ghost mannequin, including what cameras, lighting, and equipment to use.
PhotoRobot Equipment and Software
At the center of the setup, there is the_Cube. This photography robot quickly transforms into a rotating mannequin, and includes a system for quick mannequin exchange. The design streamlines workflow by allowing us to photograph a long line of fashion and apparel in a single session.
Meanwhile, PhotoRobot editing software provides automation, control, and drastic reduction in times for post production and time-to-web. Save and automate style guides, and deploy Chromakey for automatic pole removal, compositing photos, and achieving the ghost mannequin effect.
Additional Photography Equipment
Also in the studio, we use the following photography equipment to photograph a spaghetti dress on a ghost mannequin.
- Camera - For high-quality and consistent results, PhotoRobot supports high-end DSLR and mirrorless Canon camera models.
- Studio lighting - The lighting setup combines strobe lighting and LED panels to obtain the ideal exposure, shadows, and contrast from all angles.
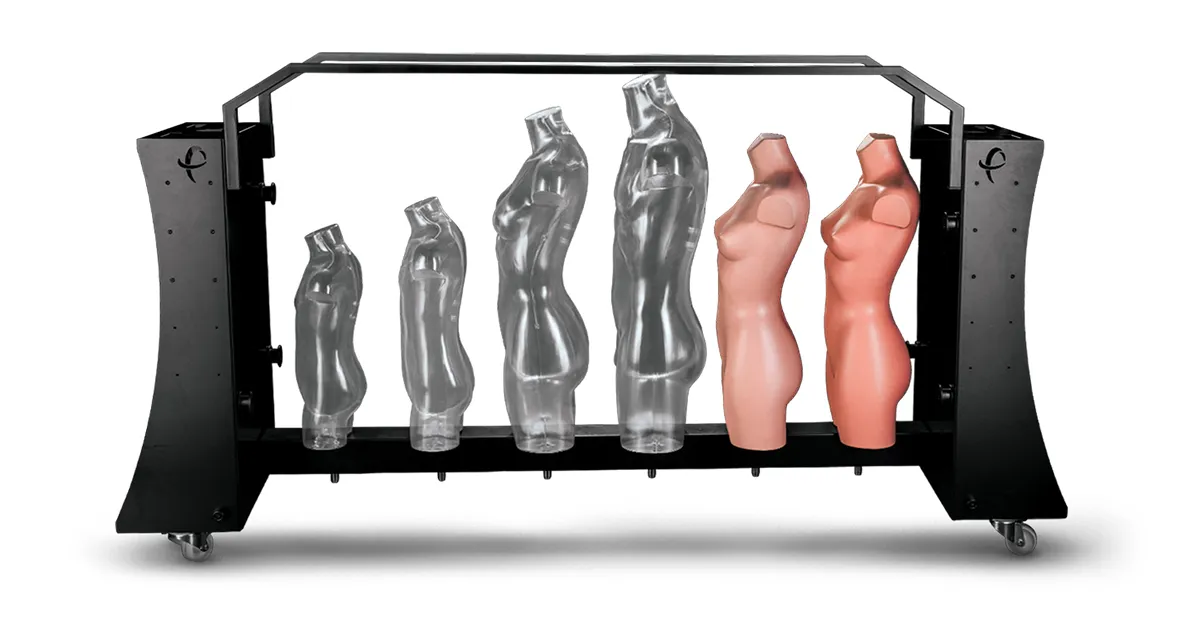
- Ghost mannequin torso - Here, any modular mannequin with removable chest and arm pieces works for capturing invisible mannequin images. Each mannequin can also be quickly exchanged on and off of the_Cube, meaning we can photograph and style mannequins simultaneously.
- A spaghetti strap dress - This process works for any sleeveless dress or garments of similar cut and style. Styling then becomes routine on any invisible mannequin.
- Styling tools and accessories - Finally, to give shape to the dress and hold it to the mannequin, we have styling clips, pins, double-side tape, and a light reflector. The reflector should be bright and reflective to direct light into different areas of the garment.
How to Style a Strap Dress on a Ghost Mannequin
1 - Get the Best Invisible Mannequin for Your Dress
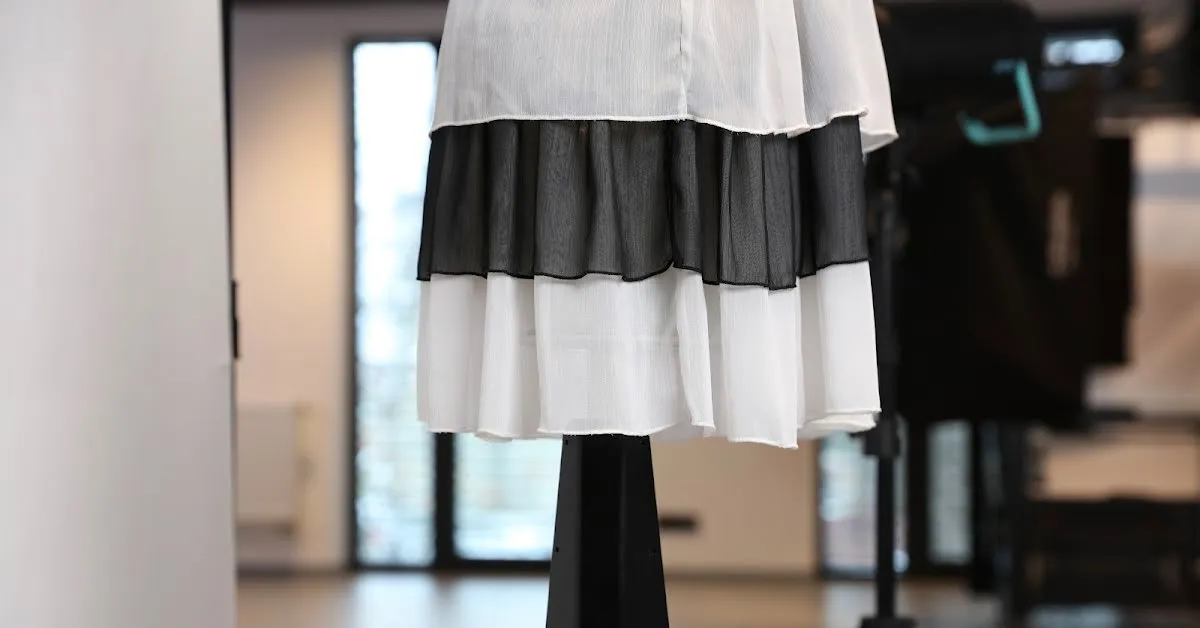
Before the photoshoot, the first step is choosing the best female mannequin to fit your spaghetti dress. It’s important the mannequin has removable v-chest and arm pieces, and it matches the size and shape of the garment.
What you want is for the dress to taper and flow naturally around the contours of the mannequin.
Removing the neck and inner chest pieces allows us to also capture the straps on the back of the dress. We do this to get a better idea of how final images will turn out after post production.
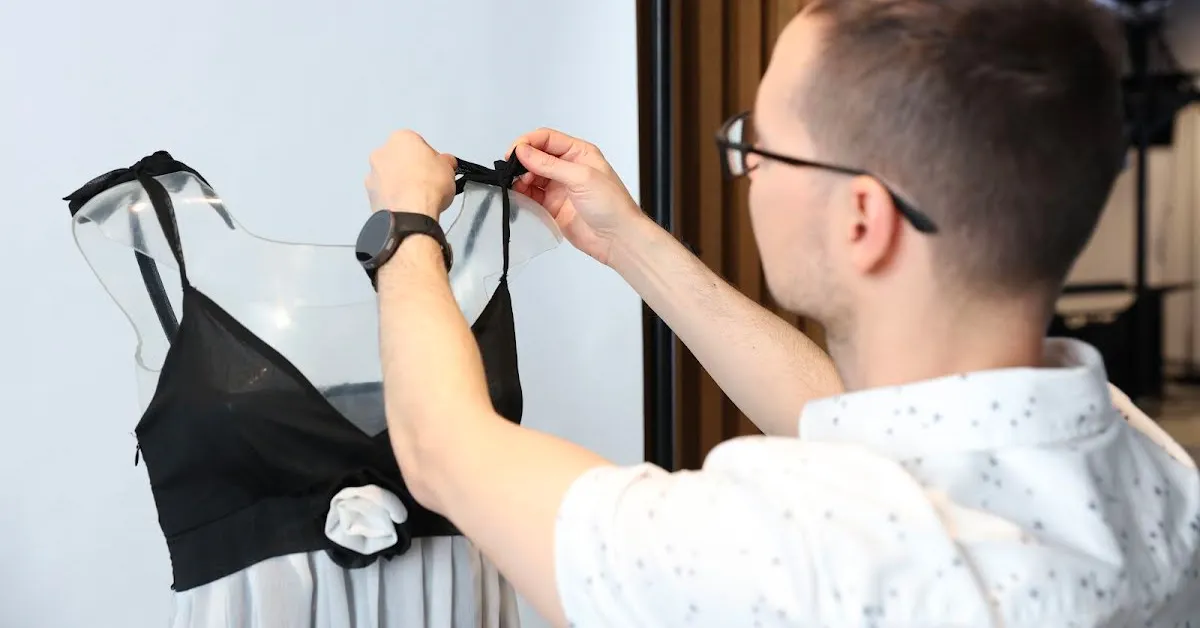
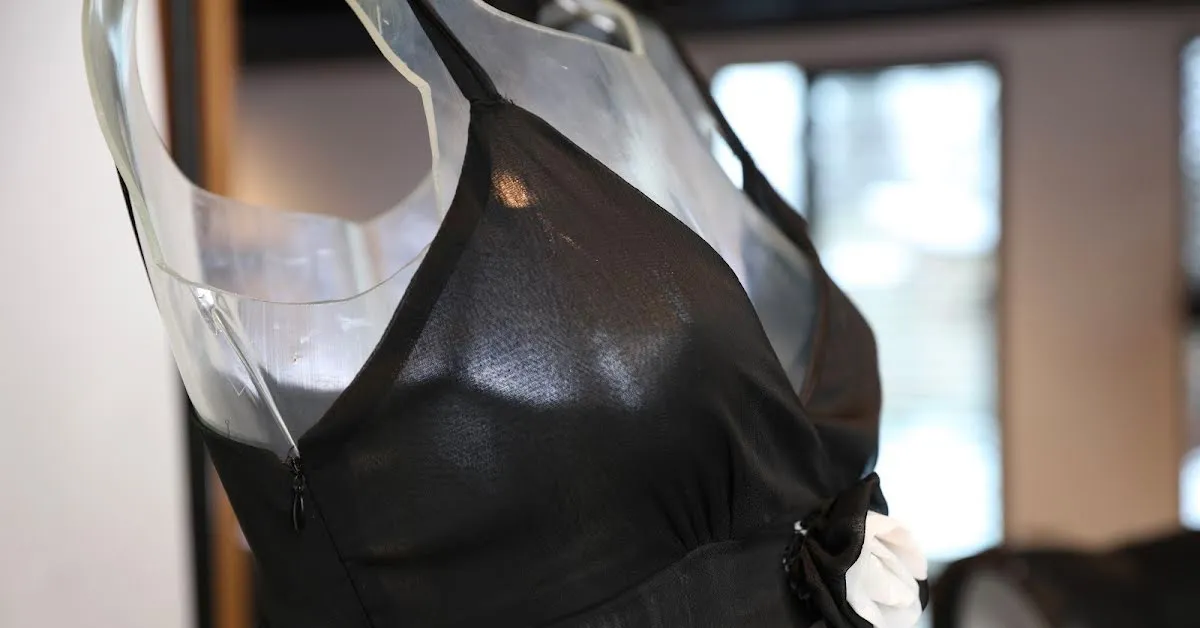
2 - Dress Your Ghost Mannequin for Photography
Now, with our mannequin and the_Cube installed to support it, the next step focuses on fitting the dress to the mannequin.
Pay careful attention to how the garment fits the form of the body. Use styling clips and pins to create shape and definition, starting first with the shoulders.
The dress should fall even on both sides, with the shoulders symmetrical. If you can’t achieve perfect symmetry, double-sided tape is also useful for holding the shoulder straps in place.
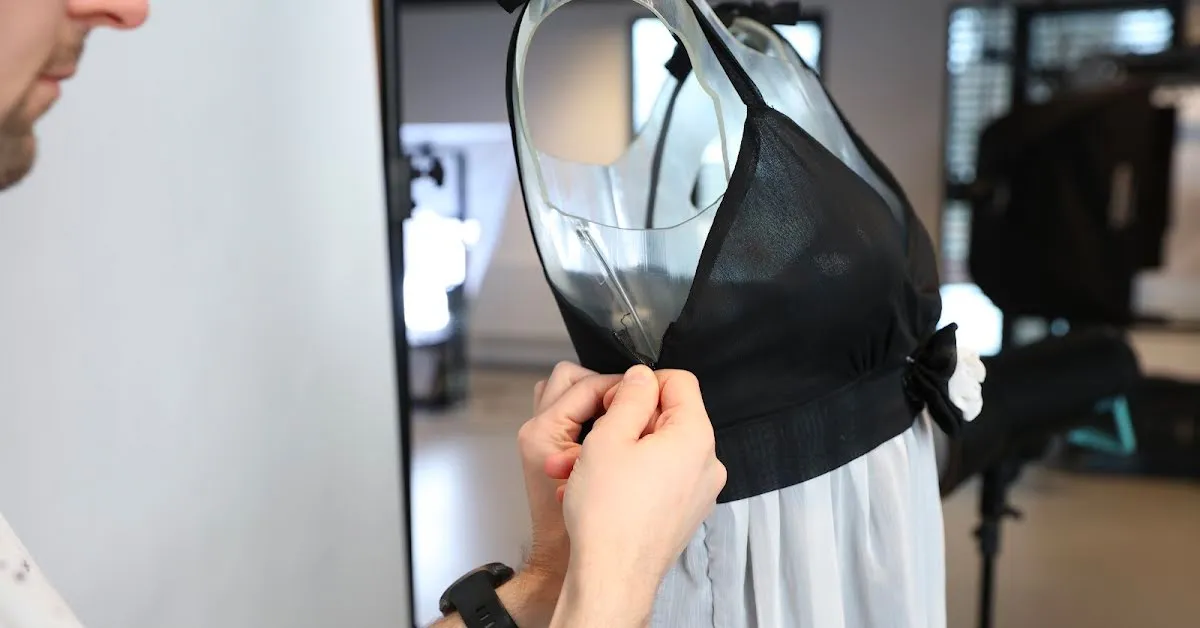
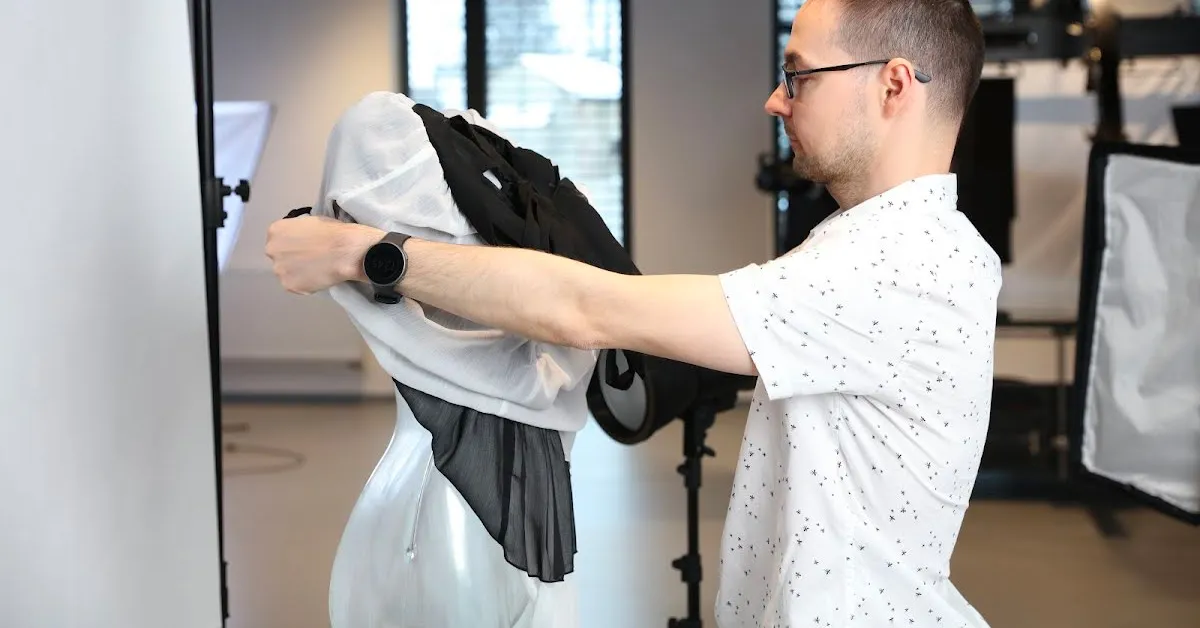
3 - Style to Photograph the Frontside of the Dress
To prepare to photograph the front of the dress, we need to work on the backside of the mannequin. Here, look for any excess fabric that you can pull taut to give the dress a tighter fit.
It’s better to pull fabric tight along the center zipper line, and then use styling clips to hold it in place. Clip different areas and experiment until the frontside of the dress looks satisfactory, with no unsightly bunching or creases.
For the shoulders and armpits, afford extra care to your styling efforts. These areas provide shape and definition in photos. Ensure the dress contours smoothly down the mannequin, using pins to eliminate excess fabric.
4 - Direct Lighting to Showcase Distinguishing Features
Next, it’s time to emphasize the fabric and design of the dress. To do this, experiment with the lighting to direct attention to finer details, patterns, and colors.
Use both light and shadow to bring the dress to life. Examine how light and shadow contrast, and aim to highlight areas of the dress that make it unique and appealing.
For this, you might also utilize a bright, white reflector to control how and where the light hits the dress. Direct light into hard-to-reach places that provide shape, or over areas that showcase the cut, material, and design features.
5 - Photograph the Dress on the Mannequin
Now, we can photograph the dress on the mannequin. Photographing the frontside of the dress is straightforward, requiring only a few commands at the control station.
- Capture photos of given angles (here using predefined positions).
- Separate the background on all images.
- Retouch the pole of the torso using manual or automated Chromakey retouch.
- Set the lighting to the product for consistent exposure, shadows, and contrast.
- Control the process to capture images for compositing and post processing.
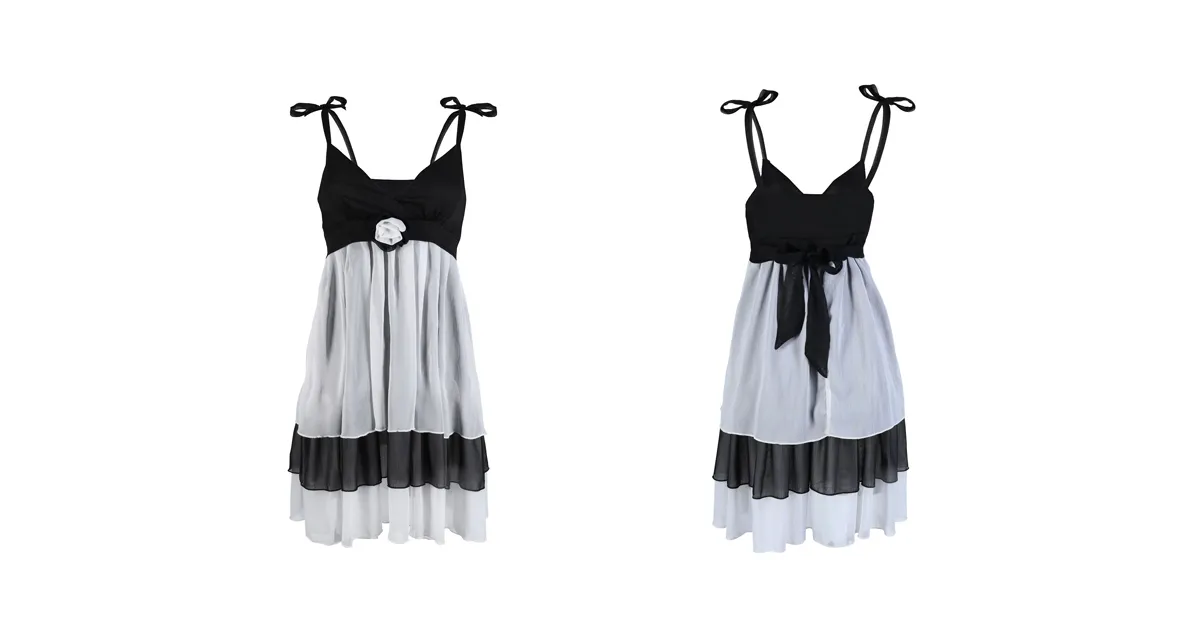
6 - Take Photos of the Dress Inside-Out for Compositing
In the final step, we need to photograph the dress inside-out to present both sides of the straps. This is where photographers often encounter problems.
However, a simple technique in editing, compositing photos makes the process quick and easy. Typically, either our photographer handles this, or we can outsource the task. It doesn’t take much time or effort, so even outsourcing is quick and affordable.
Either way, we simply flip the dress inside-out and redress the mannequin. Lay the straps exactly as they were in the original photos, and again move to the control station to photograph the dress. The images we get here we use as composite photos in post production. This is how we make the straps appear to hang naturally on the invisible mannequin shoulders.
Judge the invisible mannequin effect yourself
For More eCommerce Photography Tutorials
If you enjoyed this eCommerce product photography tutorial, join us on the Web and YouTube for the latest from PhotoRobot. Our guides, tutorials, and videos aim to ensure your product photography, no matter the product, leaves nothing to the imagination. Whether it’s ghost mannequin photography of a spaghetti dress or other apparel, our resources are by photographers and for photographers.


