Capturing Images with PhotoRobot Systems
After creating a Workspace in the PhotoRobot Controls App (further referred to as “CAPP”), the Capture interface grants user control over PhotoRobot hardware and cameras to automate image and video capture.
Capture Interface
The CAAP Capture interface consists of 4 main areas:

- Item information
- Folders, frames and images
- Hardware configuration
- Sequence control
Create New Item
In CAPP, a project can consist of one or more single items, while the item is typically a specific photographed object. An item can then include one or more folders to keep different types of images separate. The most common example is to designate one folder for a 360 spin (“Spin”), and another for still images (“Stills”).
Before starting photography, you must add a new project (unless using an existing one), and have at least one item.
To create a new item manually, go to Project and select Add item.
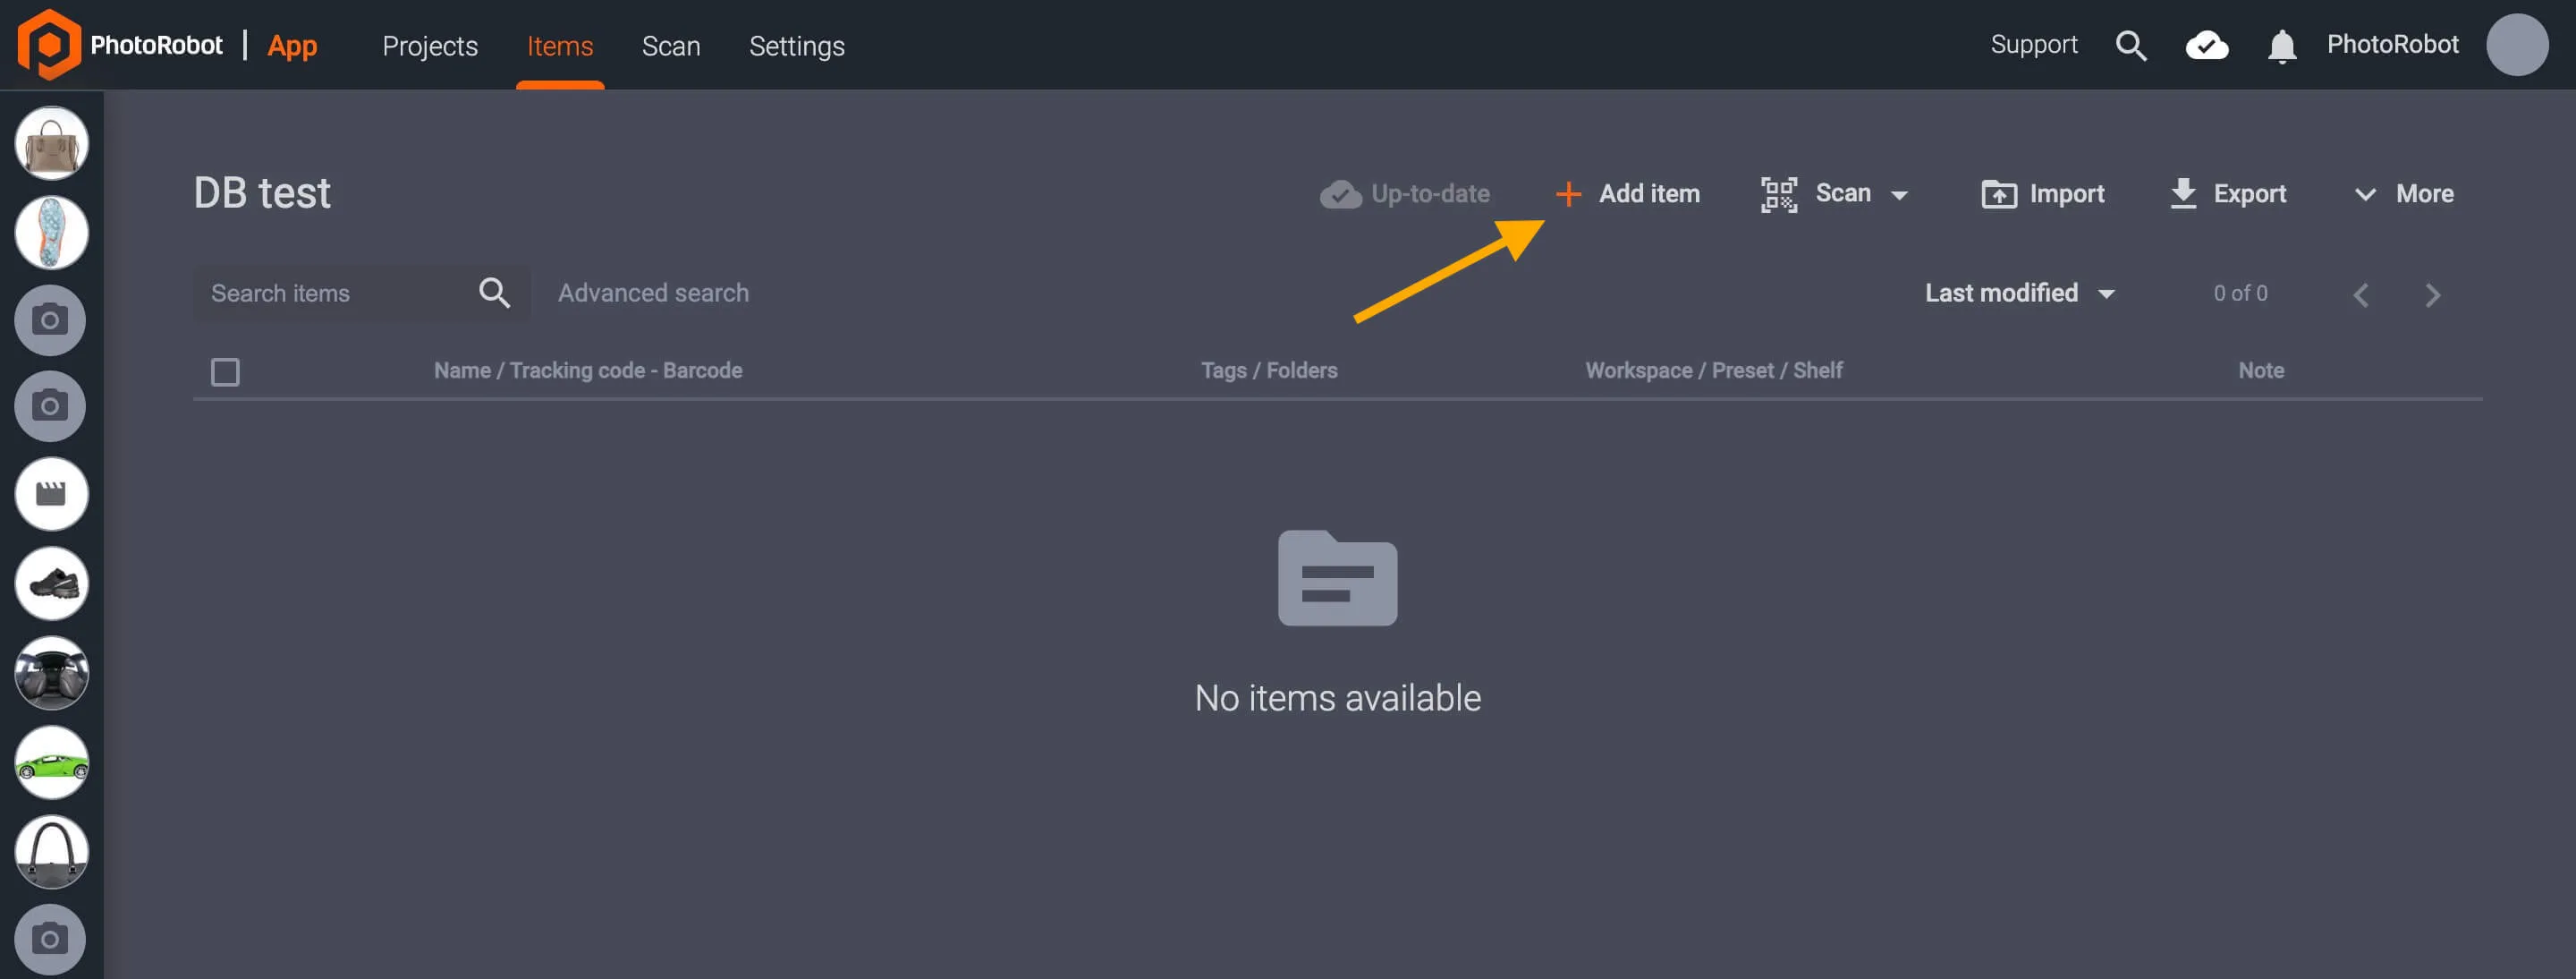
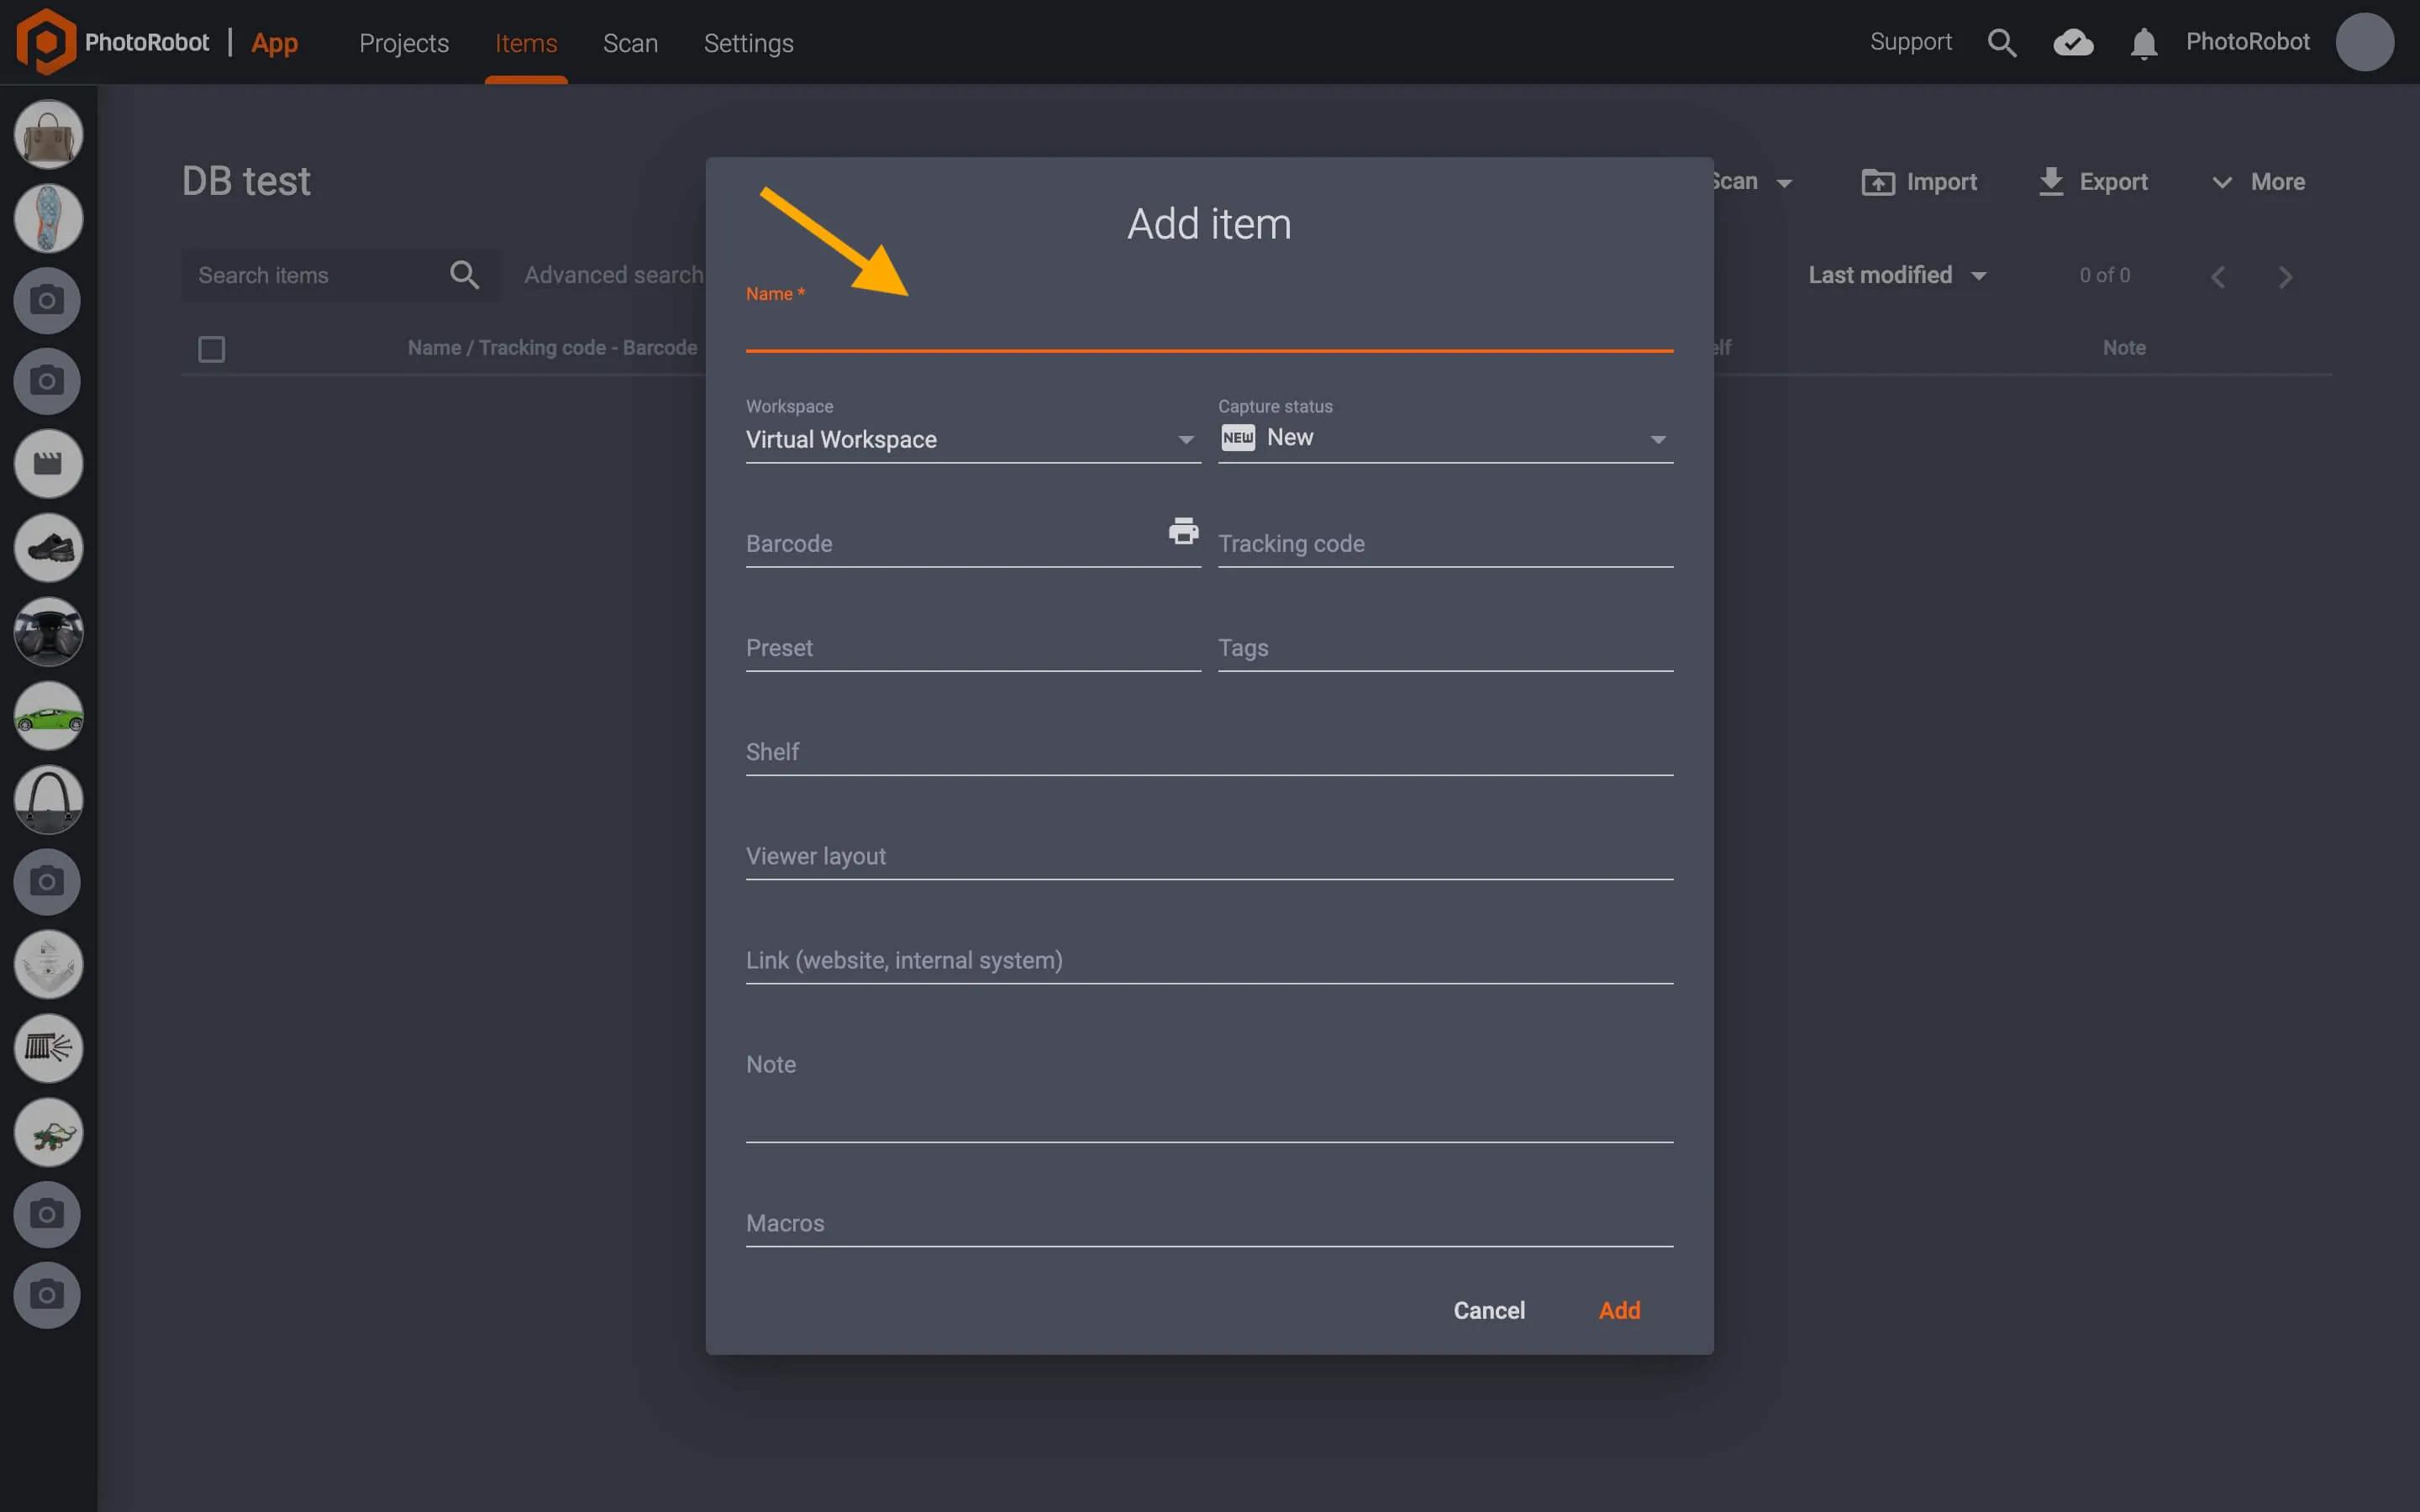
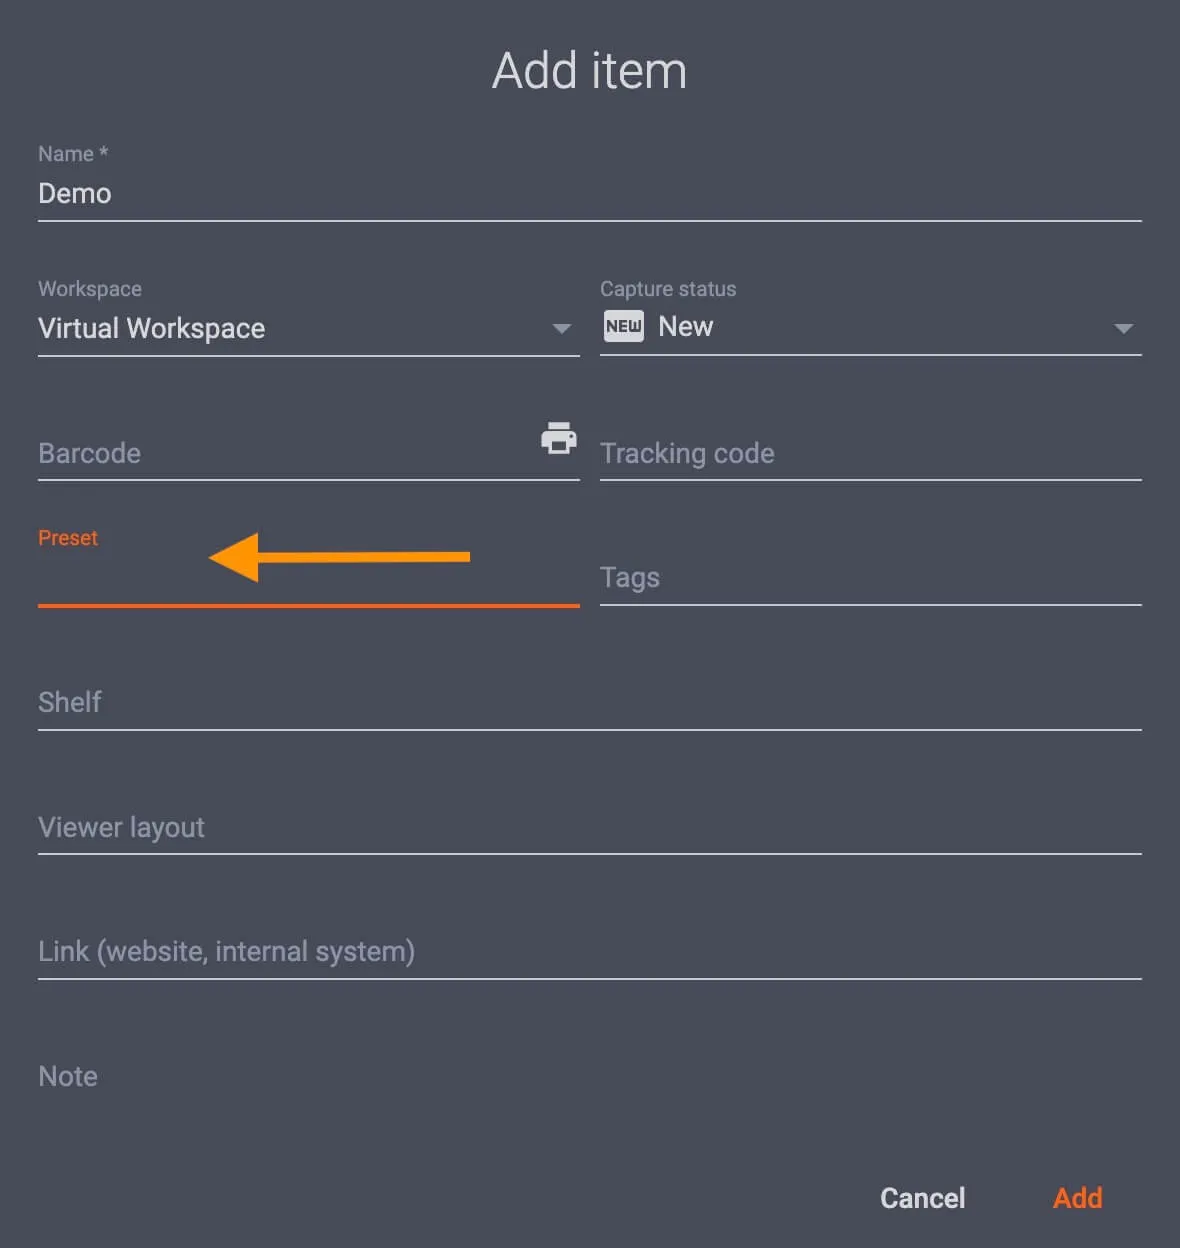
Next, in the window that appears, completing the mandatory Name field will enable the Add button to create the new item. Here, there are also options to fill in more item information: codes, links, notes, macros, and more, although these fields are only optional.
Note: If the new item has a barcode, it is possible to input or scan the item barcode into the system when manually creating a new item:
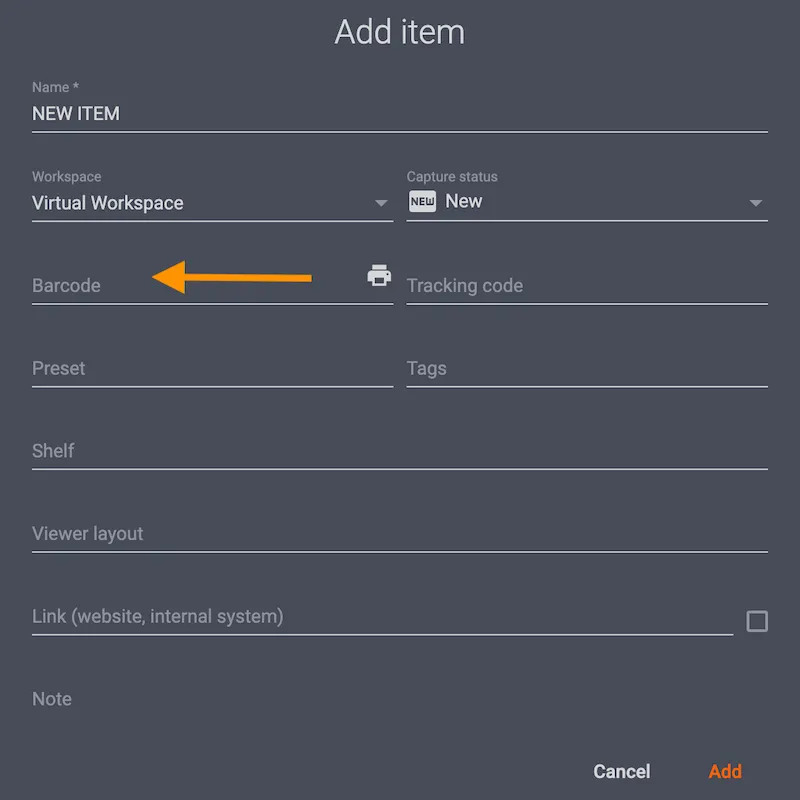
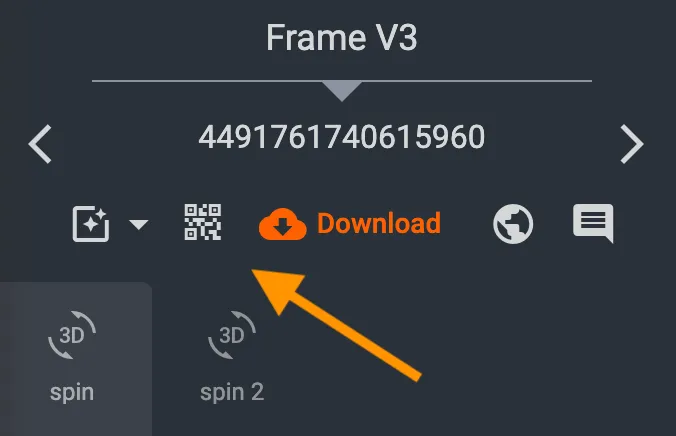
Adding an item barcode to the item will enable the display of the barcode directly within the Capture mode interface by clicking the barcode button in the Item information area.
Remember to consider the license type you are using for CAPP. If using a Cloud-based license, there will be more attributes in addition to those in the fields above.
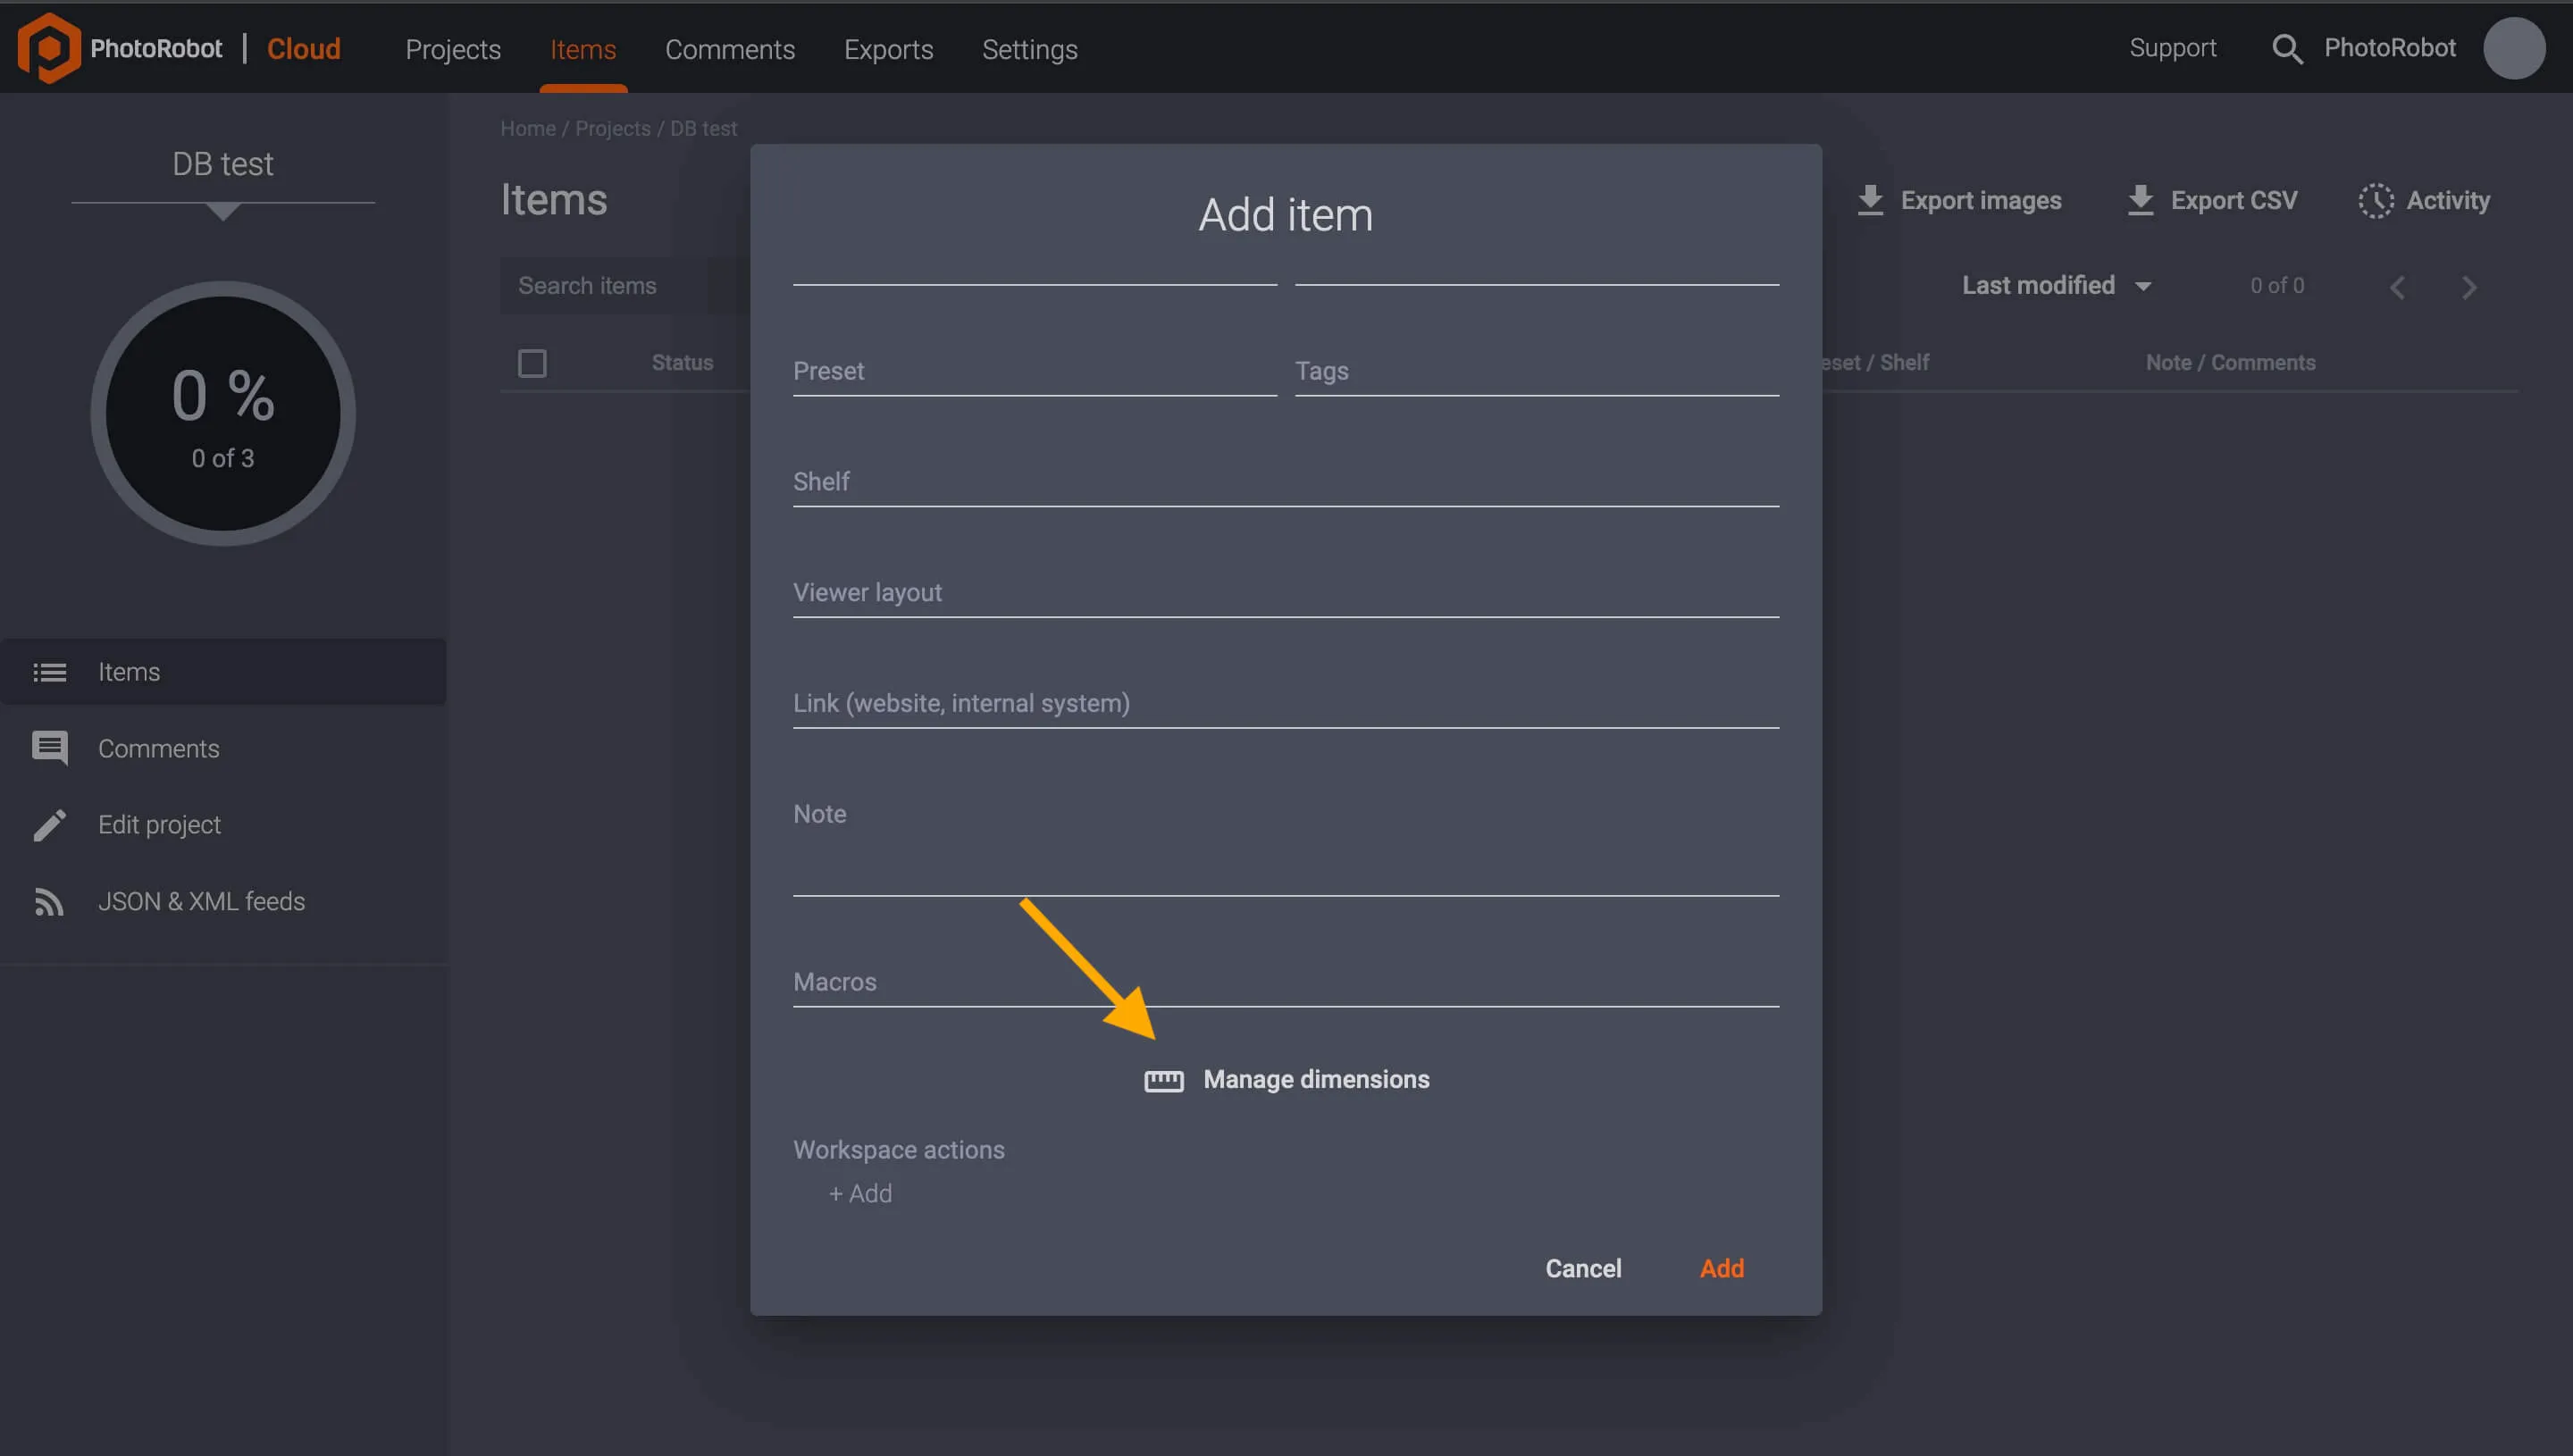
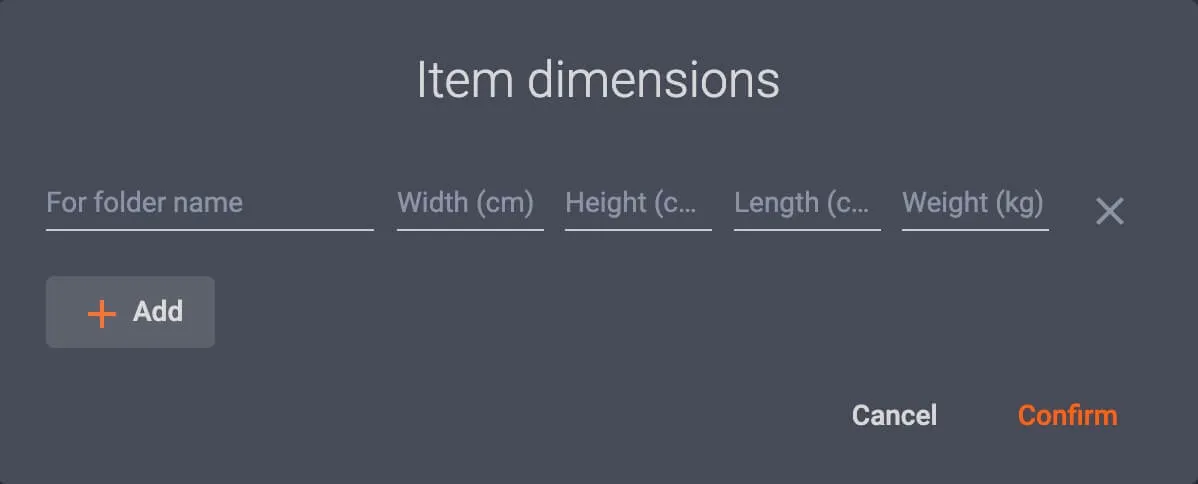
With the Cloud-based license, scroll to the bottom of the new item options, and select Manage dimensions to add an item’s width, height, length, and weight. Note: An active Cloud-based subscription enables users to add measurements without any limits. Fill in the attributes, and select Confirm to add the dimensions to the item.
Clicking Add then creates the new item with all user-configured attributes.
Import New Item
Additionally, it is possible to create multiple items in one batch using the Import function. A prerequisite of item import functionality is to import via CSV file. CSV files contain all attributes for each item the user will import.
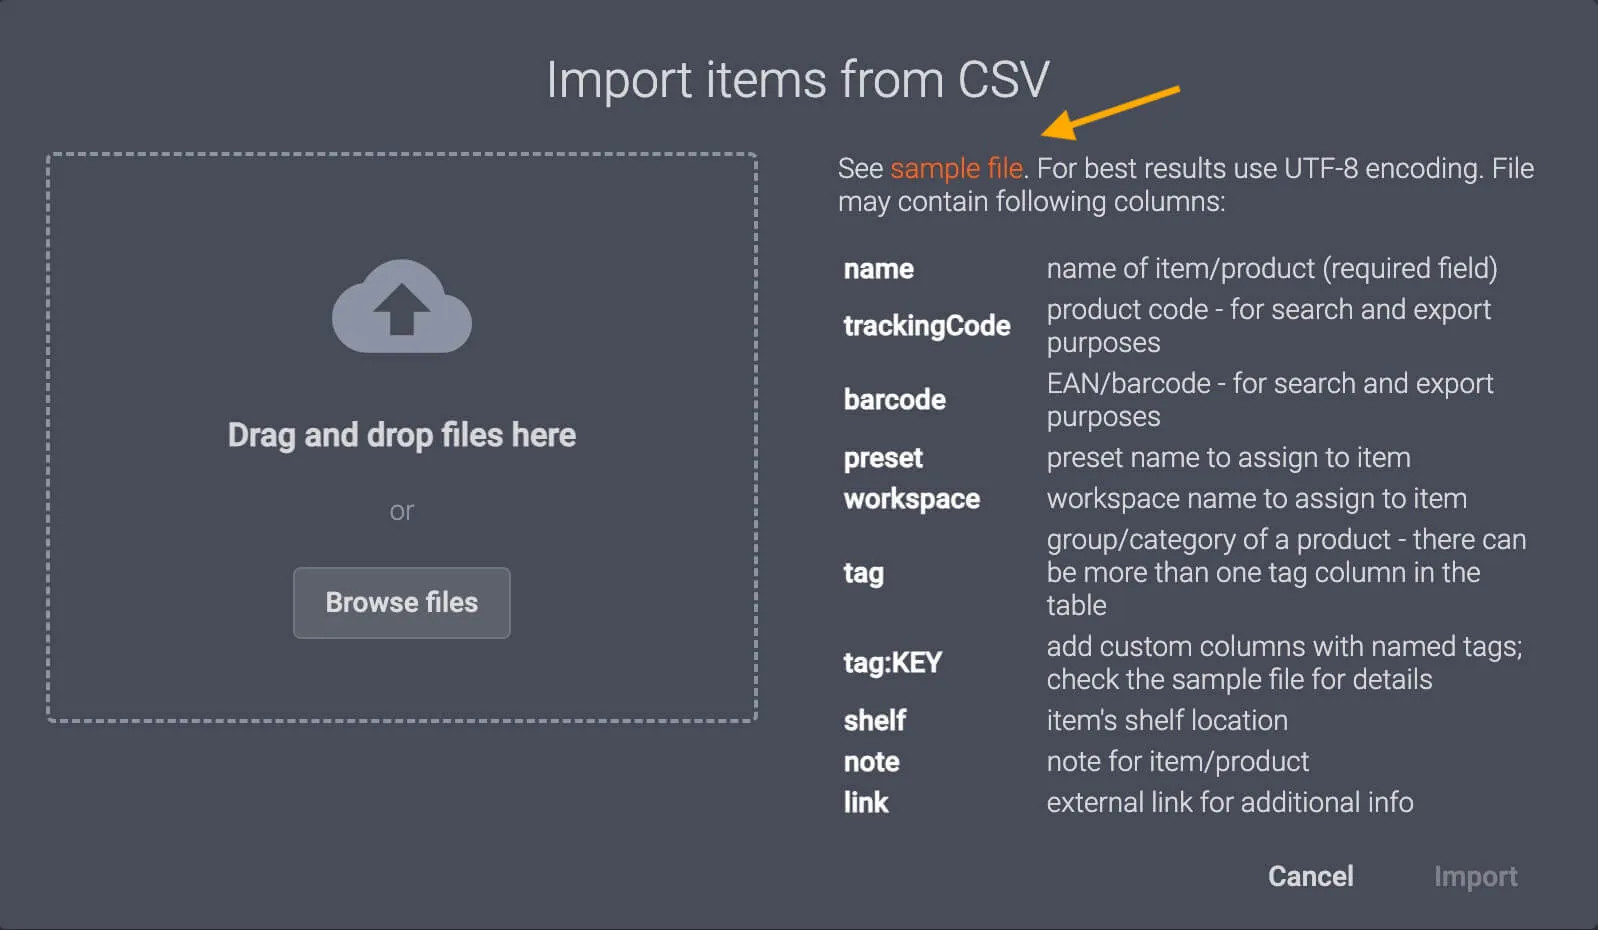
The CSV file stores tabular data in plain text, with delimiters to separate each individual data record. Note: There is a sample-import.csv file for item import, available for download directly in the application.
To import new items, go to Project and select Import.
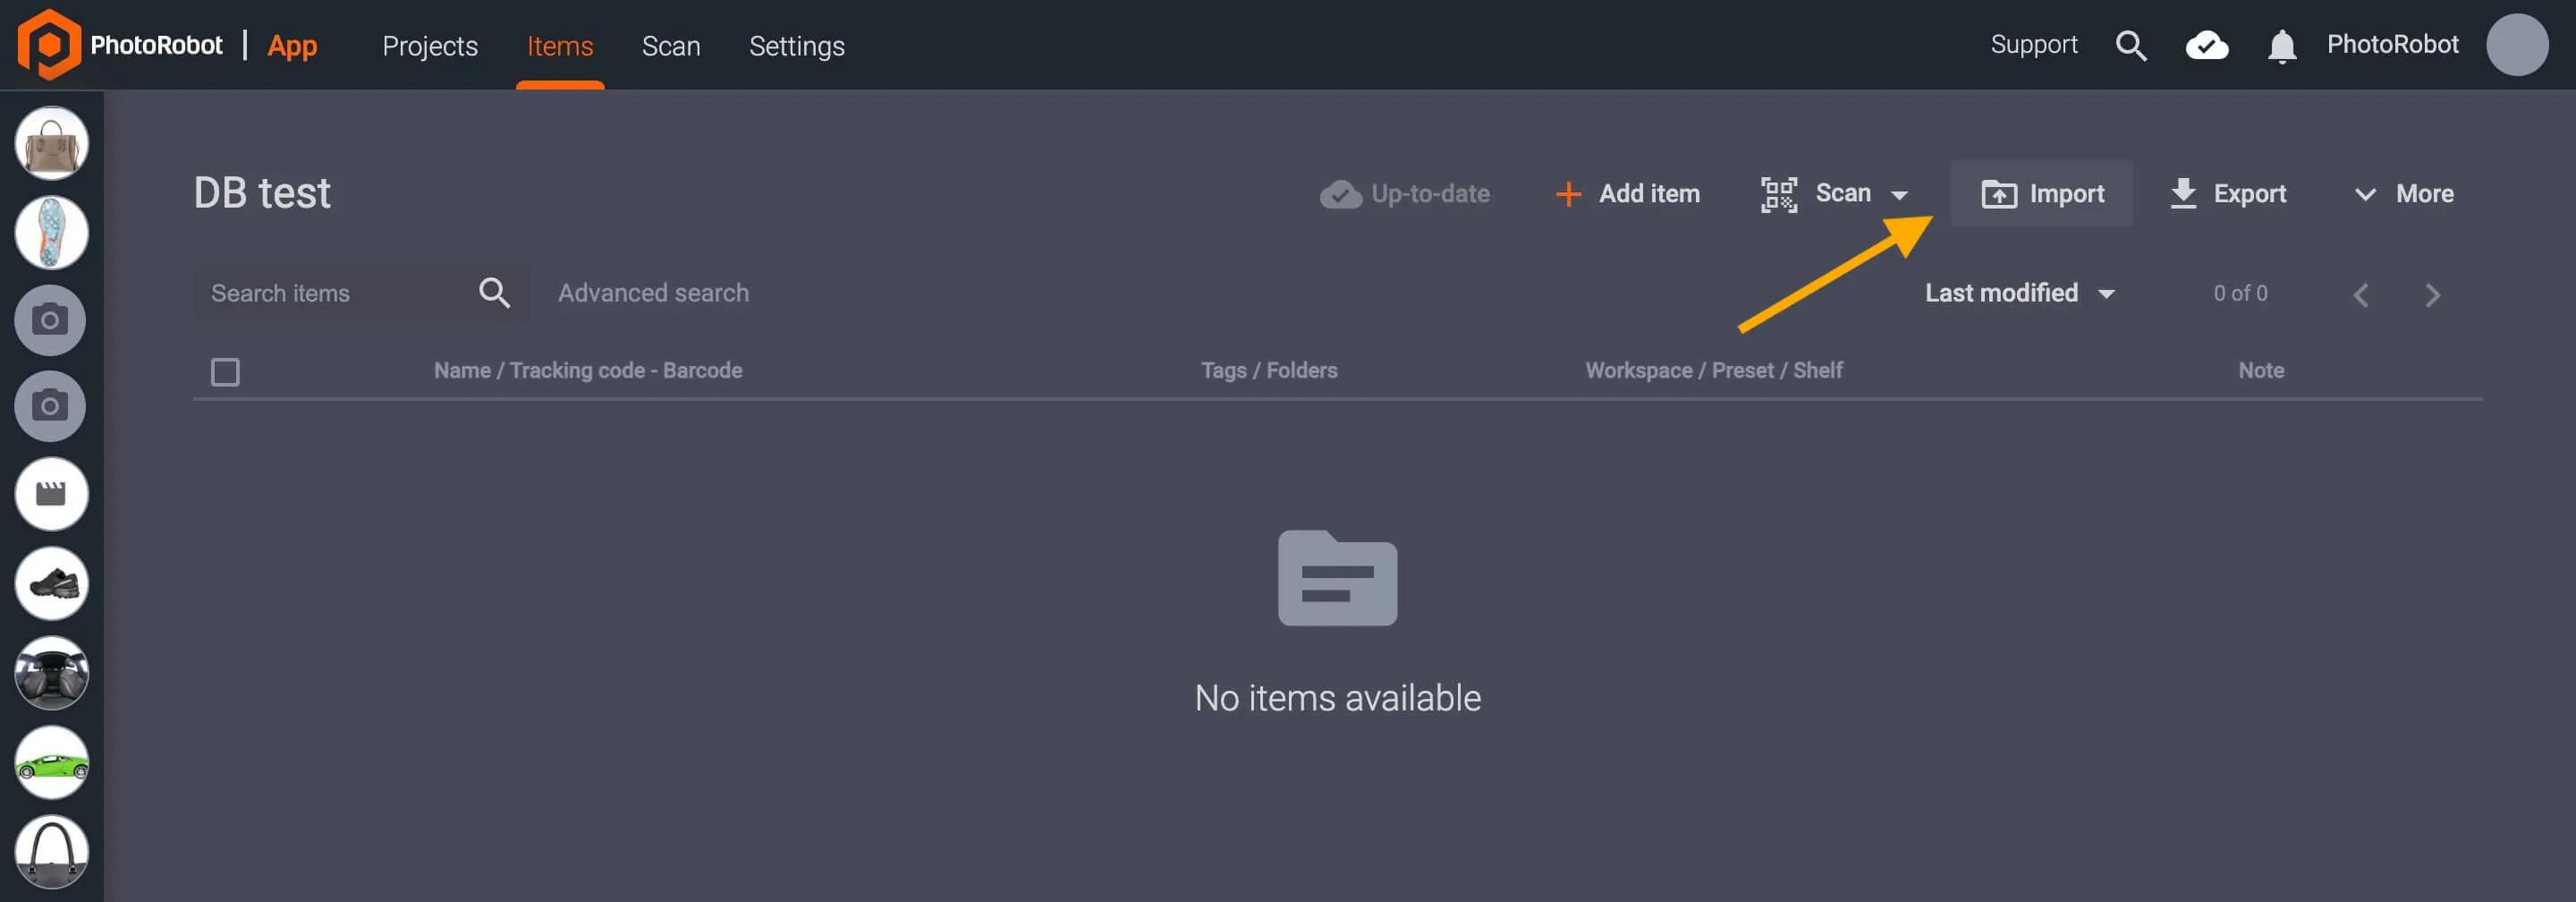
Then, in the pop-up window, it is possible to drag and drop a CSV file, or to browse local folders to import into CAPP via the Browse files button.
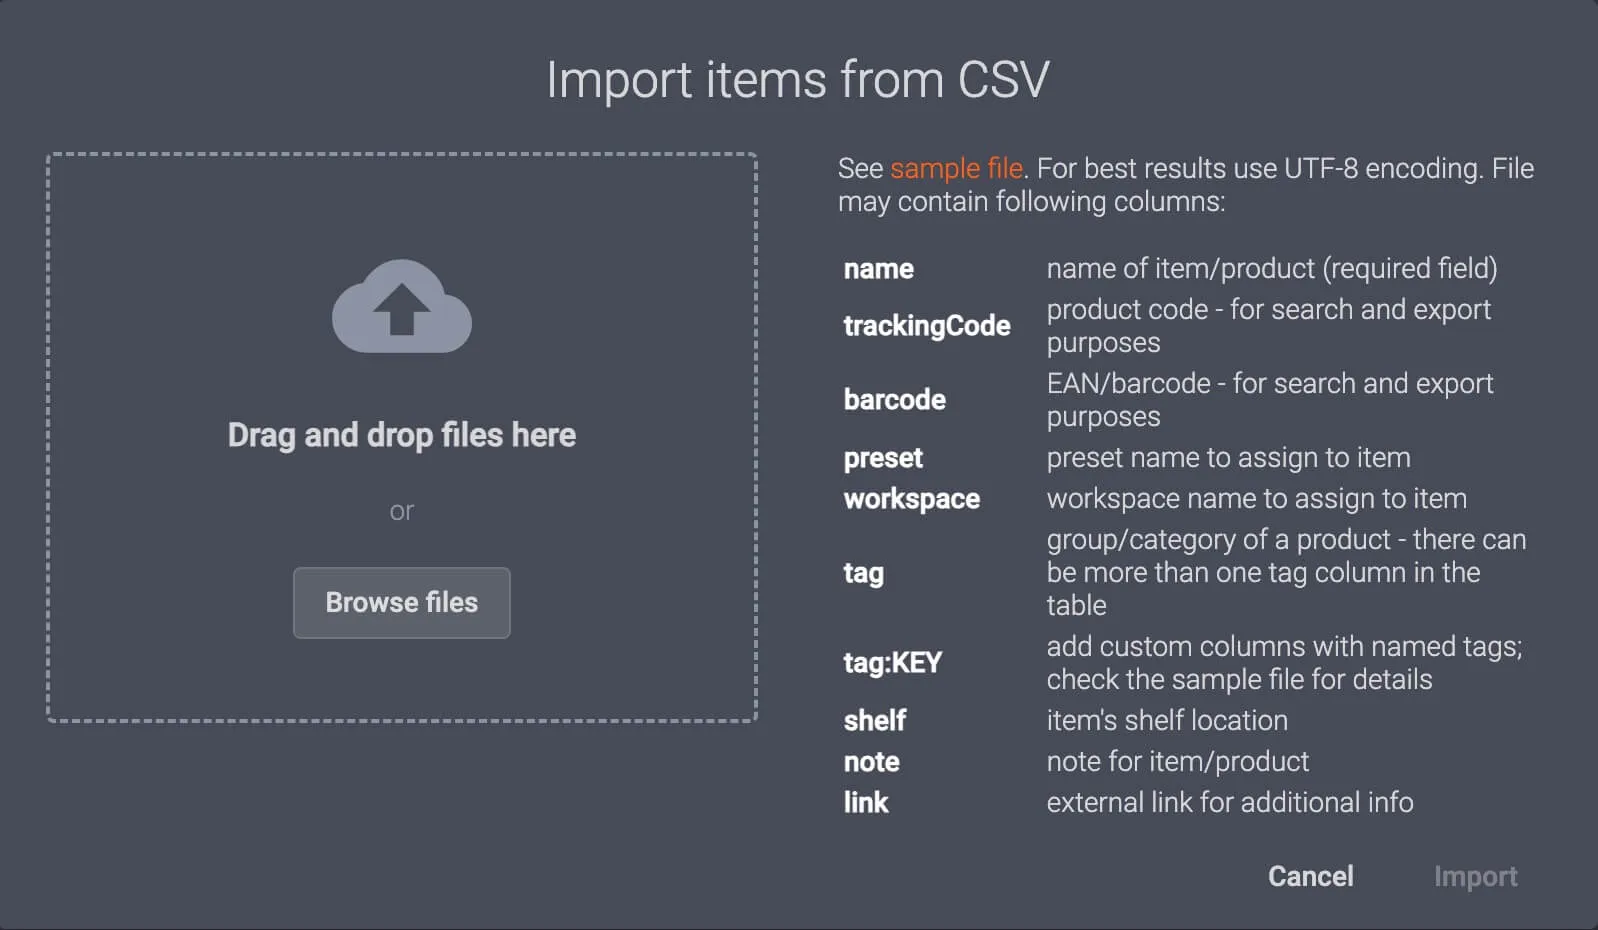
To use a sample CSV file, click Sample file in the top-right part of the interface. This downloads the sample CSV to the local computer.
Remember: Item import can include item dimensions (length, width, height, weight) without any limit on an active user license.
Auto Create New Item
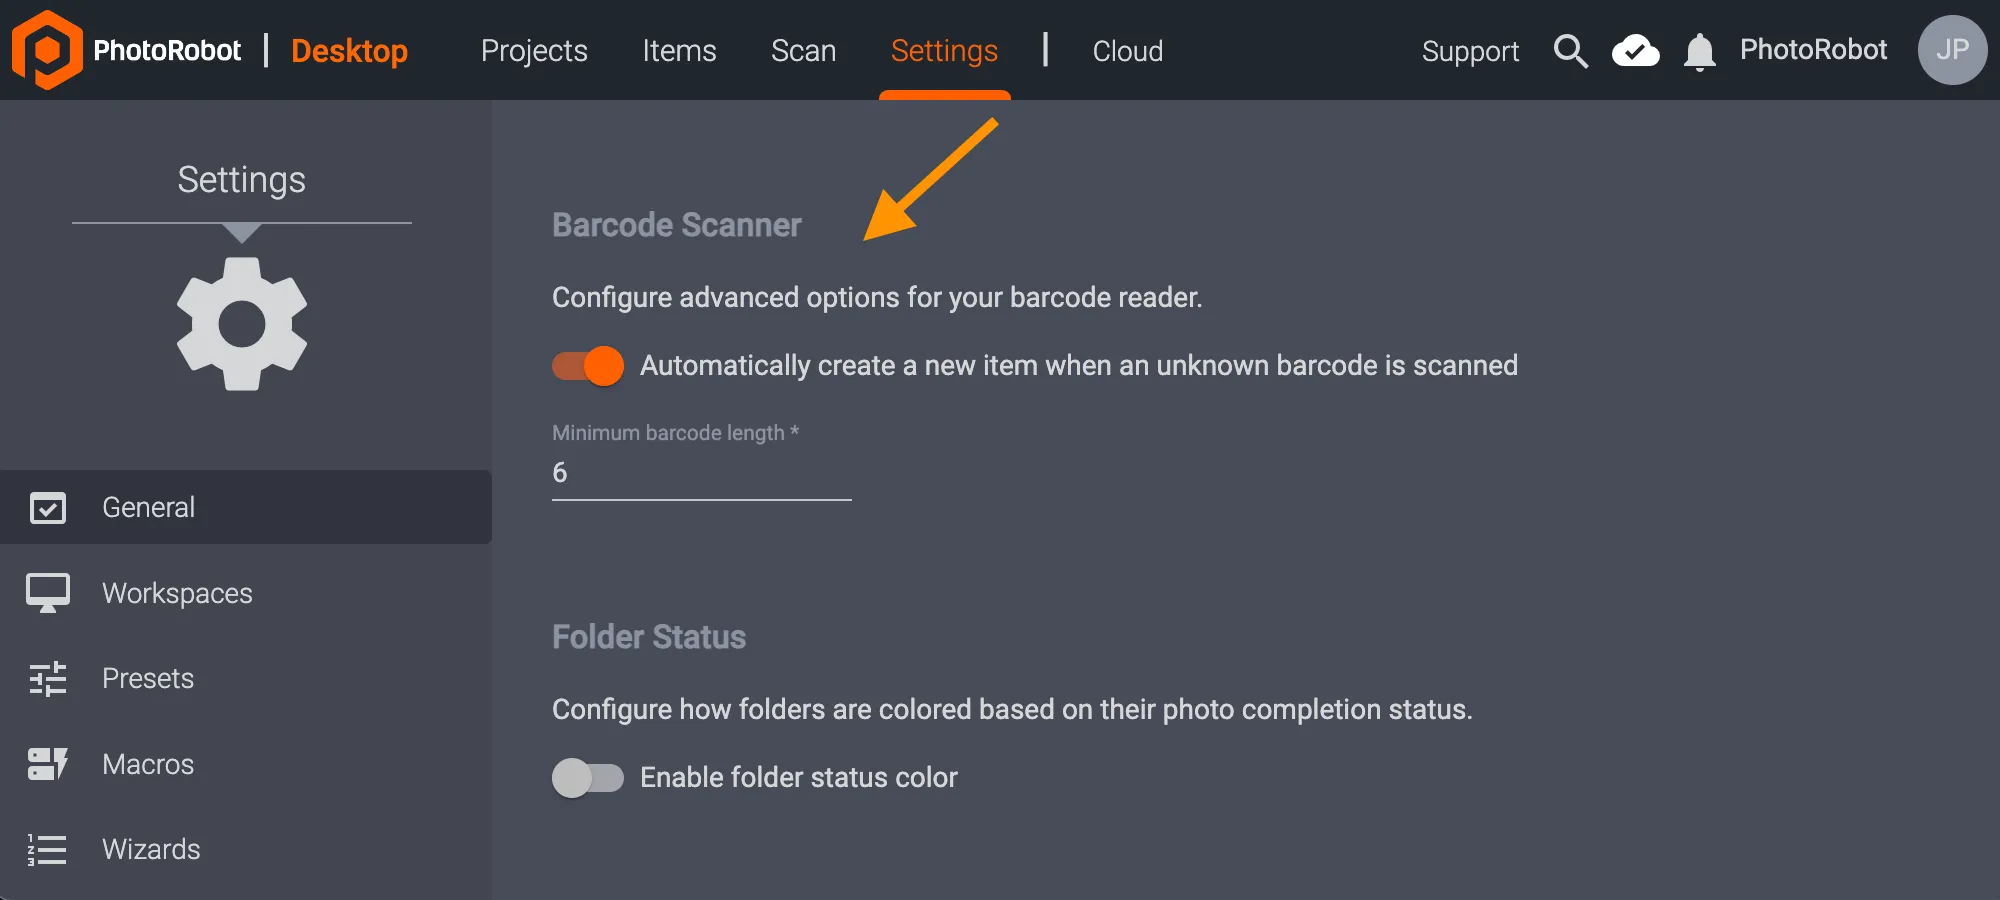
As an alternative to creating items manually in CAPP, advanced barcode scanner settings enable the automatic creation of new items after scanning an unknown barcode. This setting functions to identify an item at the point of capture (typically via barcode or QR code). An operator simply scans an unknown code, and a new item is automatically created in the project. The item naming will be according to the scanned string, and in the item’s identifier field.
To enable or disable automatic item creation by barcode scanner, access the General Settings in the local desktop version of CAPP. Next, locate the Barcode Scanner settings, and use the toggle to configure on or off Automatically create a new item in the system when an unknown barcode is scanned.
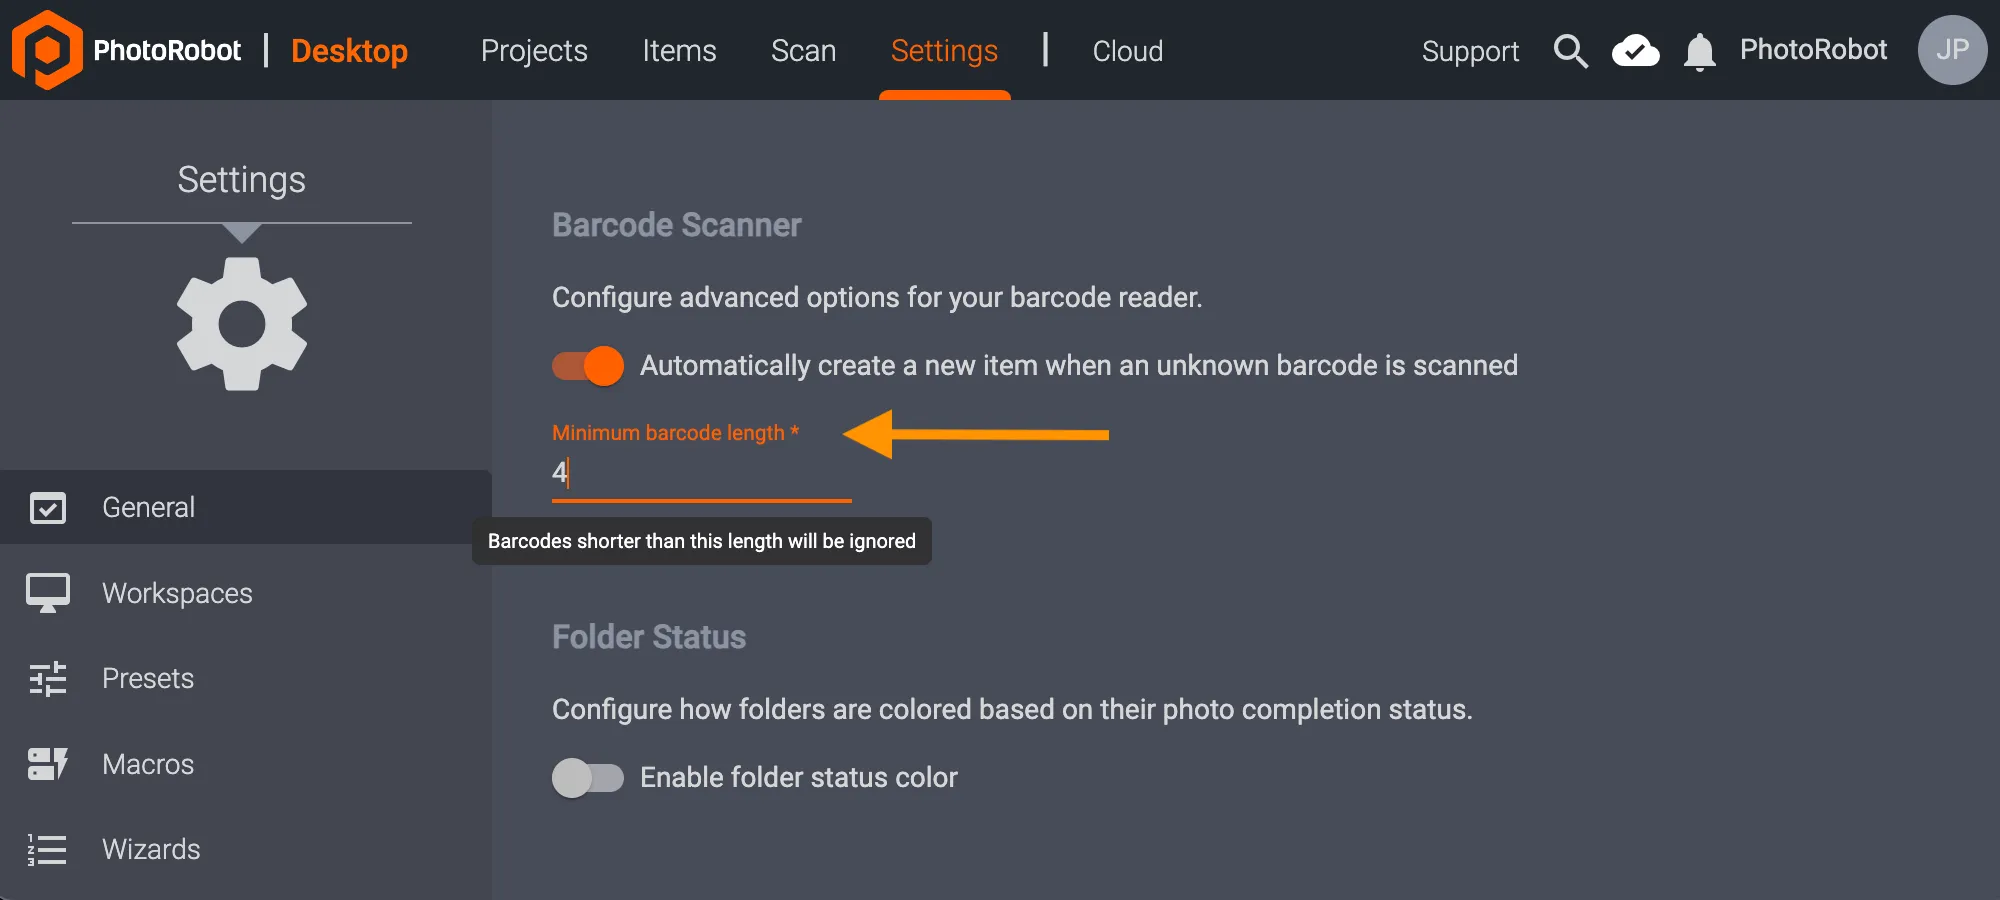
Note: As of CAPP version 2.13.beta58, there is now the option to configure the minimum string length for barcodes. Previously, the minimum barcode / QR code length was 6 characters (to avoid dual interpretations of the scanned string among other issues). Now, this number is adjustable to allow, for example, four-character identifiers to work without the need for further adjustments.
To adjust the minimum string length for barcodes / QR codes, configure the Minimum barcode length also in the local version of CAPP in General Settings - Barcode Scanner. Barcodes shorter than the length input will then be ignored by the system.
Item Information
This section of the CAPP Capture interface provides basic information about the item, and consists of 3 main areas.
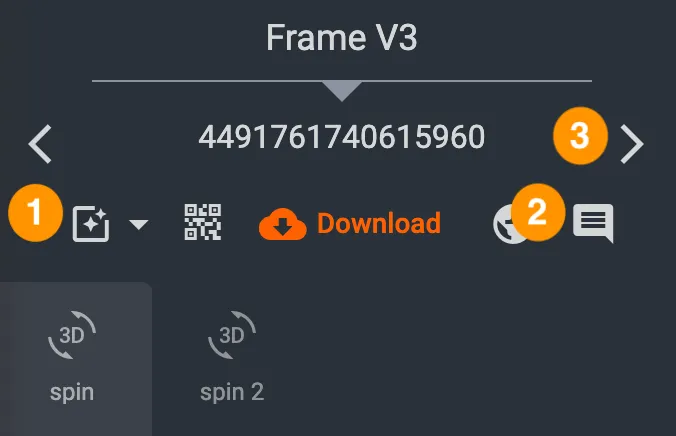
- Capture status - Toggle item status to Captured, Edited, Recapture, or Fix Editing
- Comments - Click to access all item-level comments
- Next / Previous - Use to navigate between items according to selected item status filter
Note: If the item contains a barcode which was either manually input or automatically scanned into the system, the item information area will also display a barcode button. Clicking the barcode button will launch a pop-up window to display the item’s barcode.
Tip: Set Item Status Filter to limit results to quickly find and navigate projects.
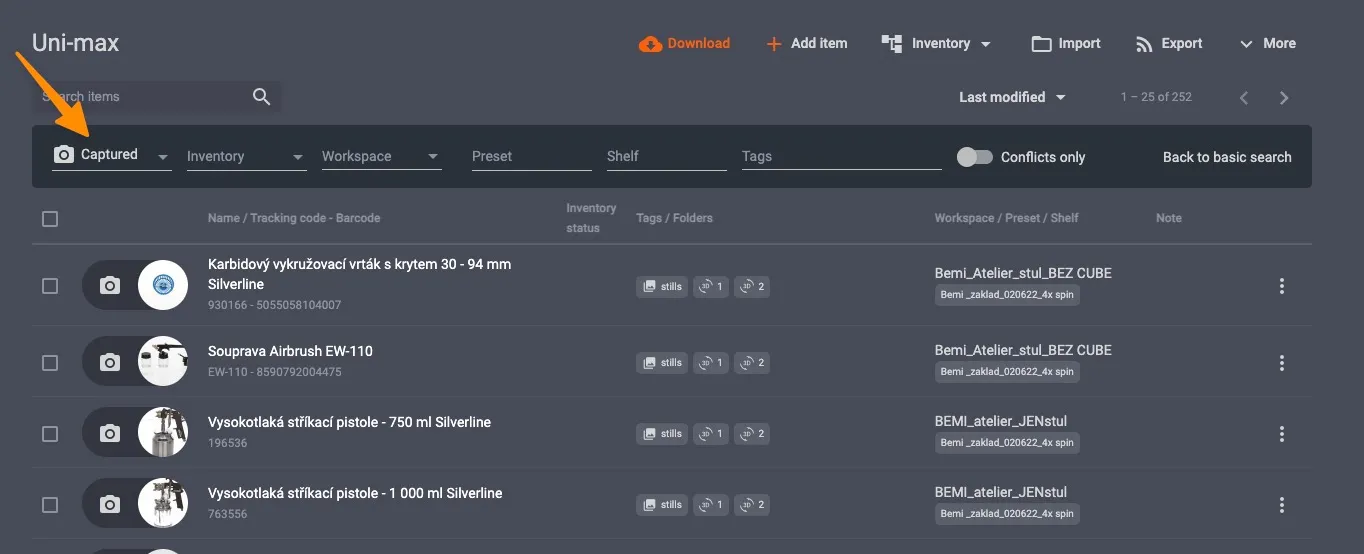
- Filter results to display only items marked: Captured, Edited, Verified, Approved, or Rejected.
For example, if responsible for verifying images, limit results to “Edited” to locate & review only items that have already been post-processed. After review, set item status to “Verified” or to “Fix Editing” to approve or reject changes and notify team members. The item status will inform responsible parties when images are ready for publishing, or when more editing is necessary.
Folders, Frames & Images
All visual assets are organized into Folders, with folders divided to represent different types of outputs. The three types of folders are:
- Spin (360 / 3D)
- Stills
- Video
Each Folder contains individual frames. A frame consists of information about the photographed angle (instructions for photographic processes), and one or two versions of the image:
- Original - The original file as received by the camera
- Edited - The image file which has been edited via PhotoRobot’s post-processing tools
Navigate the Folder interface as follows:
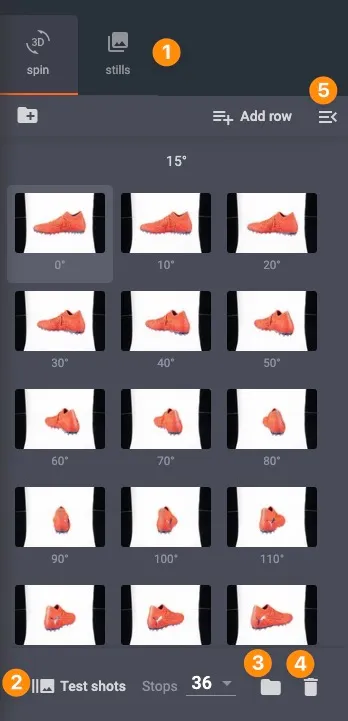
- Select between folders (1)
- Experiment with configurations by taking Test shots (2)
- Open image storage on a local computer computer (3)
- Clear photos for re-capturing (4)
- Access folder menu* (5)
The Folder menu includes the following functions.
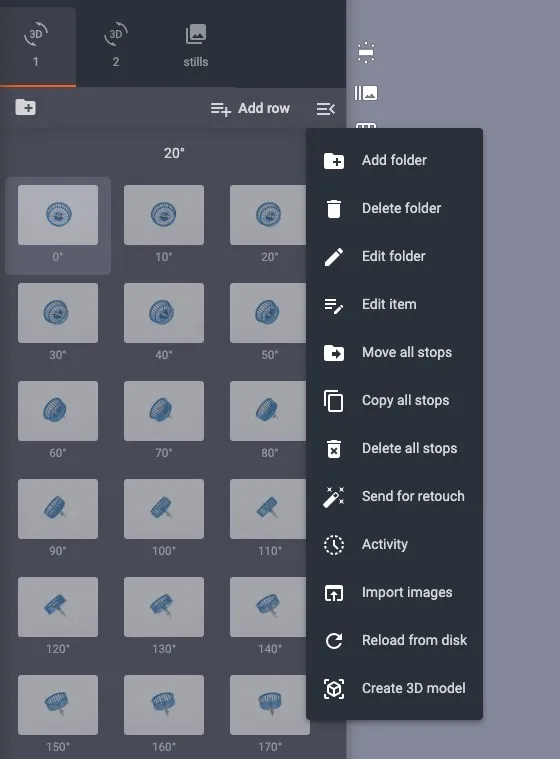
- Add / Delete / Edit folder
- Copy / Move frames between folders
- Delete frames - completely remove all frames together with all images and angle configurations
- Send for retouch - mark item for external retouching
- Activity - view the activity log of an item
- Import images - upload your own images
- Create 3D model - generate a 3D model from images contained in the folder (*Available only on MacOS; with multiple PhotoRobot supported 3D model formats)
Also, within each frame there are additional menu options:
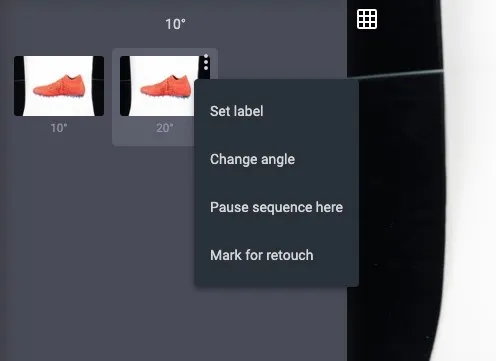
- Set label - Create labels for individual frames (e.g. “hero shot - front”, “3 / 4”, “back”, or GS1 image naming conventions)
- Change angle - Adjust angle on an individual frame
- Pause sequence here - Select to pause the photography sequence at this frame and wait for an operator to resume the shoot
- Mark for retouch - Specify image for external, 3rd party retouching
Sequence Control
To start a sequence, press the Play button (1) at the bottom of the screen:
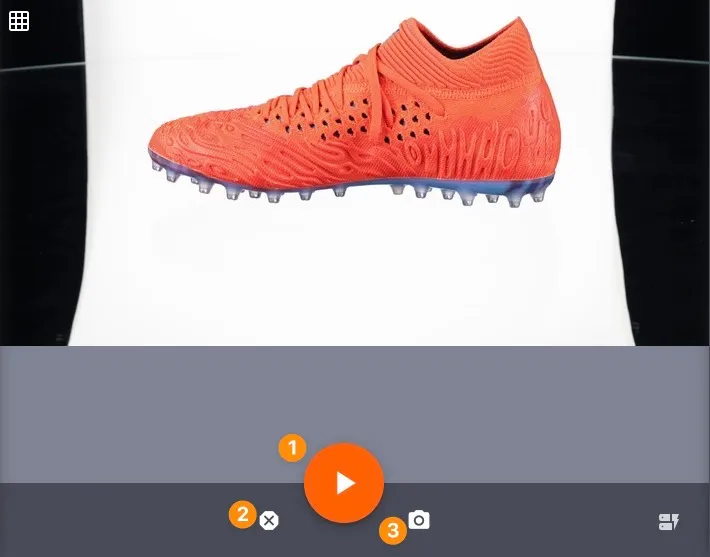
Interrupt a sequence at any time via the Emergency stop button (2).
In a stills folder use the Take snapshot button (3) to capture a frame without defining it first. The snapshot will then be captured and included as a new frame in the stills folder.
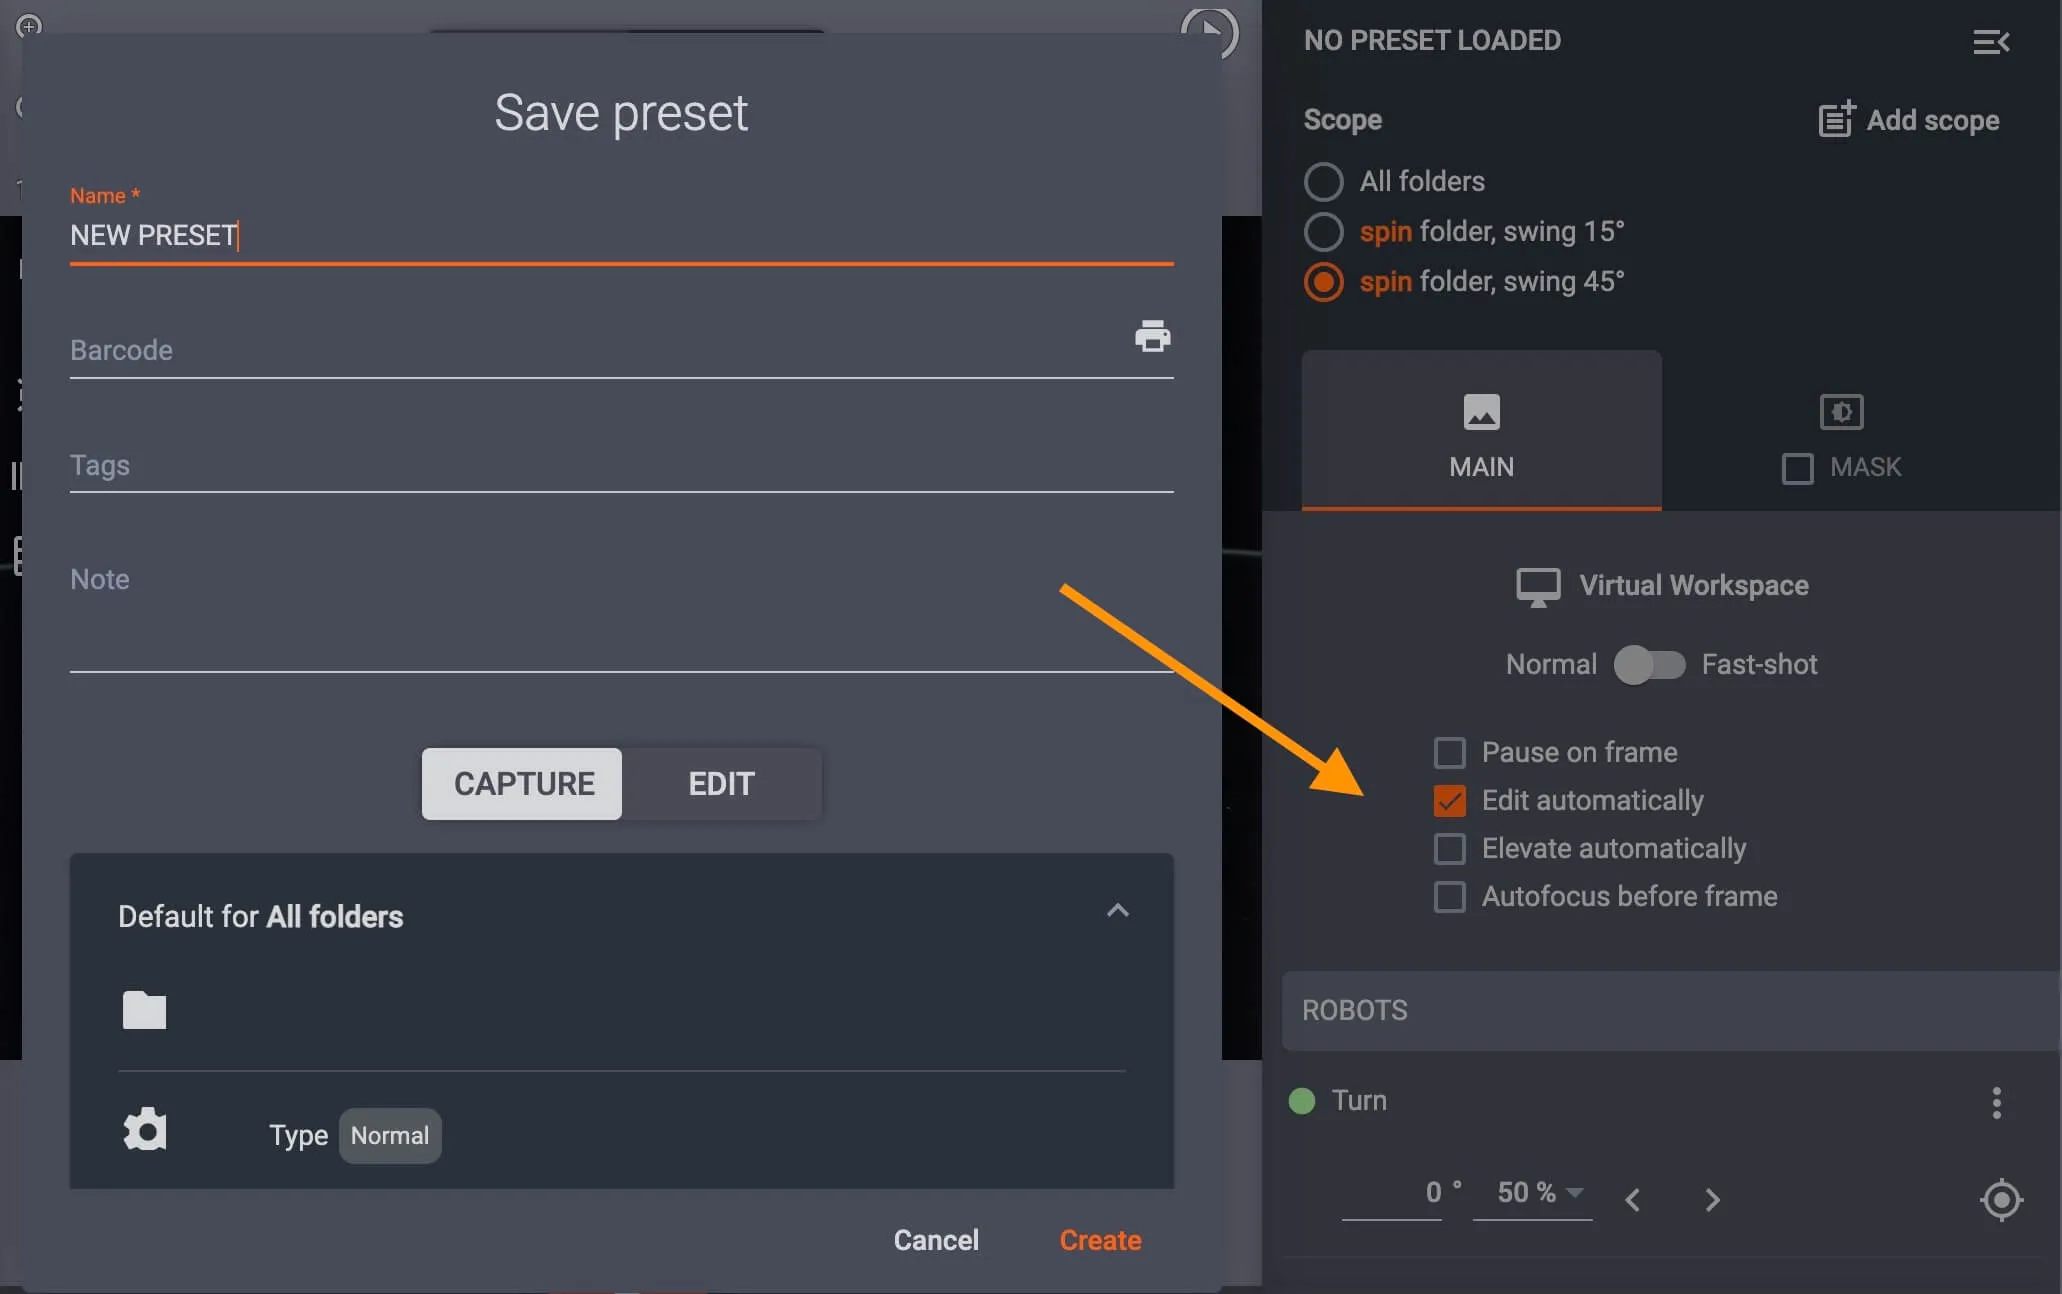
Sequence Options
Along the right hand-side panel of the CAPP interface, configure sequence options. Sequence options include:
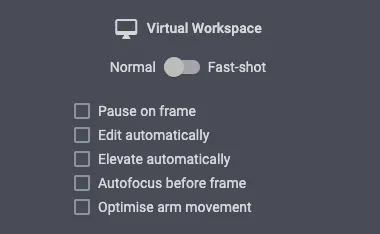
- Workspace configuration - Access workspaces or change between each
- Normal vs Fast-shot toggle - Configure to pause turntable rotation before taking photos (Normal), or, for significantly quicker sequences, to take photos during non-stop rotation (Fast-shot)
- Pause on frame - Toggle on to command turntable rotation to stop after each frame (useful when creating product animations)
- Edit automatically - Configure to automate editing immediately after capture
- Elevate automatically - Enable for automatic elevation to the center of a product before beginning a sequence (using item dimensions)
- Optimise arm movement - after the sequence, the arm will remain in the position of the last photographed row. The following sequence will start from this position.
Spin
In a Spin folder, find options for 360-degree product photos.
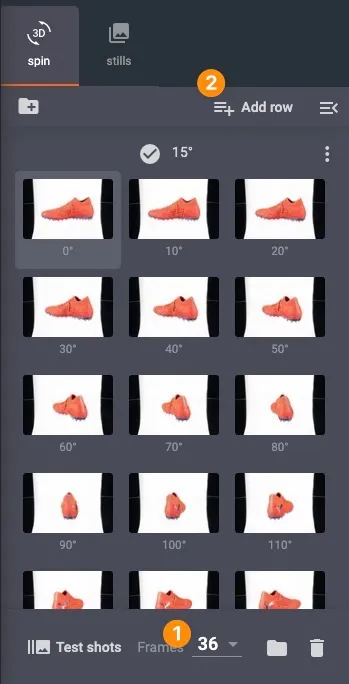
Configure Frames (1) to select the number of frames to capture per rotation (e.g. 24, 36, etc). Use Add row (2) to specify capture of additional rows from a different swing angle (the vertical angle from which the camera points at the object).
Stills
To define which frames to capture in a stills folder, use Add frame in the top right-hand corner of the interface.
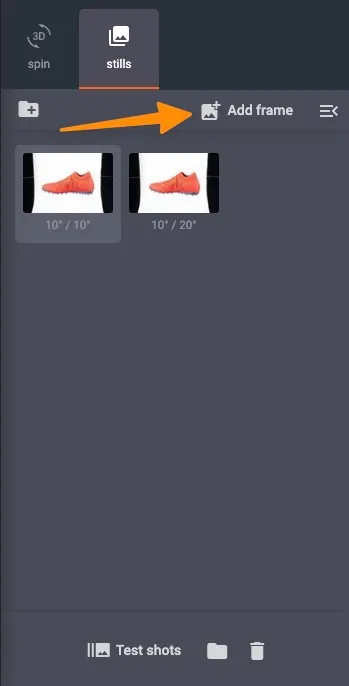
Alternatively, press Take snapshot to simultaneously take a photo and create a new, corresponding frame. Connect a camera over WiFi to take photos by hand and automatically add new frames (close-ups, detail shots) to the stills folder.
Freemask Background Removal
Freemask background removal is a process in which two images are captured for each frame:
- Main image - a standard photo of the object
- Mask image - a photo of the object lit from behind
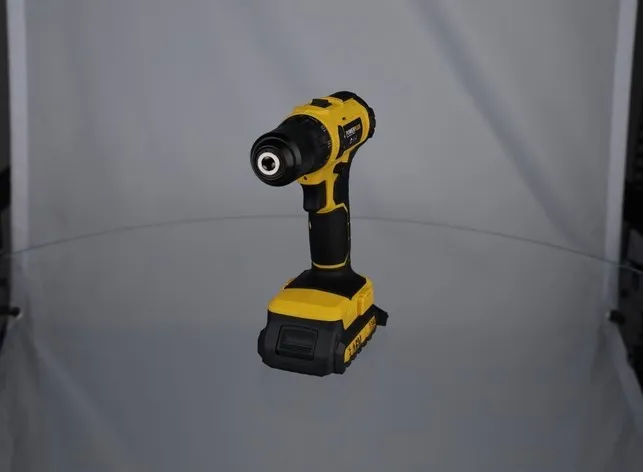
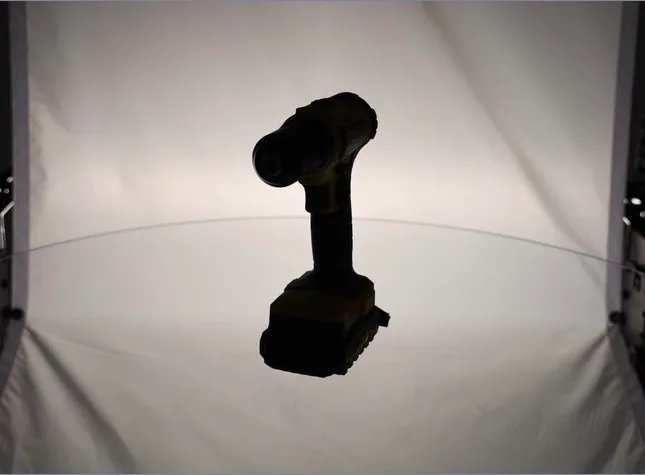
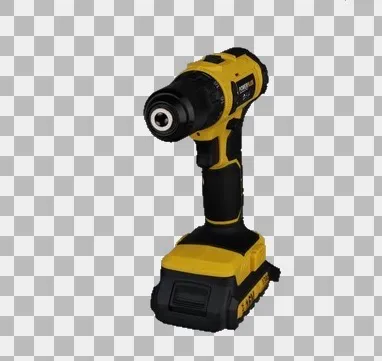
These two images are then composited to achieve a photo with the background effectively removed around the object:
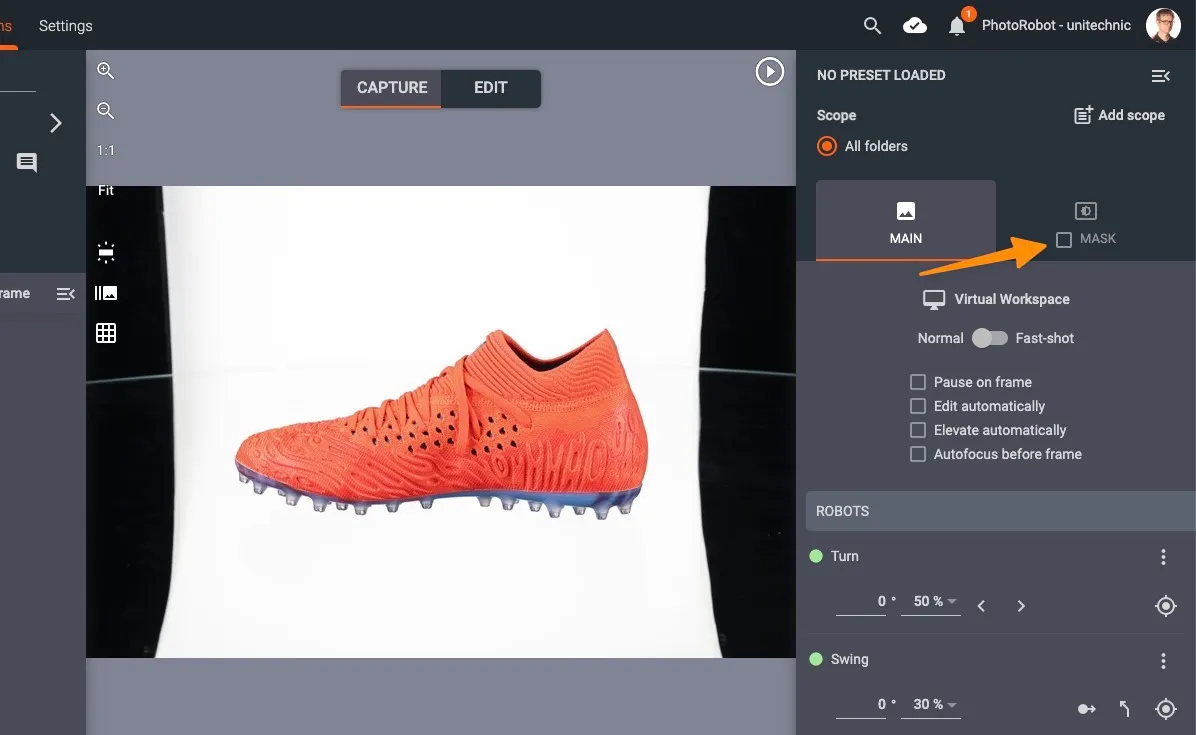
To enable Freemask, select the Mask checkbox on the right hand side panel:
Hardware Configuration
Robots
Depending on the robot (or combination of robots), there are up to 3 types of robotic movements, and control options for position, speed, and calibration of each movement:
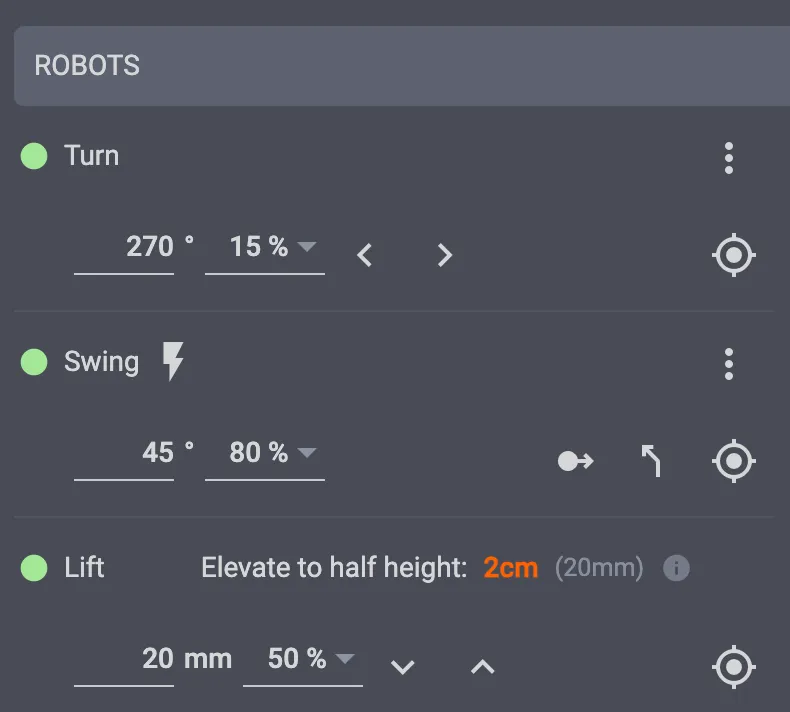
- Turn - Standard to the majority of PhotoRobot devices, Turn enables users to control turntable rotation around its center
- Swing - Configure the vertical angle at which the camera targets an object (i.e. at 0° to remain level with the turntable, at 90° for a top-view overlooking the product)
- Lift - Set camera elevation
Find the position, speed, and calibration settings within the configurable options for Turn, Swing, and Lift:
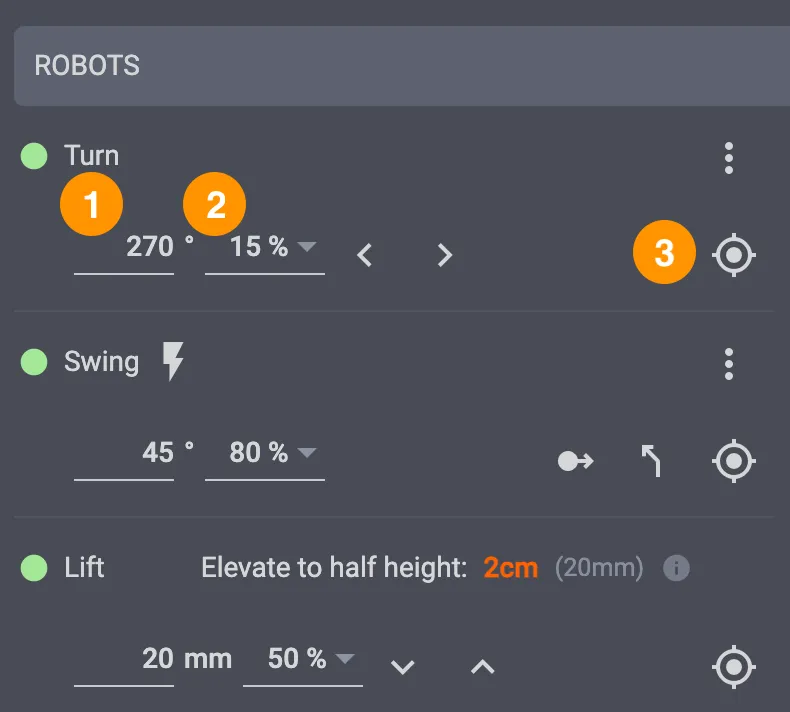
- Use Set Position status (1) to move the robot.
- Configure speed of the movement using Speed input (2).
- Use the Calibration button (3) to set the robot to its starting position.
If configuring movement for the first time, always set the robot to its initial position via Calibration.
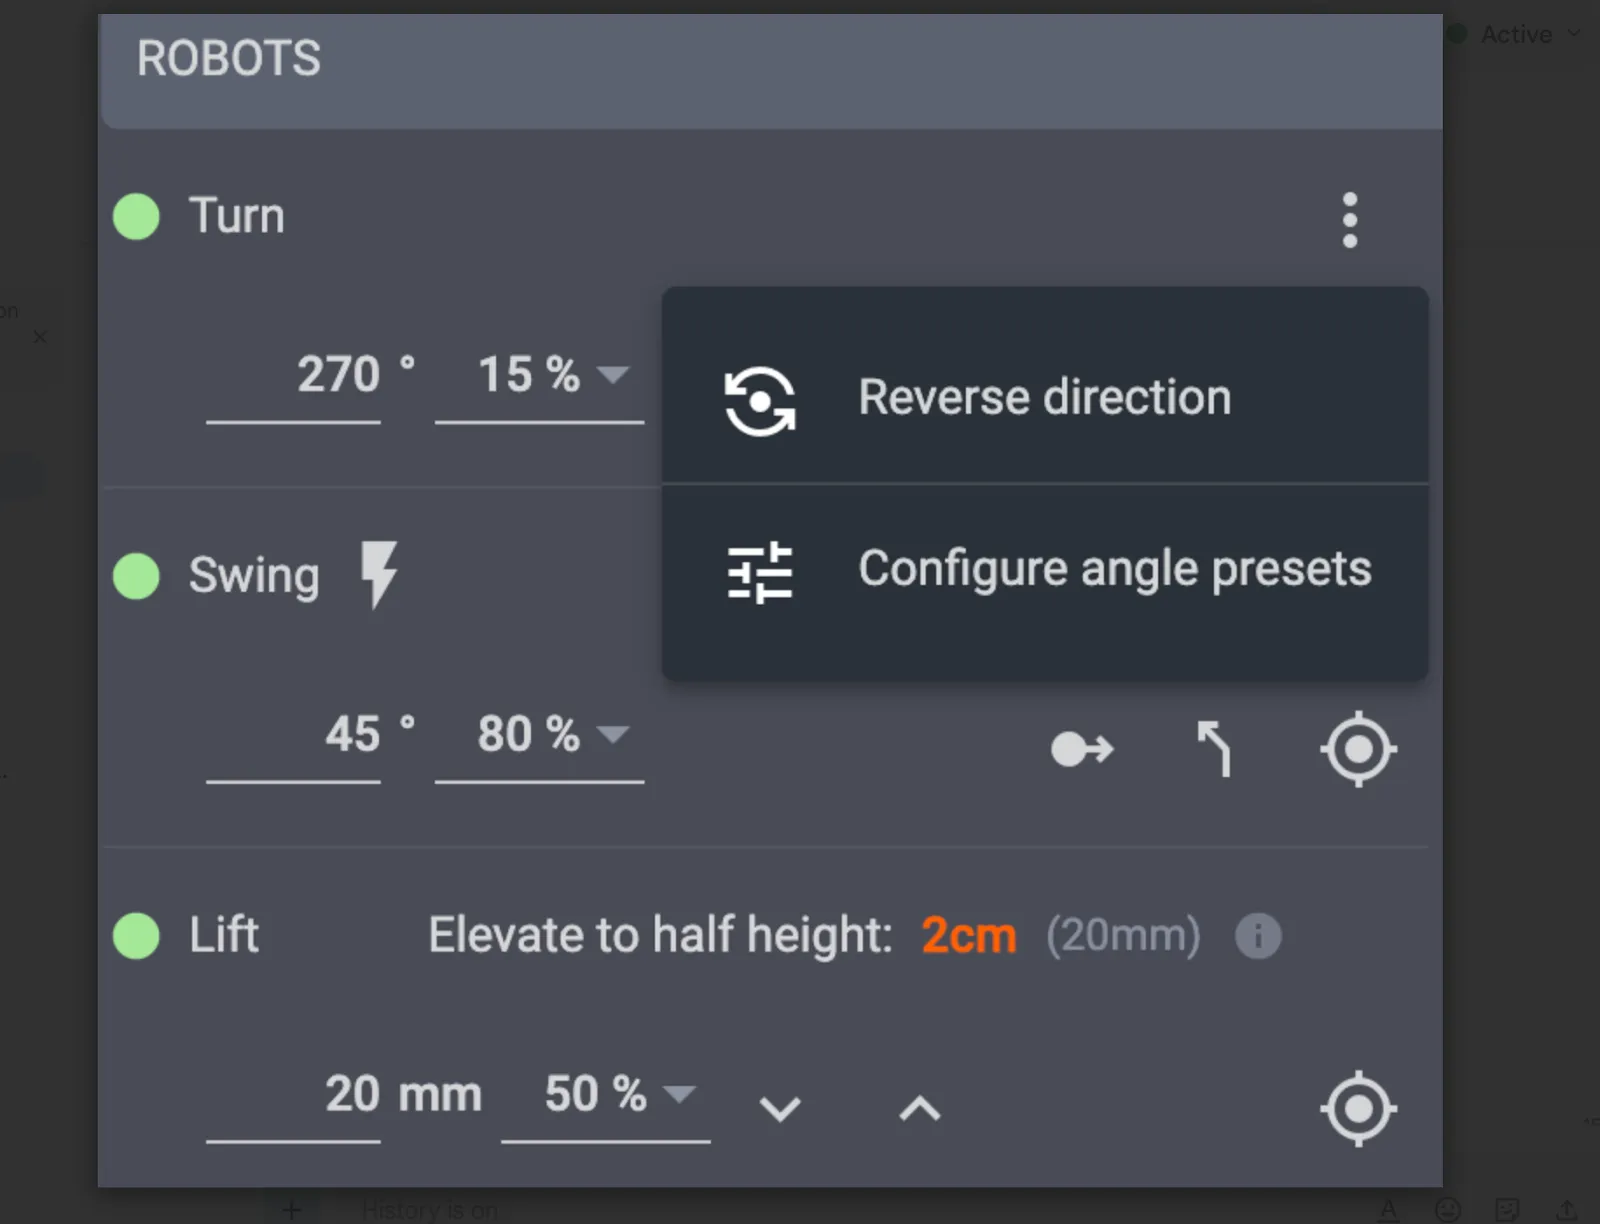
Additionally, as of CAPP version 2.13.3, there are configurable quick-angle presets for Turn and Swing on the Capture mode interface. Click the three vertical dots next to either field Turn / Swing, and then click Configure angle presets.
This launches a pop-up window for the user to input the desired turn or swing angles separated by commas (maximum 4), ex: 0, 90, 180, 270.
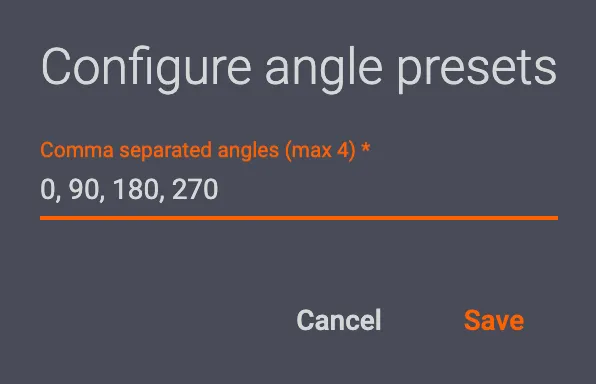
Clicking save will apply the preset swing / turn angles to capture to the robot settings.

Cameras
Enable one or multiple cameras for a sequence via the Cameras interface:
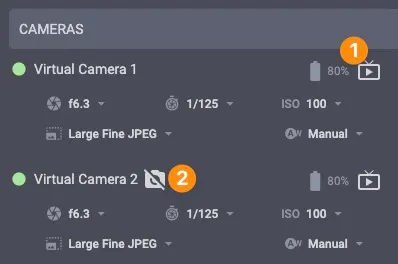
Click on the Live View icon (1) to enable focus point selection via clicking in a Live View picture. Exclude cameras from the sequence via the Exclude camera icon (2). Any excluded camera will not trigger during the sequence. Typically, this is useful when users have an extra camera connected over WiFi to take photos by hand alongside a predefined spin and stills.
Note: Refer to the PhotoRobot support manual on Camera Configuration for more information.
Lights
CAPP supports both strobe lights (Broncolor or FOMEI), and any LED lights with DMX support. For instructions on how to install & configure lights in CAPP, refer to the PhotoRobot manual on setting up a workspace.
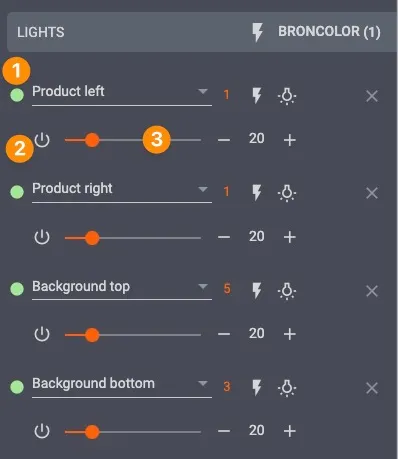
In the CAPP Lights interface, assign individual lights a position via the Light position menu (1). Using the drop-down menu, select either a custom position, or one of the predefined positions. Predefined positions include:
- Product left / Product right – Lights positioned to illuminate the product from the front
- Background top / Background bottom - Lights to illuminate the background from behind for creating a white background
To define a custom position, select Custom position from Position list options.
Switch lights on or off via the Power button (2). This is useful for example for a freemask approach, in which it is necessary to switch off front lights to take the mask image.
Move the Light intensity slider (3) from left to right for darker or lighter illumination. Note: Some DMX-controlled lights also provide control over color temperature.
Scopes & Presets
By default, hardware configuration is the same across all folders within an item.
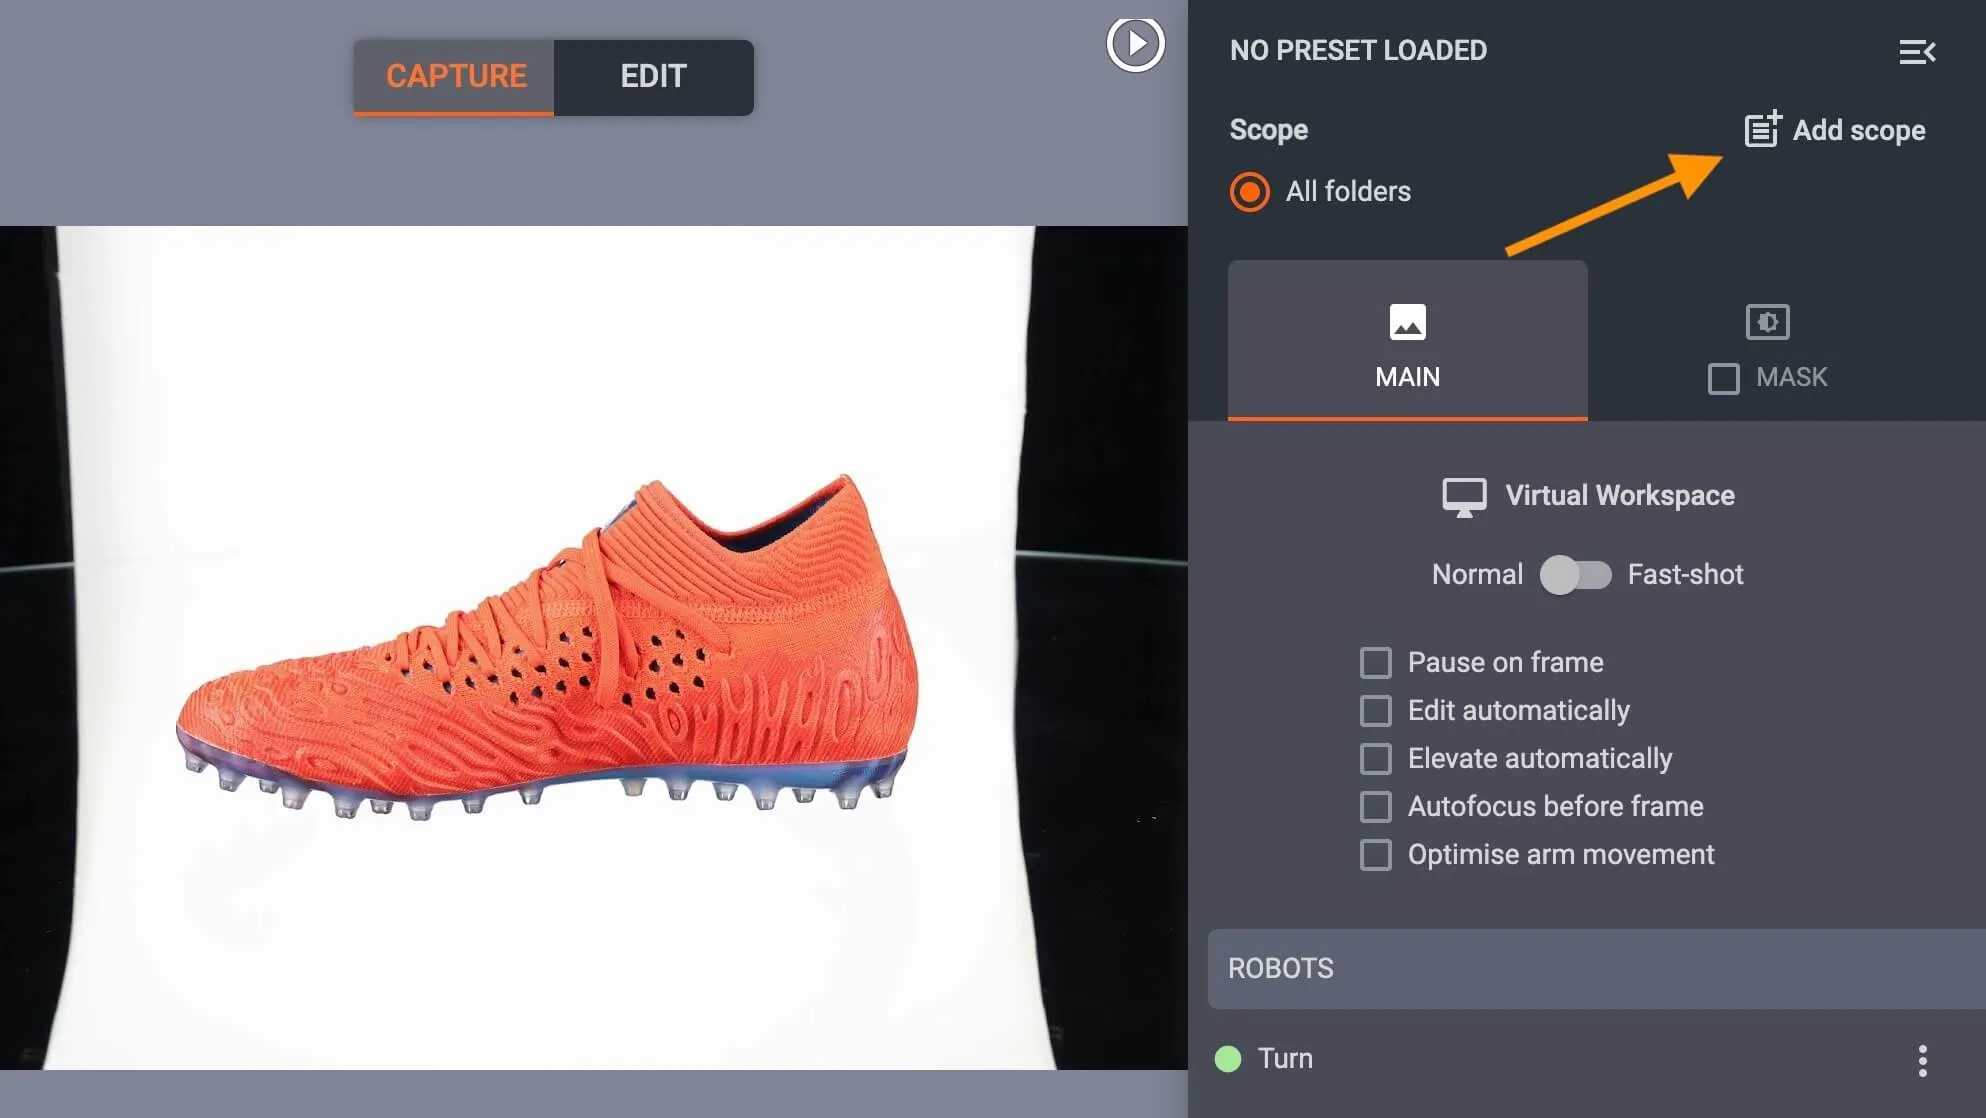
To customize a hardware setup (by folder or by row), use the Add scope button:
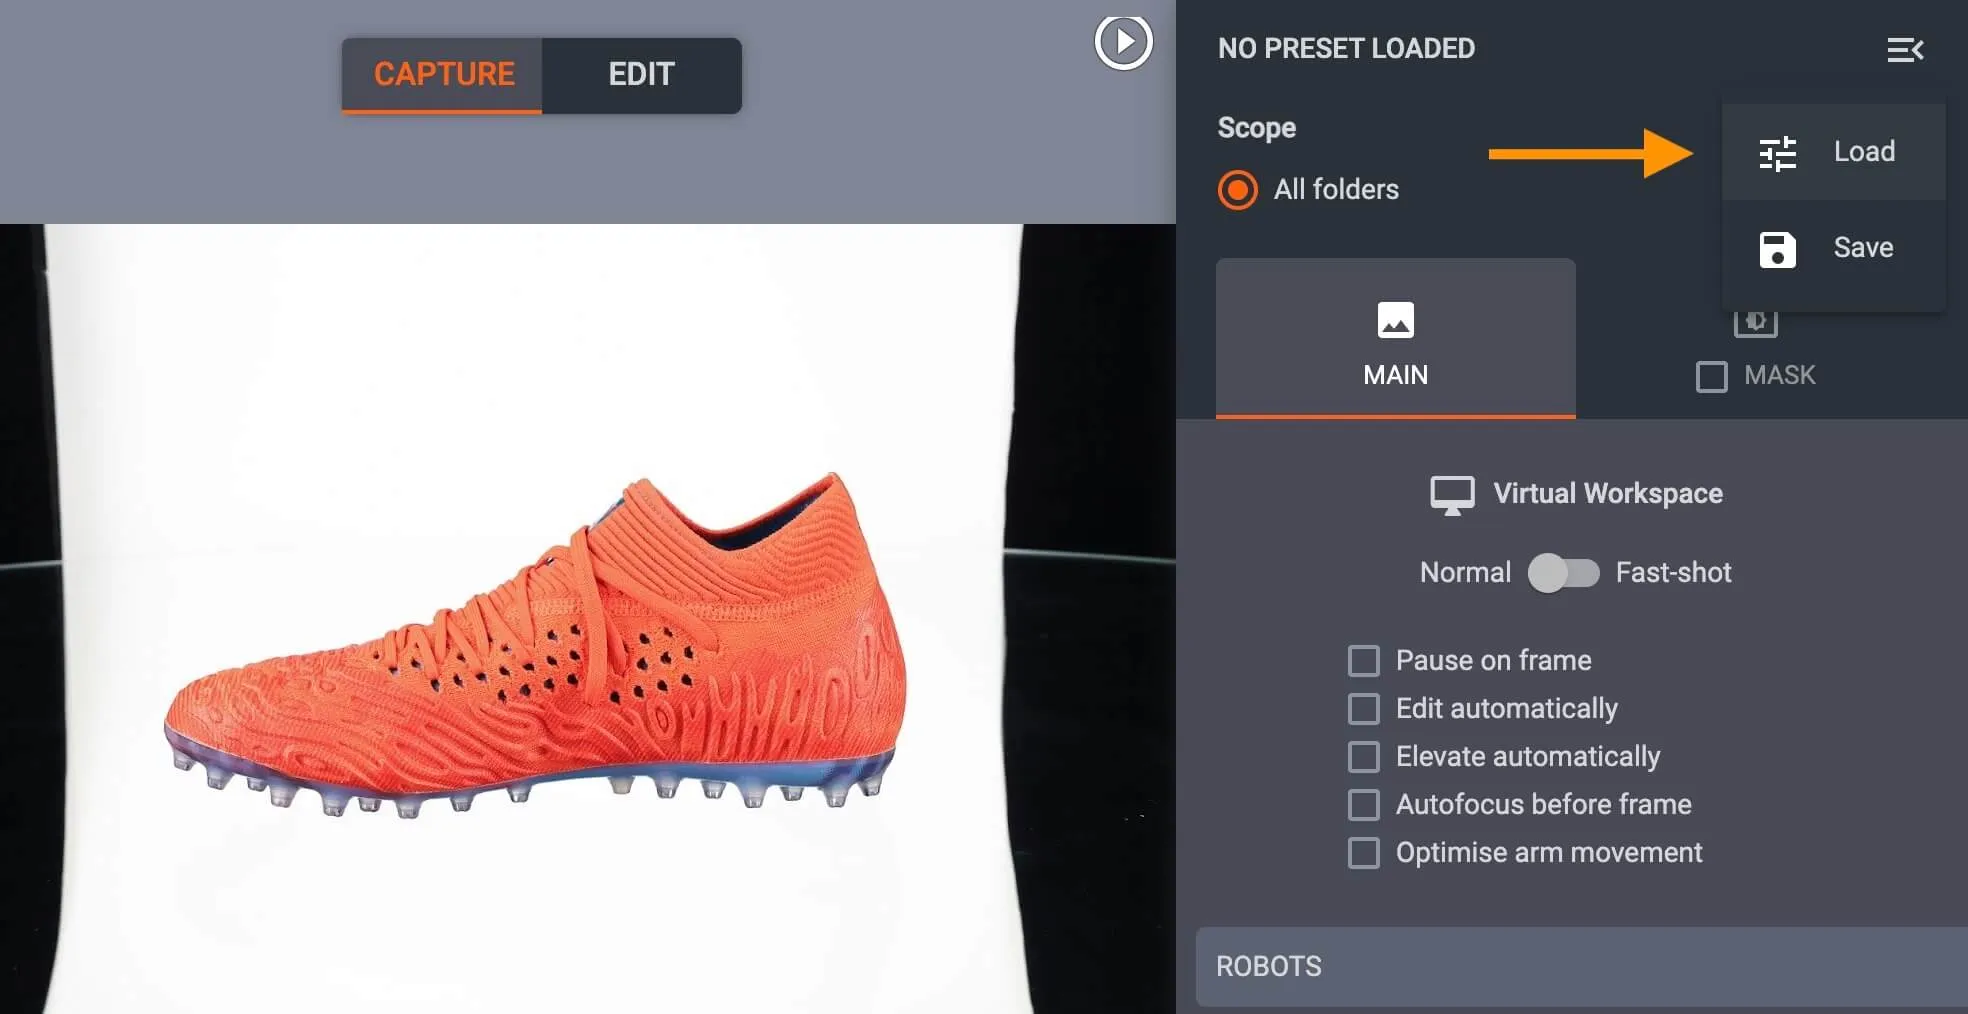
After customizing a configuration, load or save settings in the upper, right-hand corner via the drop-down menu for Presets:

- Click the file icon to save all capture settings, and later load configurations to reuse across similar photoshoots.
Assign Presets
In CAPP, there are 3 methods to load / assign Presets for an item or multiple items.
1. Select an item, and load a Preset via the drop-down menu icon in the upper-right part of the interface:
- Alternatively, use the hot key “P” to open saved Presets. Then, select a configuration to apply to the item. This will create folders for the frames that will be shot, along with all capture settings and predefined editing operations.
2. When creating an item, users can select a configuration via the Add item menu by clicking on the Preset field.
- To assign a Preset to multiple items, select the items from the Items menu, and click Assign preset:
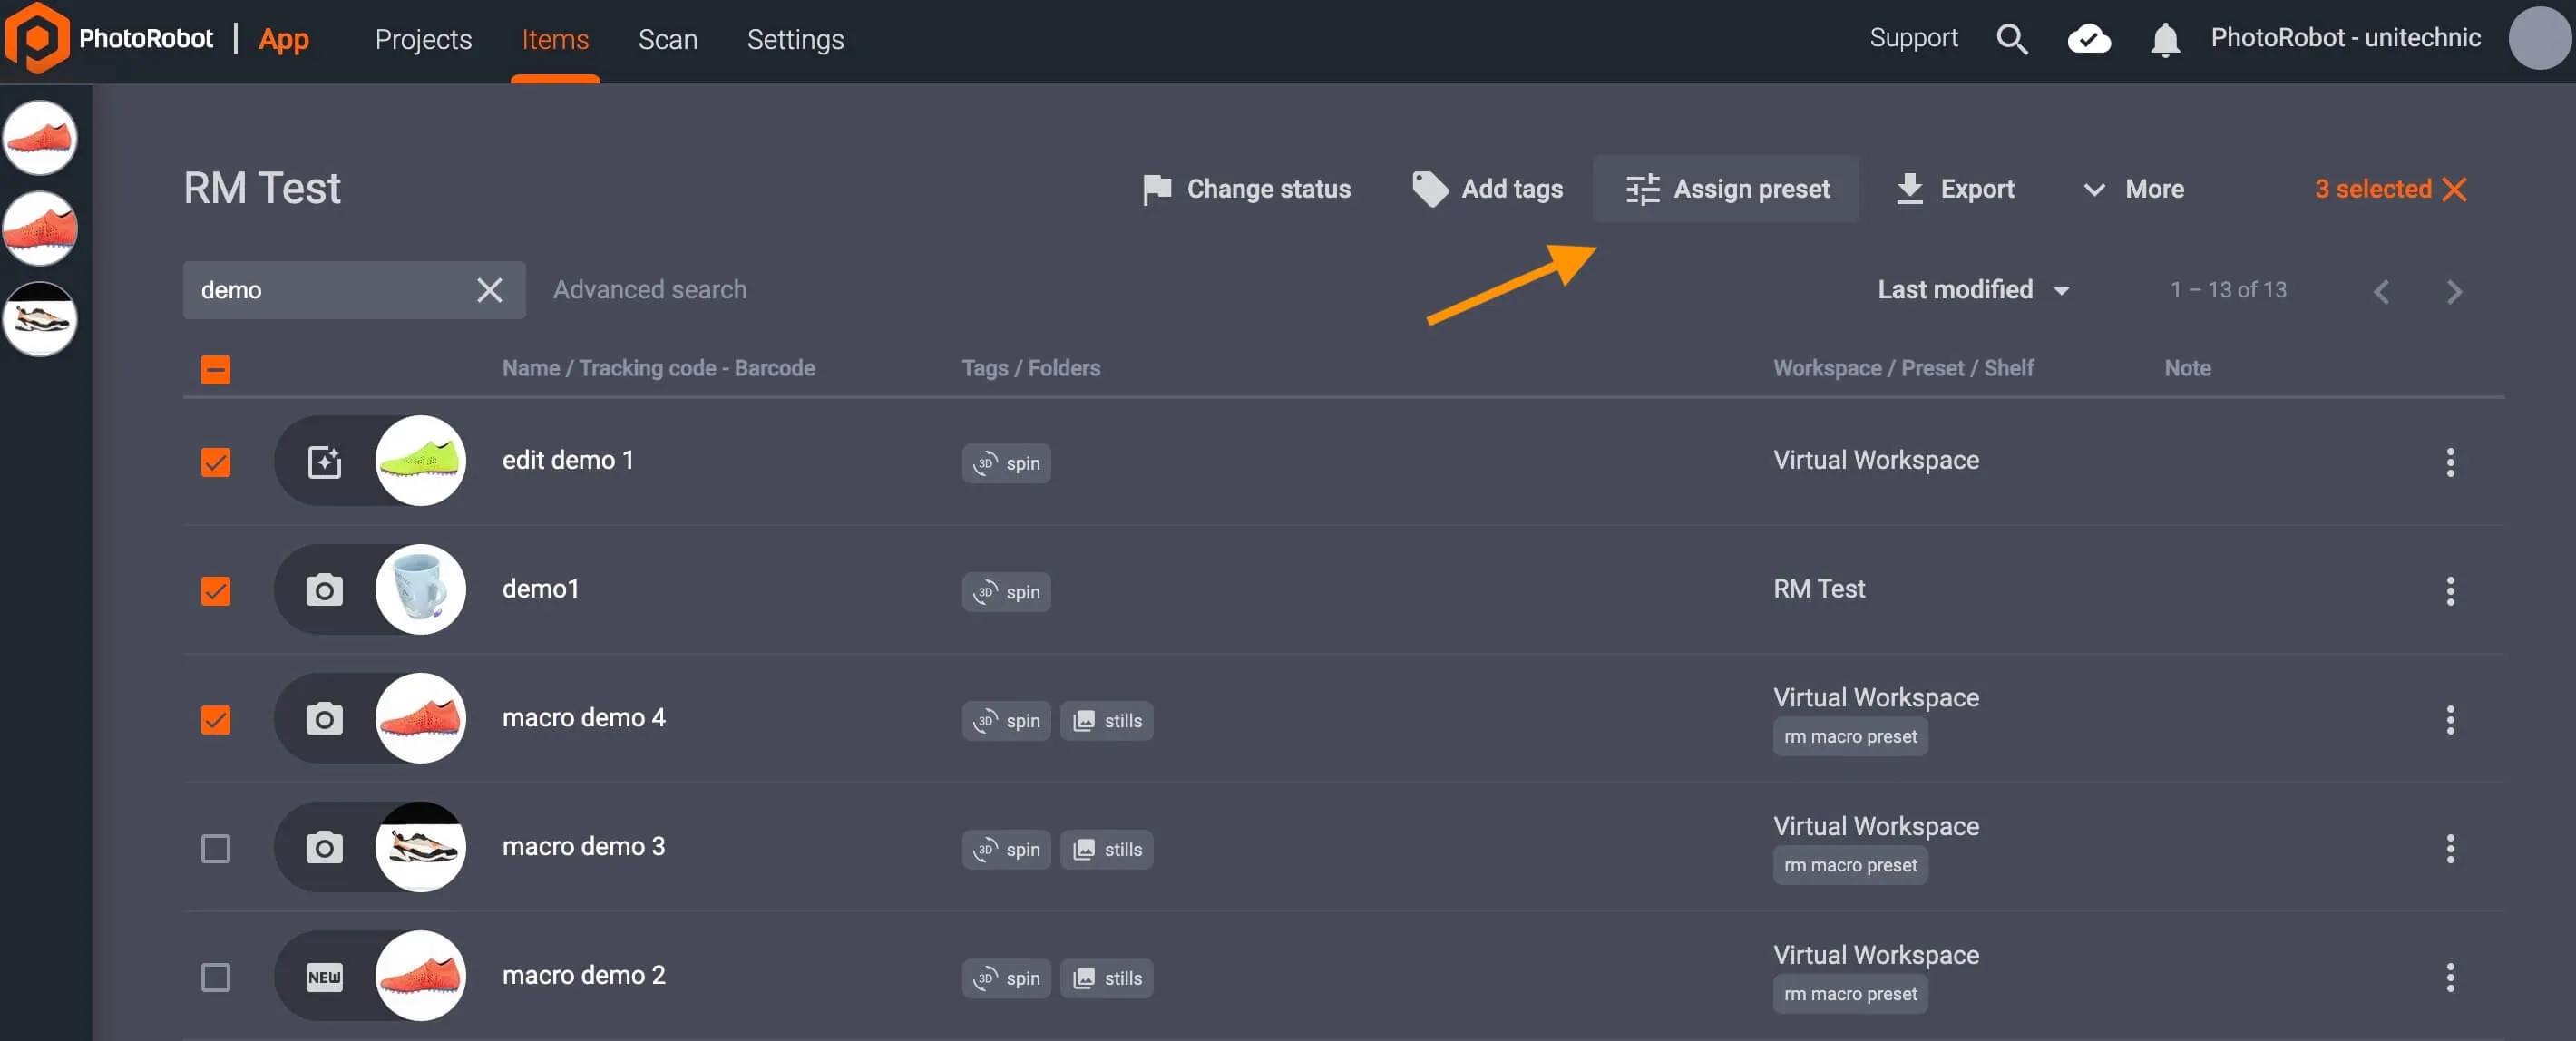
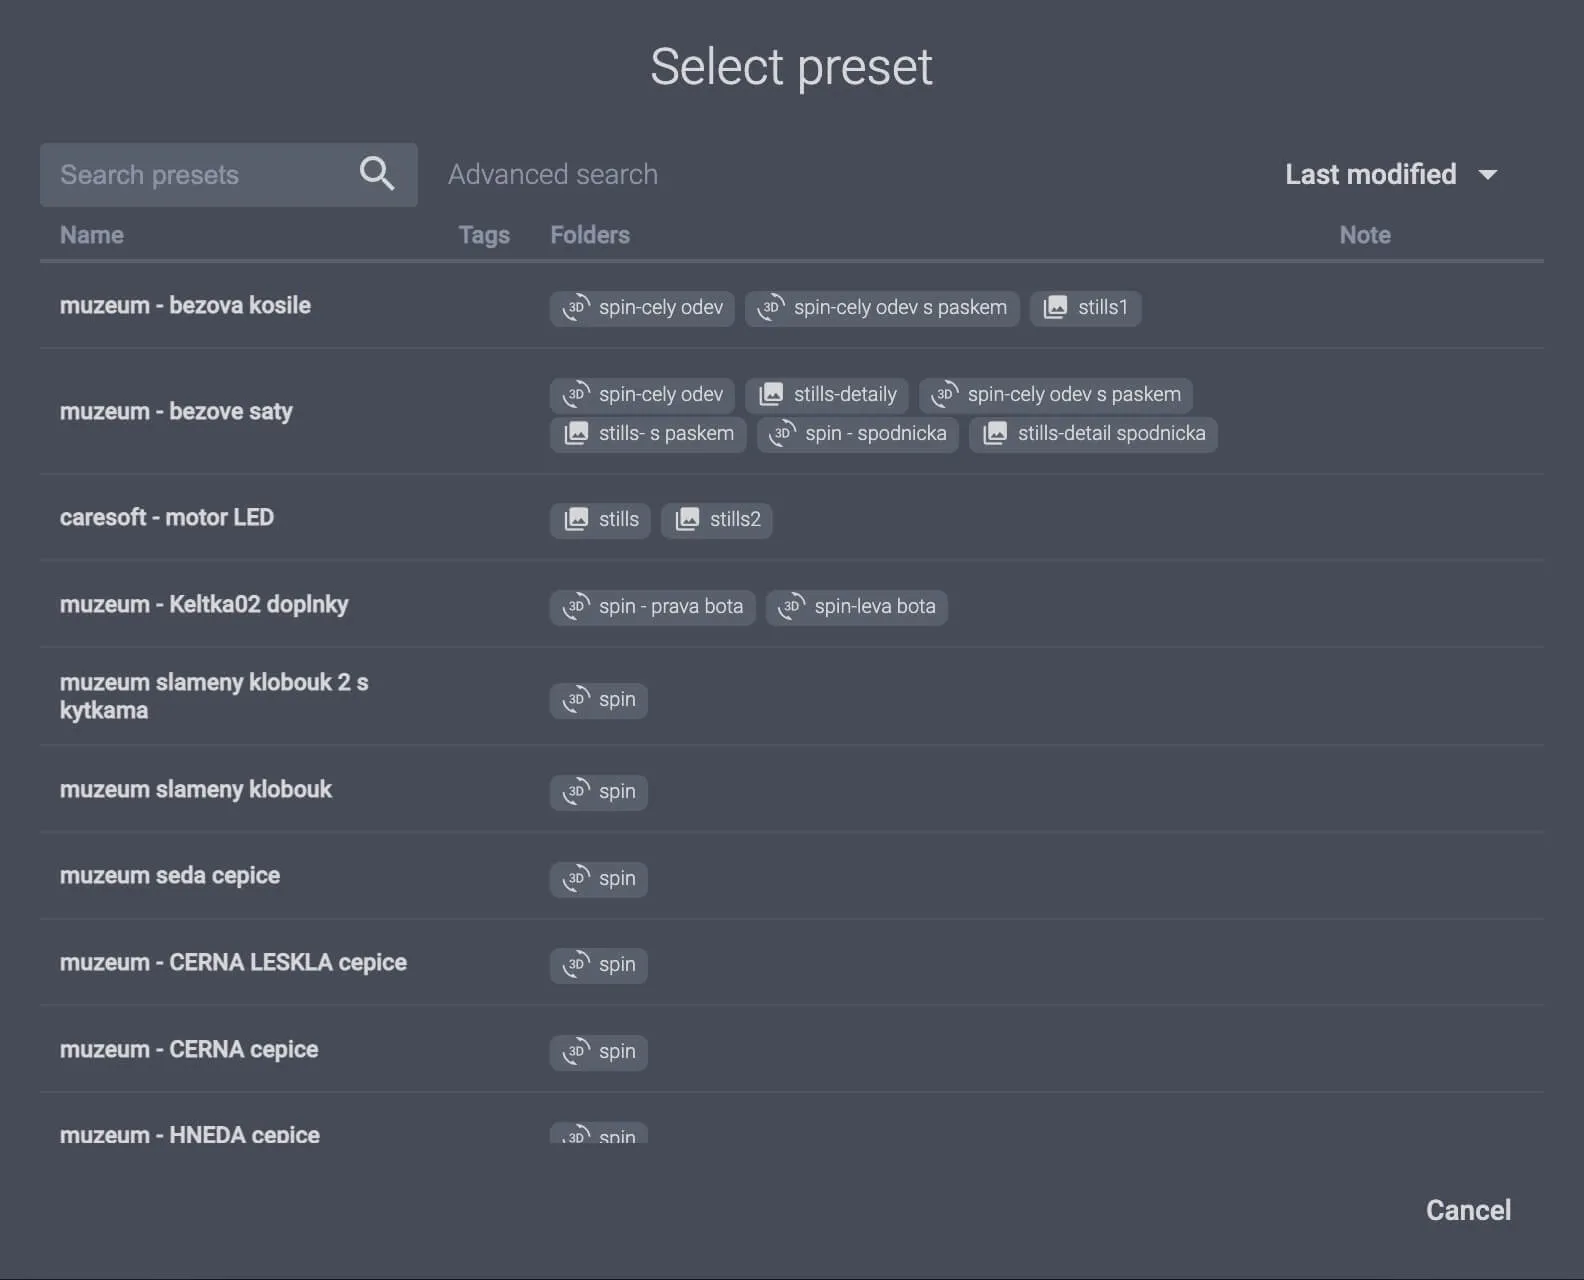
- Select the preset by name, and assign it to the items by clicking Assign preset again:

3. Alternatively, in the Items menu, click Import to import items from CSV:
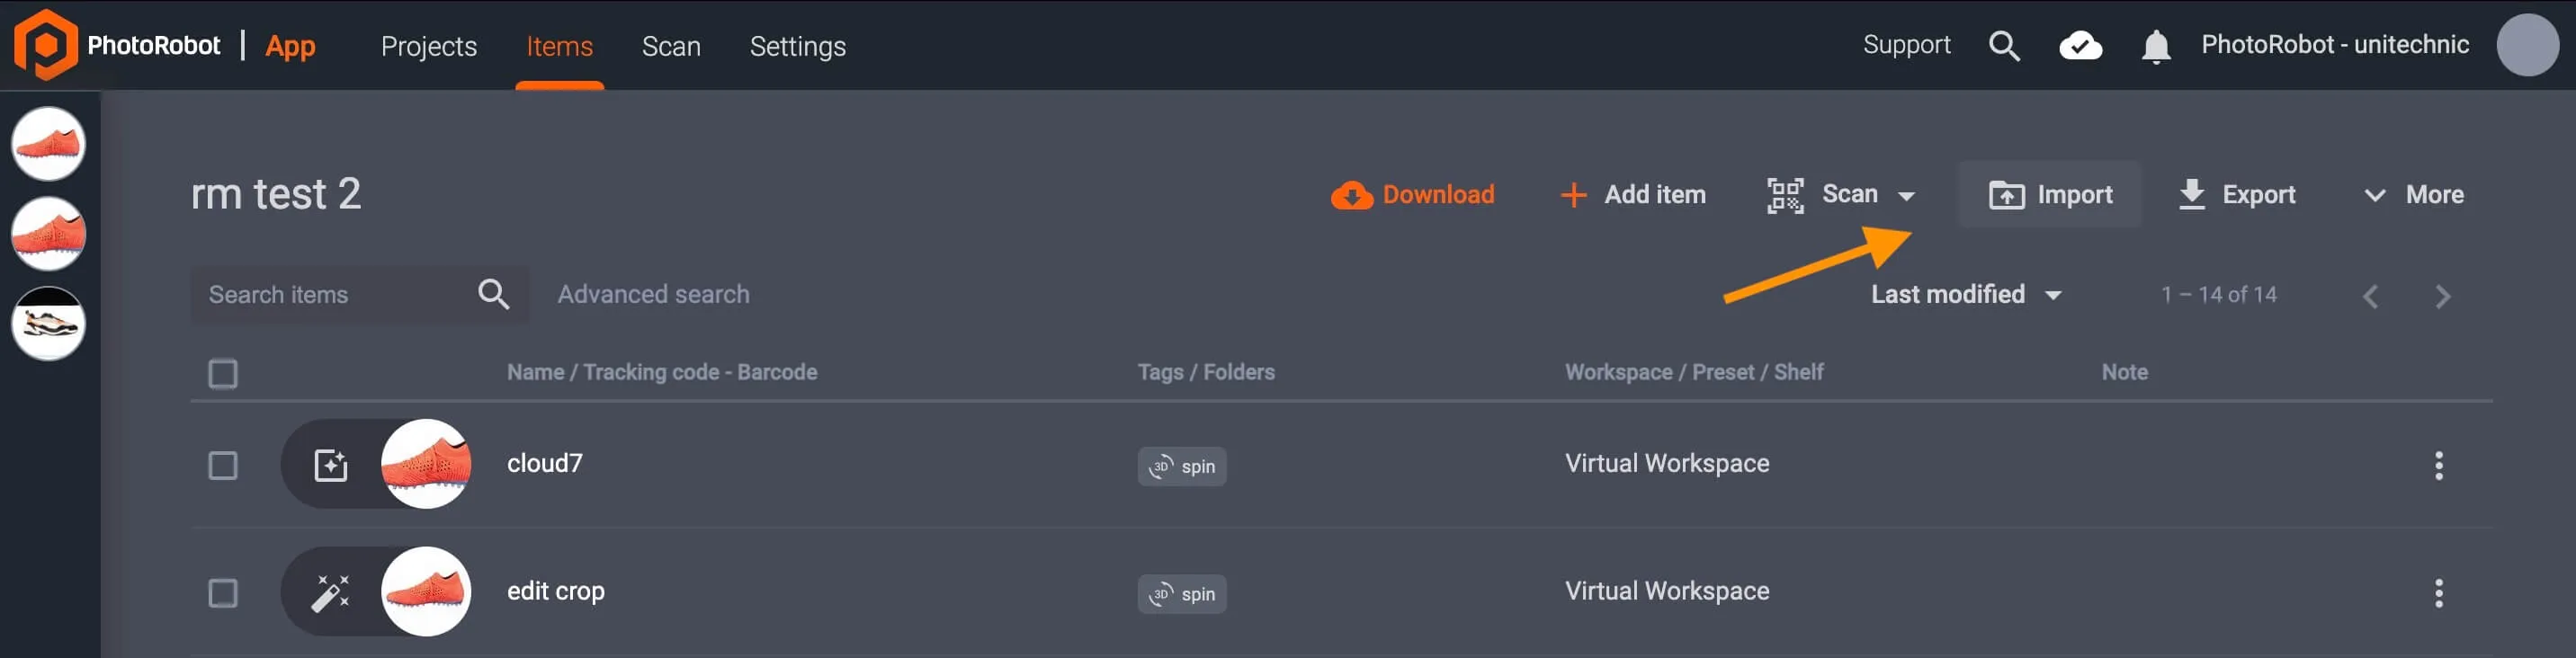
- CSV import functionality enables PhotoRobot users to create an item with its configurations in Excel to import into the system.
- CSV files may contain the following customizable columns, and one functions to assign a preset by preset name to the item:
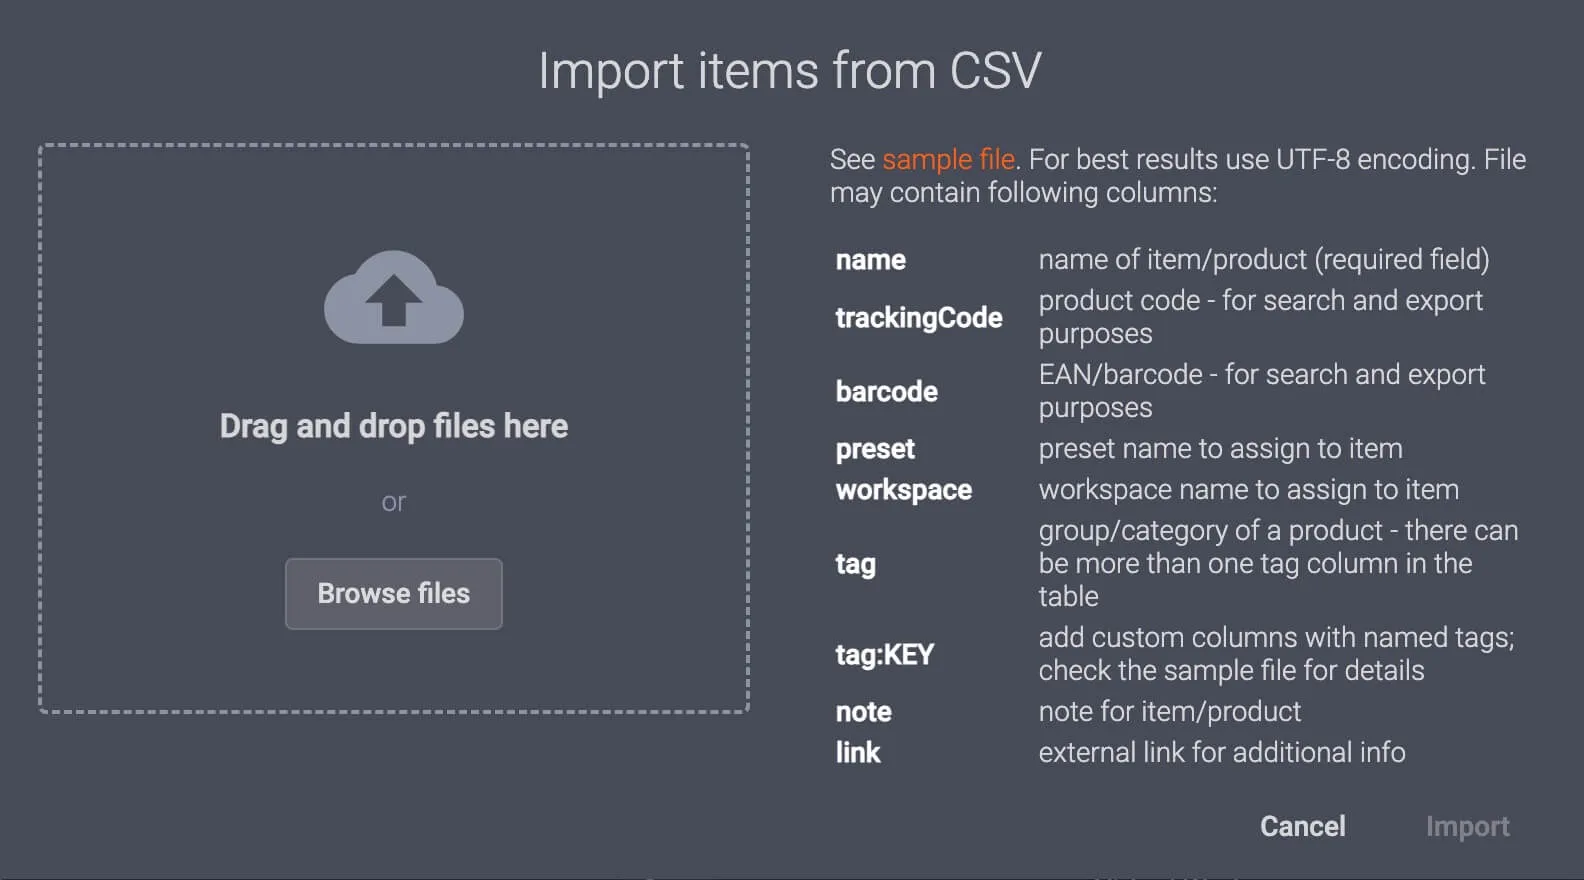
( ! ) - Note: When using CSV import, UTF-8 encoding is recommended for the best results.
Sorting Items to Shelves (Carts)
Additionally, in CAPP, sorting items to Shelves (or Carts) enables you to simplify the workflow by automatically setting up a workspace and preset after assigning a shelf to an item.
Creating Shelf (or Cart) codes in the system helps to sort items into categories with configurable photoshoot settings. It is possible to assign a shelf to an item by configuring its settings in the app, or, alternatively, by CAPP integration of barcode reader support.
Barcode reader support enables teams to print a unique barcode which they can simply scan to assign an item to its shelf. In this way, teams can scan a shelf code, and then scan an item to quickly assign its photoshoot settings without clicking a mouse, or moving to a workstation computer.
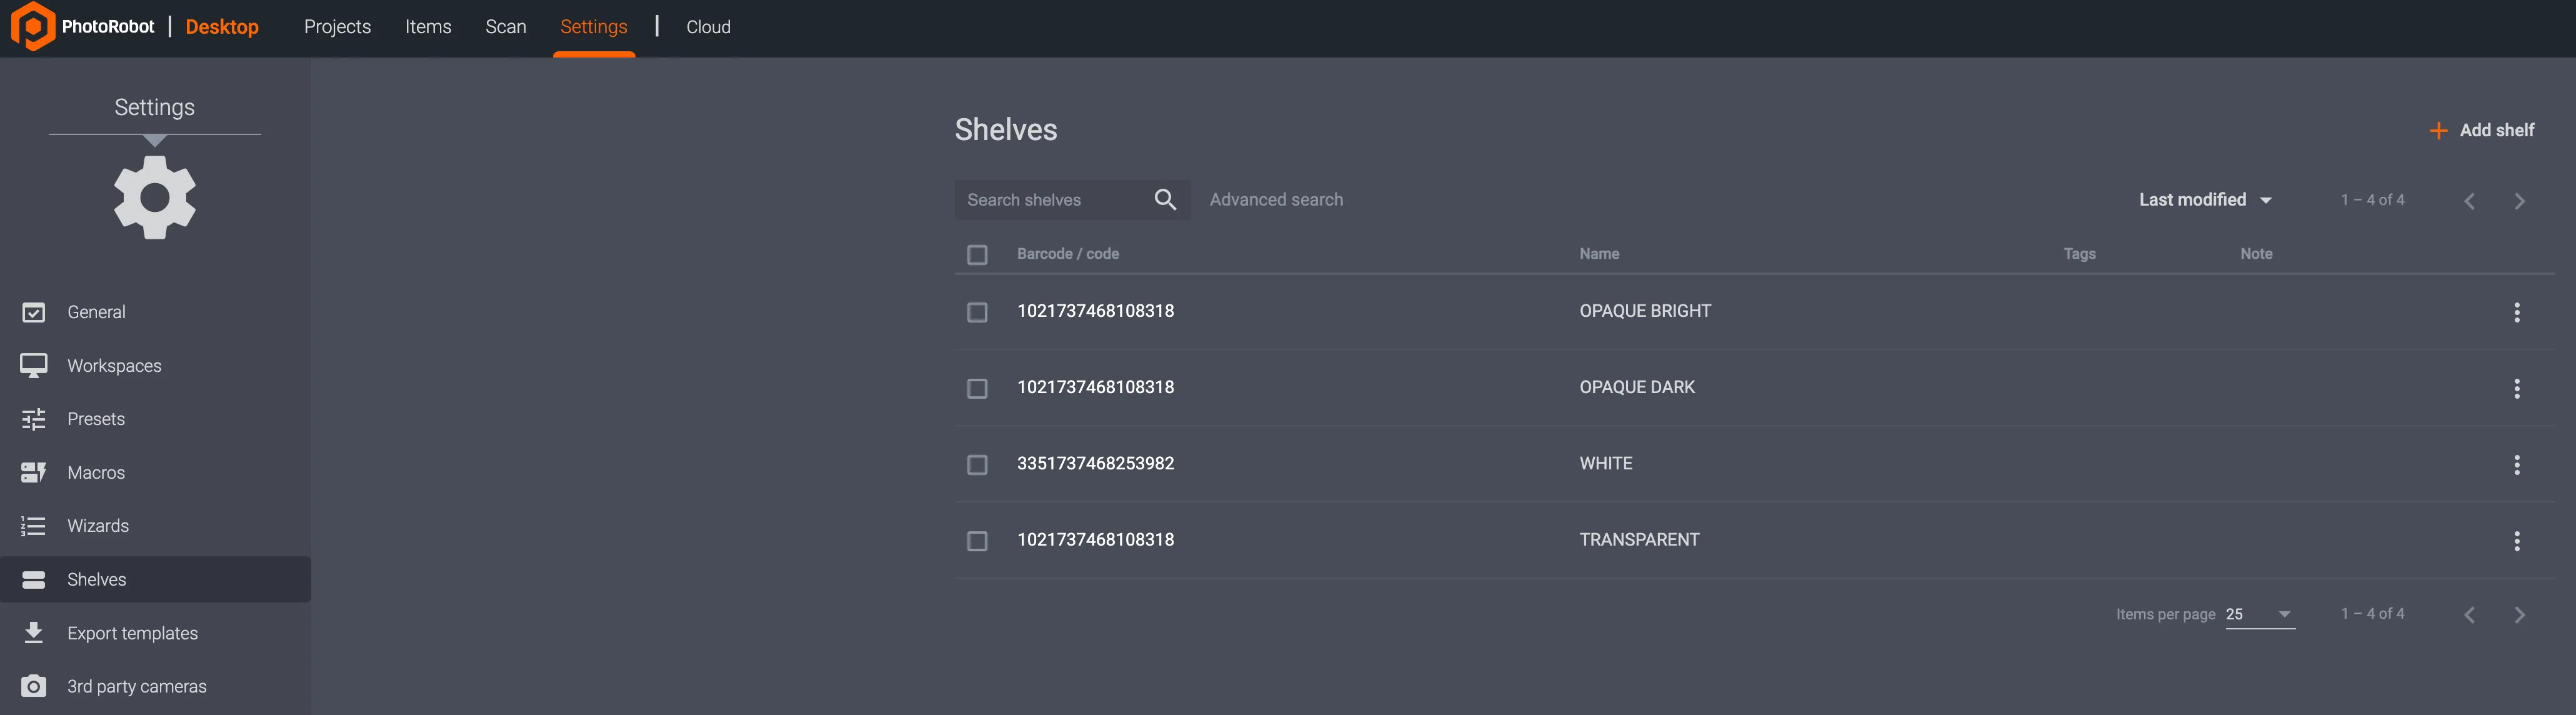
To access Shelves settings in CAPP, open Settings in the local or cloud version of the app:
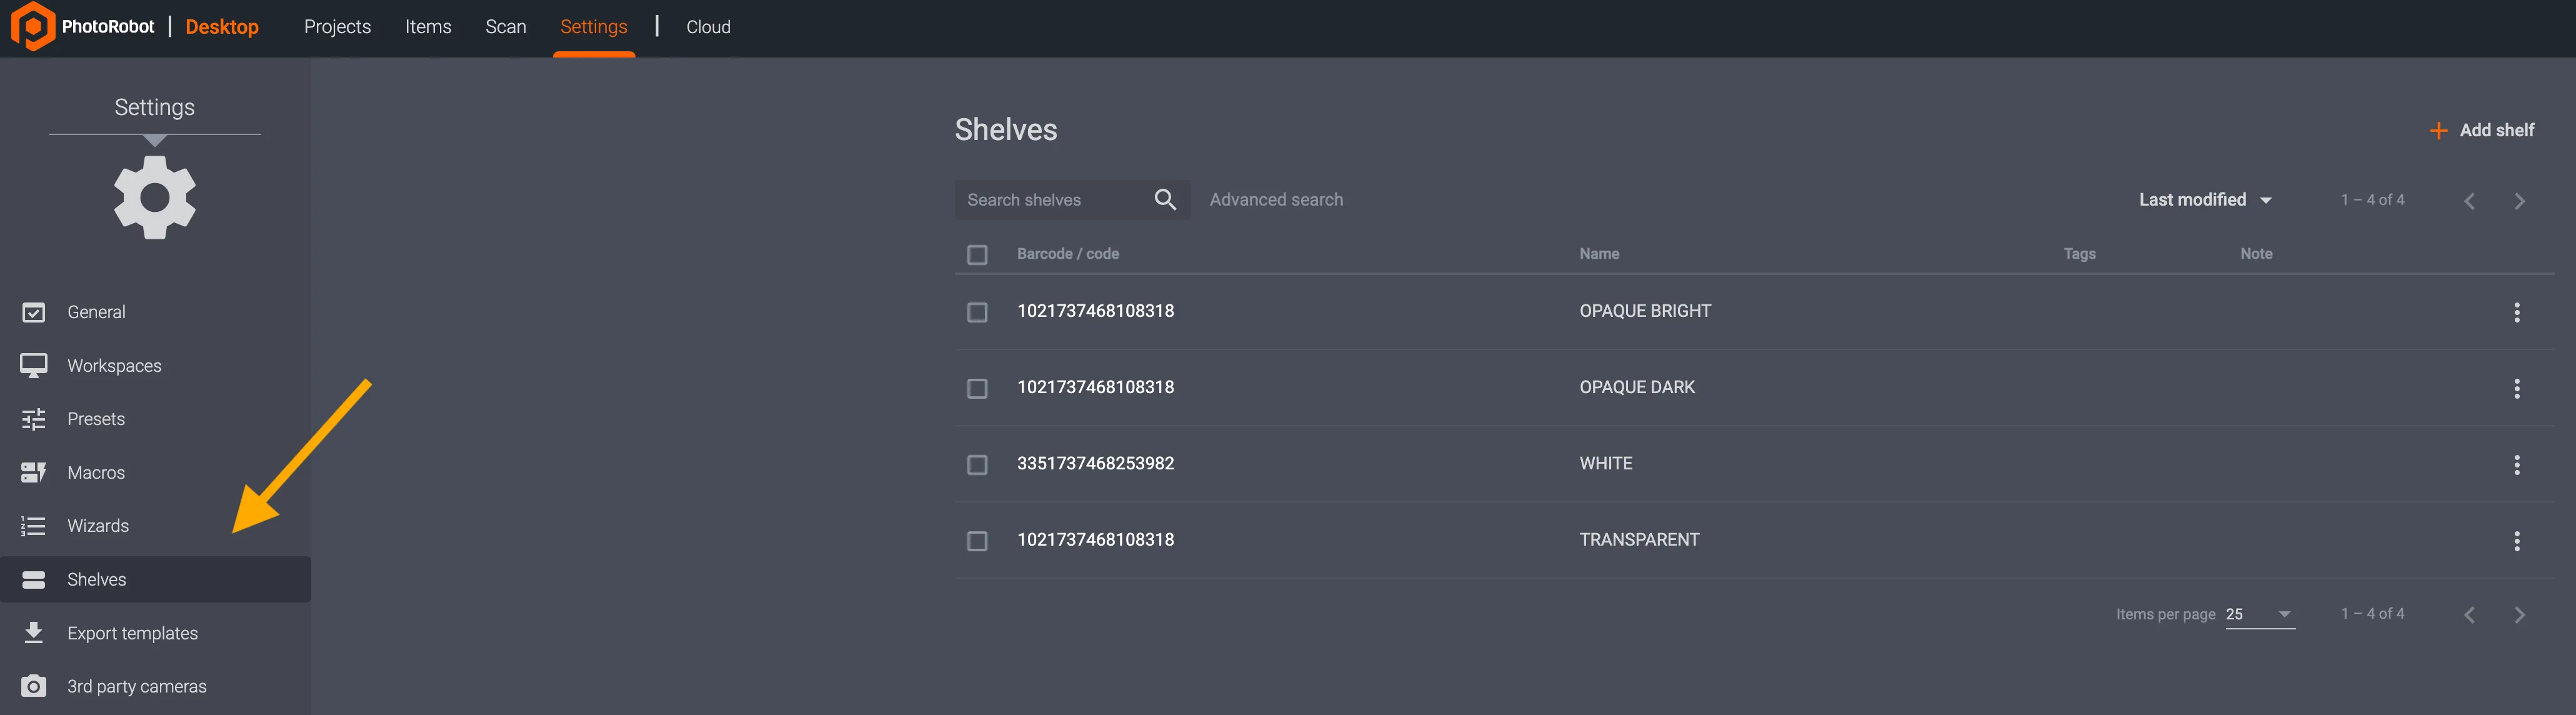
- Click the Shelves menu item on the left-hand side of the Settings interface to view saved shelves (if any).
- Search for Shelves via Advanced search, or select Shelves via the box to the left of the shelf barcode / code.
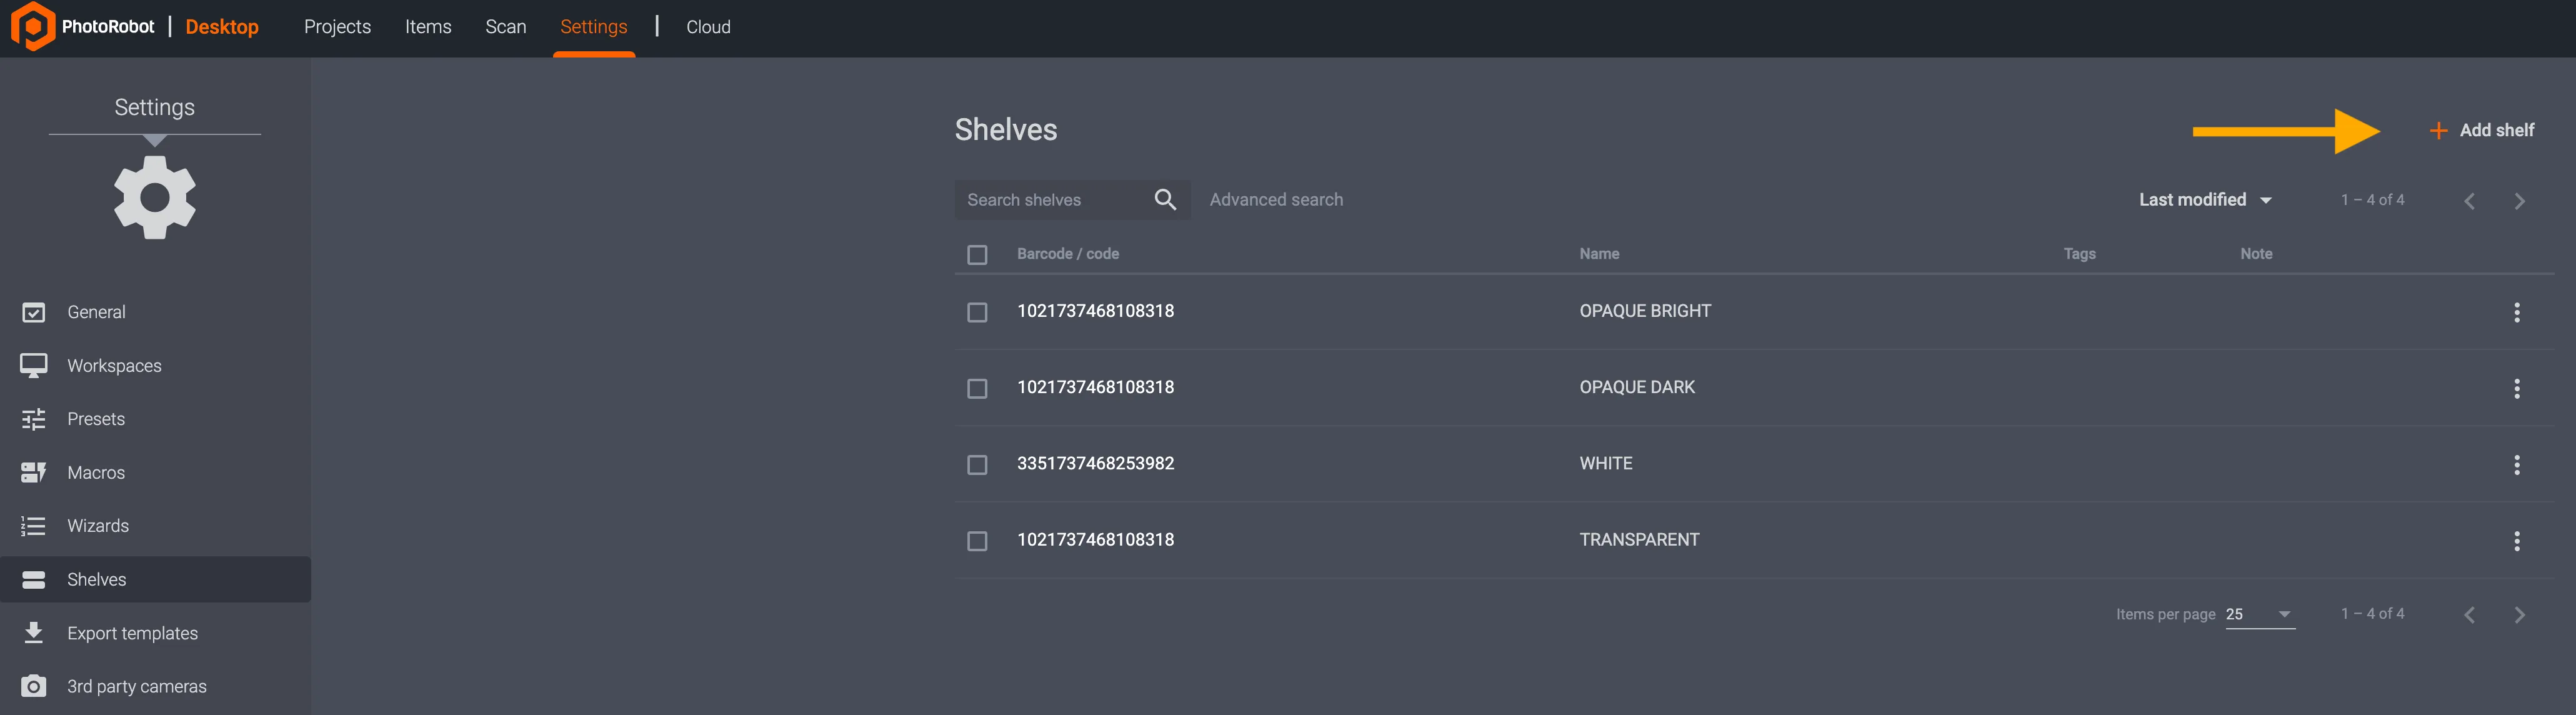
To create a new shelf, use + Add shelf in the top-right corner of the Shelves menu:
New shelf settings then enable the creation of custom Barcode / codes to use with a barcode reader, Name creation, Tags, Notes, Workspace and Preset selection.
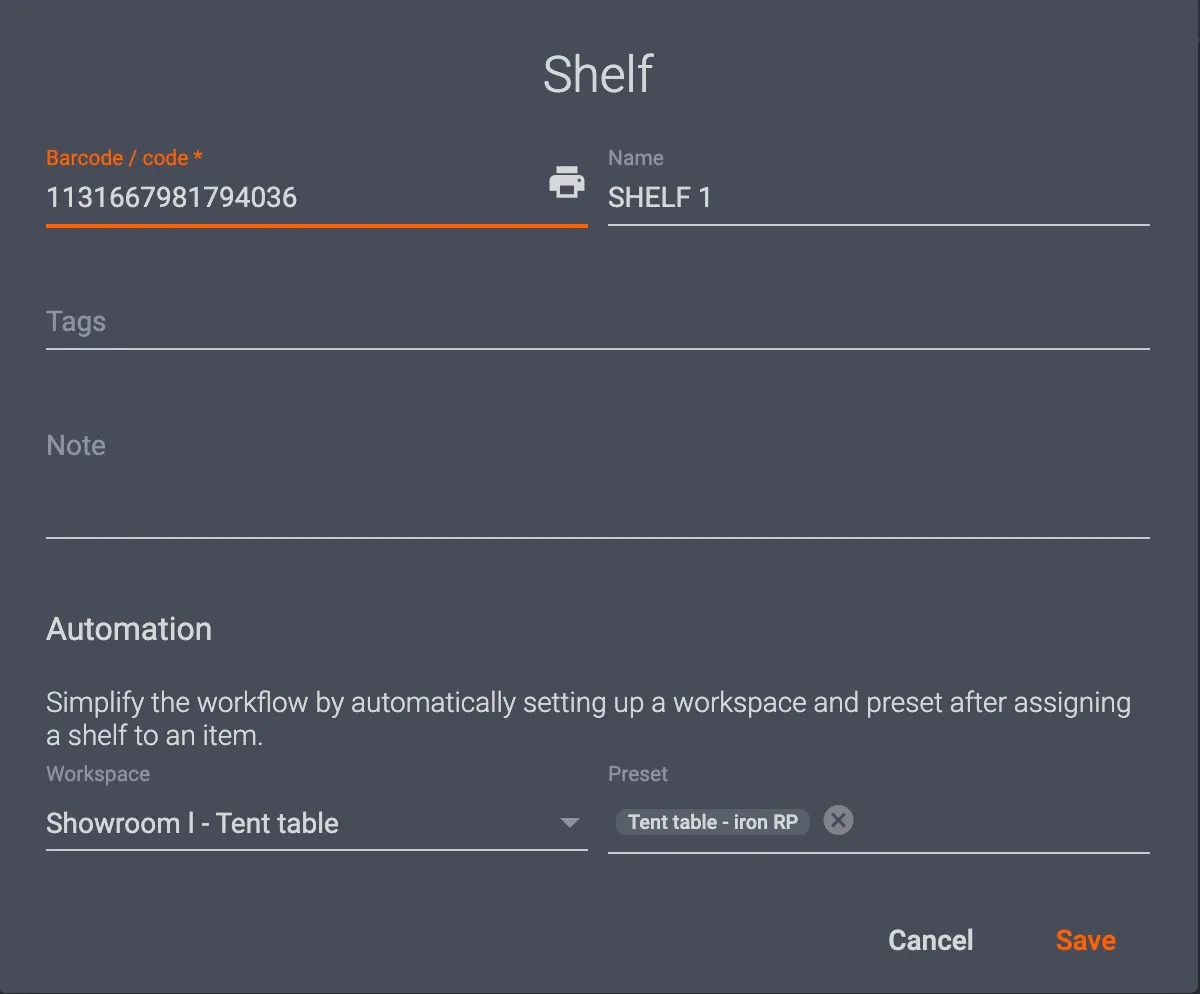
- Barcode / code is customizable to create a unique Shelf code the system can use to assign settings via barcode reader.
- Name is often used to distinguish the types of objects being photographed, for example: small, medium, and large items; footwear, versus jewelry, clothing, or any similar types of object.
- Workspace and Preset fields are then configurable by robotic workstation (and its location in the studio), and Preset fields for the shelf’s automated capture and post-processing settings.
- Save in the bottom-right corner of the interface creates the shelf in the system for future assignment via the app or via barcode reader.
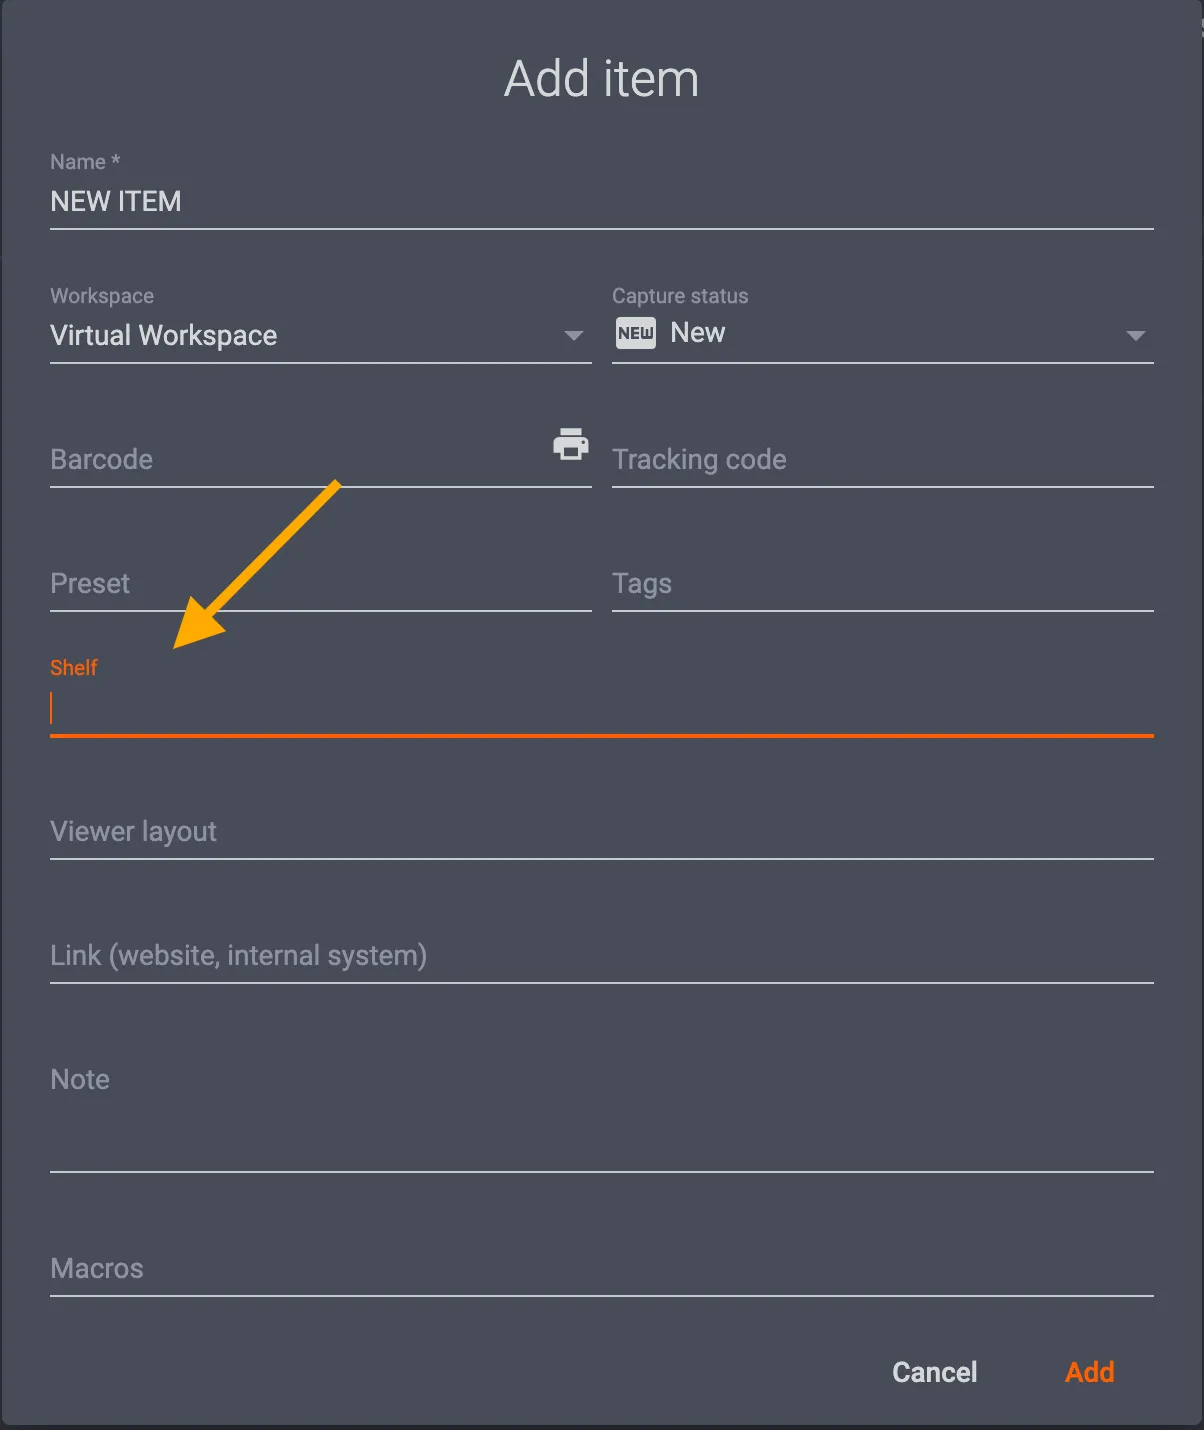
Later, to assign a Shelf code to a new or existing item in the app, select the Shelf field in the Item settings menu, and select the Shelf to assign it to the item:
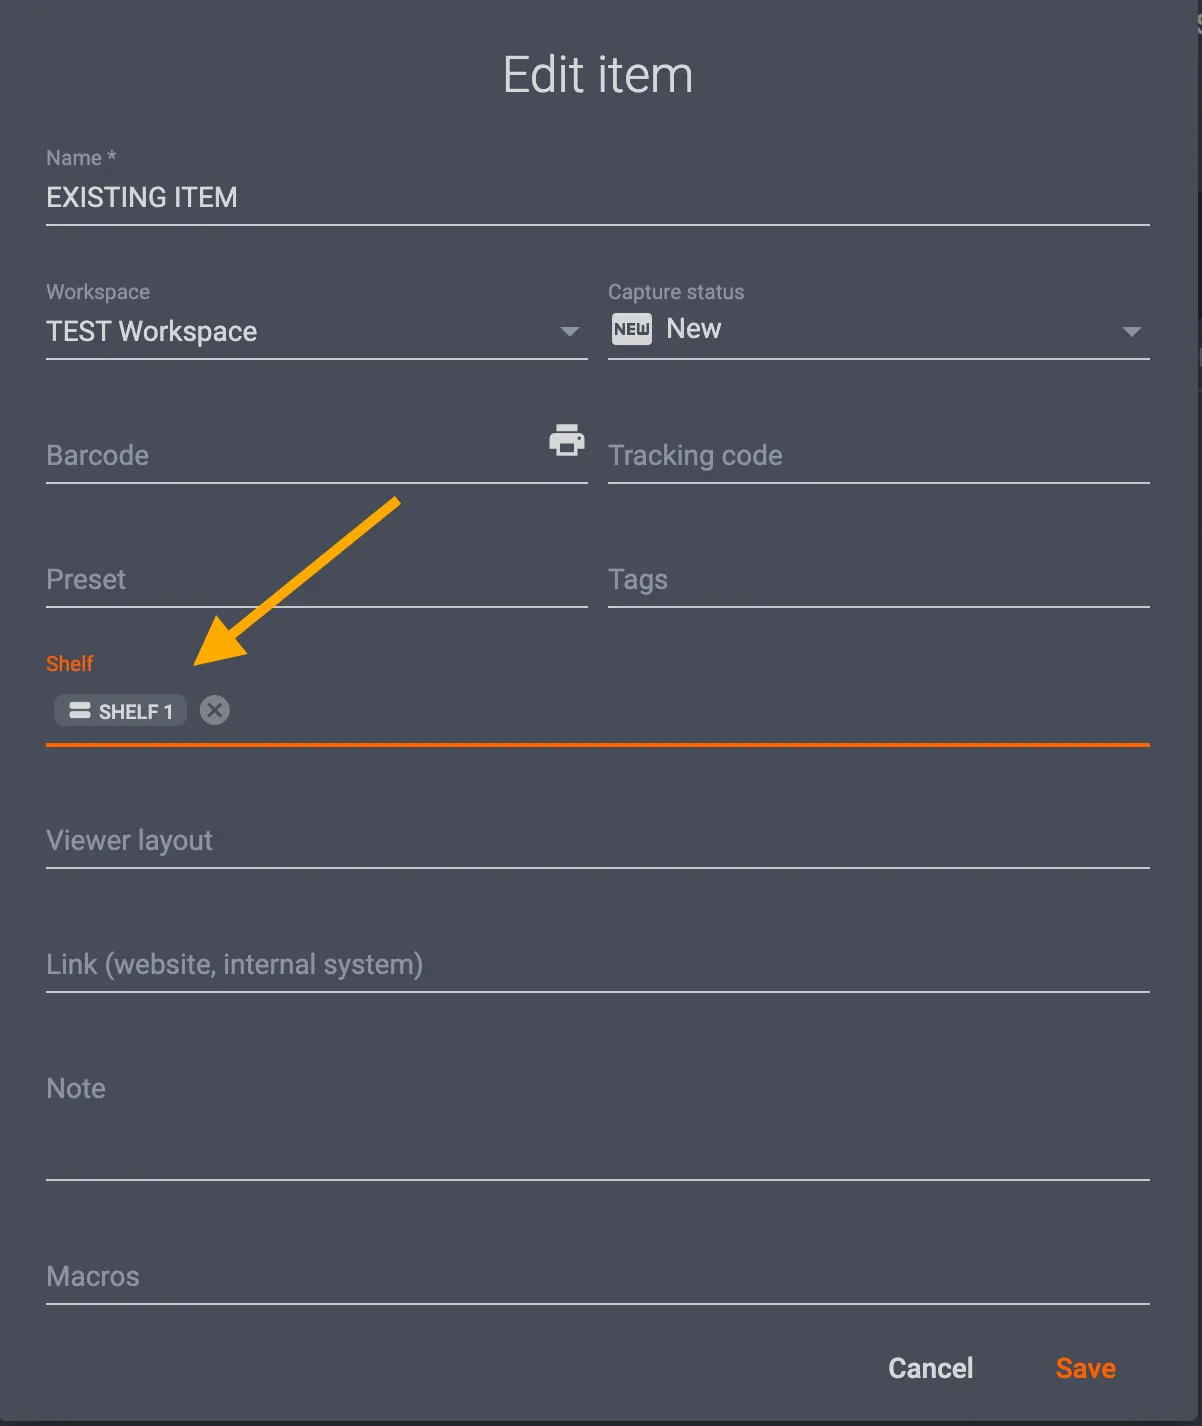
Note: The process is the same to apply a Shelf to any existing item for capture in the system. Simply select the item settings, and configure the Shelf field:
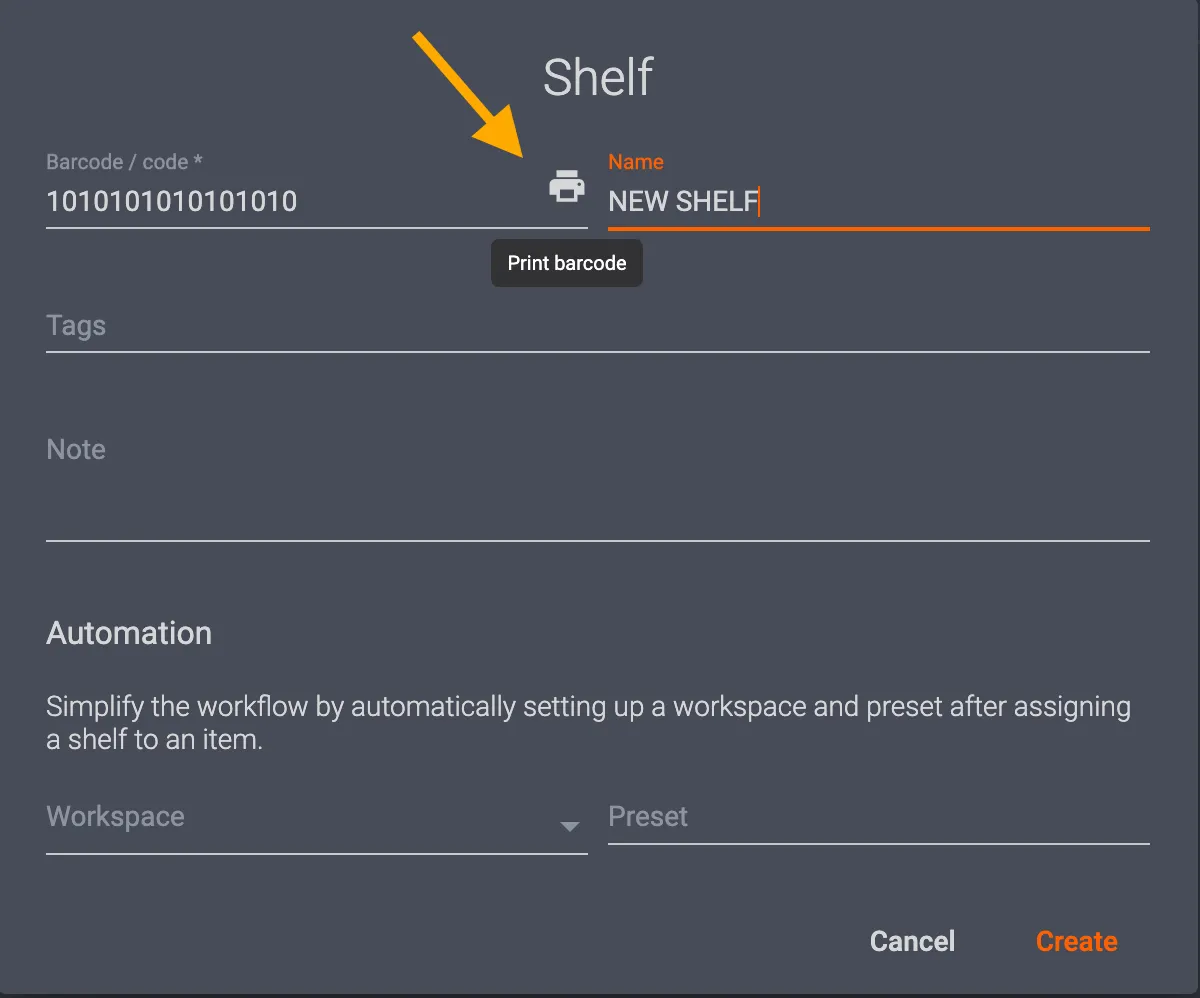
Alternatively, if using an integrated barcode reader, print the unique shelf code, and use it alongside item barcodes to quickly organize your products and shooting lists by workstation and preset.
Add Settings Scope Operations
Primarily, configuring settings scopes instructs the system which folders to save captured images into, which frames to capture, and settings for the capture process. Scope settings also include sequence configuration (normal vs fast-shot mode), robot speeds, camera settings, light controls, and predefined editing operations.
Before shooting an item, users create or assign Presets in the system. The settings of the Preset can apply across an entire folder, specific items, or on individual rows and frames (in edit mode).
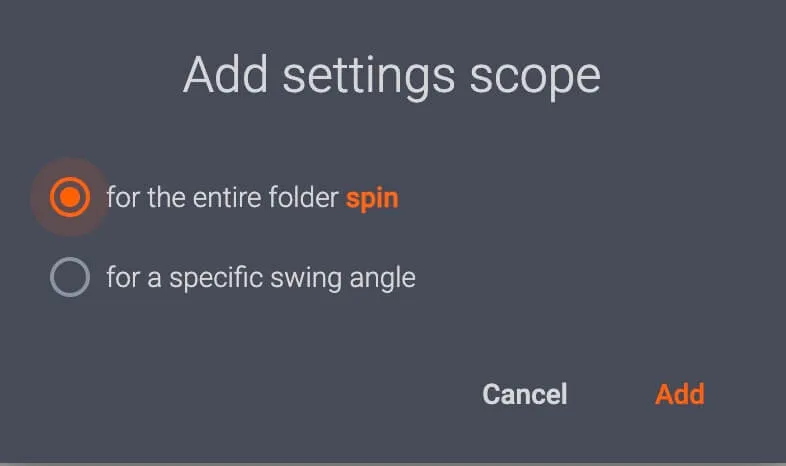
- Select settings scopes for the entire folder spin, for a specific swing angle, or for current image only (edit mode only).
- Each setting scope contains hardware configuration, capture settings, and one or more editing operations.
Add Settings Scope for Specific Swing Angle
If applying scope settings for a specific swing angle, specify the angle on which the capture Presets will apply (e.g. 15°, 45°, etc):
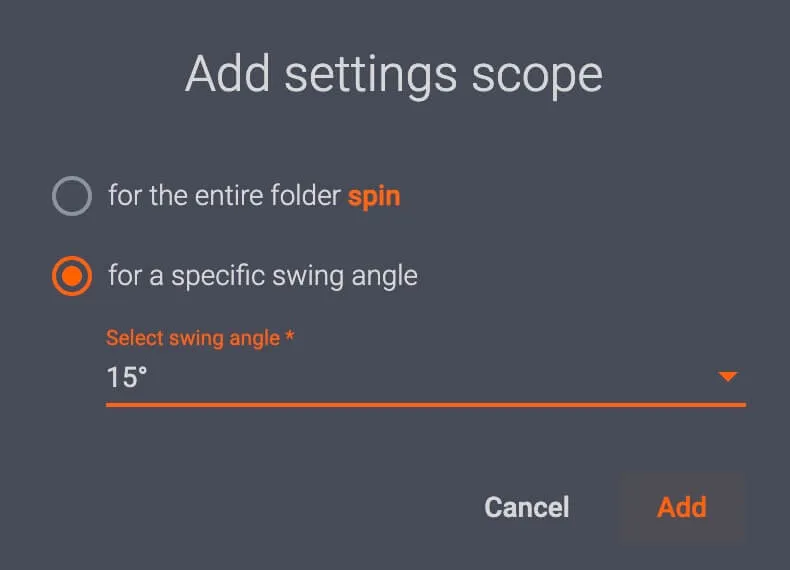
- Settings scopes can apply to one or more swing angles via Select swing angle. Specify the swing angle, and click Add to assign scope settings to a folder.
- The target folder with its assigned Presets will then display in the top-right part of the interface:
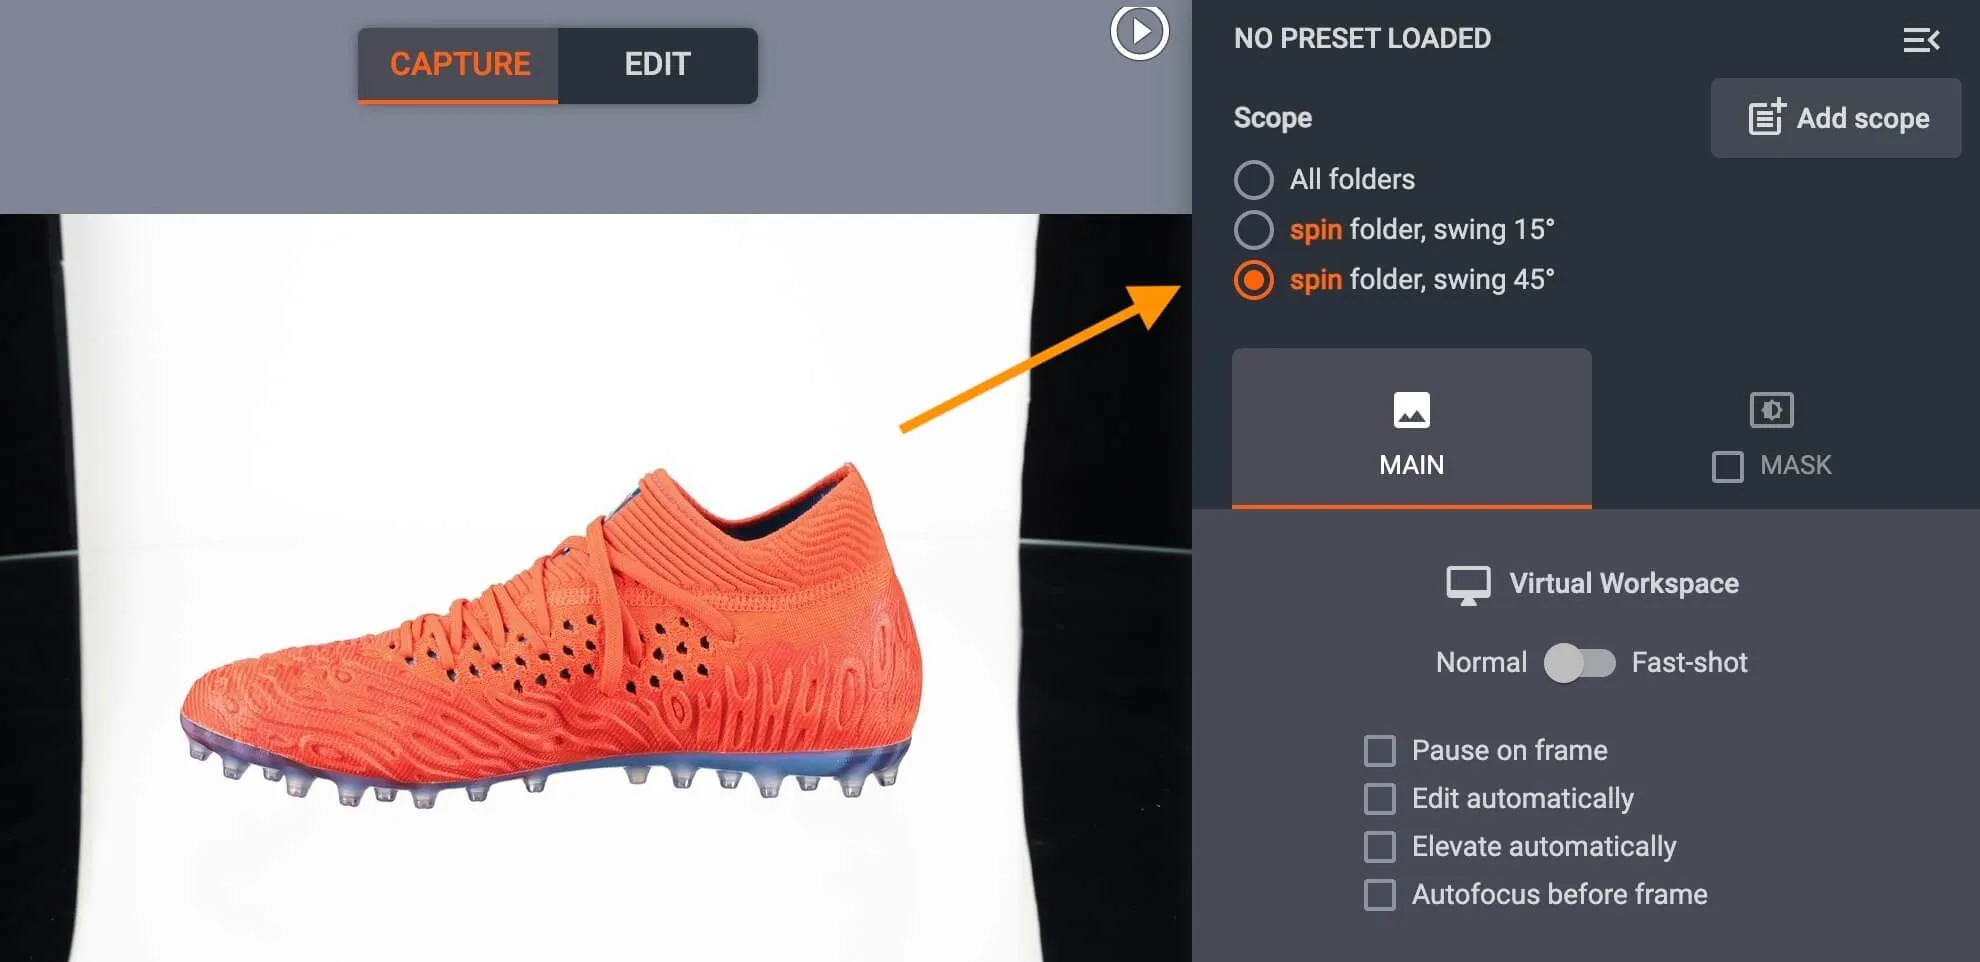
If applying different scope settings to multiple swing angles, click the specific swing angle to view or configure the settings assigned to its folder.
- For example, it is possible to configure low intensity light for a spin folder at a swing angle of 15°, and high intensity light for a spin folder at a swing angle of 45°.
- Users can also add settings scopes to a still image folder, or any other folder within the item.
- The system will then apply settings scopes automatically when capturing images.
To view or configure the settings scopes across all images, click All folders. After configuring the settings scope, clicking the start button will begin the capture process with its assigned Presets.
Further, if Edit automatically is configured, the system will capture photos and also apply predefined editing operations automatically after clicking the start button.
( ! ) - To find more information on all editing operations and their functionality, see the PhotoRobot User Support Manual - Editing Images.
Macros Functionality & Configuration
Macros in CAPP enable users to define commands for the capture process of an item and its folders (spin, stills, etc). Commands can apply to individual or multiple folders, run sequences, image edits, workspaces, presets, copy image settings, and move image settings. Users can also further customize macros by name, barcode, tag, or notes.
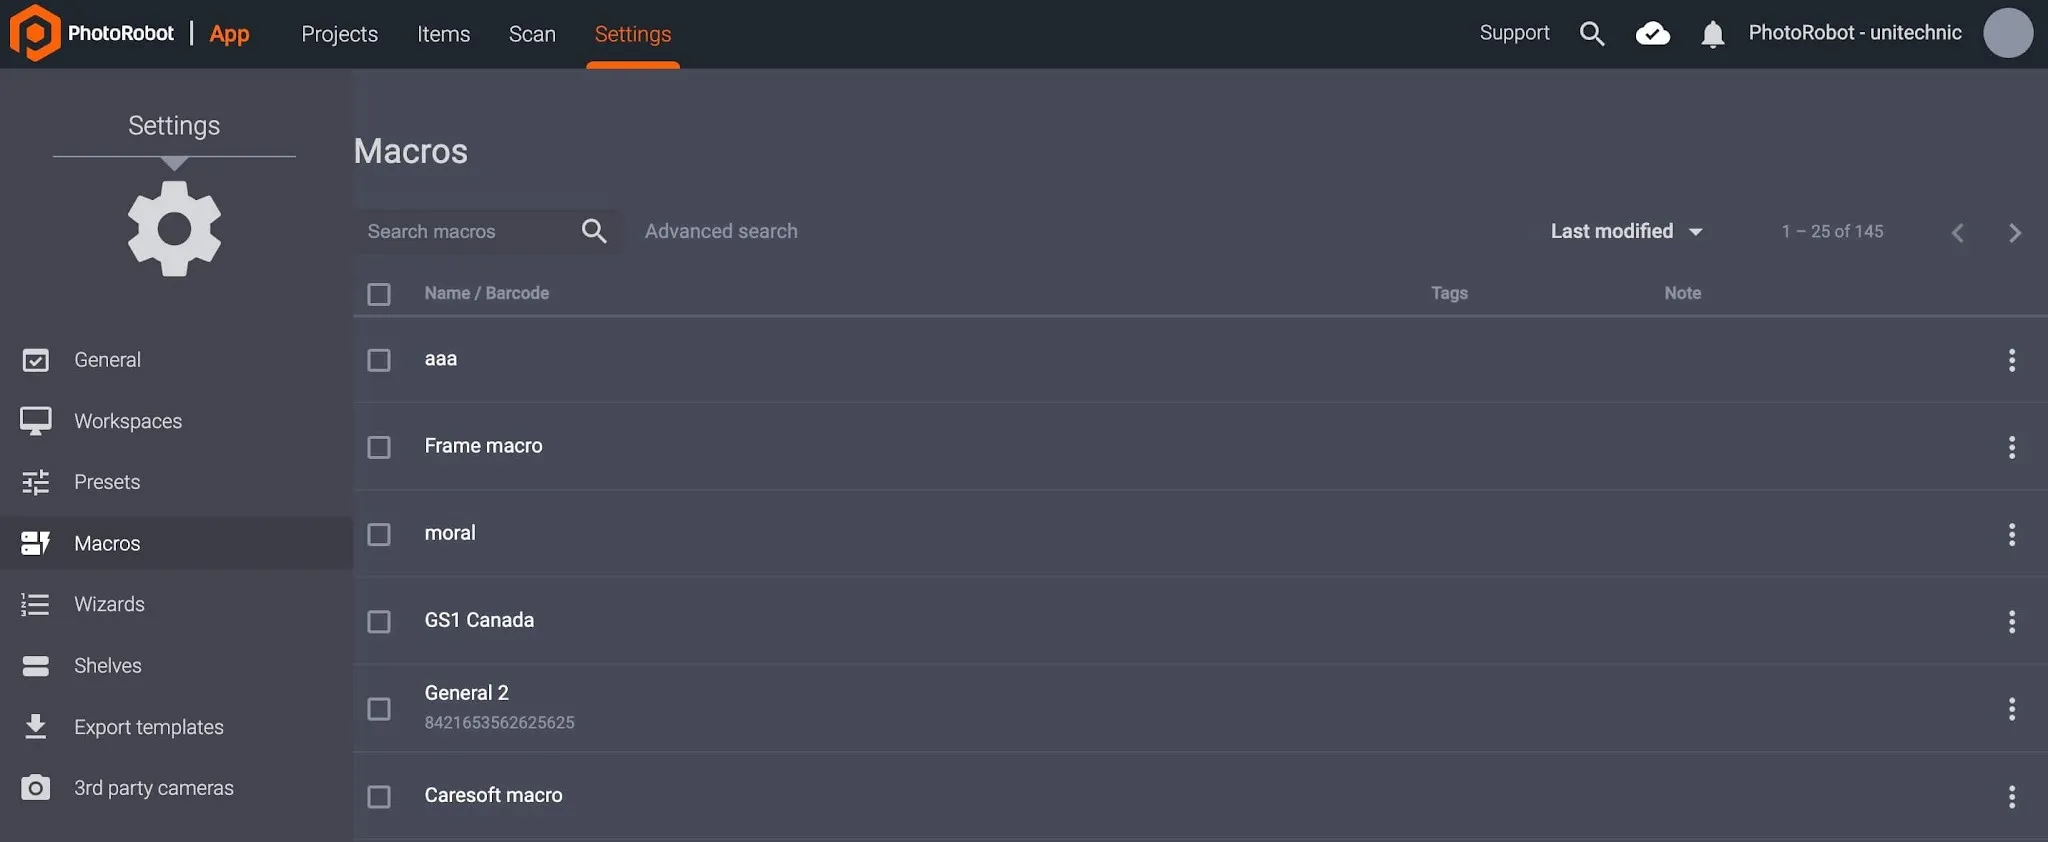
Note: For detailed instructions on the configuration and use of PhotoRobot Macros, refer to the PhotoRobot Macros User Guide. Find out how macros enable photography automation magic across multiple folders and components, with the automatic processing of complex tasks.
PhotoRobot Wizard Mode
Wizards mode in CAPP functions as an alternative to manual hardware, camera, and sequence configuration. In use, Wizards mode enables an administrator or photographer to create different Wizards to simplify capture mode for production-line operators. An operator is then able to start CAPP in Wizards mode, which functions as an extremely simple interface with wizard-guided steps. There are also limited controls for ease of use and onboarding.
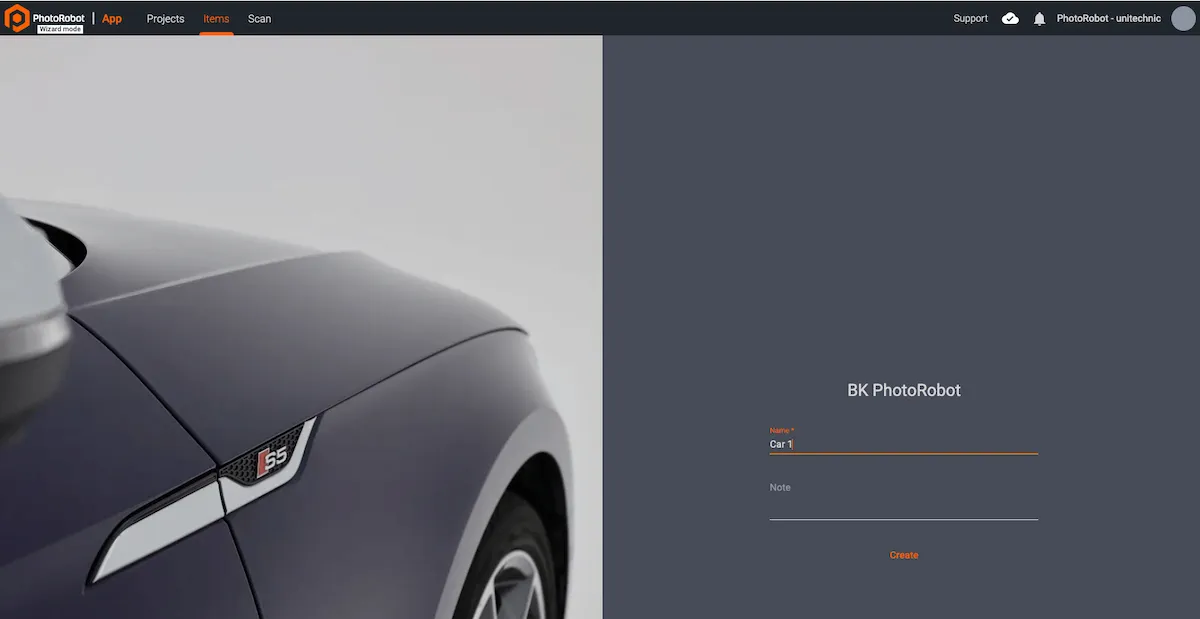
After creating a wizard, it stores Presets and Workspace configurations, as well as predefined steps operators must follow. Operators cannot adjust any settings, and they must complete the instructions in each step before they can move onto the next process.
Note: Wizard steps are defined in a JavaScript-like language format, and scripted by PhotoRobot consultants for custom functionality. Users can also script basic functions for initial experiments or simple setups. For documentation on the technical configuration and operator use of wizards, refer to the PhotoRobot Wizard Mode User Manual.


EOS Rebel Series


EOS DSLR Series


EOS M Mirrorless Series


PowerShot Series


Close-Up / Handheld

The Canon EOS Rebel Series offers beginner-friendly DSLR cameras with solid image quality, intuitive controls, and versatile features. Ideal for photography enthusiasts, these cameras provide reliable autofocus, vari-angle touchscreens, and Full HD or 4K video recording.
Connection
Resolution (MP)
Resolution
The Canon EOS DSLR Series delivers high-quality images, fast autofocus, and versatility, making it ideal for both photography and video production.
Connection
Resolution (MP)
Resolution
The Canon EOS M Mirrorless Series combines compact design with DSLR-like performance. Featuring interchangeable lenses, fast autofocus, and high-quality image sensors, these cameras are great for travelers and content creators seeking portability without sacrificing image quality.
Connection
Resolution (MP)
Resolution
The Canon PowerShot Series offers compact, user-friendly cameras for casual shooters and enthusiasts. With models ranging from simple point-and-shoots to advanced zoom cameras, they provide convenience, solid image quality, and features like image stabilization and 4K video.
Connection
Resolution (MP)
Resolution
The Canon Close-Up & Handheld Cameras are designed for detailed, up-close photography and video. Compact and easy to use, they offer precision focus, high-resolution imaging, and versatile macro capabilities—perfect for vlogging, product photography, and creative close-ups.


