How to Make a Simple 3D Model with Apple Object Capture API
See how to make a simple 3D model using Apple’s Object Capture API integrated with PhotoRobot’s Control & Automation software.
Apple’s Object Capture API and Photogrammetry 3D Models
Immediately on launch, we were itching to test Apple’s Object Capture API to make 3D models with PhotoRobot. And while it isn’t perfect yet, we must admit that Apple is certainly setting the standard here. Object Capture uses photogrammetry algorithms to transform a series of photos into high-quality 3D models optimized for Augmented Reality. It integrates with PhotoRobot Control software and into professional 3D content workflows.
To test Object Capture, the process was similar to photographing 360 spins. First, we photographed two sets of 36 photos. This provides views from above as well as from the bottom of the product. We then used Object Capture to scan our photos and produce a USDZ file. This file we could view in AR Quick Look, or embed on our webpage using a 3D content viewer, such as Emersya.
But how well did Object Capture perform? Read on to see the results for yourself and get PhotoRobot’s review of the Object Capture API. See where Object Capture excels, versus what still needs improvement. We’ll share what we tested, the results, and how to make 3D models with Apple’s Object Capture and PhotoRobot.
1 - Object Capture overview and integration
Apple’s Object Capture can function with photos from an iPhone or an iPad. However, in today’s use case, we’re deploying Object Capture on professional product photos we captured with PhotoRobot. Object Capture is available on MacOS Monterey and above, meaning it integrates seamlessly with our automation-driven equipment for eCommerce photography.
The software’s API, together with PhotoRobot software, uses photogrammetry scanning techniques to create a 3D model from photos. It takes information about the physical object via recording, measuring, and interpreting our imagery. We then use this information to replicate the object in the form of a 3D digital asset.
These assets make for compelling product content for product pages, marketing campaigns, online marketplaces like Shopify, video games and more. They come in the form of anything from basic, interactive 3D models, to product configurators, and immersive AR experiences.
2 - How to photograph a product for Object Capture
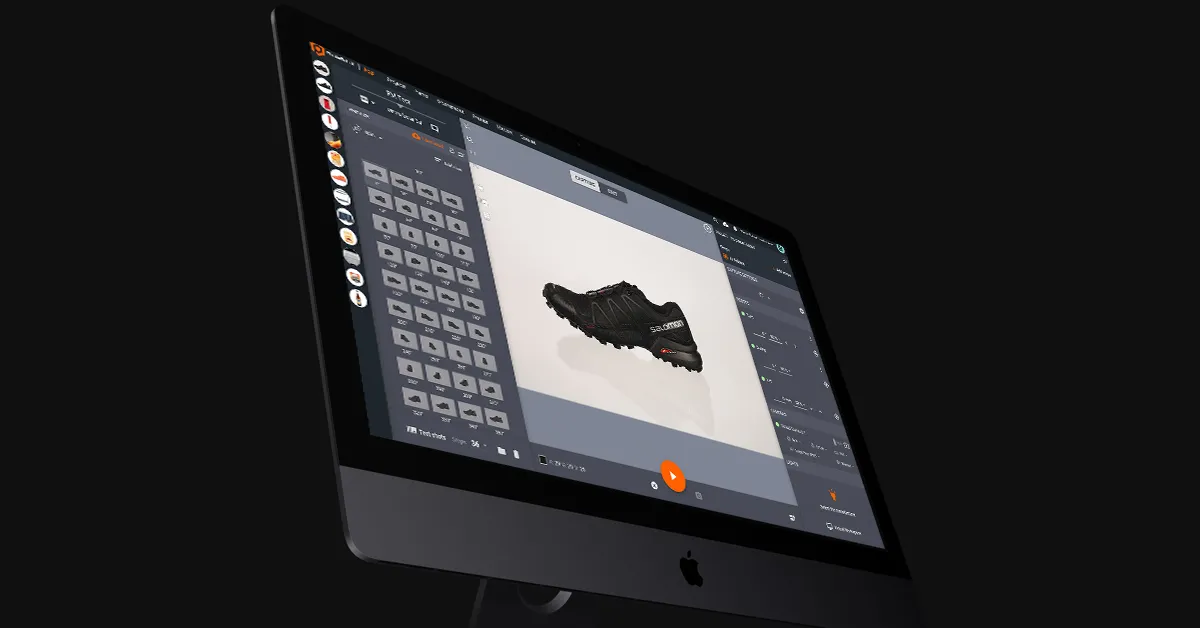
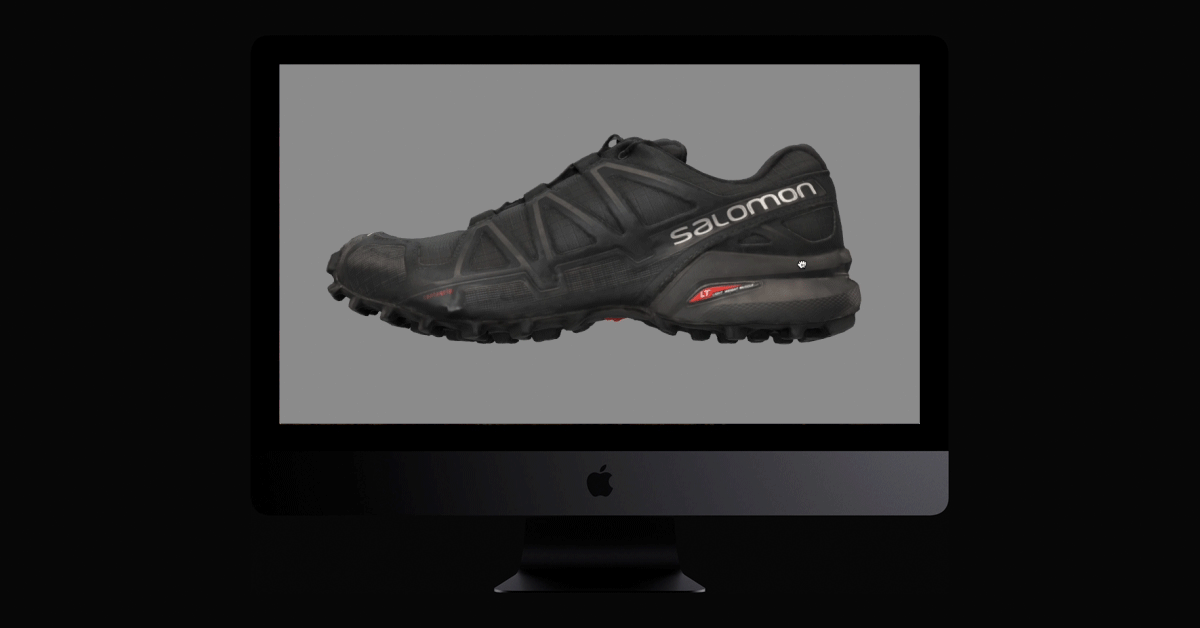
For our experiment, we chose to build 3D models of a single piece of black footwear from Salomon. We used PhotoRobot’s Case as our motorized turntable, together with a 26 MP Canon EOS RP.

In the end, we needed to use two product spins (each consisting of 36 photos) to generate the 3D model. One of our spins presented the footwear flat on its side to capture the shoe’s top and bottom. The other spin presented our shoe in standing position, showing 360-degrees from side-to-side.
For this, we needed to photograph 36 frames around the shoe, which was placed normally on the turntable. Then, we needed to do the same with the shoe laid on its side, again capturing 36 frames in rotation.
Now, rather than using standard studio lighting, we found a few adjustments were necessary. For one, Object Capture encounters issues when working with reflective surfaces. However, we did find a way to work around this and still achieve satisfactory results.
3 - Adjustments to the lighting setup
Notice, in the resulting model, any areas with glares either bake the reflection into the capture, or confuse the algorithm altogether.
For better results, we did find a few techniques we can employ in the studio.
- Use a larger light shaper to soften the light.
- Set two front lights to point at the object from 45°.
- Use no background light.
Often, this lighting setup produces results we can work with. However, with some products, the software will still encounter problems with reflections. When this happens, it’s possible to reduce glare using a polarization filter on the camera.
If further reduction is necessary, you could potentially accomplish it via cross-polarization. This technique calls for two polarization filters: one on the camera, and one in front of the lighting. The only problem with this is that the resulting 3D model loses all information about the reflectivity of the surface. This means you will have to add this information back later via manual photo editing.
4 - Crop photos before generating the 3D model
Now, before generating the 3D model, we found it was better to crop all of our photos first. This makes generating the model much quicker.
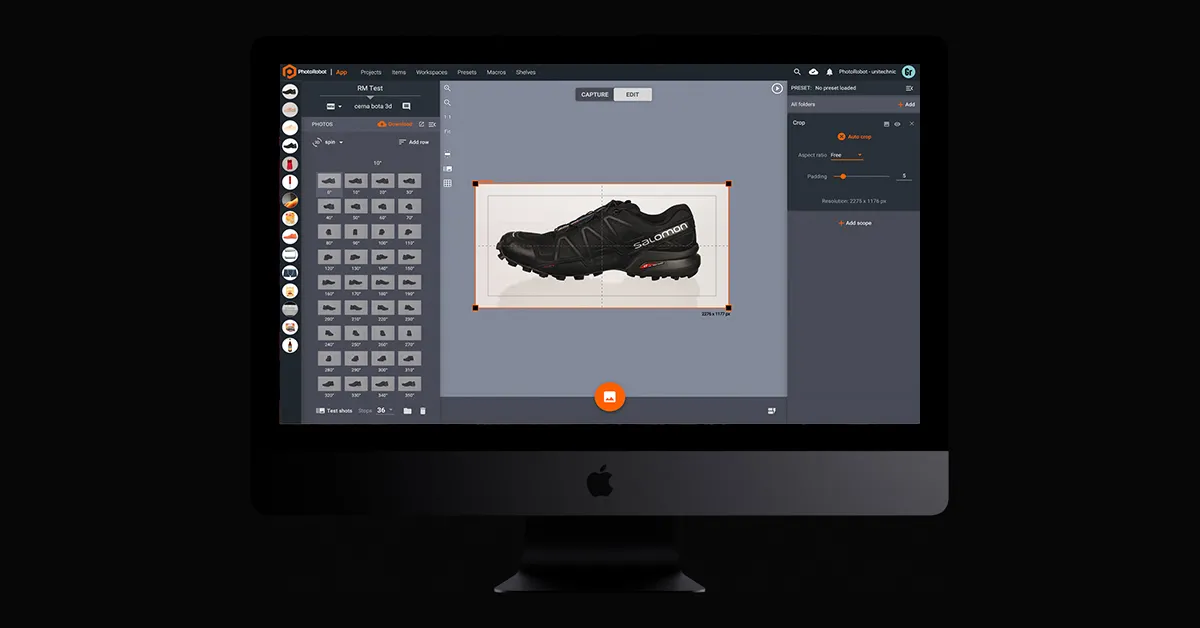
So, in PhotoRobot_Controls, we simply cropped one photo and applied the operation across all 72 of our frames. The Auto Crop function takes only 5 seconds to process all photos and apply the editing operation. This is no matter how many photos are in the outline, and despite the fact that each image is a different size.
After the operation processes, we can then go to Generate 3D model to configure settings before production.
5 - How to configure settings in Object Capture
When working in Object Capture, there are 2 settings we can configure before generating a model from our photos. These can be found after pressing Generate 3D model.
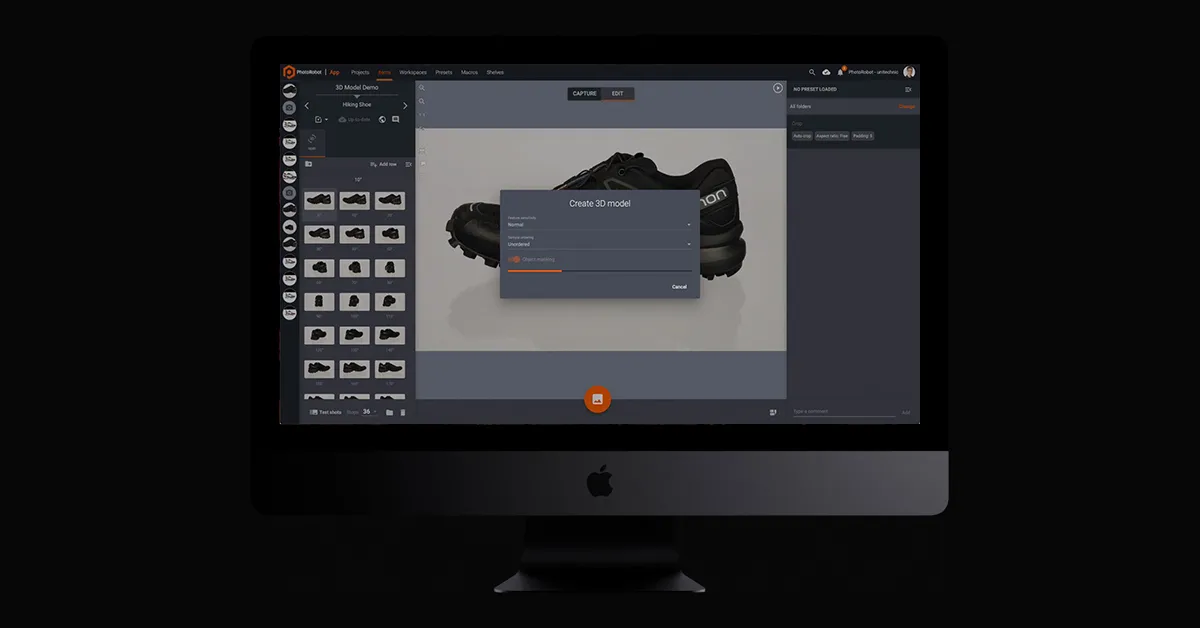
The first, Sensitivity, can be adjusted from normal to high. This corresponds to how sensitive the algorithm will respond.
The second, Object masking, we can toggle on or off to automatically separate the object from the background.
6 - Generating and previewing the resulting model
After choosing your configurations, all that remains is pressing Start. The photogrammetry algorithm then processes all of the source photos, and produces a USDZ file containing our model. The file is created in approximately 3 minutes with Object Capture and average hardware, whereas other methods can require hours of calculation and a professional touch.
Instead, in little time after pressing Start, we receive the output as a MacOS file for preview.
We can then work with this file on any editing software. When satisfied, we can use files on an e-shop like Shopify, or any other online marketplaces with support for 3D models.
To use for your webpages or marketing campaigns, there are dedicated 3D content hosting platforms. These platforms effectively bring 3D product visualization and customization to life, for both product teams and consumers.
7 - How to publish 3D models via hosting platforms
Finally, to publish 3D models on your own web space, you’ll need an embeddable 3D viewer. At PhotoRobot, our go-to and long-time partner for this is Emersya. The Emersya 3D, AR & VR experience is available for any webpage, device, or operating system.
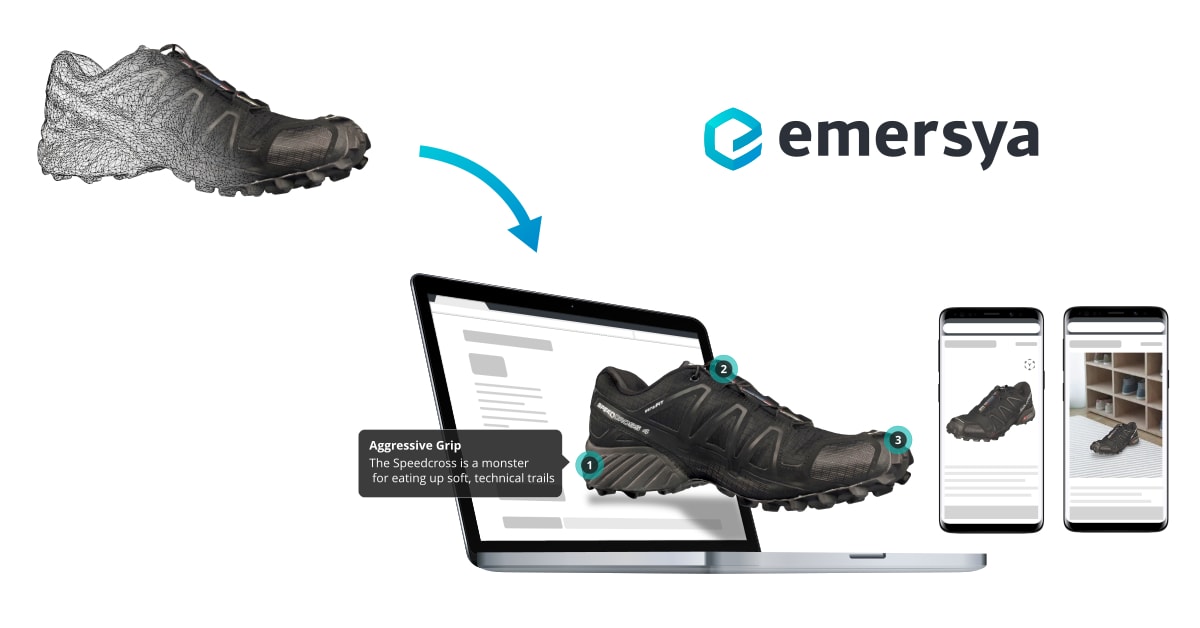
With native HTML5 and WebGL technology, the Emersya viewer requires no plug-ins. Responsive design ensures all product content is viewable and compatible on all devices shoppers might use. Meanwhile, hardware accelerated 3D using WebGL technology guarantees high-quality product content.
All we had to do was upload our file into the viewer, an, thanks to Emersya, our 3D model is then embeddable on any page. It’s the same process as embedding a video using a simple iframe code. The advanced API provides control over the 3D model directly from our website, and works on any webpage or CMS e-commerce platform.
View the embeddable 3D models for yourself
PhotoRobot’s review of Apple’s Object Capture
In the end, we encountered a few issues with Object Capture. The first, we mentioned already, relates to its ability to scan reflective surfaces. It is possible to work around this using cross-polarization, however manual editing is required after.
Other issues we noticed are working with transparency, and when scanning smooth or uniform surfaces. Currently, Object Capture does not work well with transparency. Nor does it with objects lacking texture or distinctive features, making it more difficult to detect object shape.
Nonetheless, we still think Apple performs remarkably well with Object Capture, and its API integrates seamlessly with PhotoRobot software. Generating a 3D model for some objects can provide a challenge, but, overall, Object Capture makes a welcome addition in the studio.
Especially for some products, it generates impressive results without much need for later editing or retouching. Then, with 3D viewers like Emersya, it’s easy to embed 3D models on our own webpage or CMS e-commerce platforms.
Curious to learn more about 3D modeling and hosting?
Reach out to us today or sign up below for our Professional Product Photography Newsletter. Also find us on Facebook, LinkedIn, and YouTube to stay up-to-date on everything happening in the industry and PhotoRobot. From how to make 3D models with PhotoRobot, to production of any 360 or 3D product content, we have you covered.


