eCommerce Photography - How to Optimize Production
In eCommerce photography, production speeds matter. Discover 9 stages to optimize your in-house studio for high-speed, high-volume production.
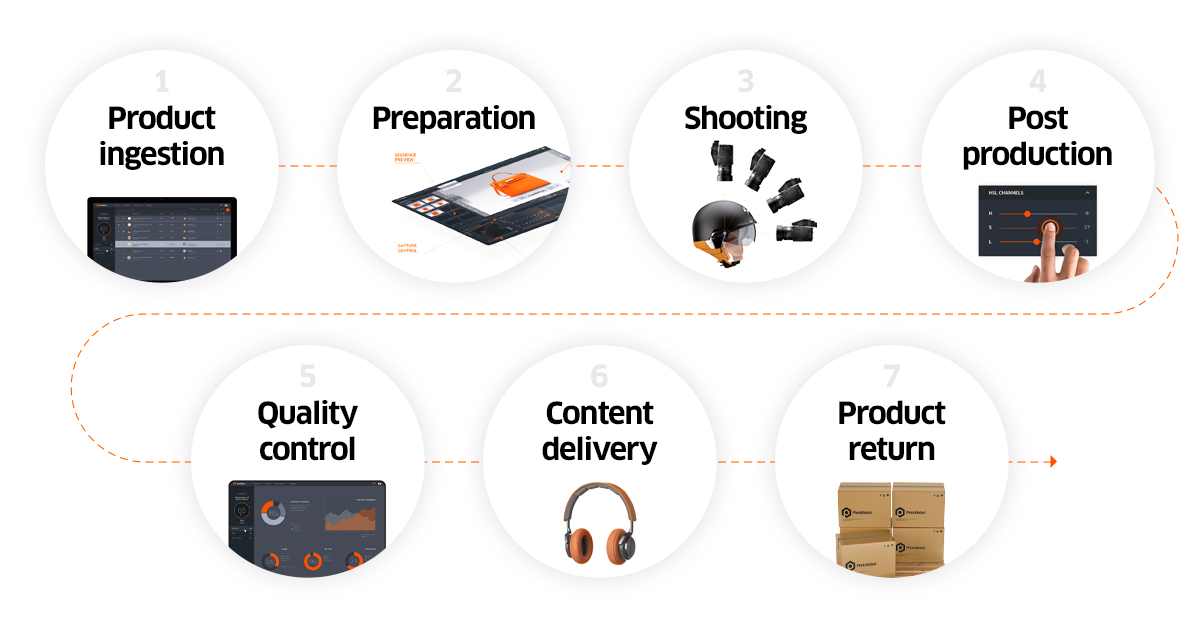
9 Stages to Efficient Ecommerce Photography
In eCommerce, manufacturers and retailers alike take on product image production for greater brand consistency, maximized sales, and reduced returns.
The measure of a studio’s success thus becomes how fast it can:
- Source products
- Produce product imagery
- Create ‘web-ready’ results
- Sell products online
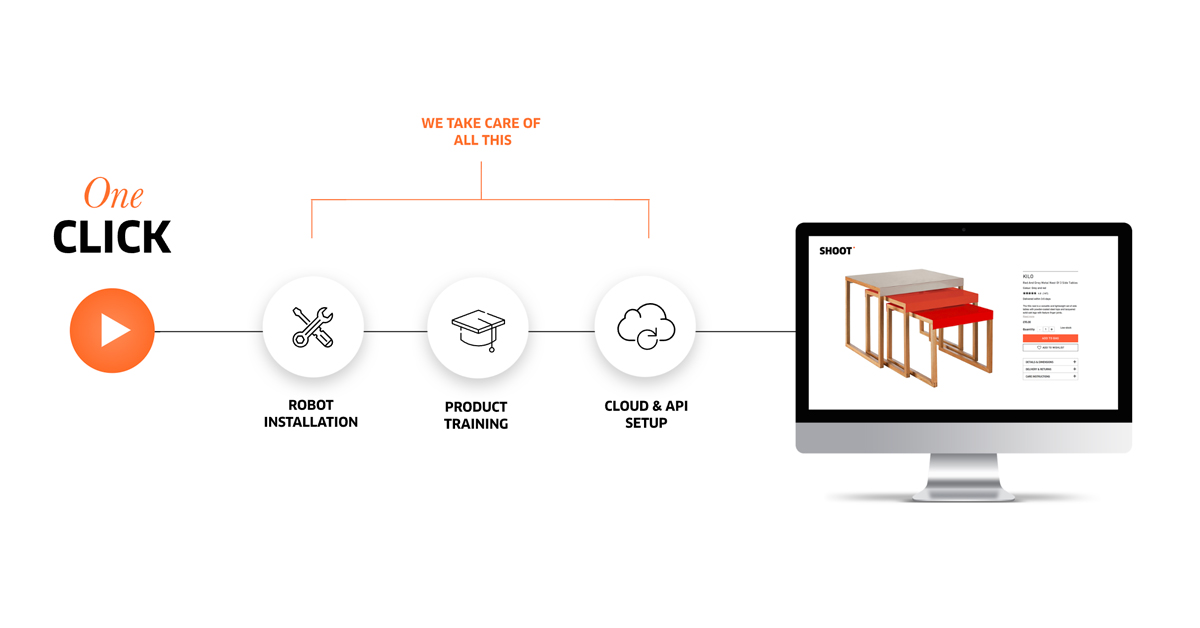
To optimize performance in each area, workflows account for the use of specialized photography robots together with automation technology. Product photography software can then centralize & automate processes on one system: producing, QA-ing, publishing, formatting, sending, and managing digital assets.
In this way, the product photography studio realizes higher production speeds, greater accuracy, and reduced product content ‘time-to-market’. The studio also benefits from higher levels of organization, customizable workspaces, simple processes, as well as free & effective collaboration.
Follow along as we detail the 9 stages to efficient eCommerce photography, including:
- Organization
- Preparation
- Studio planning
- Ecommerce photography machines
- Test shooting
- Shooting
- Post-production
- Publishing images
- Digital asset management
We’ll guide you through the production process of eCommerce photography, from product-in to product-out. Read on to discover the process, hardware, and software to help you get the best photos for your online store.
1 - Organization
Categorize your products
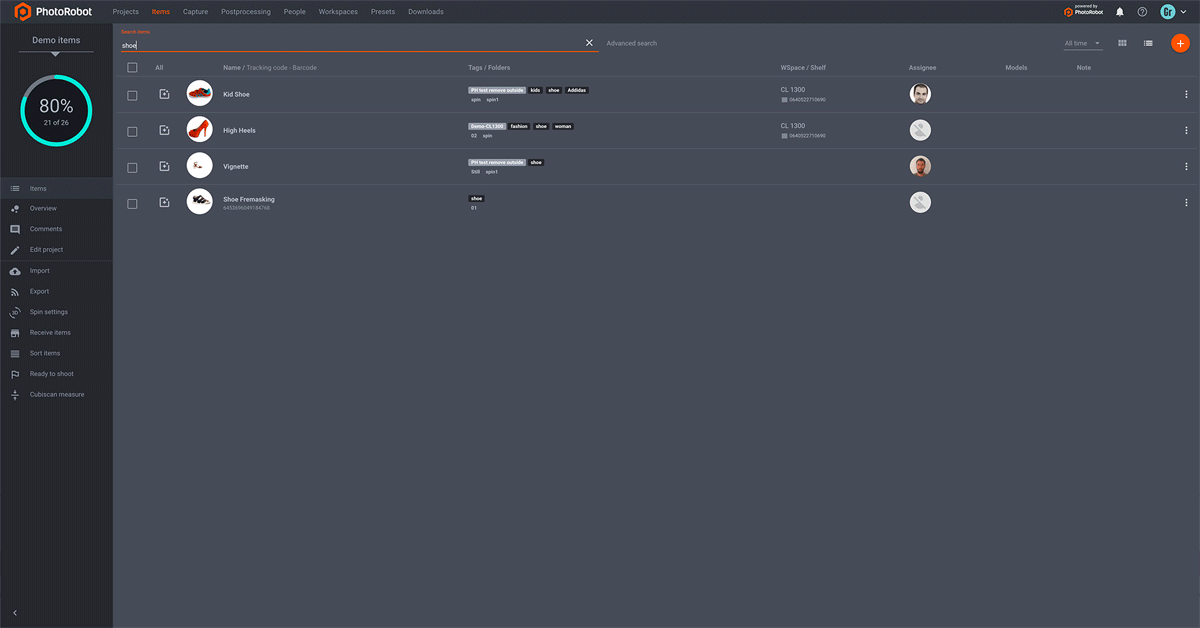
The first stage of any ecommerce photoshoot involves cataloging inventory. Different types of products will call for different camera settings, equipment, lighting, and post-processing. Thus, grouping items together by size, shape, color, and transparency is where every project begins.
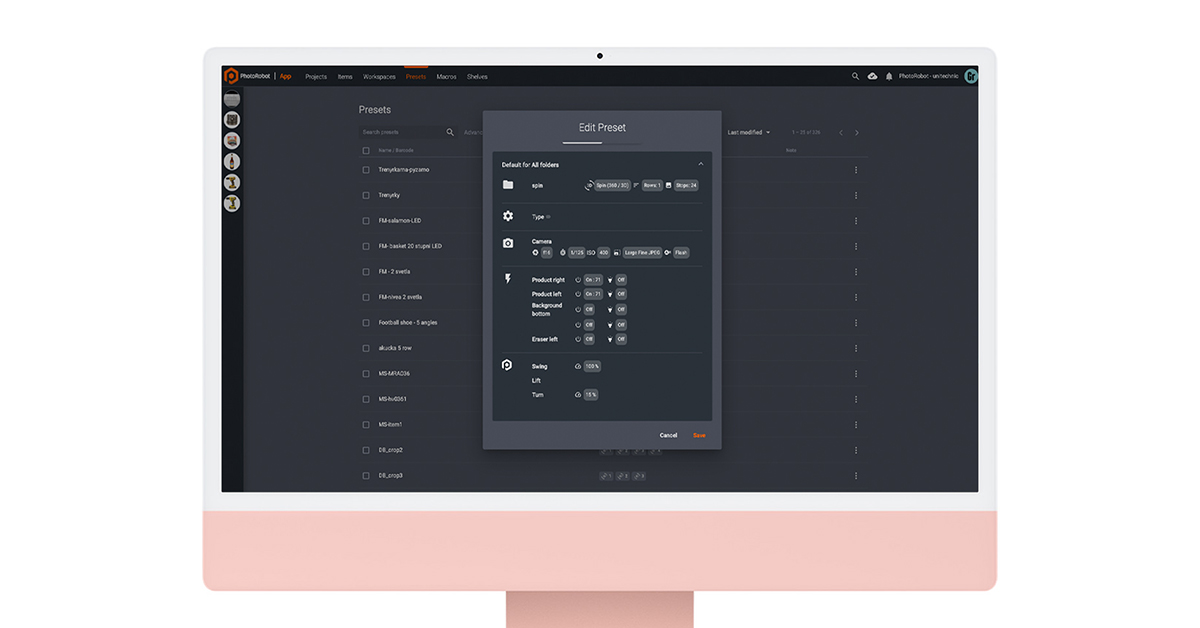
These categories we will use to automate capture sequences, robotic processes, light control, and post-processing. For example, PhotoRobot software has what we call Presets. These are configurable software settings users can apply to similar types of products. Once configured, studios create a unique barcode for the Preset. This barcode represents a “shelf” both in the physical studio and in the software according to the type of item.
Assigning items to their virtual shelf requires only scanning the product’s SKU followed by scanning the shelf code. This sorting to “shelves” groups products together in the software by their photoshoot and post-processing settings. It enables us to prepare for shooting various types of products: light, dark, transparent, reflective, etc.
The system also stores identifying product information attached to its barcode: name, color, description, size, and associated tags. If you sell unique products, you can manually input all of this information. It’s also possible to generate unique barcodes, or add custom tags so items are easy-to-access and identifiable.
Develop a file naming, tagging, and metadata structure
To further organize for photoshoots, set up a file naming convention and a tagging structure. It’s also important the item number corresponds to any folder where the digital assets will exist. The naming and tagging structure will then ensure images are easily searchable and retrievable.
This will help to decrease project management errors on the eCommerce backend. In this regard, automation technology can enable automatic file naming & tagging for different products, projects, customers, or organizations. With PhotoRobot, users can also manually import any type of data via CSV import, or by calling an API.
If CubiScan is present in the workflow, you can scan products when receiving them to obtain their exact weights, measurements, and dimensions. This information the software can then automatically attach to files and store in a database as soon as we record it. In this way, you prepare for the photoshoot long in advance: from file naming and asset management to metadata assignment.
Catalog product images
It’s equally vital when organizing for a photoshoot that you have an organized system to catalog your digital assets. In eCommerce photography, businesses often have multiple assets for every one product. There can be still images, marketing angles, close-ups, 360 spins, video, and 3D product models.
This means you need a digital asset management system that:
- Shows which images are web-ready versus those still in production
- Organizes various outputs into easily located folders (still images, packshots, 360s)
- Allows for file renaming and structured content delivery
- Enables batch processing for editing multiple images simultaneously
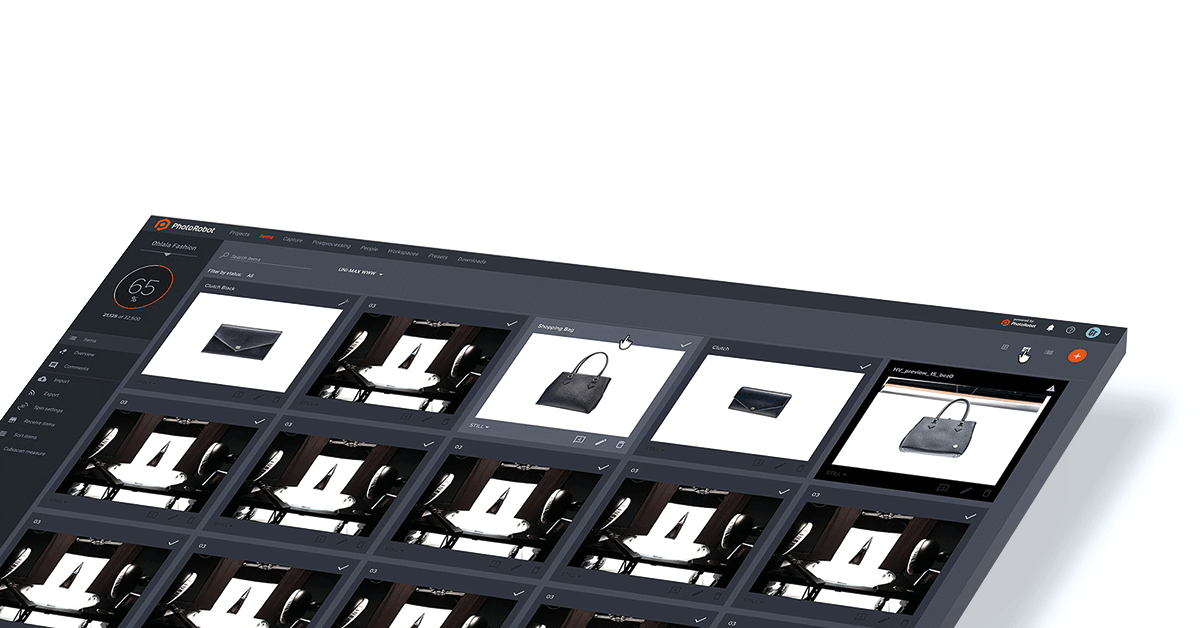
Ecommerce photography software such as PhotoRobot centralizes production with digital asset management on one platform. It gives studios the power to edit hundreds of photos at once, catalog progress, attach timestamps, and easily search content.
In the end, each product has its name, description, number, date and metadata in every file folder where it appears. Nothing gets lost in transit. All product information is in one central location, with no copying and transferring files from one system to another.
Backup product images
Ecommerce studios also need a system in place for backing up images after production. This is another area that PhotoRobot integrates into the workflow. With Cloud-driven technology, images are backed up immediately and automatically after capture. This is before the automated post-processing operations of the software, meaning original files never go missing.
Cloud technology also makes it so that projects are accessible from anytime, anywhere – for internal or external talent. Team members, project managers, retouchers, and clients alike simply log into the system for remote access to digital assets.
The system backs up original files in case anything goes wrong, and there is no need for duplicate files. Automation then enables real-time image scaling with support for JPEG and WebP image formats. Together with the Cloud-based, global Content Delivery Network (CDN), these ensure quick-loading and pixel-perfect resolution on any device.
Create a structured workflow plan
If you want to be consistent, especially as your business grows, your studio should have workflow documentation. It should detail each stage of production, from shooting methods to style guidelines, post-processing, and content delivery.
In this way, as the business takes on more and more customers, it’s easier to maintain consistency. A structured workflow for example will document step-by-step how to organize for a photoshoot, prepare products, and set the scene. It will include instructions on file naming, file types, formatting, and delivery requirements.
As you document each stage, both your human resources and outsourced talent will be able to easily recreate processes. After all, communication is key to business. When everybody is on the same page, operations can run smoothly and efficiently no matter how large the operation becomes.
2 - Preparation
Create a shooting list
Preparing for the actual photoshoot begins with the shooting list. With PhotoRobot, users create a shooting list via CSV file import, or by calling an API. Users can import any type of data, and also change the structure of shooting lists by customizing columns and tags. The shooting list records product names, SKUs, ID numbers, and sometimes additional product info. It will contain each item to photograph in a single photoshoot, or over the course of days / weeks.
After creating a shooting list, the system will then organize image files into projects, items, and folders. The project is the highest level data entry, consisting of all the items to photograph. It is possible to incrementally import new items into existing projects, or to add new parameters and tags. In this way, users can modify any project even after the shooting begins.
Within the project, individual items usually represent a specific, photographed object, e.g. one product. Items then include one or more folders to keep different kinds of images (still images, 360s) separate and organized.
A common example would be an item containing one folder named “marketing angles”, and one named “360 spin”. Before shooting, you would create these two folders within the item, which will later fill up with images as you capture them.
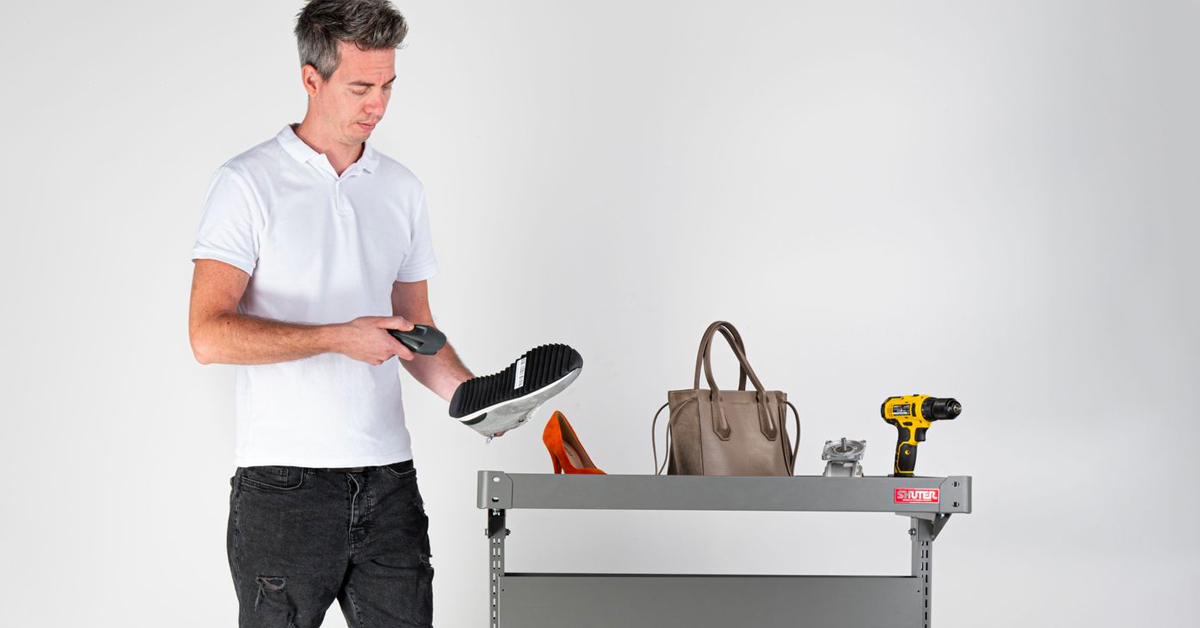
Prep the product line
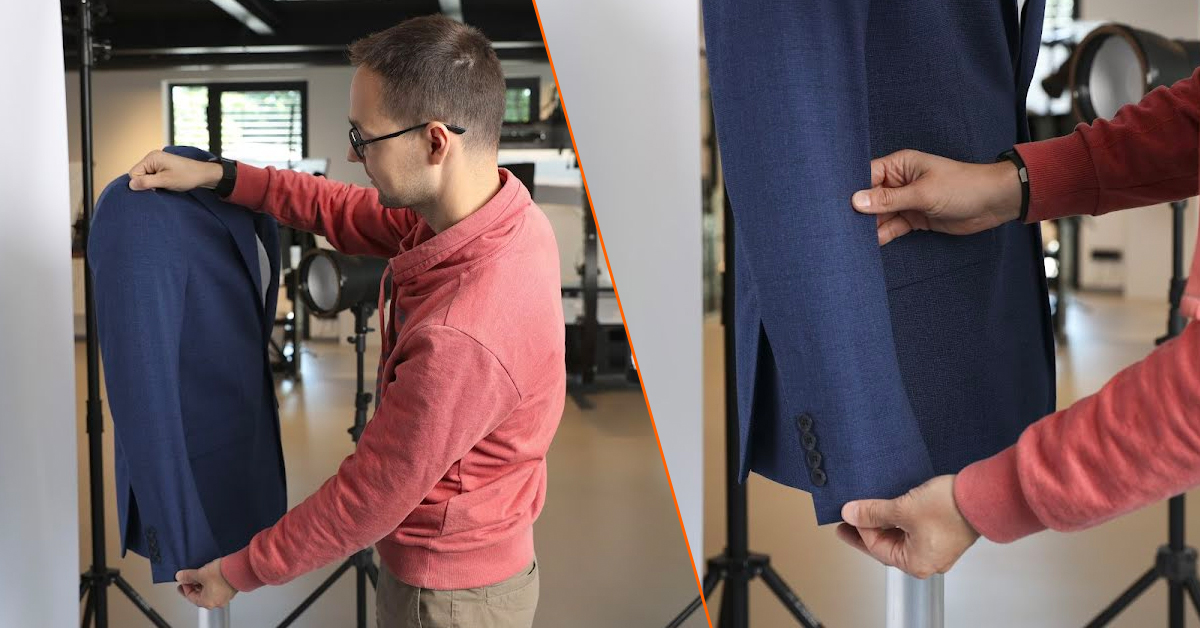
When your workspace is ready and the products arrive on-floor, the next step is prepping each product. Be sure to spend extra care, ensuring each item is in mint condition. It’s important products don’t get damaged, dinged, or scratched before the shoot.
Even the smallest defect or speck of dust can mean hours of advanced editing and post-processing later on. Thus, product prep is vital to saving on time (and related costs).
For example, if shooting clothing or footwear, the product should be:
- Brushed clean depending on the material, with no visible dirt, dust, or grime
- Not showing any product tags that distract away from the item
- Steam cleaned or pressed if possible
- Free of any wrinkles, creases, or threads showing
- Shined or wiped if it has any reflective or transparent materials
- Examined for any defects
No matter the type of product, teams should closely inspect every detail that might show in product photos. After ensuring each product is in pristine condition, you can then begin grouping products together for the photoshoot.
Group similar products together
There are many ways to group products together to streamline eCommerce photoshoots. For example, PhotoRobot software Presets act as configurable settings users can apply across batches of similar types of products.
Users can create settings for groups of products based on:
- Size (from as small as a microchip to as large as automobiles)
- Shape (for products that require advanced background removal operations)
- Color (light, dark, reflective, semi- or fully- transparent)
- Capture settings (camera, equipment, angles, elevation, lighting, post-processing)
Grouping products together by Presets will help to simplify processes and editing later on. Studios configure and save each Preset in the software to automate by style guides, staging, and image overlay.
Adhere to a brand style guide
No matter if you produce visual content for your own eCommerce business or for a customer, consistency is key. In fact, many businesses will have their own brand style guide which details how their product content should appear online. It helps stylists and photographers know which angles to photograph, the types of content (still images, 360s), and post-processing guidelines.
In fashion eCommerce for example, a style guide would describe how to photograph clothing, accessories, footwear, etc. It would include instructions for on-model photoshoots versus using a mannequin, or for lifestyle versus flat lay photography. These instructions can also contain example photos, diagrams, or post-processing parameters for different types of products.
If you don’t already have a style guide, start by identifying who the brand should appeal to most. From here, you can develop instructions for visual content around the brand’s purpose and target consumer. Consider color themes, photography scenes, product styling, types of eCommerce images, and additional branding approaches to help you stand out.
In this way, you’ll have detailed instructions to help you quickly realize consistency across all photoshoots. These instructions can also function as configurable Presets in PhotoRobot software to help studios automate repeatable and repetitive tasks.
Determine which types of images you need
The type of product as well as the target consumer will determine the format of eCommerce product images you need. Some categories of products will benefit more from 360 and 3D product visualization, while others need only specific marketing angles. Usually, the more complex or aesthetic the product, the more it benefits from immersive product visuals.
The goal after all is to help consumers make an informed decision about a product they can only view online. Items with moving, hidden, or technical parts (automobiles, machinery) require additional photos, angles, or close-ups. Further, fashion products like clothing or jewelry photography call for imagery that helps consumers effectively visualize wearing the product.
Thus, decide if your products need only still images from a few angles, or the complete 360 / 3D experience. You can then plan for which techniques your photographers will deploy in the studio.
Plan around eCommerce image standards
Among today’s leading brands, retailers and manufacturers, popular eCommerce photography formats include:
- Packshot photography (also “pack shot” or “packaging shot”) are still or moving images of a product, sometimes including its packaging and labeling. Packshots attract attention firmly on the item, usually with a plain background to showcase fine details & design features. They might also include close-ups, such as a closer view of a logo, the fabric, or the material.
- 360 product photography uses special software to stitch together photos into a 360-degree product visualization. The standard 360 product spin consists of a single row of elevation around the item at each frame, usually at 10° elevation.
- 3D product photography (also multi-row spins, or hemispherical / spherical spins) entails a spin capturing two or more rows of elevation around the product. The first row is usually at 10 degrees, while subsequent rows capture several vertical angles. This makes a 3D product experience, with both a horizontal and vertical viewing axis.
- Ghost mannequin photography such as with PhotoRobot’s Cube produces a true-to-life, 3D effect, giving clothing a “full-bodied” and “worn” appearance. This is thanks to modular mannequins and photo editing to make clothes appear as if an invisible model is wearing them.
- Ecommerce 3D modeling utilizes special photogrammetry scanning techniques and software to generate digital 3D product models. These usually consist of at least 36 photos around a product, multiplied by shots from two or more rows of elevation. 3D models are popular in eCommerce for use with 3D product viewers, product configurators, and AR / VR.
After determining which formats your eCommerce images will take, you can then move onto prepping the workspace.
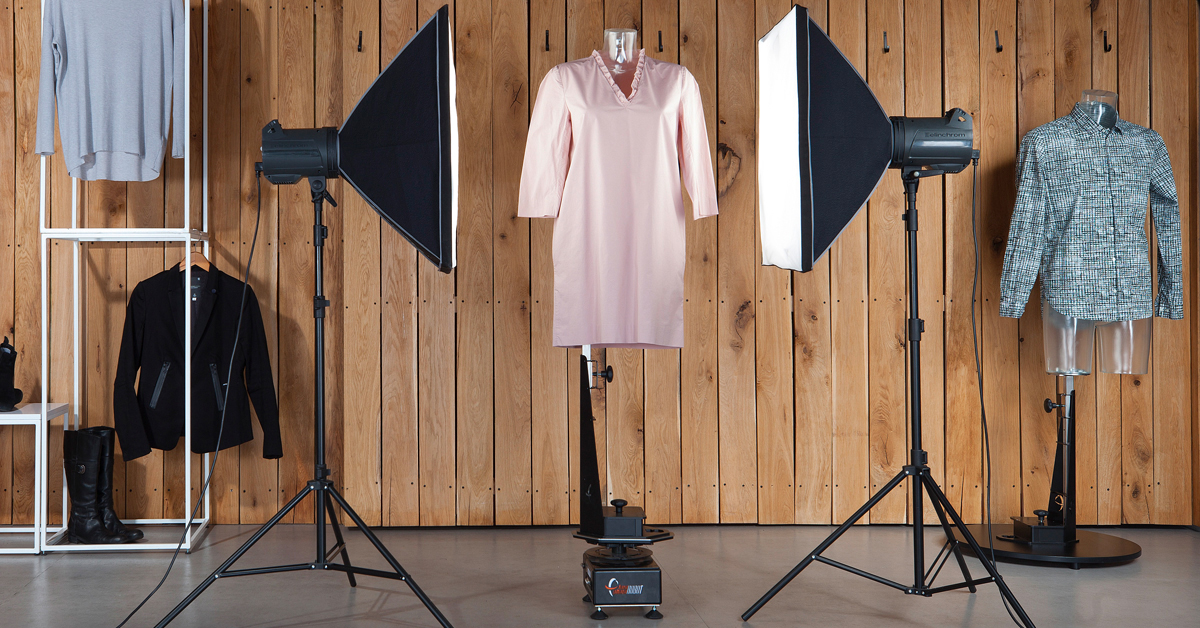
Prepare the workspace
A common setup for eCommerce photography will include space for a motorized turntable, a lighting setup, and a workstation computer. This might be in a warehouse, a studio, or a larger production hall. Ideally, the products will also be on nearby shelves, sorted into categories according to their photography and post-processing presets.
There can also be a robotic arm or multi-camera rig to synchronize camera capture with the rotation of the turntable. These software-driven devices enable remote camera control with smooth, mechanical precision. They stabilize cameras along a chosen trajectory, and can automate elevation according to object dimensions to quickly produce multi-row 360s.
Whatever the setup, there should be enough space for the photographer to freely move around the area. Be sure there are no obstacles or cables that might get in the way, and inspect all equipment. There should be no dirt or dust that might appear in photos, such as on the plate of the turntable.
Afterwards, all that’s left is to virtually prep the workspace in the software. Workspaces in the software list hardware for the photoshoot, and settings for PhotoRobot modules, cameras, lights, and other accessories.

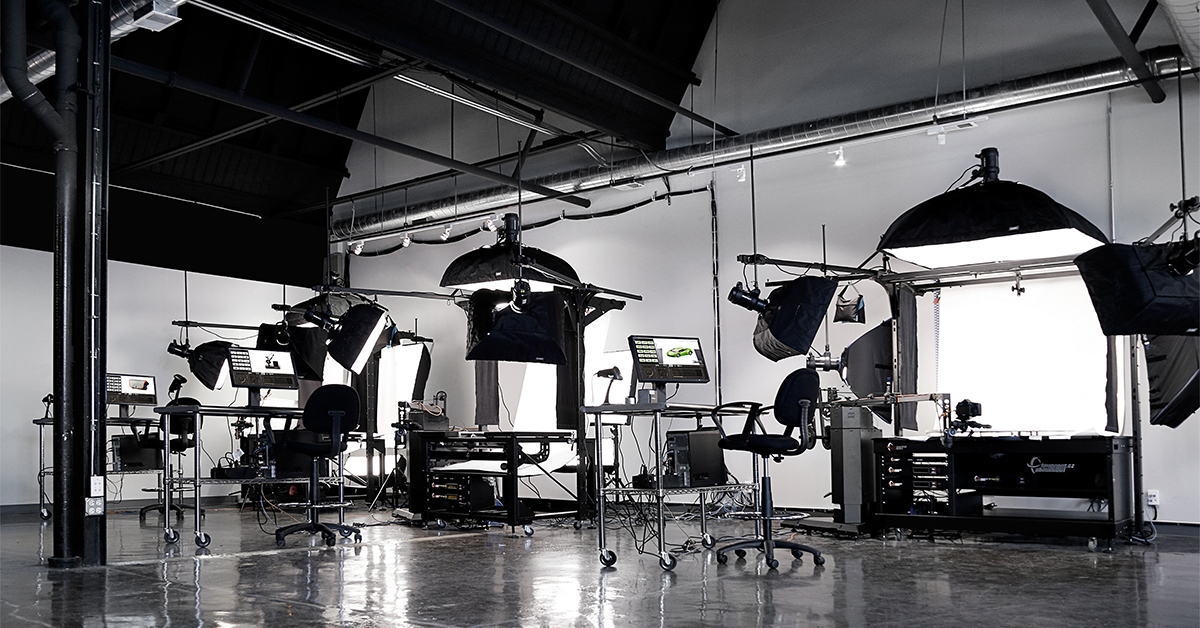
3 - Studio planning
Space
If building a new eCommerce photography studio or adding on, space considerations are key to accommodate the machinery, inventory, and team. This is especially true for 360 product photography. Photographers need room to move around and make adjustments without hassle. They need easy access to products. There must be space for product prep and temporary storage, as well as solid, level floors to support the system. The area should also have room for a workstation computer, and for any additional staging tools like mannequins or props.
Equipment
What equipment you outfit your studio with will depend on available space and the scope of your business. Smaller webshops and retailers may take advantage of more compact turntable setups. Meanwhile, larger manufacturers deploy entire production lines of robots, from different size turntables to multi-camera rigs. The studio then requires professional lighting, softboxes, background diffusers, and sometimes equipment for product staging (like PhotoRobot’s Cube).
Electrical
Electrical consumption is only a minor concern with eCommerce photography modules like PhotoRobot. This is because the turntables themselves require only a moderate amount of electricity. The same is true if also using the Robotic Arm, or the MulitCam. However, you do need to ensure you have adequate power for the combination of strobes, cameras, and a workstation computer. These can add up, but usually four 20a 115v circuits in the studio is more than enough for daily operations.
Environment
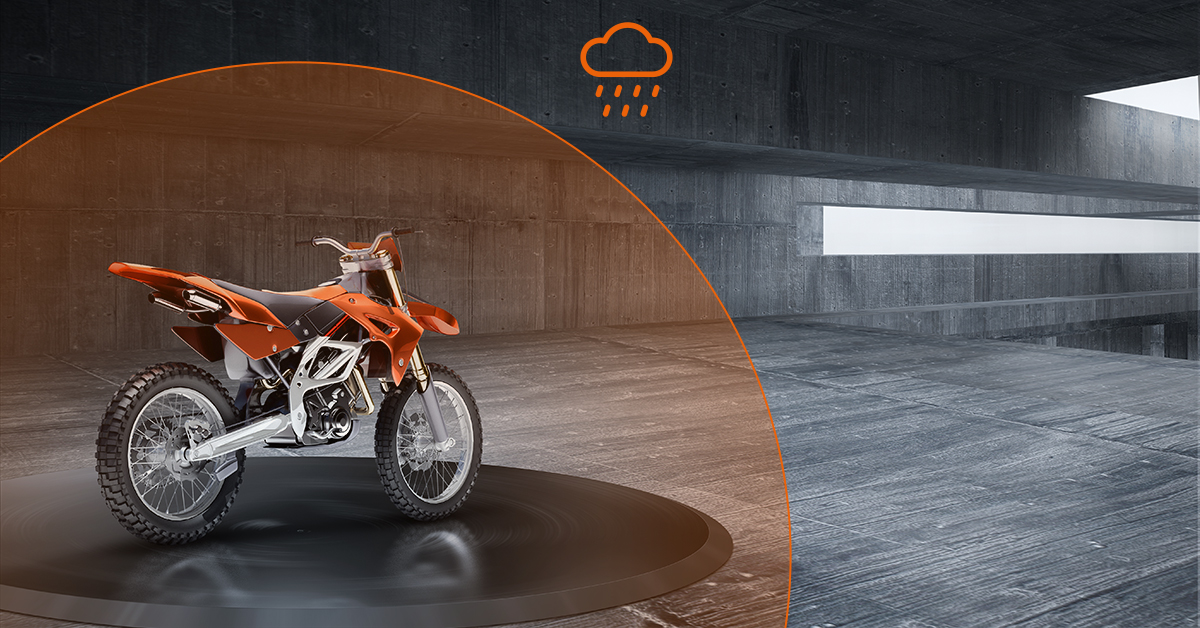
If considering a fixed installation, a clean climate-controlled environment will be ideal for your eCommerce photography. It helps ensure products and the photography scene require less attention. Yet, this isn’t always necessary. For example, PhotoRobot’s design enables it for use in any product’s “natural” environment. This is thanks to the extremely quick installation times of the devices. Disassembly is also just as easy, making the environment less of a concern for the equipment’s correct operation. It can be set up and taken down in any space such as a warehouse or garage in sometimes an hour or less.
Proximity
Another concern is the proximity of the products from storage to where you prep them. Inventory needs to travel from storage to prep, to sorting, shooting, and back again. The quicker this process, the more items your photographers will be able to handle every session. Logistics also plays a vital role by ensuring products are less likely to get damaged during transport. Thus, consider a location for your 360 turntable that is nearby storage, prep, and the workstation.
Network access
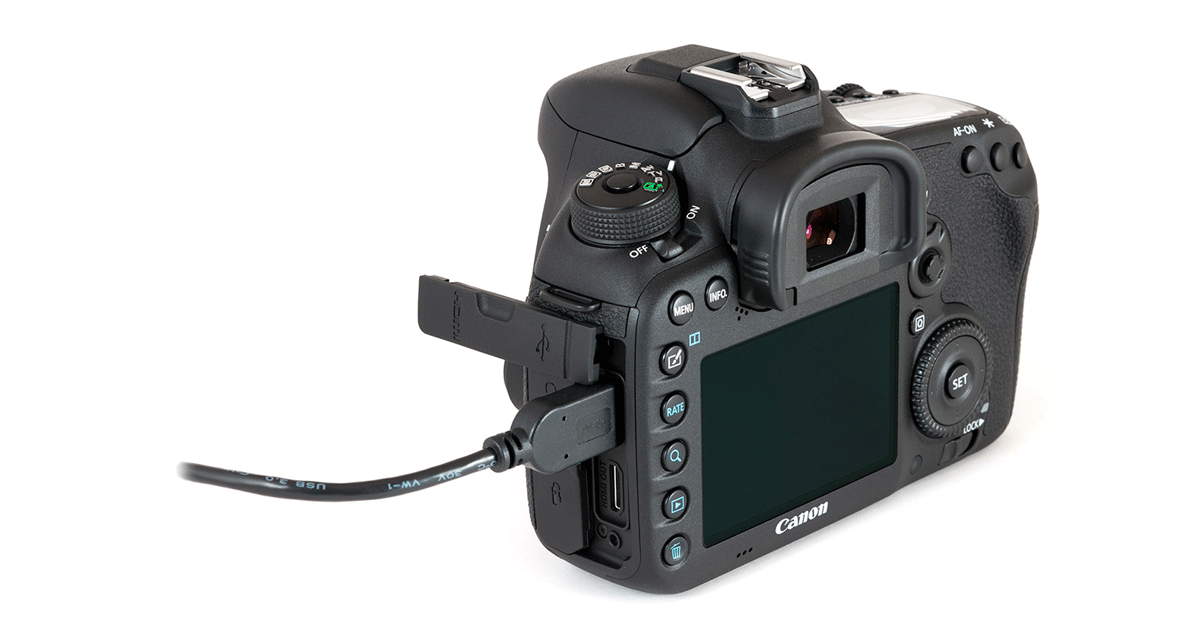
The 360 turntable and compatible devices communicate with the software and camera over a local area network (LAN). This enables teams to install and manage multiple systems at one time. The hardware connects to the same local area network as the computer to control all studio equipment and devices. Internet connectivity is necessary to activate robots, download firmware updates, and for software control of the machinery, camera & lights. Alternatively, users can access Cloud services over the internet, while cameras connect to the system via USB for tethered shooting.
Camera
Photography of eCommerce products calls for capturing fine details and showcasing unique product features. Product photos must be high-resolution, display various angles, and sometimes include deep zoom, hot spots, or macro shots. It might be zooming into an item’s material design, or a photo to better present branding or a logo. Yet, with PhotoRobot you don’t need the most expensive or high-end camera on the market.
PhotoRobot modules support DSLR and mirrorless Canon cameras, with 26 MP models usually more than efficient. Models such as the Canon EOS RP (26 MP) can capture photos customers can zoom into as much as 10x at any angle within a 360 spin. Its tethered shooting and remote capture integrates seamlessly into the software controls, and across all PhotoRobot product photography modules.
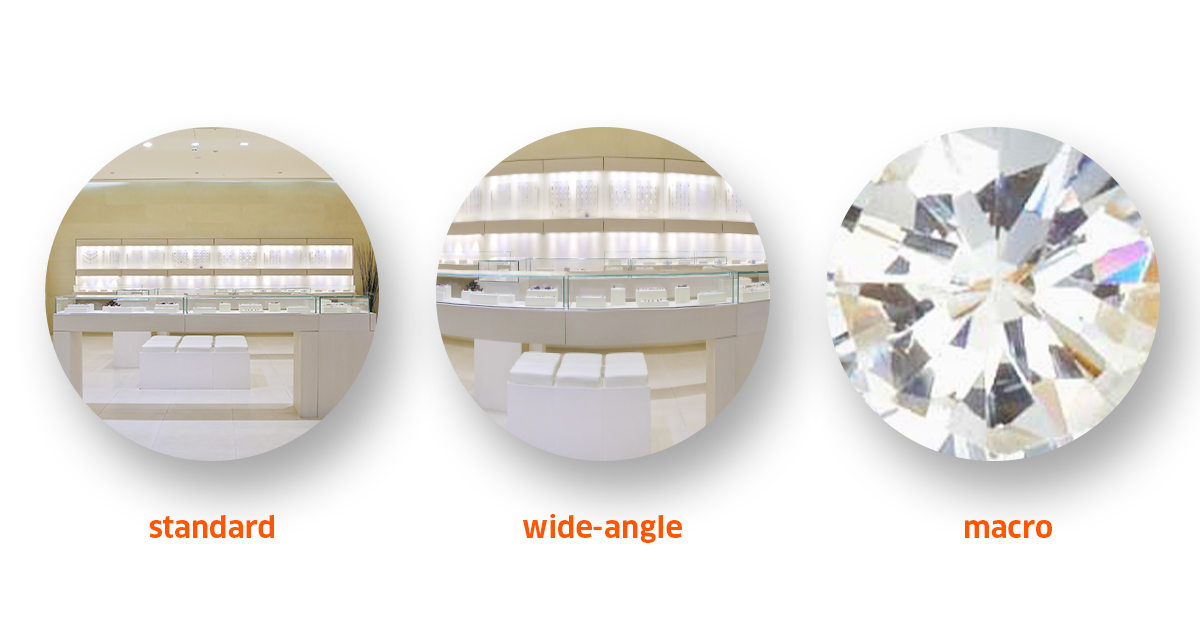
Lens
Choosing an appropriate camera lens will depend on the type of products to photograph. Extremely small products (jewelry) will call for macro lens photography to capture intricate details and a deeper depth of zoom. For shooting larger products that don’t require extreme close-ups, a standard lens often performs well. However, they limit the depth of zoom your images can achieve, losing more focus the closer they get to the object.
Wide-angle lenses are more for landscape or lifestyle photography, such as product photos of a car on the road. Another example could be a tennis player swinging your brand’s racket. In these cases, a wide-angle lens can capture a wider field of view without having to further distance the camera from the subject. On the other hand, these lenses are terrible at capturing fine details. They lose resolution and produce blurry images at deeper depths of zoom.
Thus, eCommerce product photographers usually have both standard and macro lenses in the studio. They also tend to avoid 3rd party lenses, instead purchasing directly from the manufacturer who produces the camera. In this way, both quality of glass and internal structure of the lens is ensured for greater consistency over time.
4 - Ecommerce Photography Machines
Motorized turntables
At the heart of any eCommerce photography setup, there is often a motorized, 360-degree photography turntable. Motorized turntable photography tends to have a greater positive effect on the eCommerce experience. This is because today’s consumers enjoy more interactive content when shopping online. It helps shoppers to better familiarize themselves with products, and to view items similar to how they would appear in-person.
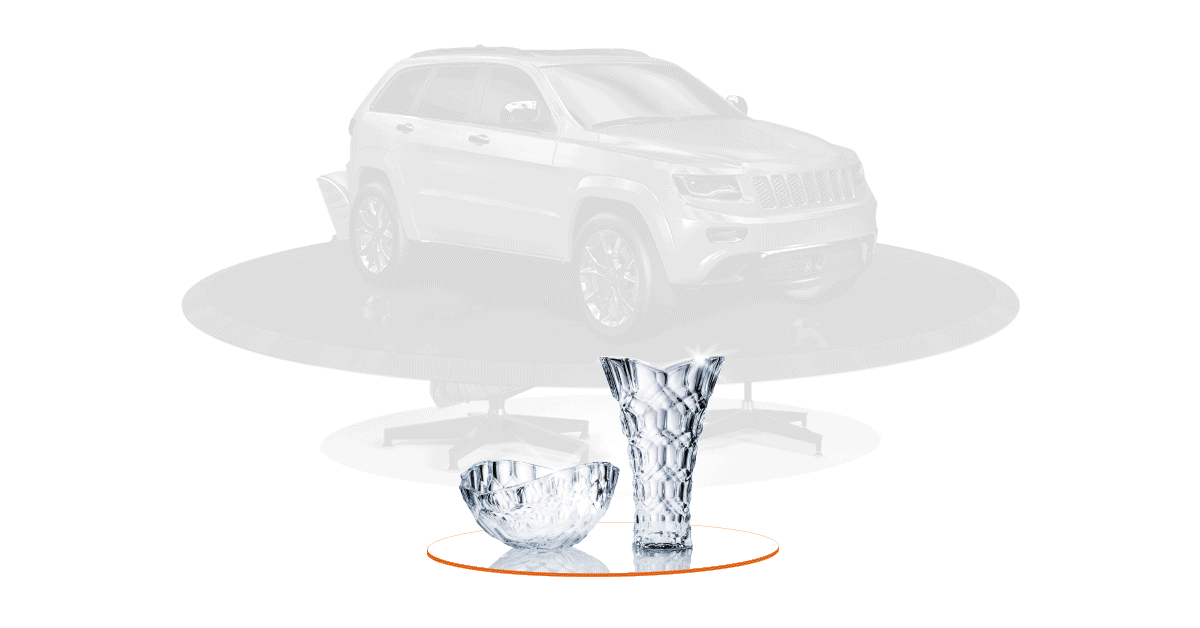
360 photography turntables come in a range of sizes for products as small as microchips to as large as automobiles. Plate diameters thus vary in diameter and load capacity. Meanwhile, 360 turntables can serve as a fixed installation, while others set up easily on-location.
The photography turntable might also support workflows with a robotic camera arm, multi-camera camera rig, or the Cube robot. Robotic arms and multi-camera rigs drastically reduce the production times of 360 and 3D imagery. The Cube helps with product staging, such as to suspend items in air, or for installation with quick-exchange mannequins.
The Centerless Table
The Centerless Table is a universal solution for shadow-free eCommerce photography of small to large items with no clipping required. This is thanks to a unique lighting system, an optical glass plate, and diffuse background to light products from all sides. These make it easy to capture shadow-free images of transparent, reflective, dark, and light objects. It could be any object from the size of an engagement ring, to consumer packaged goods, handbags, or small suitcases.
The system features laser guided positioning, a white fabric background, as well as integrated flags, light booms, and other accessories. These enable photographers to naturally create a white background for high-quality photos, from still images and packshots to 360° imagery.
The Centerless Table has a load capacity of 40kg (88lb) and supports two plate sizes: 850mm (appx. 33’’), or 1300mm (appx. 51’’). Studios also sometimes combine the Centerless Table with the Cube robot to synchronize turntable rotation with an item suspended in air. In other cases, they add a robotic camera arm or multi-camera rig to the module for faster production speeds.

Robotic Turntable
For small to medium size, heavier objects, studios might use an eCommerce product photography turntable like the Robotic Turntable. The Robotic Turntable is a heavy-duty 360 turntable, supporting objects up to 200kg (appx. 440lb). Its plate supports small yet heavier objects like machinery, tools, engines, automotive parts, milling machines, and other heavy products.
Useful features for 360 product photography include integrated mounts for lighting, and cabling through the interior of the machine’s frame. These ensure freedom of movement in the studio, with no obstacles or cables for photographers to stumble over. Like other 360 turntables, the machine also features laser-guided object positioning, and integrated accessories.
The Robotic Turntable can function in a module with the Cube robot, and the Robotic Arm or MultiCam. It has two plate sizes: 850mm (appx. 33’’), or 1300mm (appx. 51’’).

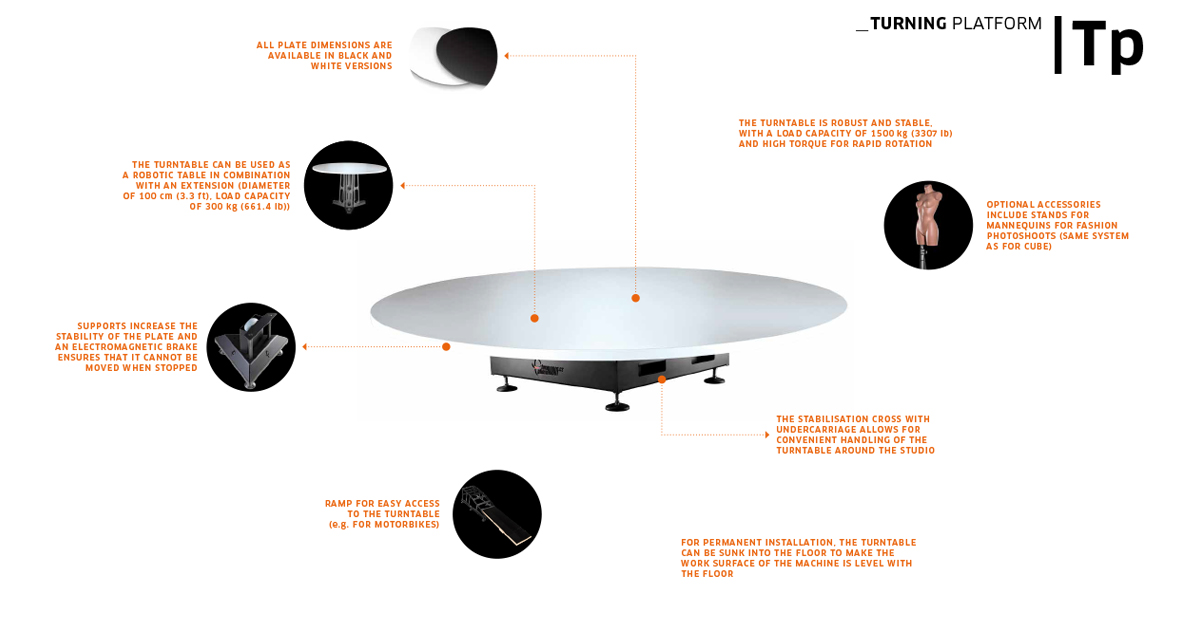
The Turning Platform
If photographing larger or heavy objects from furniture to garden tractors, your photography module might revolve around the Turning Platform. This heavy-duty, motorized 360 turntable has a robust design, and, like other PhotoRobot turntables, an extensive range of integrated accessories.
The platform has a load capacity of 1500kg (3,307lb), and a plate diameter of 280cm (9.2ft). Zero-clearance transmission, high torque power, and software-driven controls then ensure smooth turntable rotation in sync with precise camera capture. Together, these make automated, high-speed 360 image capture and post-processing possible for a wide selection of products.
The device supports items small to large, light or heavy, and modules often combine it with the Robotic Arm. Optional accessories include mannequin stands for fashion product photography (such as the Cube). The platform is transformable to support even heavier objects, or to extend into an infinite runway for on-model photography.
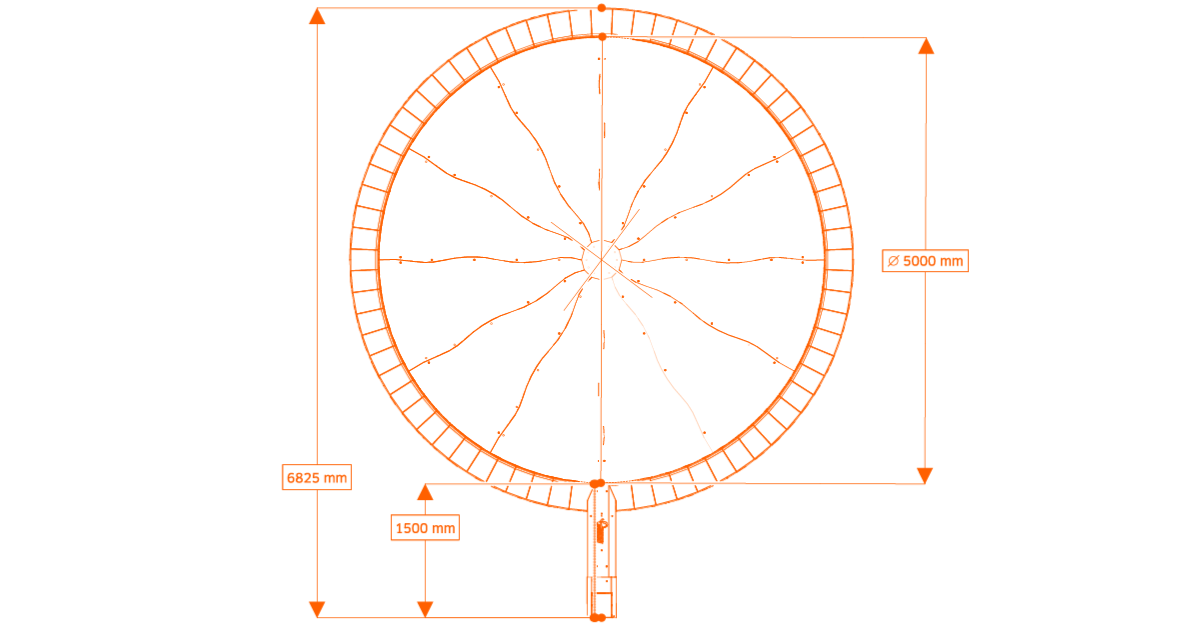
Carousel 5000
Extremely large and heavy objects call for a 360 turntable such as the Carousel 5000. Large 360 turntables like this often feature in garages, warehouses, photo studios, and showroom floors. They support photography of products from automobiles to motorcycles, household furniture, pianos, or heavy machinery.
The Carousel itself features a 4,000kg (appx 8,818lb) load capacity, and a 5m (appx 16.4ft) plate diameter. It comes in two versions. One installs on top of any existing space, while the other becomes a natural part of any studio or showroom floor. The turntable plate of both versions also has an extremely low profile. In this way, you can place products on the device even without an access ramp or a crane. With automobiles for example, all it takes is parking the vehicle.
By design, the Carousel is exceptionally resistant and robust for long-term operations and hassle-free maintenance. Even at high-volume workloads, the massive central bearing unit only requires tension adjustment and lubrication once every 12 months. Meanwhile, the drive and control units as well as the flooring material are accessible for easy service or replacement.

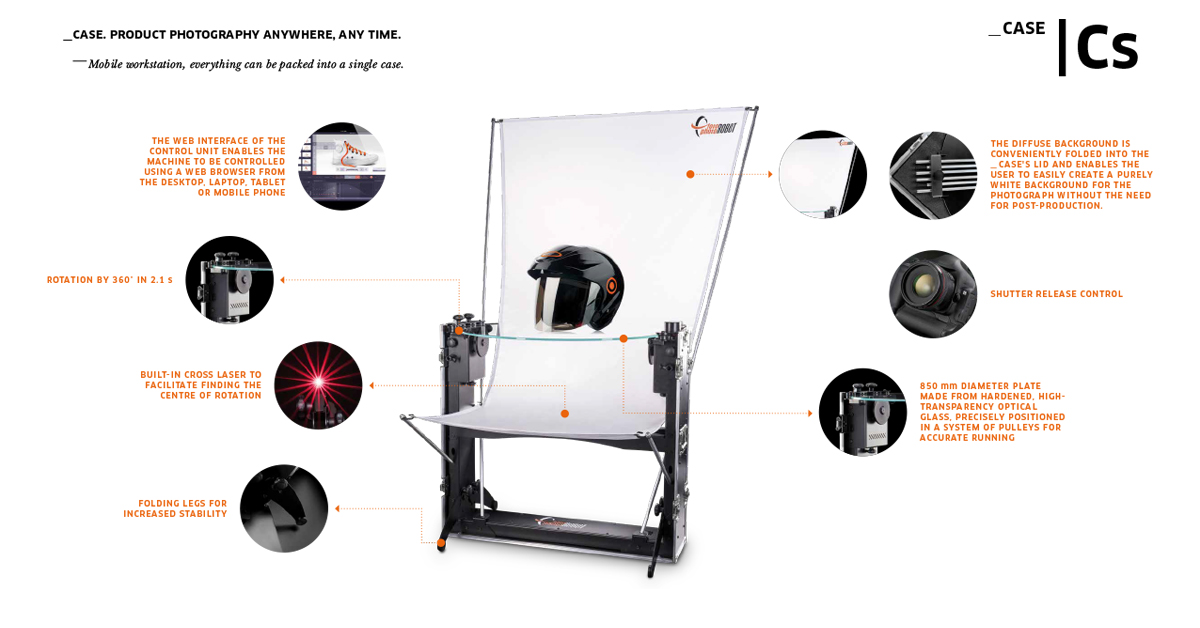
Case 850
If your eCommerce photography calls for on-the-go tabletop photography, the Case 850 is a mobile 360 turntable. Its design enables quick set-up in 15 minutes or less. The device also folds up into its protective carrying case for easy transport after disassembly. All components and integrated accessories are thus quickly transportable from one location to the next.
Featuring an 850mm (appx 33.4’’) optical glass plate, the turntable offers sufficient workspace for small to medium size objects. Software-driven controls then ensure smooth turntable rotation in sync with remote camera capture to enable automated post-processing.
Retractable wheels also make the device easy to move around any photo studio, warehouse space, or production hall. After photoshoots, simply fold the device up into its case, and move onto the next location. It’s even possible to transport the device by small car, with the case able to fit into cargo spaces or backseats.
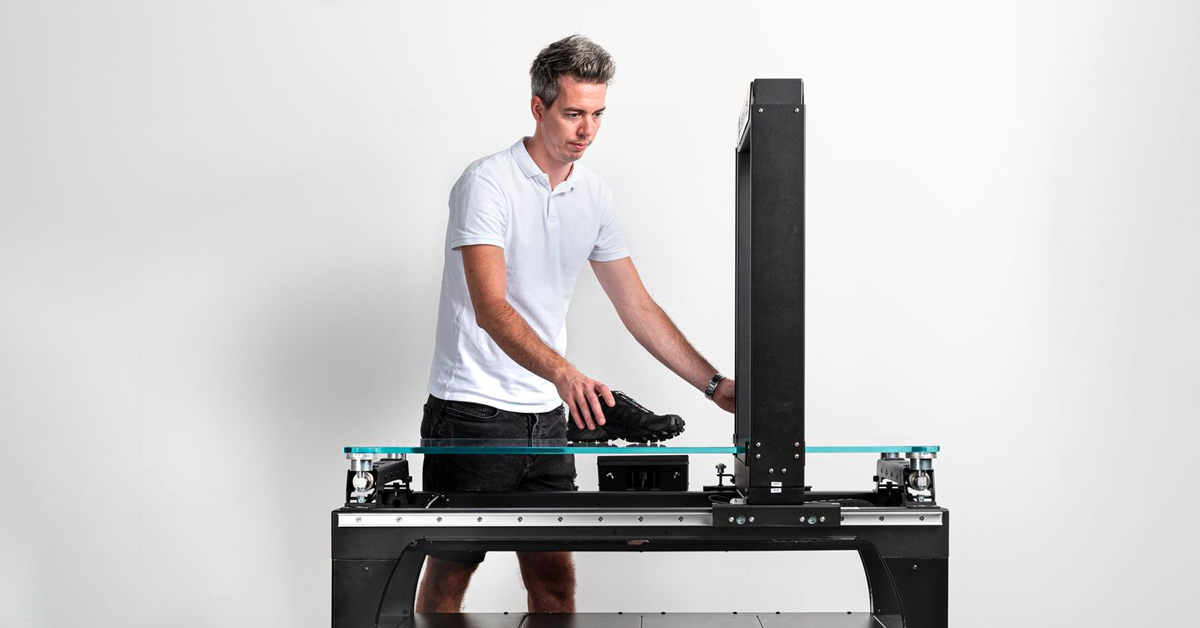
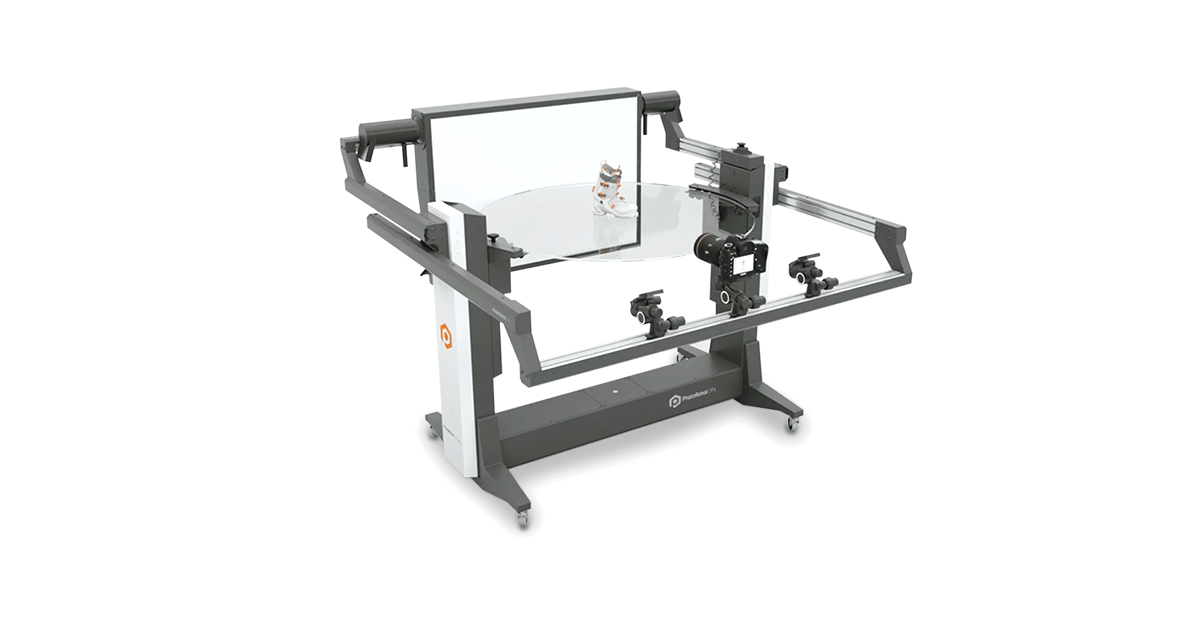
The Frame
In the family of motorized turntables, the Frame is a universal solution for 360 eCommerce photography and 3D modeling. The device combines a 360 photography turntable with an integrated robot camera arm and built-in background. Both the camera and background travel around the optical glass plate, enabling photography from both above and below the glass.
The glass plate’s diameter of 130cm (appx 51.1’’) supports objects small to medium size. It has a load capacity of 40kg (appx 88.1lb), and features dual-axis 360 plate rotation. In this way, studios can capture any angle quickly and accurately.
The glass plate and diffuse background produce quality product photos on a pure white background. These ensure no clipping is necessary for transparent, glossy, light, or dark products. The device automates the capture of complete image galleries as well as single-row and multi-row spins within minutes. It also makes capturing photos to generate photogrammetry 3D models possible in a single click.
Robotic Arm
Together with a 360 turntable, the Robotic Arm streamlines single-row 360 and multi-row 3D image capture. The device elevates cameras from 0 to 90 degrees to capture photos up and over an object. This movement synchronizes with the 360-degree rotation of a compatible turntable to capture the upper hemisphere of products.
The software can fully automate elevation of the device, or operators can direct the Robotic Arm manually. Two shank sizes (one short, one long) provide a large mounting range and flexibility in choice of tripod heads and cameras. Operators adjust arm length manually, with an integrated laser for easy positioning.
All the while, a robust base ensures the device is completely stable, but also easily moveable. It has retractable wheels for transport between workstations, and a docking station for quick setup with compatible devices.

The Cube
For items that don’t stand on their own, the Cube is a simple yet effective product positioning device. It works standalone or can combine with a photography turntable by installing it in the upper structure of the table. It then hangs upside-down above the turntable’s plate to partly or fully suspend objects in air. The Cube likewise rotates in sync with the turntable’s rotation.
Suspension mode positions items such as handbags, chandeliers, light fittings, and even bicycles for 360 product photos. The device supports unstable or odd objects as heavy as 130kg (appx 286.6 lb). It combines with devices like the Robotic Arm, or functions as a standalone turntable with a 100 cm (appx 39’’) diameter plate.

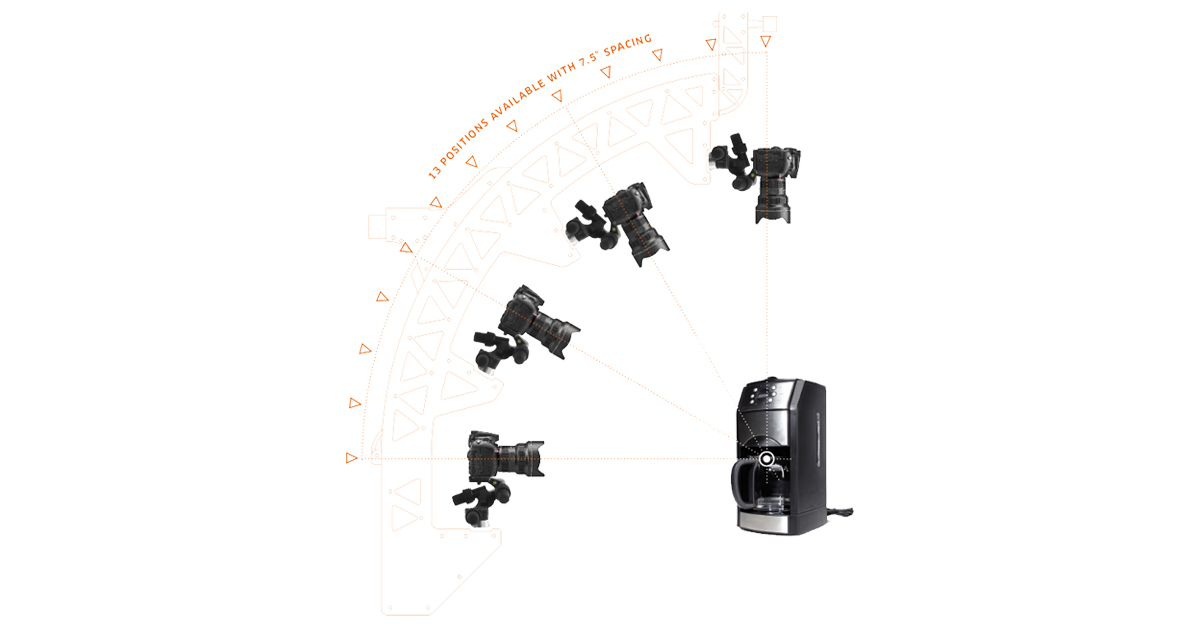
MultiCam
A MultiCam in the studio enables extremely fast capture speeds for multi-row 3D product photography and 3D modeling. This multi-camera camera rig combines simultaneous image capture from multiple cameras in sync with a 360 photography turntable. In this way, cameras capture multiple elevations 360-degrees around a product in a single turntable rotation.
Photographers can then capture complete 3D experiences including top views, as well as photos to generate eCommerce 3D models. The MultiCam captures 144+ images in approximately 20 seconds. Precise camera control and image capture then enable automated post-processing across individual images and entire 3D spins.
The camera rig has 13 positions available for attaching multiple cameras at a spacing of 7.5 degrees. There are two sizes for the arch supporting the cameras, and motor-assisted height adjustment. In this way, photographers can quickly adjust cameras to the center of any object for synchronous shooting with turntable rotation.

5 - Test shooting
Take studio measurements
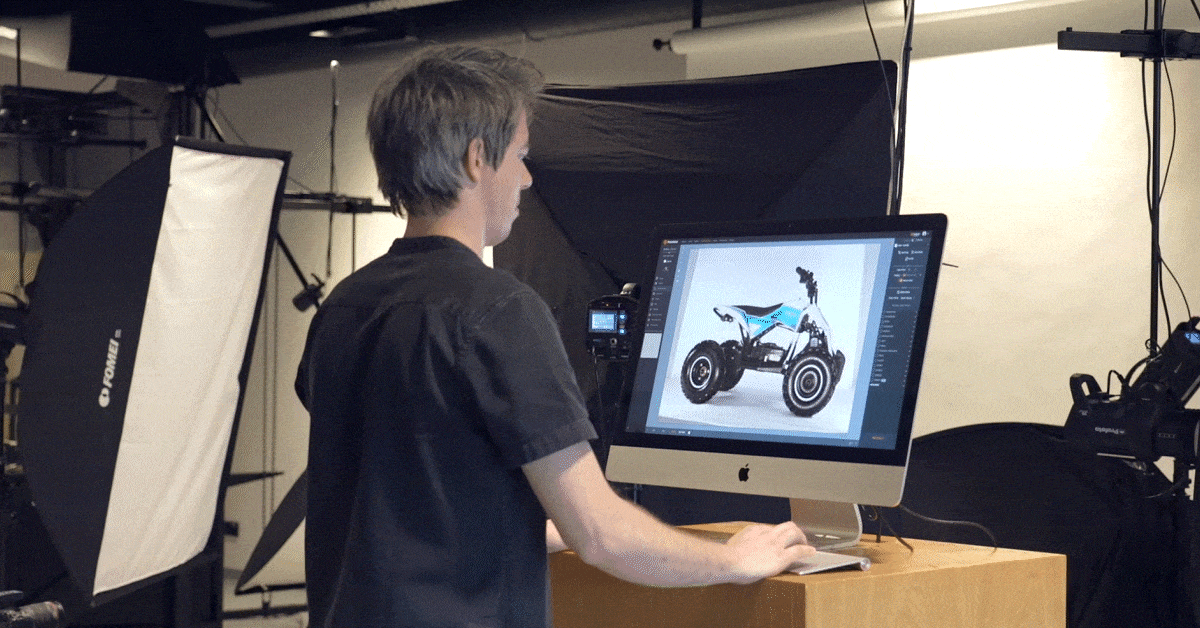
When you have your equipment and customized studio space, the next stage is taking measurements. This starts with setting up the equipment, positioning a product for photography, and taking a few test shots. Test shots will help you find the right camera settings and composition for the photos.
If using a camera tripod, a robotic arm, or MultiCam, document the distance from the floor to the top of the shooting surface. You’ll also want to know the distance of any camera rig and the camera to the center of the product.
Here, integrated laser systems help with positioning objects to the center of the turntable. Images may still need additional software centering, especially if shooting 360 spins, but this is simple with PhotoRobot Auto Centering. The software provides near fully-automatic image centering, so photographers can focus more on shooting products.
Thus, focus on getting your measurements in the software for future automation. These configurations you can save as Presets to use across similar types of photoshoots.
Determine the best camera settings
Compatible cameras with PhotoRobot include recent DSLR and mirrorless Canon camera models. Usually, for 360 product photography, 26 MP cameras are more than suitable. This also applies to still shots, marketing angles, and taking photos to create photogrammetry 3D models.
After choosing a camera, it’s important to document camera settings, especially if using the camera in manual mode. Camera settings can later serve as software Presets to automate shooting across similar categories of products. For example, Presets might save camera settings for shooting light versus dark objects, or transparent versus reflective objects.
Take into account and document all camera settings, such as:
- Shutter speed
- Aperture
- ISO
- White balance
- Focal length
- Any unique settings that might change from one shot to the next
Also be sure to document which lighting you’re using, whether natural, artificial or a combination of the two. Information like this will help talent easily recreate processes, and ensure more consistency across photos.
It’s important everything is well-documented such as you would in a brand style guide. You’ll save time in the end, and also be able to save configurations for future reuse in the software.
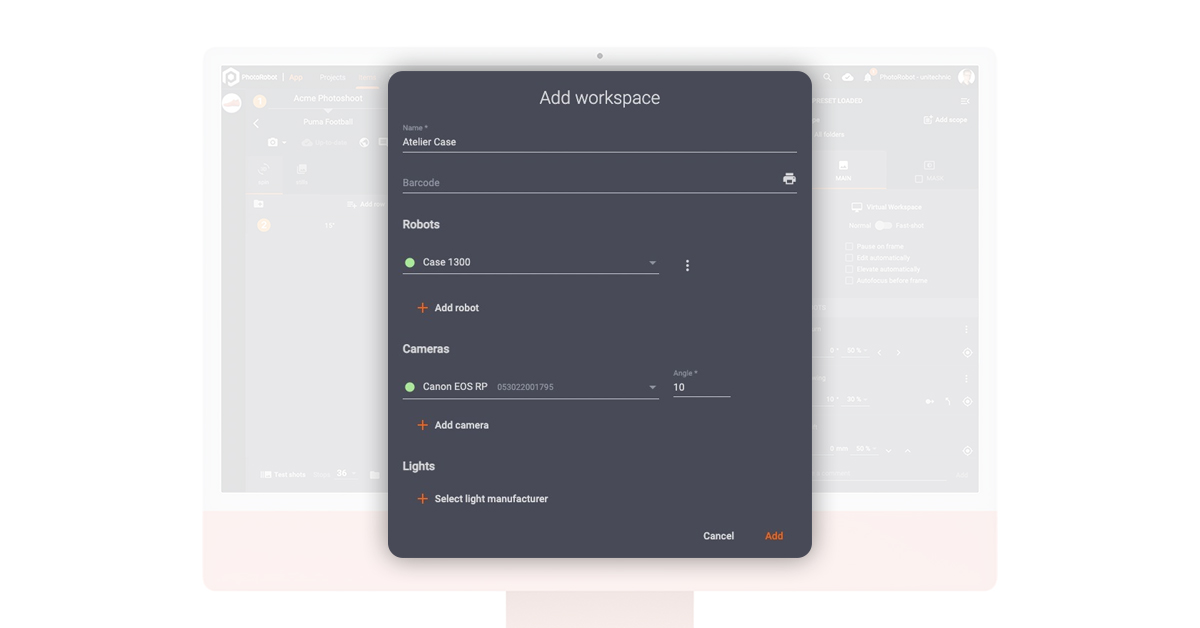
Set up a software workspace
Before you can start shooting, you will also need to configure a software workspace. In the software, a workspace is a list of hardware you will use for a specific photoshoot. It can include PhotoRobot modules, cameras, lights, and other accessories.
To start using actual (as opposed to virtual) hardware, all PhotoRobot devices connect over the same LAN as the workstation computer. The camera connects to the computer via USB. All devices then communicate and activate via the software workspace.
The workspace enables configuration of robots, laser settings, cameras, angles (if not using a Robotic Arm or MultiCam), and lights.
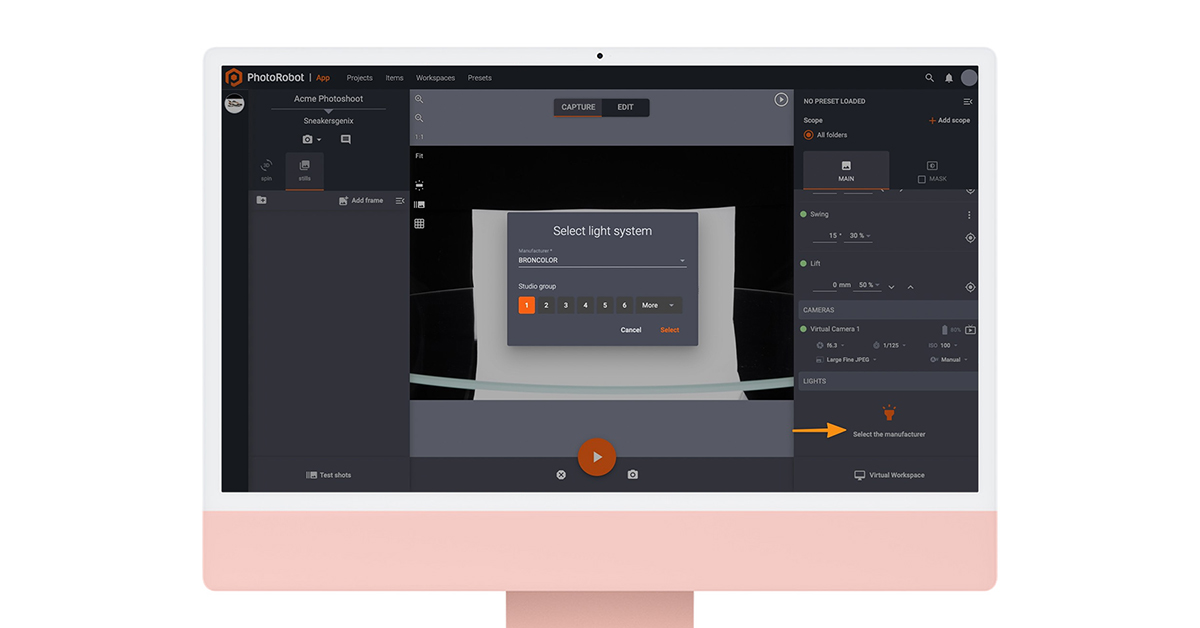
Configure studio lighting
Compatible light systems with PhotoRobot include strobes by FOMEI and Broncolor, or any LED lights with DMX support.
The software enables users to first select lights by manufacturer. If using lighting by Broncolor, you can choose which studio group of lights to control. For FOMEI lighting, there are two control options, although FOMEI LAN Transceiver is recommended.
To control LED lights with DMX support, the lights connect via an RJ45 or USB cable to the robot. Users can then configure these lights by two different channels in the software. The brightness channel enables control over selected brightness, while the color channel enables adjustment of color levels.
Create a new project
After configuring a workspace, you have to create a new project, and at least one new item. In the system, a project usually includes items from a single photoshoot, or sometimes a single shooting day / week.
Projects can consist of one or more items, and a single item is usually a specific photographed object. Items also contain one or more folders to store different kinds of images of the product. A common example is creating one folder to store still images, and one folder for a 360 spin.

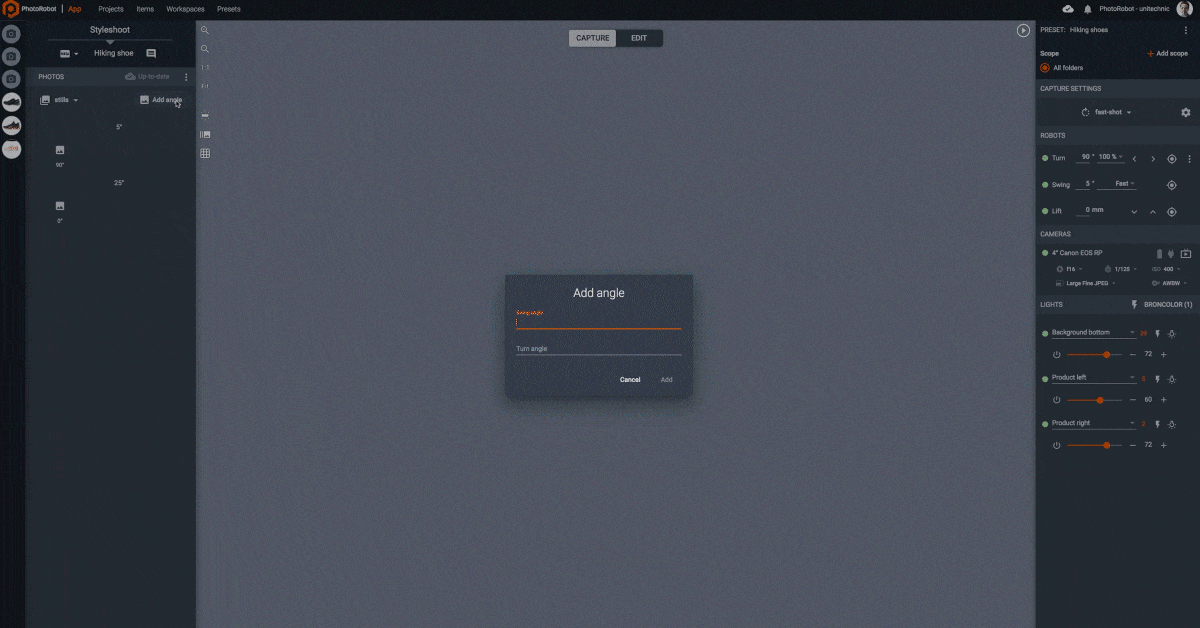
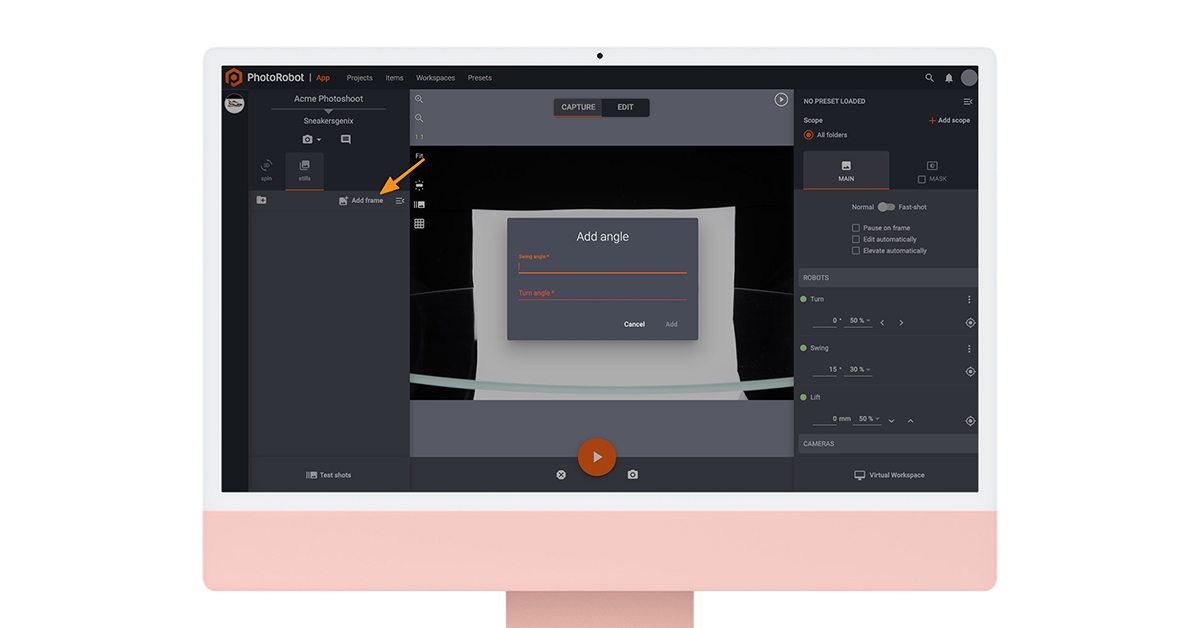
Add a spin or still image folder
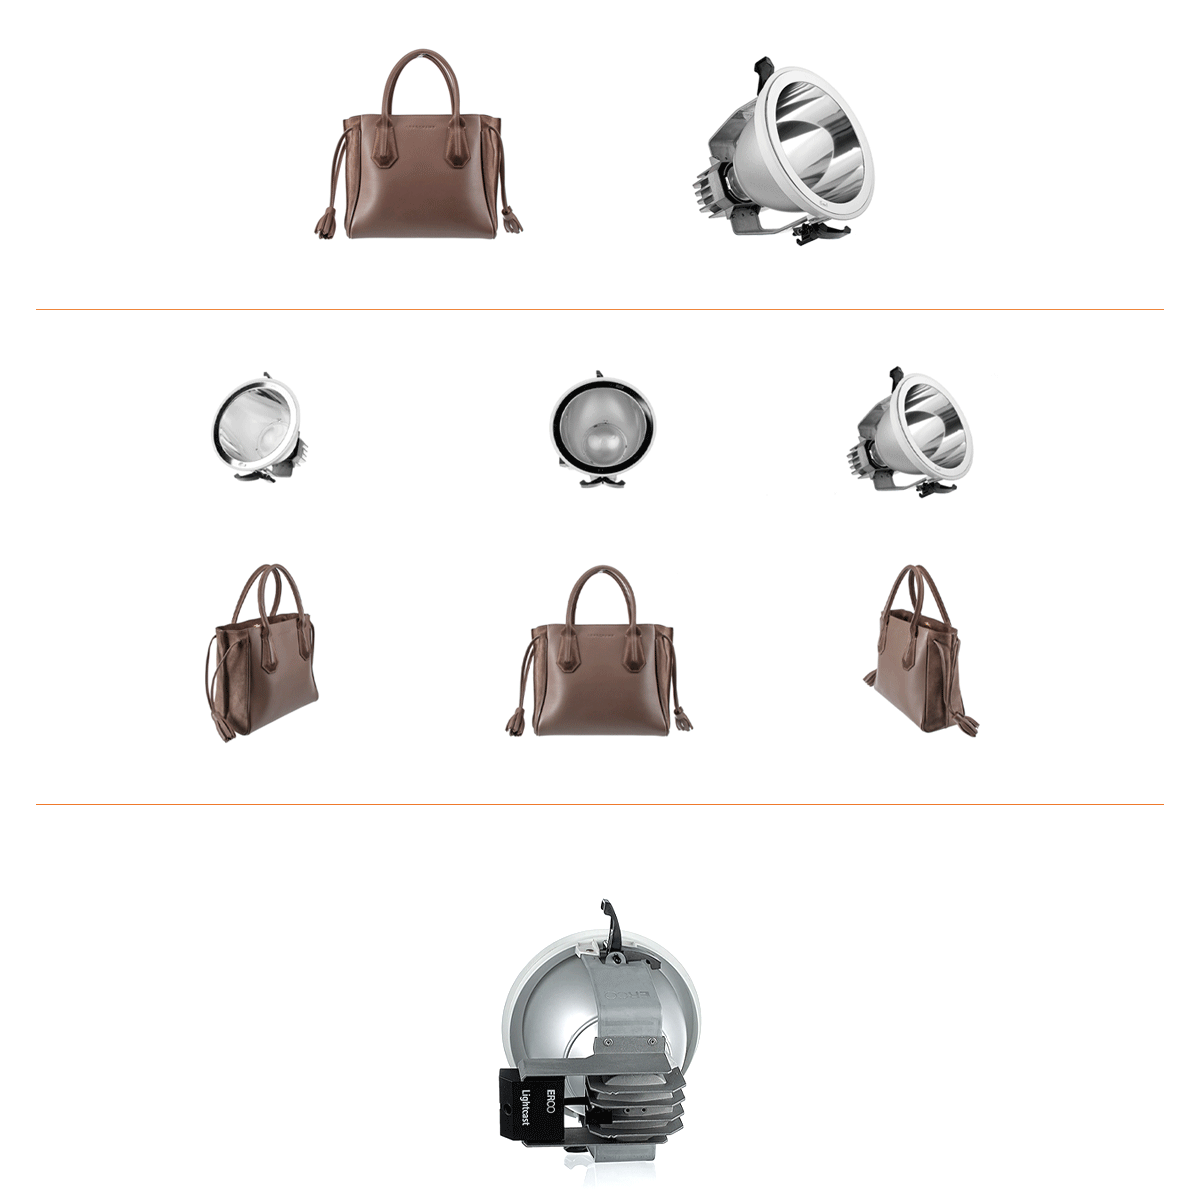
With a 360 spin folder, the software will automatically add frames based on how many images per spin you select. Most often, product spins consist of 24 or 36 individual frames, with 36 the default in PhotoRobot software. This is the standard single-row spin, while 3D spins require exponentially more frames with each additional row of elevation.

Creating a still image folder will require manually adding each frame to shoot. This includes the turn angle (the rotational angle) and swing angle (the vertical position of a camera along a circular trajectory). The swing angle is important for using the Robotic Arm, or other modules that can change the horizontal position of the camera.
Take a test shot
After creating the project, items, and folders in the software, you can begin taking test shots. This is always good practice before taking any final photos. It helps you experiment with any settings from the lights to cameras, and robots. The software then stores test shots in their own folder, which is easily accessible via the capture mode interface.

In capture mode, there is also a preview window. The window displays either the current image (if you’ve already taken one), or the Live View stream from the camera. Live View is useful for checking composure and focus, and is part of the camera control user interface.
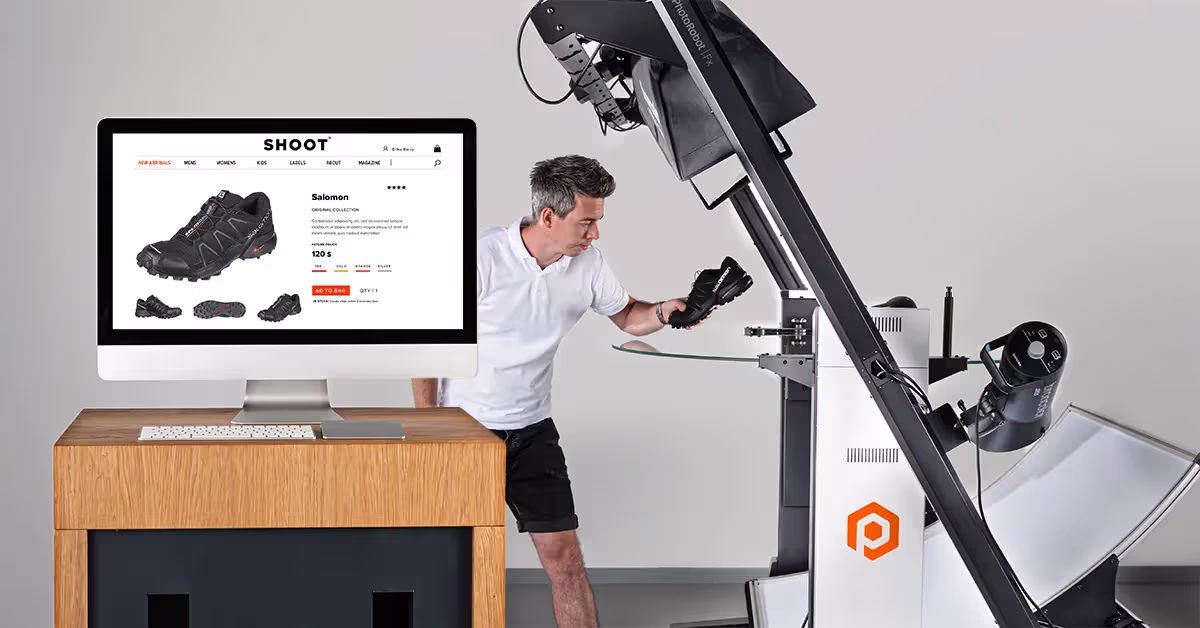
6 - Shooting
Start a photography sequence
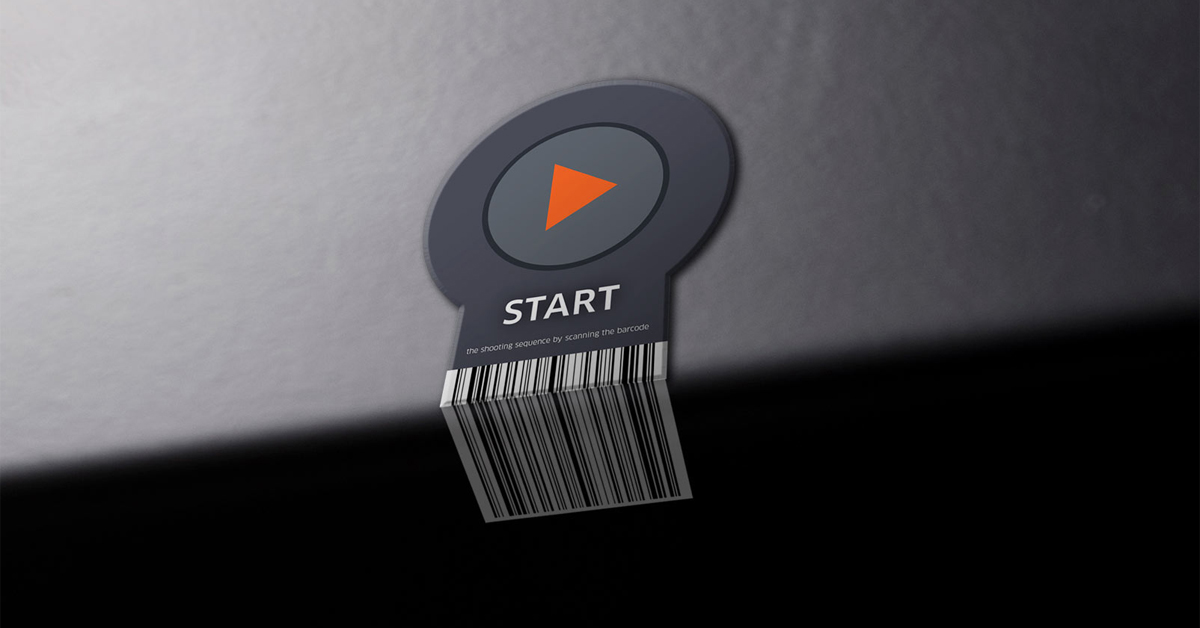
After finding the settings from your test shot satisfactory, you can run the photography sequence. The photography sequence activates via software control at a click of the start button in the capture mode interface.
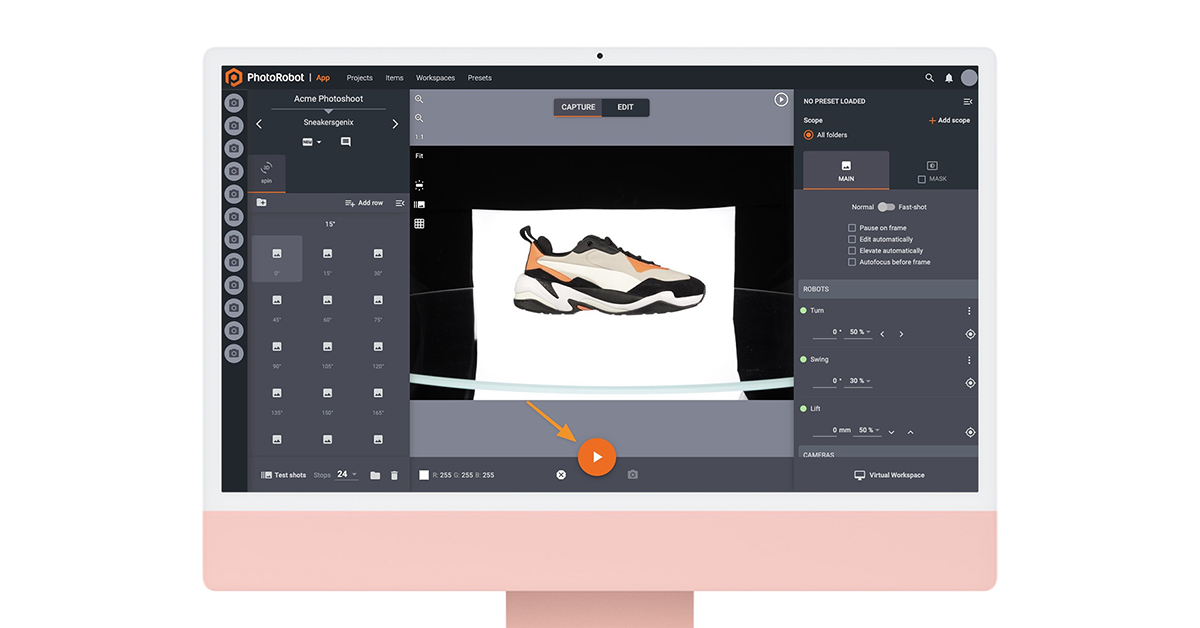
If you have a barcode scanner, it is also possible to download a unique “start” barcode to activate the sequence. You can then place the barcode near your production line to run sequences without having to move to the computer.
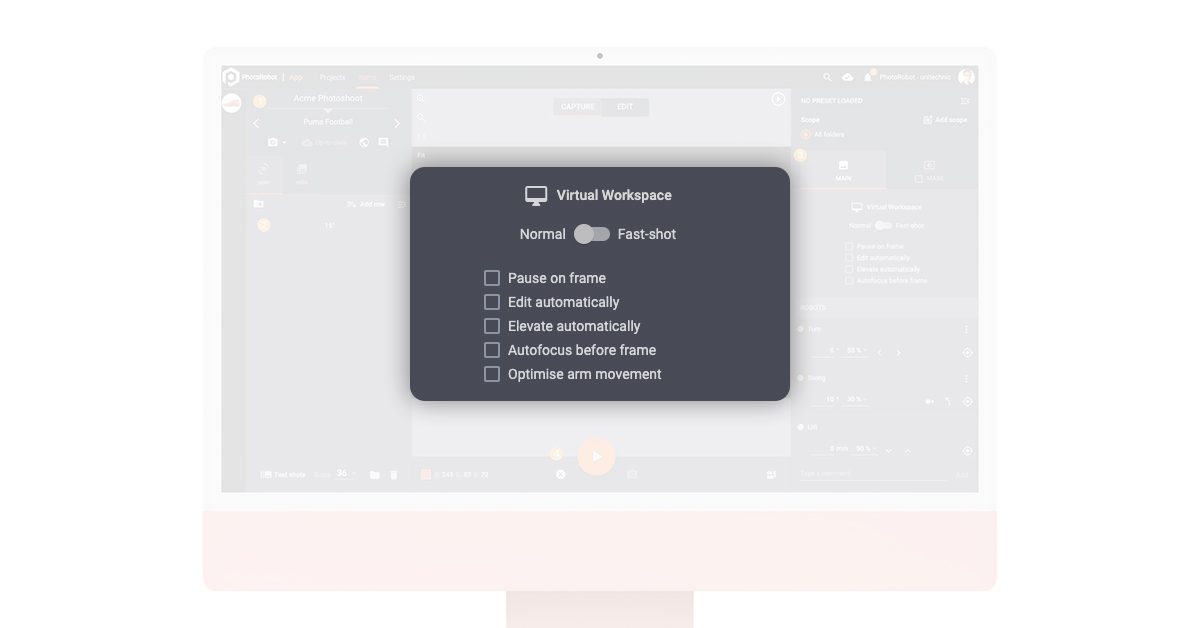
Sequence options include:
- Workspace configuration to access one or more workspaces
- Normal versus fast shot mode to either pause turntable rotation for each photo (normal), or to shoot during non-stop rotation
- Pause on frame to command turntable rotation to stop after each frame (useful for creating product animations)
- Edit automatically to configure automated editing immediately after capture
- Elevate automatically to automate elevation of the camera to the center of the product before starting a sequence
On start, software-driven controls run the sequence: activating lights, turntable rotation, image capture, and any other connected hardware. The sequence is then complete after all image thumbnails in the item folder appear. Here, the software also automatically backs up original images to a new folder to store originals separate from edited files.
Fast shot mode
For significantly faster photography sequences, fast shot mode combines image capture with non-stop turntable rotation. Powerful strobes prevent motion blur, while capture signals trigger cameras precisely as the product “freezes” in place.
This allows the capture of a spin, usually up to 36 frames in 20 seconds, without ever stopping the turntable. Add another 25 seconds on average to automate post-processing in the cloud.
That amounts to roughly 45 seconds production time for a 36 frame spin, with all photos automatically edited and web-ready. It’s about 1.5 seconds total per image, and nearly half the production time of traditional “start-stop” turntable photography.

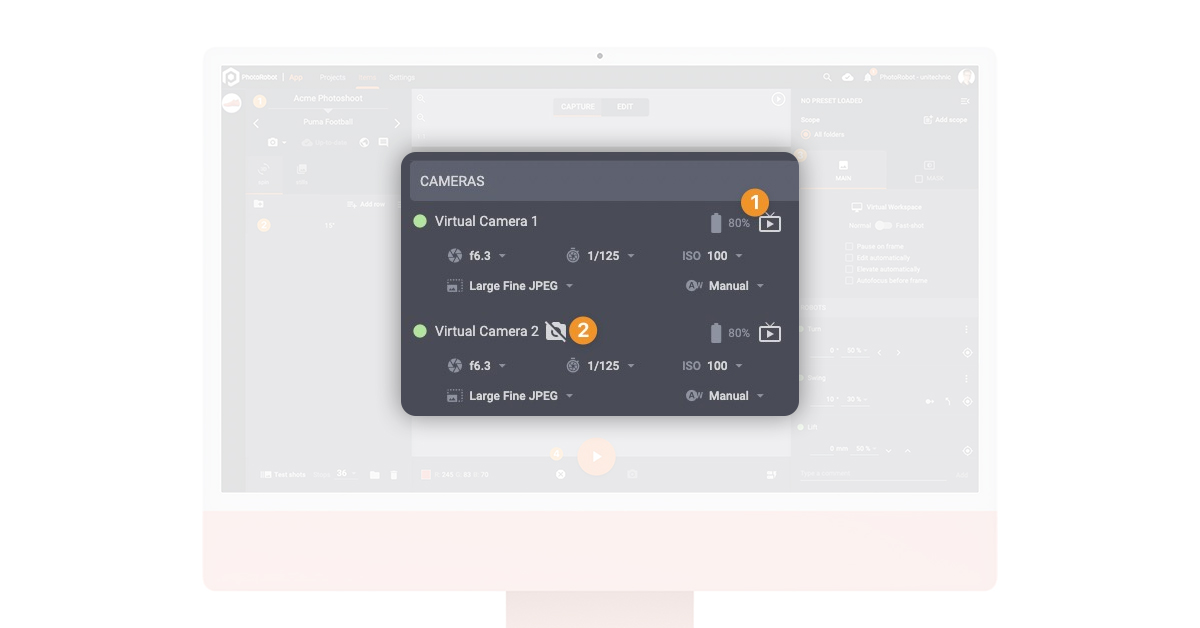
Multi-camera shooting
If using multiple cameras, PhotoRobot utilizes special hardware to control each camera down to the millisecond. This makes shooting in fast shot mode even possible with devices such as the MultiCam. Each camera can trigger milliseconds apart, and in time with the powerful strobes to capture multiple angles simultaneously.
For example, if using 4 cameras on the MultiCam, usually all it takes is 20 seconds to capture 144 images. That’s 360 degrees around the product, including top-view elevations, in a single non-stop rotation of the turntable.
But what about post-processing the imagery, especially such a large amount of photos? Here, the answer is in integrated post-processing software and cloud technology.
7 - Post-production
Batch processing with PhotoRobot
After a capture sequence, edit mode in the software provides a range of basic to advanced photo editing tools. Editing operations by default apply to all images in a folder at once. However, you can apply changes to photos individually by adjusting “scopes” in the software.
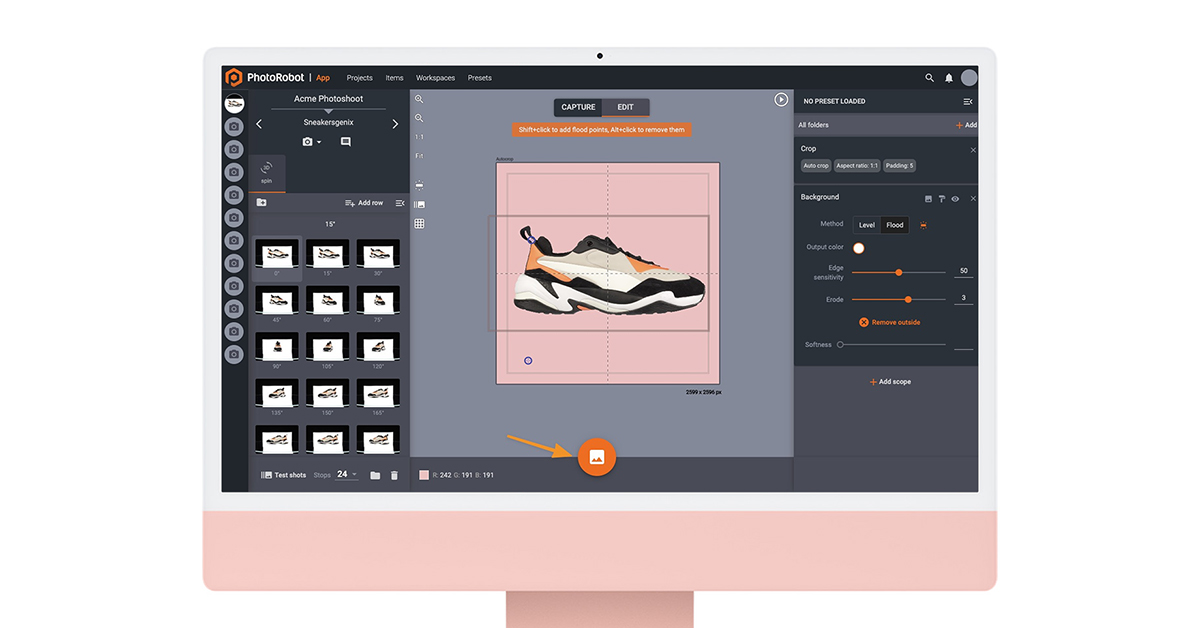
The most common editing operations include: crop, auto center, and background removal. Background removal functions are some of the most advanced, with automated background removal by level, and by flood. It is also possible to remove the background by freemask, although this requires additional configuration of studio lights.
Other editing tools control clarity, color enhancement, brightness & contrast, shadows, highlights, chromakey operations and more. These you configure in the software, and then apply across your photos based on the scope of images to edit. The software is capable of processing large amounts of images at one time. Meanwhile, you can also save all settings as Presets to apply in the future across similar batches of products.
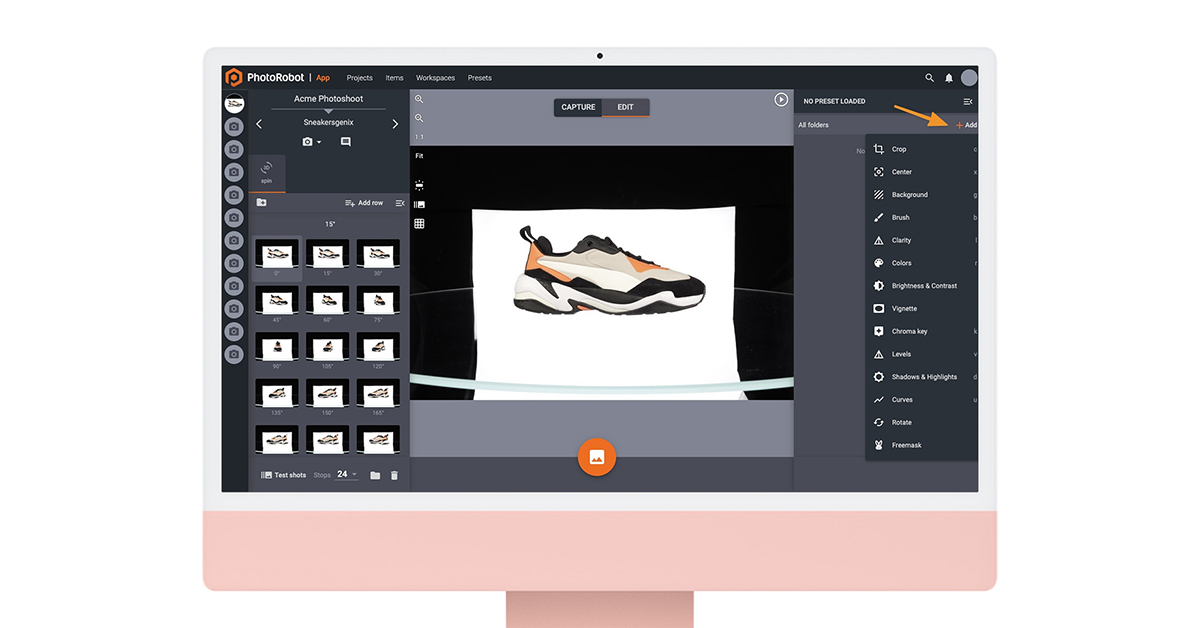
Image background removal
In PhotoRobot software, there are 3 different ways to remove a background from eCommerce photos. Background removal by level utilizes an RGB (red, green, blue) color of each pixel to remove colors above a certain threshold. This helps to quickly remove the background on photos with a white backdrop, or for making an off-white background disappear.
The background removal by flood method functions by detecting the edges of an object. It then applies flood points to fill in the available space. This can effectively remove the background from photos when working with for example a transparent background, or very white items.
Freemask background removal requires more configuration than removal by level or by flood. However, it can be one of the quickest and most exact methods of image background removal. To remove a background by the freemask function, you must configure your lights to capture both a main and a mask image. These, the software can composite together to accurately remove the background around even oddly shaped objects.
Automated image editing software
After determining the editing operations for an item, you can save all settings to apply automatically and immediately after capture. This enables one-click automation for outputs of similar groups of products in the future.
Presets contain all editing operations to apply to an item and its outputs. They can include cropping, centering, background removal, color enhancements, and all standard image editor functions. One click can then produce web-ready deliverables: complete eCommerce image galleries, packshots, 360 spins, 3D models, and video.
In this way, studios eliminate manual tasks for dramatic savings in time and costs in the editing process. It also helps set the standard for how you edit images for greater consistency and less mistakes in the end.
Local and cloud processing
For processing images, PhotoRobot utilizes local or cloud processing, or a combination of the two. Local processing supports projects who need to work offline, or when processing confidential data. The software works best with Apple computers, but is also manageable on Windows, although with a somewhat slower experience.
However, there is a dramatic difference in speed from local to cloud processing. For example, processing locally usually requires 30 to 60 seconds to generate a traditional, 36-frame spin. During this time, studios have to wait for processing to complete before moving onto shooting the next product.
If using both local and cloud processing, the software can edit hundreds of images in the background per second. This means no interruptions in shooting. Studios simply photograph products, while the software simultaneously and automatically edits outputs.
There is no limitation on image resolution, and full support for up to 50 MP cameras (8688 x 5792 pixels). Automated post-processing in the background then amounts to a production time of roughly 1 minute per product. That’s up to 500 items in every 8-hour shift, with web-ready outputs, and minimal to no need for additional retouching.
Internal and external retouching
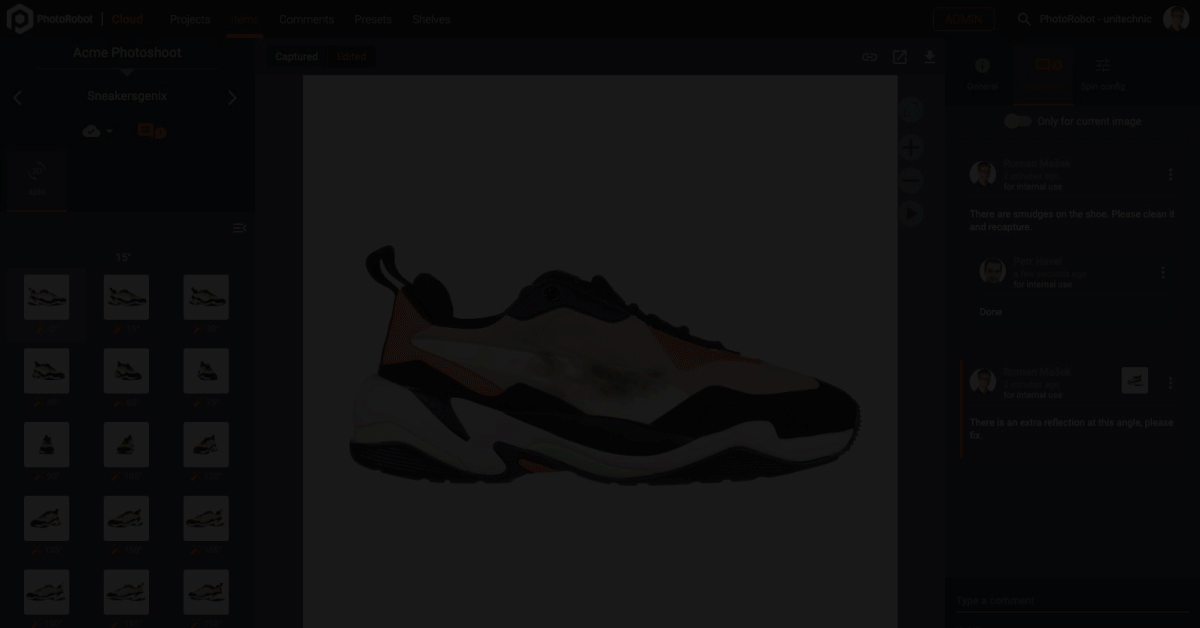
For retouching internally or via outsourced talent, PhotoRobot enables a range of project sharing and quality assurance features. This is thanks to integrated digital asset management and workflow software.
Retouch access controls enable project sharing with anybody via a link they can access from anywhere, anytime. Project managers can then share instructions as comments on individual photos or across entire folders, while workflow status reports communicate progress.
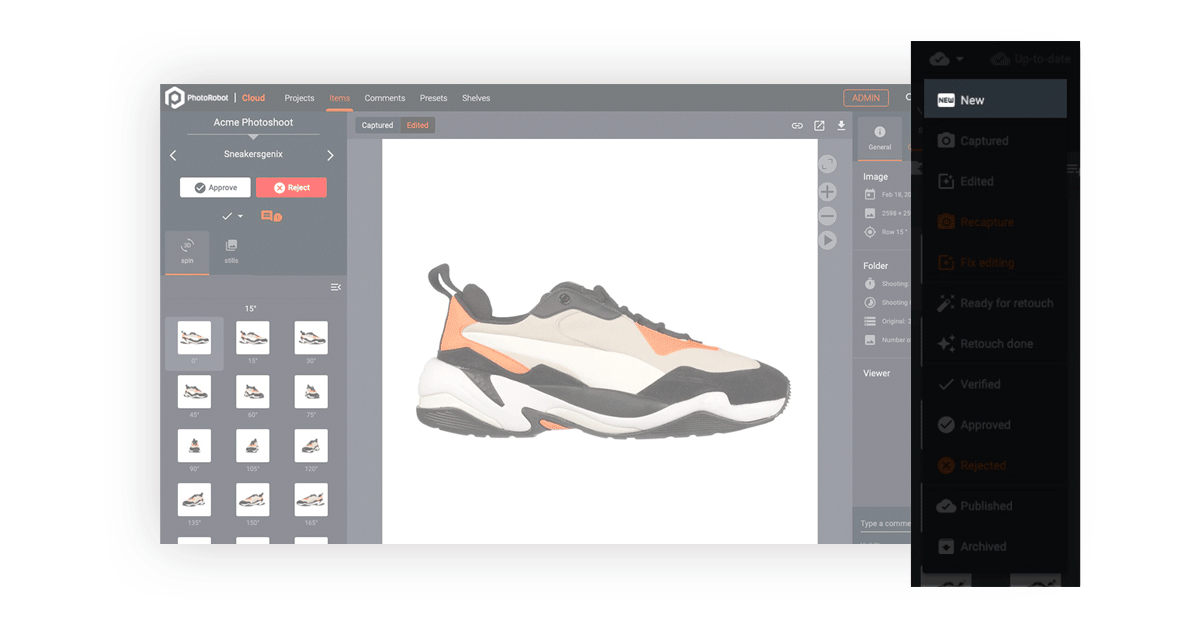
The user interface unifies the local and cloud part of the app. Thus, all details you attach locally are immediately visible in the cloud, and vice-versa. Item statuses include “ready for retouching” and “retouch complete”, while clients approve or reject “verified” work in a single click.
Further, it’s possible to attach feedback or instructions if any additional retouching is necessary. Tags also allow you to notify recipients of new comments, and to mark comments ready for action, resolved, or completed.
8 - Publishing images
Bulk image export
After successfully editing images, you can find files either in the local drive or via PhotoRobot Cloud storage. Where the images exist will depend on whether you’re using the local app or the cloud version.
When exporting, bulk image export allows you to fetch all images in required quality, filename structure, format and resolution. Users can do this from within the application, or via a standalone export utility.
On completion, you can access the exported images in a new folder. Folders can contain sets of still images, 360s, 3D models, or video.

Publish images via the cloud
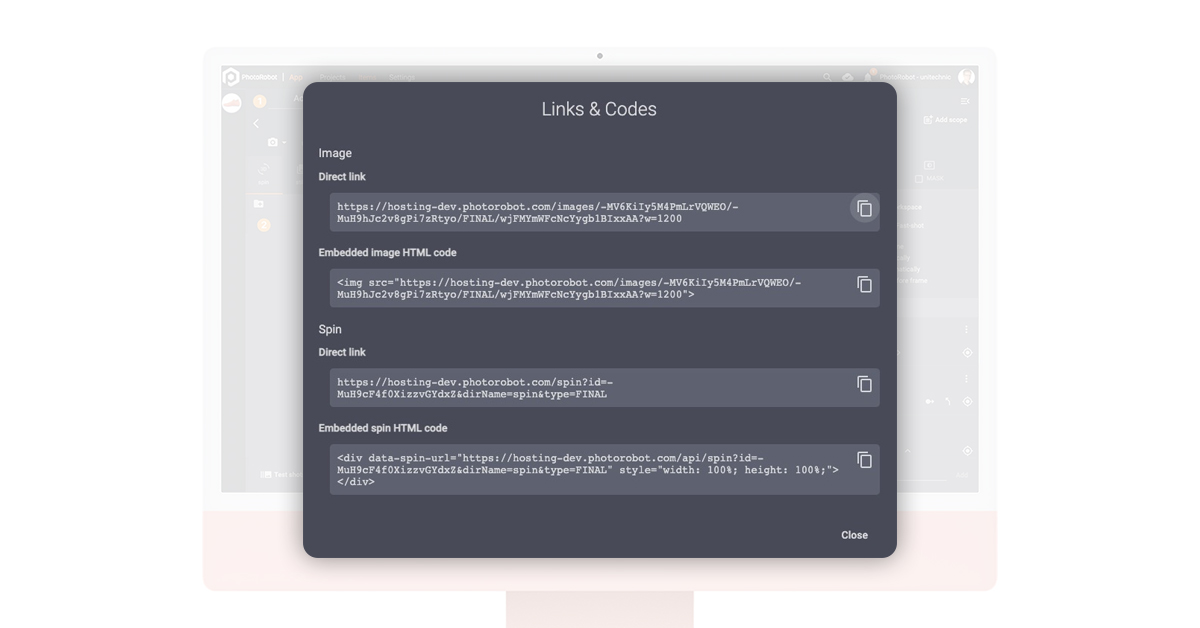
If publishing photos to the web via PhotoRobot Cloud, it takes only moments. The software interface provides links and codes for both individual images and a 360 spin or 3D model. These allow you to preview images in the cloud, and to copy an HTML code to publish images online.
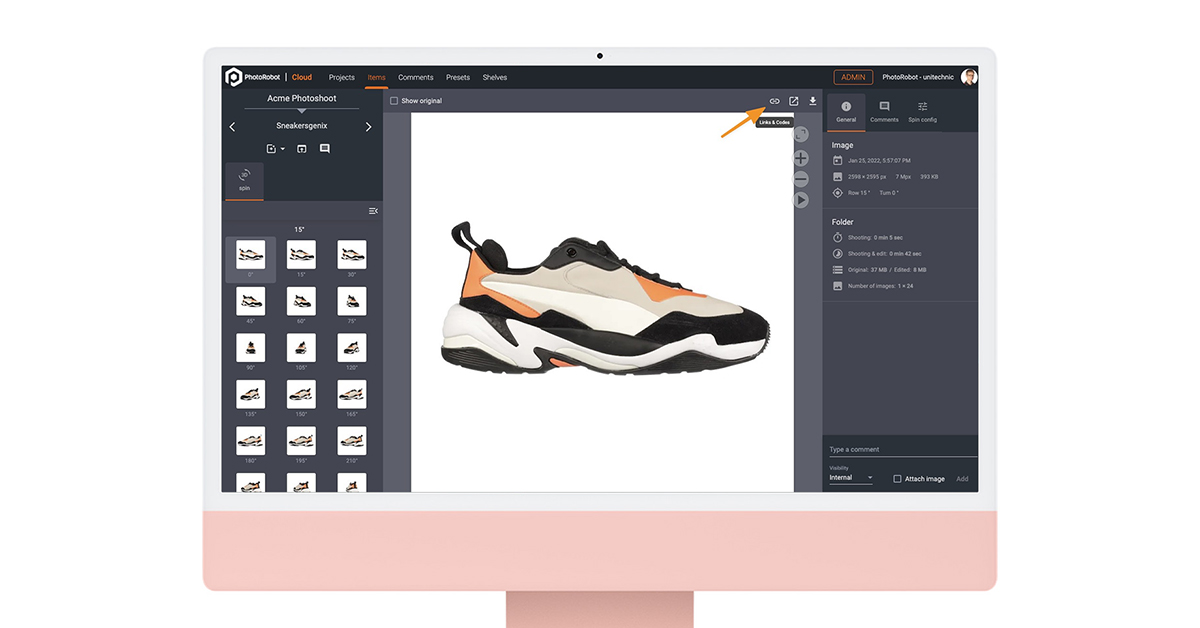
For example, the direct link accesses an image preview, either a single frame or the complete 360. If you deem the output web-ready, you can then copy the embeddable HTML code and paste it onto your page. This will embed the individual image or the complete 360 spin anywhere you need it.
PhotoRobot image hosting
The PhotoRobot Viewer cloud platform enables immediate and automatic eCommerce image hosting after capture. It supports a gallery viewer, 360 spin viewer, hotspots, annotations, and more for any eCommerce product images. There is full support for deep zoom, macro shots, animations, and single-row or multi-row 360 spins.
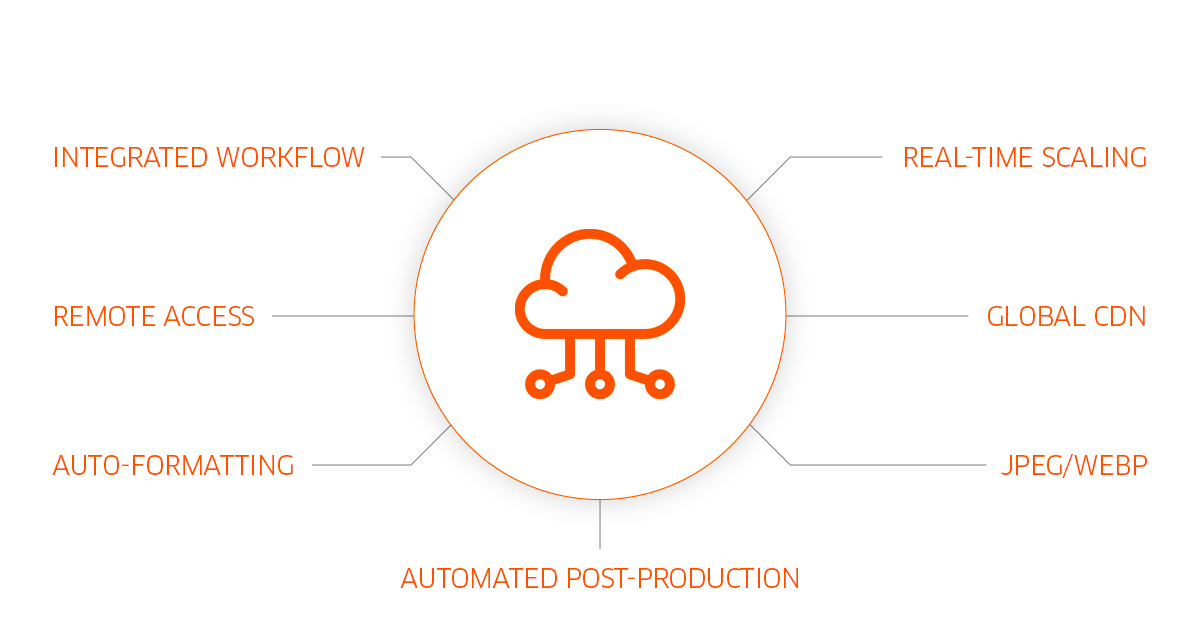
PhotoRobot Viewer offers customizable layouts, thumbnails, buttons, icons, and viewing features. It hosts images via a cloud-based, global content delivery network (CDN), and provides real-time scaling with pixel-perfect resolution.
Further, integration with eCommerce export feeds, image optimization, and support for JPG / WebP / JSON / XML make content delivery easy. The software can also connect to numerous structures via API, such as for processing undeveloped RAW files.
360 product viewer - spin hosting
An integral part of PhotoRobot Viewer, the SpinViewer is a 360 degree product viewer for eCommerce product photography. The viewer hosts product 360s that are compatible on any device. It enables real-time control and configuration of single-row and multi-row spins.
Features include options to modify object color, background color, rotation speed, spin direction, and product size. Animations are thus easily customizable, with multiple parameters to match your brand’s eCommerce platform.
In addition, the viewer supports hot spots and annotations. Hot spots can emphasize areas of a 360 spin, such as close-ups or unique product features. They might zoom into a logo, showcase moving or complex parts, or present hidden product features. Hot spot titles then tell consumers exactly what they’re looking at, or share additional product information.
Integrated digital asset management also provides secure storage, with easily searchable and redistributable assets. If using the Cloud platform, there is in fact no file transfer necessary to publish after capture. You can immediately and automatically publish images to eCommerce websites and apps to dramatically reduce time-to-market.
9 - Digital Asset Management
Storing eCommerce assets
It’s important businesses safely store all of their eCommerce assets, from archived originals to post-processed results. For this, PhotoRobot’s integrated digital asset management provides unlimited and reliable storage for any product content.
It enables the storage of all assets in a centralized system, offering multi-regional deployment with disaster recovery. All data is in ISO 27001, with security via Google Cloud and access only via TLS-encryption.
The software also automates backups, with regular audits to provide the highest levels of security possible by today’s standards.
Disaster recovery
To prevent worst-case scenarios, whatever platform you use to store digital assets must also ensure disaster recovery. For this, Cloud technology can store data redundantly in at two or more geographic locations.
With PhotoRobot, this multi-regional, geo-redundant storage safeguards eCommerce assets immediately on upload. Storage locations are then always at least 100 miles apart within the multi-regional location bucket.
Geo-redundancy occurs asynchronously, and any asset you upload is instantly accessible worldwide, just as with all Cloud storage data.

Asset organization
Proper organization is vital to ensuring you and your customers have easy access to the latest digital assets. The more eCommerce images you produce, the more crucial this becomes. All content should be easily searchable and redistributable, from RAW files to post-processed still images, 360s, and 3D models.
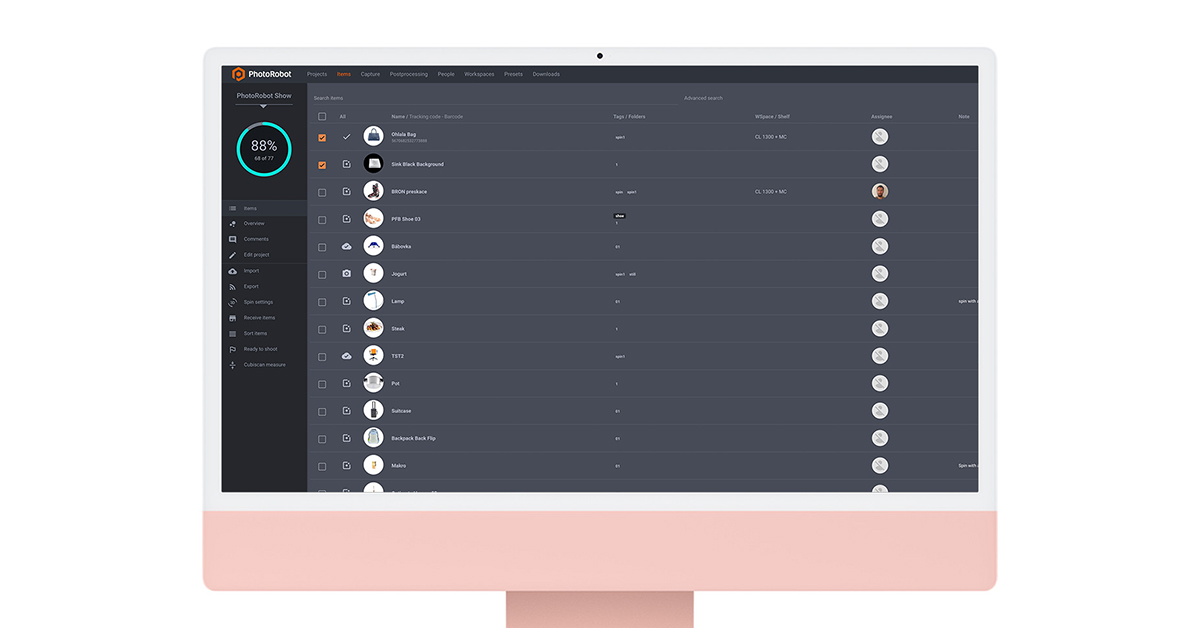
In this regard, features for easier navigation and asset categorization are essential. PhotoRobot software for example provides full-text search for quick navigation between projects, items, clients, and users. It enables additional search queries for items and item statuses, and supports tags to categorize eCommerce images.
There is full support for multiple types of assets. These include still images, image galleries, single-row or multi-row 360 spins, eCommerce 3D models, and product videos. Meanwhile, supported file formats cover JPG, PNG, WebP, as well as RAW files, camera downloads and naming conventions.
Bulk operations
To ensure optimal studio workflow, digital asset management software can allow for bulk cloud processing. In this way, studios can shoot products while bulk post-processing operations run simultaneously in the background. There is thus no need to interrupt photoshoots, and more time for getting stock in and out of the studio.
Using PhotoRobot, an entire batch of images with less complex editing operations takes on average 1 minute to post-process everything. For more complex operations, post-processing times can vary, but neither speed nor productivity is compromised. Teams simply focus on the photography, while editing is automated, out-of-sight and out-of-mind.
Accelerate your eCommerce photography
In the end, improving the productivity of your eCommerce photography can amount to a lot of work. If running your own studio, the hardware and software will be a crucial component to overall productivity. Studios must account for each stage of production to optimize workflows, from organization, to prep, test shooting, shooting, and post-production. This is where finding the right level of studio automation for your business truly matters. The faster you can accurately recreate production processes, the more products you get online and into the hands of consumers.
This is why PhotoRobot works directly with businesses around their product lines to design custom solutions for their operations. PhotoRobot takes into account everything from available space, to specialized robot modules, intended operation, and software functionality. We work around the needs of your studio to support high-speed, high-volume eCommerce photography. It does not matter if it’s for a small webshop, a distributor, retailer, or an industrial-scale production hall. Ready to learn more? Book a demo tailored around your business model to see how PhotoRobot can support your eCommerce product photography.


