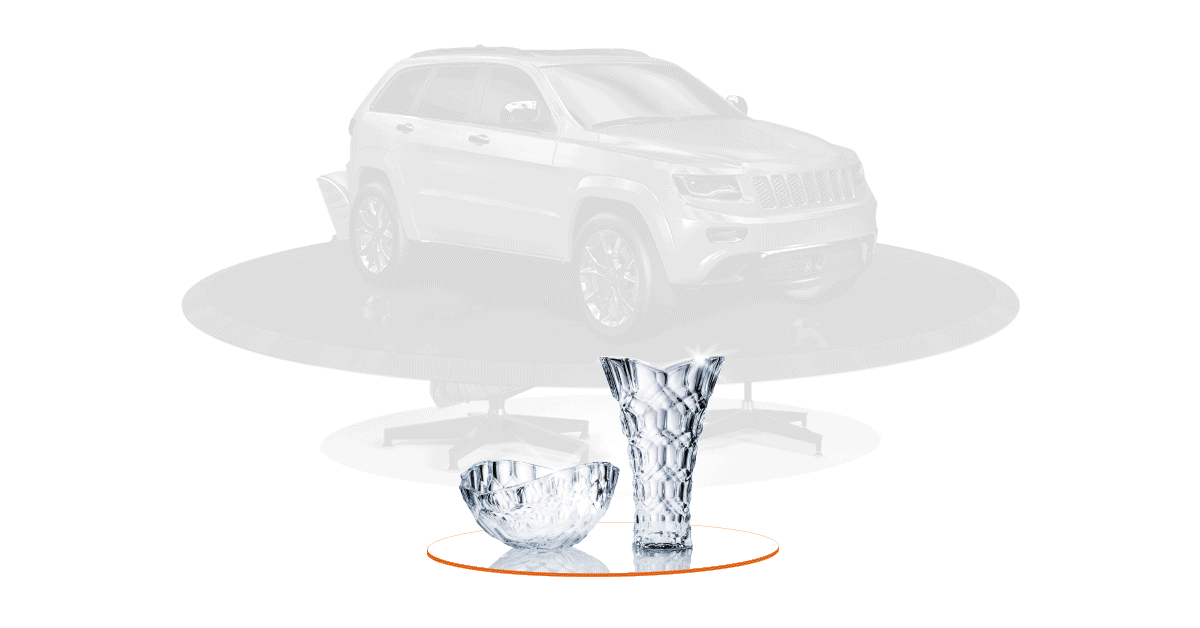
360° Product Photography - Content Formats and Production

Discover 360° Product Photography, from different formats of 360s to automated photography equipment, software, workflows and content production.
What is 360° Product Photography?
360° product photography (also 360° spin, spin photography, or 360° packshot photography) appears mainly on webshops and e-commerce product pages. Widely popular across online marketplaces like Amazon and various social media shopping platforms, 360° content aims to capture consumer attention. Through more interactive product experiences, 360° photography engages in a way flat lay or still life photography simply cannot.
360° imagery allows brands to showcase multiple angles of a product, giving shoppers more information to make confident purchases. Typically, 360° content comes from stitching together a row of single product photos at specific angles around an object. The result is an interactive, 360-degree product experience (a 360 or spin) that shows an object in rotation.
There are various types of 360s: from single- to multi-row spins, time-lapse animations, product videos, and virtual product demos. Some display a product in continuous rotation at the click of a mouse, while others allow for interactive click-and-drag control. In this guide, we’ll zoom into the types of 360 product content while sharing how to make each. Read on for a closer view of the industry, including today’s solutions, equipment, and software for 360° product photography.
Why invest in 360° product visualization?
Leading brands often use a combination of 360° product imagery, animations and product videos to sell products online. Visually-rich product experiences are a way to bridge the gaps between in-person and virtual shopping. They help consumers better visualize and become familiar with products without having to physically inspect them in-store. Along with consumer-value, the benefits of utilizing 360° product photography are many:
- enhanced buyer’s confidence – 360° visuals lead to more informed purchases. They allow shoppers to better visualize information like shape, size, material, or features that may otherwise go unnoticed. The gap between the imagery and reality is minimal, helping consumers to make a decision with all available information.
- more e-commerce conversions – 360-degree product experiences can also generate more website traffic, on-page time, and higher SEO, which in result means conversions. That is, if your product visuals are both engaging and answering all of those shoppers’ questions.
- reduced overall returns – the more informed consumers are about products, the less likely they are to return them. 360 spins and 360 packshots eliminate much of the guesswork to online shopping.
- stronger brand image – the more satisfied customers, the more they shop again, give referrals, spread word-of-mouth and overall boost brand image.

Key terminology: Stills, 360s, 3D spins and 3D models
To avoid any confusion, let’s clarify some key terms in the industry. In general, common terms in 360° content production include the following.
- Still images (also stills) are individual photos from specific angles (frames) around an object. Usually, a 360-degree product spin will consist of 36 still images at 10-degree intervals stitched together with special software.
- 360s (also 360 spins, spins, or 360° packshots) often refer to standard, single-row spins. A row is the angle of camera elevation for each frame, and is usually at 10° elevation.
- 3D spins (also multi-row spins, or hemispherical / spherical spins) consist of two or more rows of still images. While the first row is usually at 10 degrees, subsequent rows capture several vertical angles. The result is a 3D product experience, with both a horizontal and vertical viewing axis.
- 3D models stitch together a series of photos using photogrammetry scanning and special software. Creating 3D models usually requires at least 2 rows of 36 frames around a product. Photogrammetry software then composites images into a 3D model for hosting on 3D product viewers or 3D product configurators.

What are the different types of 360° product spins?
Since 360° product photography emerged in ecommerce, it has developed into a wide range of formats. What began as non-interactive 360s has now become a range of interactive experiences. There are 360 deep zoom spins, 3D spins (multi-row, hemispherical / spherical spins), product animations, virtual product demos and 3D models. Below we’ll look closer at the different types of 360° product photography, and how product photographers capture each.
Traditional non-interactive 360° animations
Let’s start where it all began: the more traditional, non-interactive e-commerce product spins. Most commonly in GIF format, these animations remain in popular use for social media product marketing and email campaigns. GIF 360° animations display a product from all angles and in continuous rotation.
Businesses embed GIFs as a single image file on a product page or in email. These animations are compatible with the vast majority of web browsers, email platforms, and most of today’s product viewer technology. However, this format does have its limitations:
- Image quality – GIFs have lower image quality (limited to 256 colors, 8-bit), whereas other formats provide 16M+ colors. Thus, optimizing 24-bit images as 8-bit GIFs can subtract colors from the original image.
- File size – File sizes are much larger in comparison, and are not easy to compress.
- Consumer engagement – Without interactive features like movement control or zoom, GIF animations engage on a much lesser scale.
Non-interactive 360° animations
Alternatives to GIFs include newer animation file formats, although they are not standardized across all web browsers. APNG Animated WebP, for example, allows for better quality and smaller file size, but remains problematic for SEO.
Instead, sellers commonly opt for MPEG-4/H.264 video using html5. This format, like GIF, translates across the majority of browsers, email clients and software. It also allows for more, albeit very limited levels of viewer control. Viewers can navigate the video timeline to control a product’s rotation, and also preview spins in full-screen.
Interactive 360° spin photography
360 spins with interactive features enable control over the movement and rotation of product visuals. Often with zoom capabilities at the click of a mouse and “drag-to-rotate” mechanics, interactive 360s require special product viewing software. A custom script provides the additional spin functionalities (rotation, zoom, hotspots), and works to embed images into web pages. Consumers can then experiment on-page with products and inspect various hotspots and details at their own pace.
Multi-row 3D photography
Multi-row spin photography (also hemispherical / spherical or 3D product photography) stitches together two or more rows of single product photos. While the first row is typically shot at 10° elevation, subsequent rows capture several vertical angles. For hemispherical spins, 2-3 additional rows provide a 360° horizontal view of the product with a 180° bottom-to-top view.
Meanwhile, spherical 3D product photography stitches together single photos from 4 to 6 vertical rows. The result is a complete 360° product experience, with no limitation on the vertical or horizontal viewing axis. However, hemispherical / spherical product photography requires far more photos than traditional spins, as well as special photography equipment & software. For example, 3D photography often calls for optical-glass plate turntables, 3D camera tripods & mounts, and multi-camera systems.
Usually, a standard spin will consist of 24 or 36 photos from even angles 360-degrees around the product. For 3D photography, multiply the number of photos by each additional row. If shooting only 3 rows of 36 photos, that’s 108 images to combine into a single image file. What this means is that image file sizes are significantly larger, calling for more sophisticated 3D image viewing technology.
Two-axis 360° spins
Next, two-axis 360s (also double- / dual-axis 360° spins) combine two separate 360-degree image files, one horizontal and one vertical. The result is similar to 3D product photography, although sacrificing on image quality for lower production times and smaller file sizes. However, due to the production times, double-axis spins don’t make sense for companies to produce. In fact, with special 3D photography equipment (like PhotoRobot’s), producing multi-row spins is easier, less time-consuming, and more efficient overall.
Time-lapse product animations
Another popular medium, time-lapse product animations enable viewers to see products with moving parts in motion. Sometimes also consisting of a 360° spin, animations are useful for showing off a wide range of items. Take for example household appliances, kitchenware, home decor, or furniture. Time-lapse animations can help consumers get familiar with all parts of a product, both inside and outside.
Virtual product demos
Virtual product demos (also 2D / 3D product tours) are increasingly popular both in e-commerce and for b2b sales presentations. A product demo usually stitches together 360° product photos, packshots and video into an interactive product viewing experience. The format is extremely useful for demonstrating technical products like hardware and machinery components. It often provides exploding views alongside annotations, as well as zoom-able hotspots to showcase key product features.
Video clip animations
360° product video-clip animations are widely popular in fashion e-commerce. It does however require special studio equipment (like PhotoRobot’s Virtual Catwalk) to shoot. Video animations can show for example a fashion model walking on a runway. Consumers can start, pause and rotate the model to see clothing in motion and to closely inspect fine details. It’s a way to really showcase elements like fabric, material & design, while also bringing more life to fashion & model photography.
Photorealistic 3D models
E-commerce 3D models are generated from multiple, overlapping photographs to create a photorealistic 3D rendering of an object. The process uses special photogrammetry scanning software to record, measure and interpret imagery to create a digital model. Shooting is similar to taking multi-row 3D spins, calling for photos from at least 2 vertical rows. Each row will also tend to consist of 36 or more frames. These photos the software then runs through photogrammetry algorithms to generate the 3D model.
3D modeling is often deployed for online product configuration software, AR product viewing, and B2B product demos. Any products that are either highly customizable, difficult to transport, or extremely technical in nature might benefit from these experiences. Among other functions, they enable on-the-fly product customization for product lines such as clothing and footwear. 3D modeling might also serve to project furniture or heavy machinery into an AR (augmented reality) space. 3D models can show moving parts in motion, and include annotations, hotspots or exploding views to better inform their audiences.
Which products benefit most from 360° images?
In comparison to traditional flat lay and 2D product photography, producing 360° or 3D imagery takes time & resources. From investing in the photography equipment and software, to production and post-processing teams, costs are no doubt higher. So how do you know if your product would benefit from a 360° or 3D viewing experience? Usually, the answer depends as much on the consumer as it does the product. Ask yourself:
- Do customers need to visualize the shape of the product? Take for example a carpet or rug in comparison to footwear and fashion products. Can customers get familiar with the product in only a few packshots? If the product looks flat and lifeless in photos, consider 360° or 3D photography.
- Is it a product that consumers really need to inspect in-hand? Think of a lady’s handbag or a designer wristwatch. Shoppers want to really inspect products like these, often considering every centimeter of material and design.
- Are there any selling points missing? Perhaps there’s an engraving along the inner band of an engagement ring, or other partially hidden features of a product. In these cases, 360° spins with Deep Zoom technology or 3D photography can be worth the effort.
Adding the third dimension to complex products
For the most part, any three-dimensional product can benefit from 360° product photography and 3D viewing experiences. However, some products are more suitable candidates than others. After all, 360 / 3D photography requires more time and resources to produce in comparison to capturing a few packshots. It also depends on the product, and how much additional value exists in presenting it in 360 degrees.
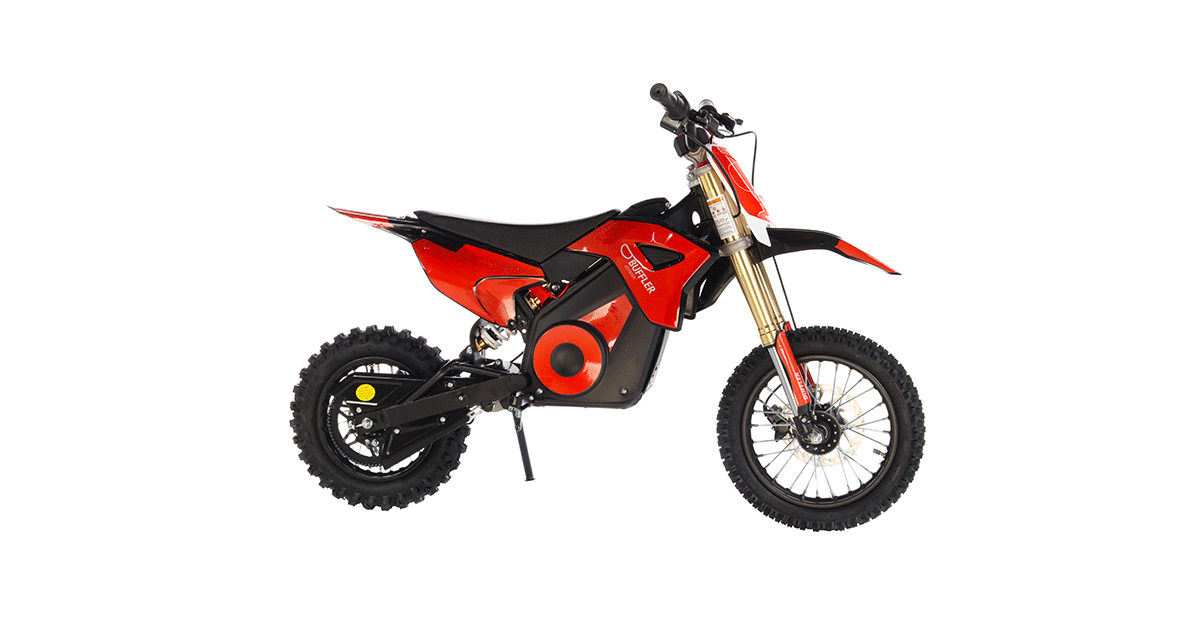
Take for example more expensive purchases like dirt bikes, motorcycles, or quads. Products like these are highly technical, consisting of many mechanical & design elements to inspect. In these cases, hemispherical and spherical product experiences can provide the level of information consumers demand. Multi-row 3D spins convey shape & definition in a way that simply cannot be matched by a set of still images.
Showcasing material and texture
Another popular use case for 360s, animations & 3D photos is to more accurately present material & texture online. Take for example fashion products like stylish clothing, apparel & accessories. From leather to suede, handbags to designer sunglasses & watches, a 360 view can capture details similar to the in-store experience. It can showcase how light reflects off glossy material, or zoom into gemstones, diamonds and other unique design features.
Truly, any product that shoppers would want to closely examine in-store or by touch can benefit from a 360 view. This also includes items like furniture & home decor, gadgets & electronics, or anything with material that’s difficult to show in 2D. Overall, the goal is to help shoppers get a real hands-on feel for items often purchased in-person.
Demonstrating technical products
Other items like machinery components, tools, appliances, and gadgets call for more advanced viewing experiences. In some cases, a 360° view can suffice, whereas highly technical products might benefit more from immersive product demos. Product demos may consist of configurable 3D models, product animations, or product tours with exploding views and annotations. Take for example an automobile engine or spare motorcycle parts.
A product tour will not only show every important angle of the machinery. It can demonstrate moving parts in action, or zoom into hidden mechanical elements & electronic components. This information is often vital for consumers to make an informed decision. Think of a mechanic or technician determining the correct component or spare part to buy. Thus, in general, the more technical the product, the more it benefits from a more advanced product viewing experience.
How to produce 360° product content?
Now, how do you produce 360° product content? For one, you have to produce content either in-house with suitable studio equipment, or hire a product photography studio. However you produce it, you’ll want to prioritize areas like:
- Image Quality – 360° product imagery requires high-quality, high resolution photos to produce. You also need many photos, as well as the time and resources for production.
- The Budget – Professional, in-house product photography equipment and software can stretch the budget. Consider if in-house or hiring out is the best option. Also, decide on the types of 360° product content you want to produce, whether 360s or in 3D.
- Product viewing technology – For any 360° product experience, find a product viewer suitable to host the content on your website. Product viewers need responsive design for viewing on both mobile or desktop. They should also be optimized for SEO, from page-loading times to the interactive viewing experience.
- The Workflow – Finally, consider workflow, whether it’s in-house or a product photography company. Plan for aspects such as product styling, or post-production workflows like photo editing, file naming conventions, or review & publishing.
Where to find a quality 360° product viewer
A 360° product viewer (also 360° object viewer or spin viewer) enables users to embed 360° spins on a website. Take for example PhotoRobot's Product Viewer. With this software, it’s easy to embed a 360° spin on any web or product page. As soon as images are uploaded in the software, copying and pasting an embeddable Javascript allows for immediate image hosting.
The script enables 360-degree presentation, optimizes file sizes, allows for zoom and for full-resolution downloads. Meanwhile, the product viewer also has customizable animation parameters, image compression, and automatic publishing. It enables immersive interaction, lazy loading, and comes with a range of SEO benefits. Beyond these, with unlimited view count and data transfer, users pay for only the data storage they consume.

Examples of high-quality 360° imagery
Now, what makes a 360 a “good” 360? For one, it should effectively do its job of conveying information about a product’s shape, texture and features. To do this, not only do photographers need to capture a product in the right light. They also have to find the best angles, and the right camera settings for high-quality imagery. Then, there’s finding the best 360° product viewer to host spins on a website or e-shop.
A good product viewer will provide high resolution imagery that is SEO-friendly and easy to host online. Like PhotoRobot’s Product Viewer, 360° viewing software should also provide responsive design for a smooth mobile or browser viewing experience. Images should load quickly on product pages, with higher-frame images lazy-loaded (only activating on user interaction).
Thus, it’s important product viewers have lazy and dynamic loading functions. Dynamic loading allows for immediate interaction with images preloaded in the background. Meanwhile, lazy loading prevents larger image files from slowing down page load times, and harming overall page performance.
360° product content production workflow
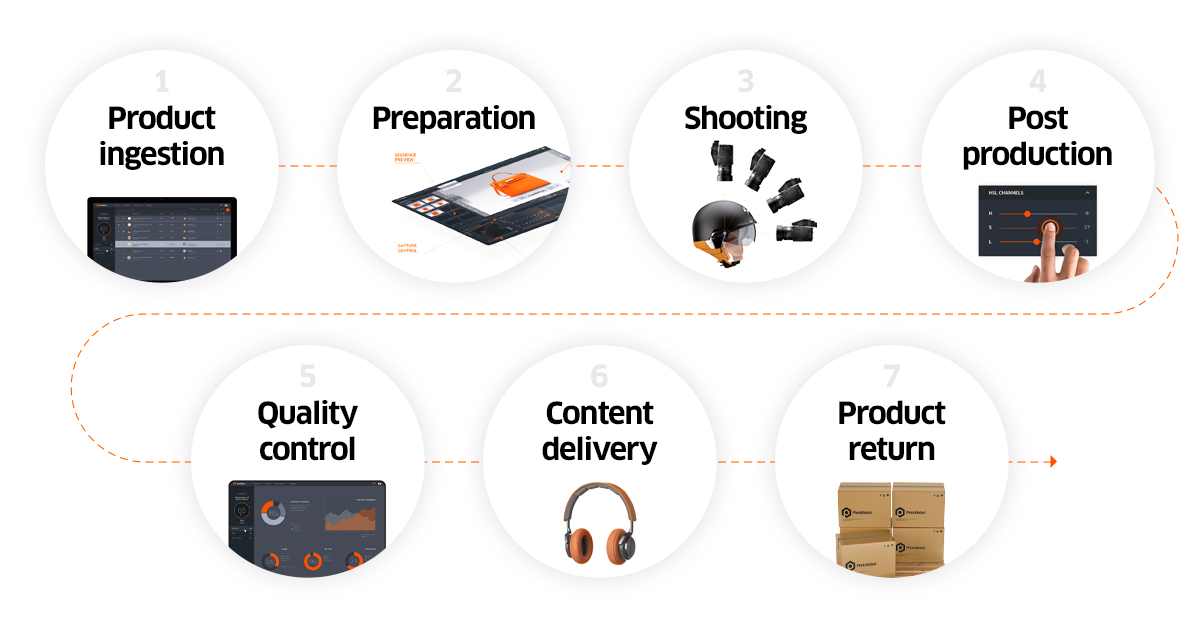
Next, how is 360° product content produced? Whether it’s professional product photography studio services or in-house, the general workflow includes numerous stages. Certainly, these vary depending on factors like the photography equipment, software, the team, workload, products, etc. However, in general, the 360° product content workflow includes:
- Product-in: receiving items, verifying inventory, sorting products (weighing & measuring);
- Product prep: observing style guides, setting the scene, hardware & software prep;
- Image capture: the photoshoot;
- Post-production: photo editing and retouching (background removal, image enhancements);
- Quality Control: photo review & approval;
- Content Delivery: file naming conventions, publishing to the web;
- Product Return: ensuring items only leave the studio after all images are captured.
Each stage of 360° product content production entails various responsibilities. Teams need to decide on who is responsible for editing or retouching, whether internal or external. They also need to determine quality control workflows, as well as how content is delivered to the web. There are file naming conventions to consider, and overall organization of production processes.
Often, these processes benefit from complete automation thanks to product photography automation software. In fact, automation software (like PhotoRobot_Controls) can streamline nearly all studio workflows & processes, but more on this later.
Does my business need 360° product content?
Businesses need to consider whether to hire a professional product photography studio or produce content in-house. Obviously, if doing in-house product photography, initial costs will be steeper than hiring a studio for only a few 360s. However, over time, return on investment can also grow dramatically with the right in-house photography equipment & automation software. The ROI becomes even more significant with higher volumes of products to photograph.
Costs for 360° product content services
If hiring out, costs vary widely from project to project. Prices for a single 360 spin can depend on many factors. These are:
- The product. Will a standard photography turntable work, or will the product wobble or require special prep? You might need equipment and accessories for product staging, which brings up the price, whether hiring out or doing it in-house.
- Volume. How many products do you need to shoot? Is it only a few packshot 360s, or do you have a wider line of products to photograph? The more, the higher the cost.
- Logistics. How difficult will transport be? Do you need special handling insurance, or a larger studio space? Think product photography of automobiles and heavy machinery. The more difficult the logistics, the higher the price.
- Types of product photography. Do you need to photograph products in 3D? Product photography service prices will vary depending on the required equipment, time, and editing.
- Image resolution & overall quality. Images must showcase all features and details that make your product unique, while conveying product shape, size, and texture.
- Licensing. Is all of the imagery yours to use, or are you only licensed to use the 360? If purchasing a gallery of still images alongside your spin, the service might cost more.

How product photography services provide spins
When purchasing 360° photography services, it’s necessary to decide on content delivery. In which format should the business deliver the 360s?
- Do you have your own 360 product viewer? If yes, the content provider can deliver single image files for upload into your viewer. In this way, you have complete control over quality and choice in product viewing technology.
- Is it a complete solution you need, including the viewer? Content suppliers can deliver a folder of image files along with the 360° viewer embedding script. However, keep in mind, this prevents you from using other product viewing technology. It’s always recommended to instead research and choose a viewer you’ll use across all channels.
- Does your e-shop have a 360° viewer plug-in? Some e-shopping platforms support special plugins to host 360s. These enable providers to upload spins directly to a webshop. However, on most platforms, HTML code works fine. In fact, nowadays, usually there is no need for special plug-ins.
- Do you need a 360° hosting service? Take for example PhotoRobot’s special image CDN (Content Delivery Network). Cloud-based processing enables image scaling in real-time and with pixel perfect resolution for any end user device. All files are easily organized, searchable and secure within a digital asset management system, with JPEG, PNG and WebP supported.
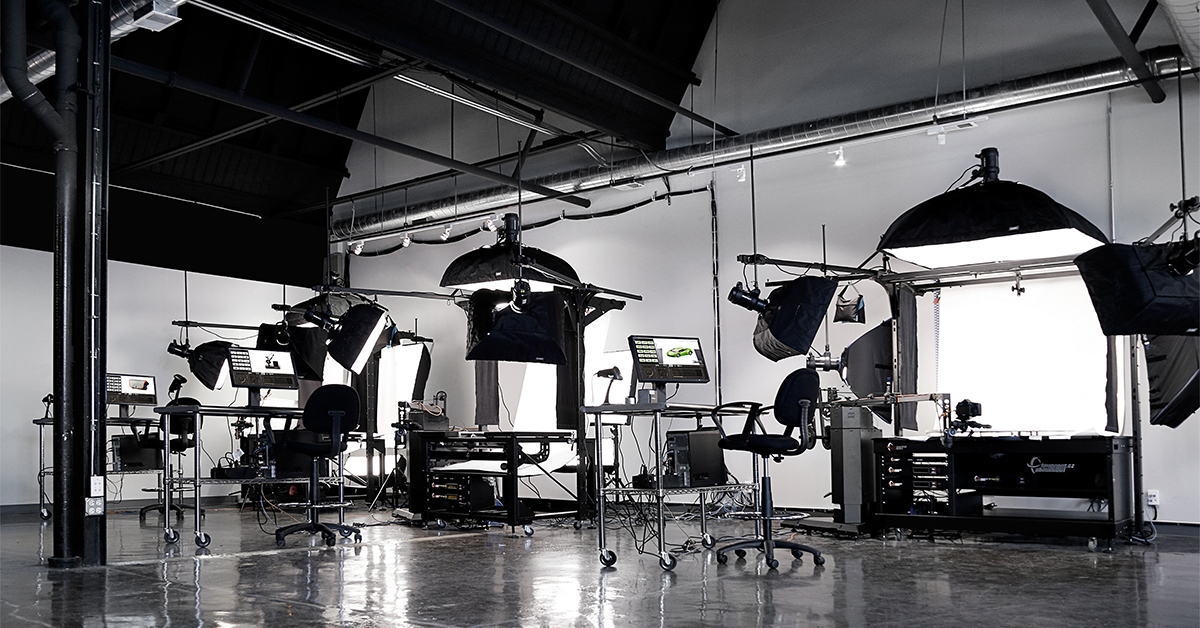
Automated 360-degree photo studios
The higher the volume of products to photograph, the more likely businesses are to consider in-house solutions for automated product photography. These consist of software-driven machines & automation. They integrate photography devices, cameras, lights, image capture and post-processing functions. Among other equipment, a fully automated 360° photo studio often consists of a motorized, rotary photography turntable. It will also have a camera tripod / mount, and likely a robotic camera arm to automate camera elevation.
Control software then automates many processes, from product rotation on a turntable, to triggering strobes & cameras. Editing operations can be automatic with reusable settings, or allow for manual editing and retouching of photos and videos. Software features usually also include tools for quality assurance, review & automatic publishing. They can automate file naming and much more.
An automated 360-degree photo studio dramatically simplifies the production of 360° spins and multi-row 3D photos. It also makes creating still image galleries, packshots, GS1 imagery, and product videos possible in a single process. With multi-camera systems, usually all it takes is a single rotation of the turntable to capture everything. In fact, with PhotoRobot, it often takes under a minute to produce 360s alongside stills, packshots, and GS1 photos.

What do you need for in-house production?
Now, the cost of an in-house, automated product photography studio varies from business to business. Calculating the total investment must account for areas such as logistics, labor, equipment & installation, training, floorspace, and scalability. There are also many product photography installations for different industries, from fashion to furniture, jewelry, industrial or automotive. What combination of hardware is necessary thus depends on the product line, from volume and size to shape & weight.
Standard 360 photography equipment
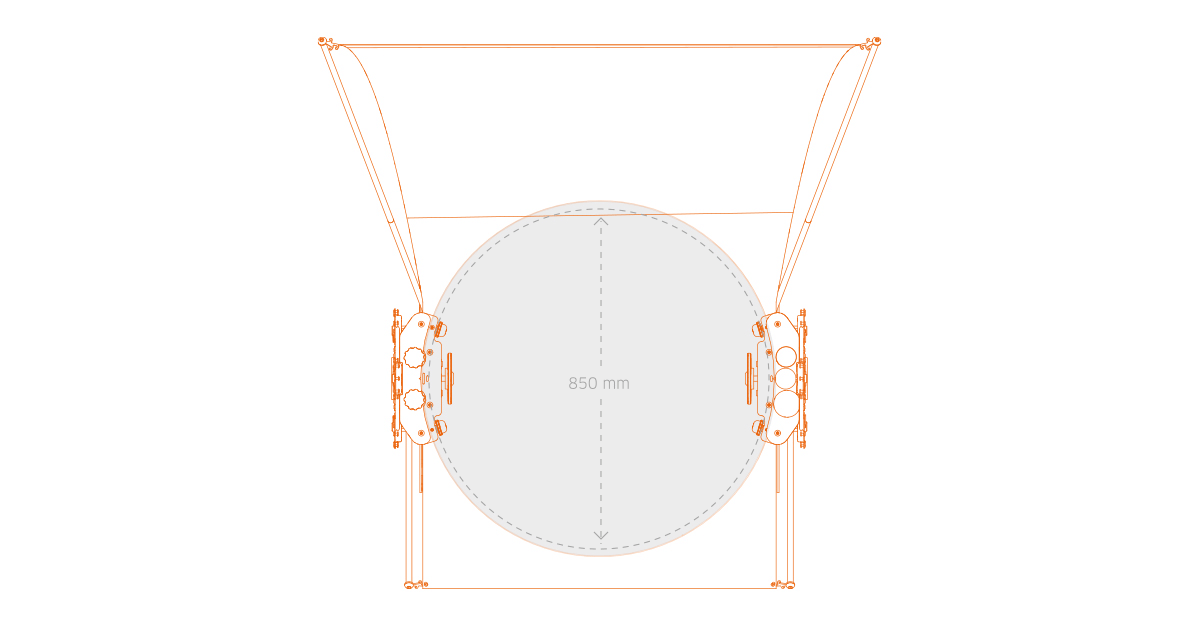
Usually, at the heart of any setup, there is a motorized photography turntable. Then, there is the camera, tripod, lights, and backdrop. The size of the turntable will depend on the type of products, from size and shape to weight. For example, PhotoRobot manufactures a long line of different turntables for positioning all sizes and types of products.
Combine any PhotoRobot motorized turntable with additional robots like the Robotic Camera Arm or the Multi-Cam. These automate camera elevation & image capture, while the Multi-Cam allows for the quick capture of multi-row 3D photography.
Other equipment you might find in an automated studio include solutions for mannequin photography, and product staging devices. Take for example PhotoRobot’s Cube. It provides a system for quick mannequin exchange, or it can be installed upside-down above a turntable in suspension mode. This mode makes it easy to partly or wholly suspend objects in air, and to synchronize product and turntable rotation.
Automation software
On top of the equipment, automation software paves the way for complete automation of content production and digital asset management. A comprehensive suite of software (like PhotoRobot’s) will integrate control of equipment, cameras, lighting, post-processing, review processes and publishing.
With PhotoRobot’s automatic object centering, cropping, scaling, background removal and more, usually product photos are web-ready immediately after capture. Users can configure as well as save and reuse settings to automate editing parameters and style guides. This can include the automation of editing across entire still image galleries, 360s, 3D photos and videos.
From product-in, to production, publishing and product-out, PhotoRobot software aims to improve all studio workflows and strengthen communication across teams. Other valuable features include automatic file naming, tools for content sharing, file delivery and inventory tracking. Combine these with PhotoRobot’s integrated image hosting & SpinViewer for a global CDN with real-time image scaling and pixel-perfect resolution.
User-knowledge
The next component necessary for an automated studio is a team well-equipped with enough knowledge for the job. This begins with a professional studio photographer capable of operating the equipment and software. Special knowledge as well as training will be necessary, although how much depends on the system’s complexity (or simplicity). PhotoRobot for example delivers a solution that even amateur photographers can learn to operate. It is necessary to learn both hardware and software operations, but usually all this takes is a few days’ training.

Available space
Finally, your studio needs available space for the machine and for a photographer to freely walk around it. There should also be room for a workstation, including the computer and connections to electricity and a network. Then, how much space is necessary will vary depending on the selected hardware for the photoshoots.
Some 360 photography devices can fit nicely and neatly into any available space, like the corner of a small webshop. Others solutions call for installation on a larger showroom floor, or, for example, in a warehouse space. Wherever the location, climate control is important, and you also want a dust-free environment. This will ensure products remain in pristine condition, and in general ensure hassle-free product preparation.
The PhotoRobot in-house 360° photo studio
Now, what equipment do you need to build a PhotoRobot in-house 360° Photo studio? Let’s begin with the lights, cameras, and camera lenses.
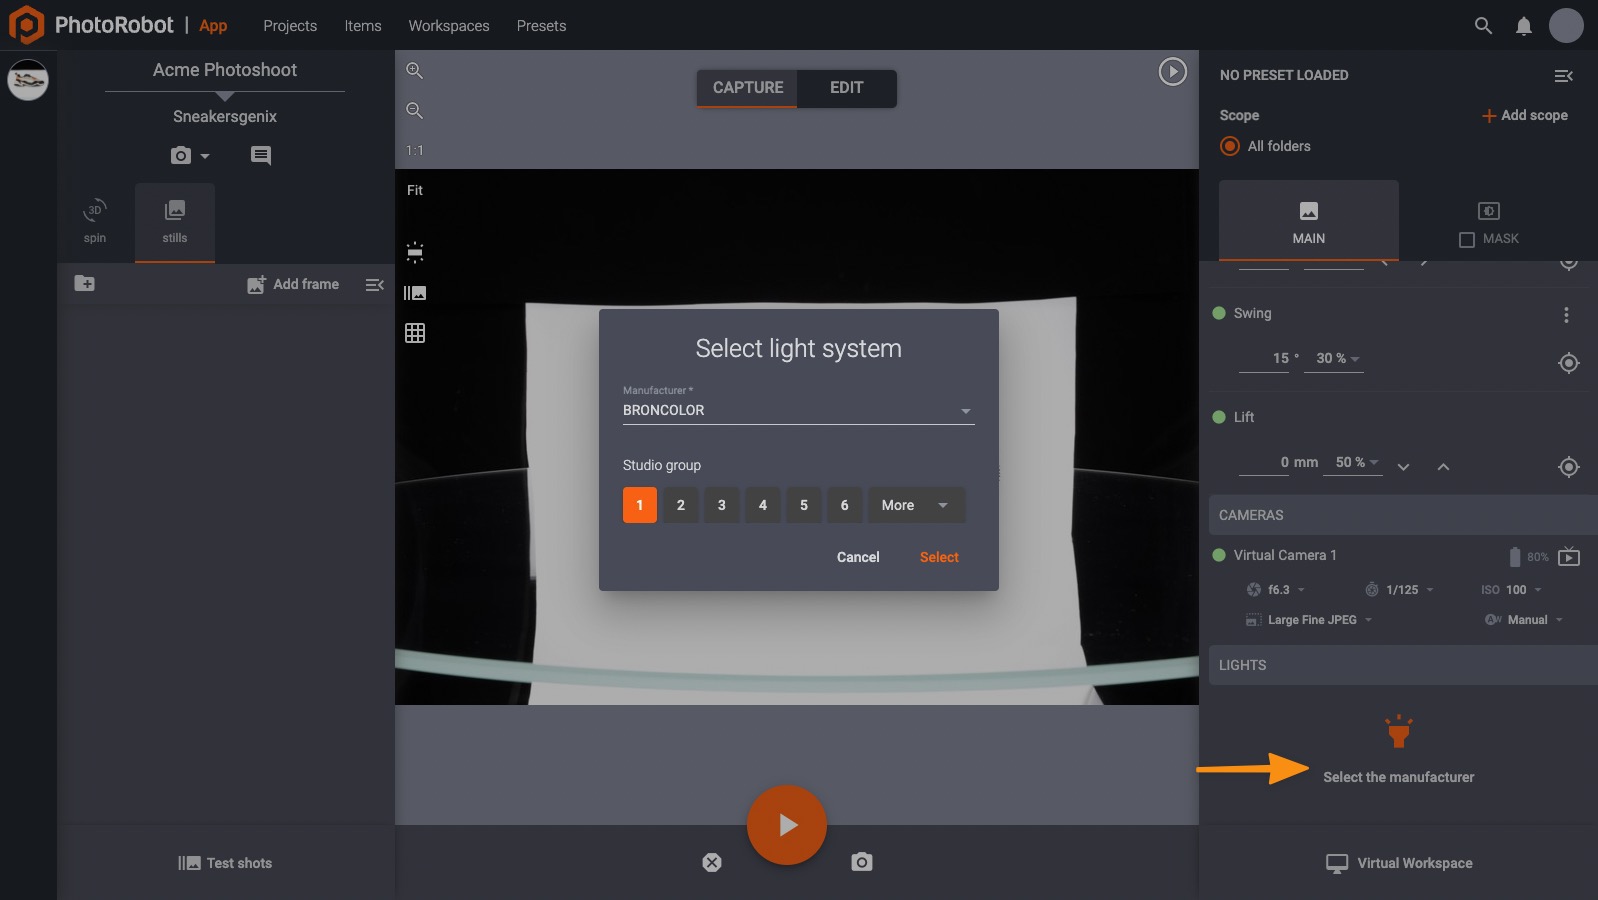
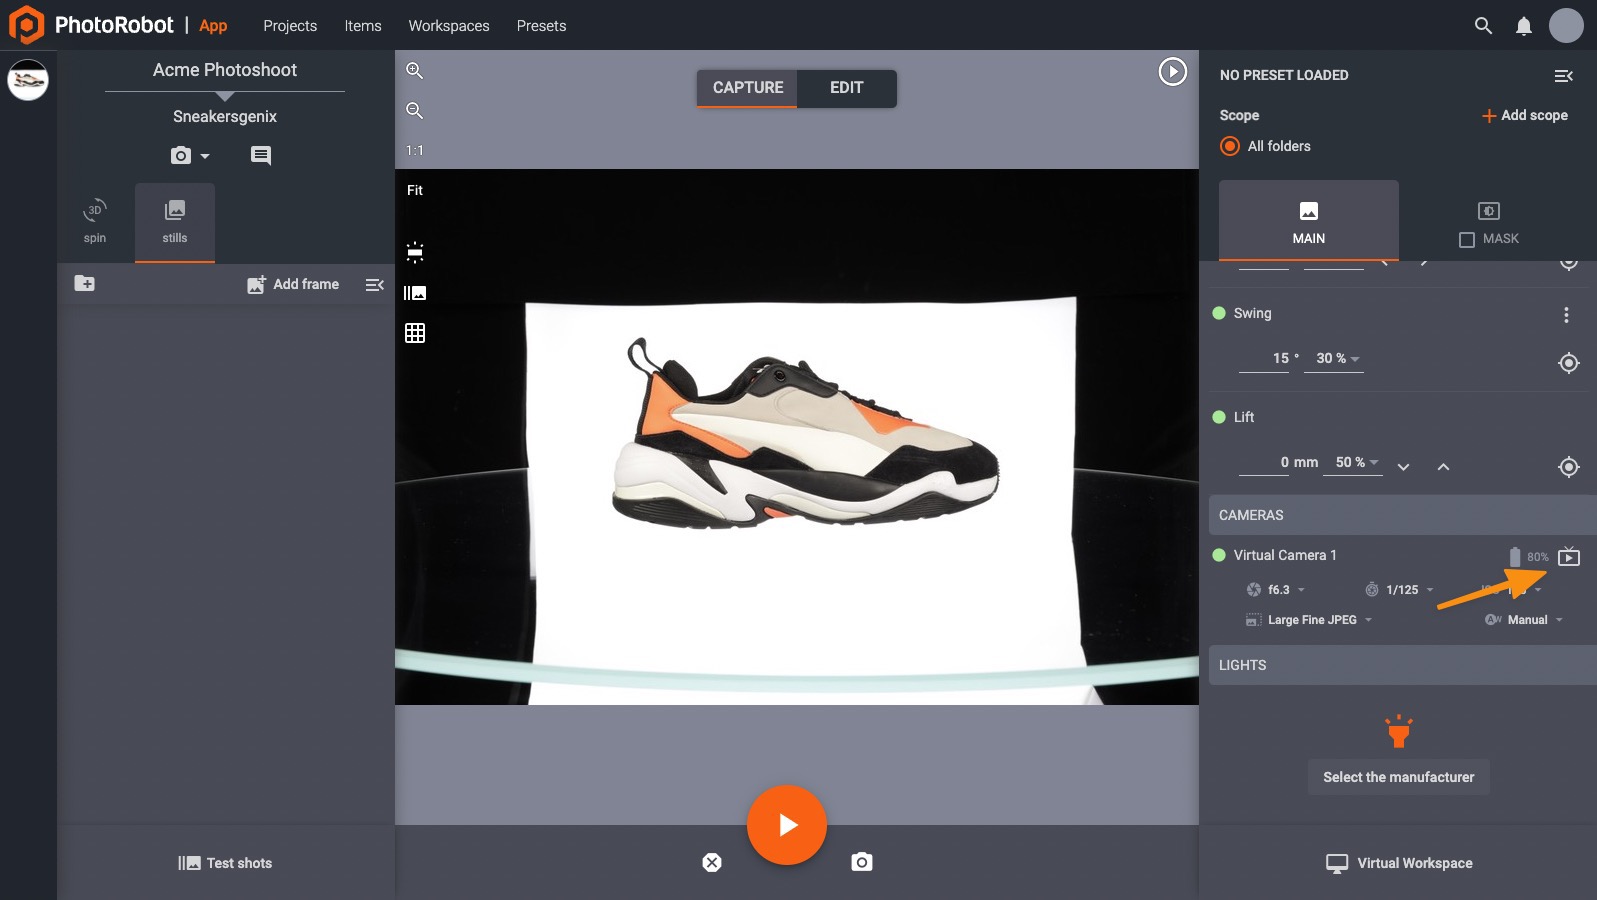
- Photography lights – PhotoRobot compatible light systems include two types of lights: FOMEI and Broncolor strobes, or any LED lights with DMX support. Software integrates control over studio light groups, and automation of flash or constant lighting.
- Cameras – Connectible cameras include DSLR or mirrorless Canon camera models. The software provides remote camera capture and settings control over one or multiple cameras. Usually, a Canon between 20 - 30 megapixels is sufficient. If using constant lighting, exposure simulation in LiveView is also useful.
- An appropriate camera lens – For micro products like jewelry, a macro lens is necessary in the studio. However, when shooting most larger products, all you need is a lens capable of keeping the product in frame. Usually, a zoom lens with 40 - 100mm focal length accomplishes this.
Next, you need a 360° photography device like a motorized turntable (or rotating mannequin). Then, there is the camera tripod / stand with camera head, and a workstation. There will also be a lighting backdrop, and sometimes accessories & product staging features for 360° photos.

360° turntables, camera systems & software control
If doing turntable photography, you’ll need an appropriate size 360° turntable. These work standalone or in combination with other photography robots, like a robotic camera arm or a multi-camera system.
- Motorized 360° turntable – For 360° turntable photography, there are a range of different size rotary turntables. These consist of smaller mobile turntables, larger turntable installations, and turntables with optical glass plates for 3D photography.
- Backdrop – Some PhotoRobot devices integrate a white diffusion cloth backdrop into the system. These make it easy to photograph products on a white background, or to automate background removal for a transparent background.
- Robotic camera arm or multi-camera system – For maximum precision and freedom of movement, the Robotic Camera Arm or the Multi-Cam work in combination with 360° turntables. Both act as a combo- tripod / stand with an integrated camera head to control one or multiple cameras in the studio. Use the Robotic Camera Arm for single-row 360 spin photography, or the Multi-Cam for quick multi-row 3D image capture.
- Software-driven workstation – A single software-driven workspace computer (MacOS or Windows) provides control over all equipment, cameras, lights and production processes.

How to produce 360° content with PhotoRobot
Among many factors, a 360° content production process will vary depending on the studio setup and the type of product. From footwear to sunglasses, furniture or automobiles, each product category calls for a different approach, and for different photography kits. Nonetheless, there are stages of production that in general apply to all 360° content production with PhotoRobot.
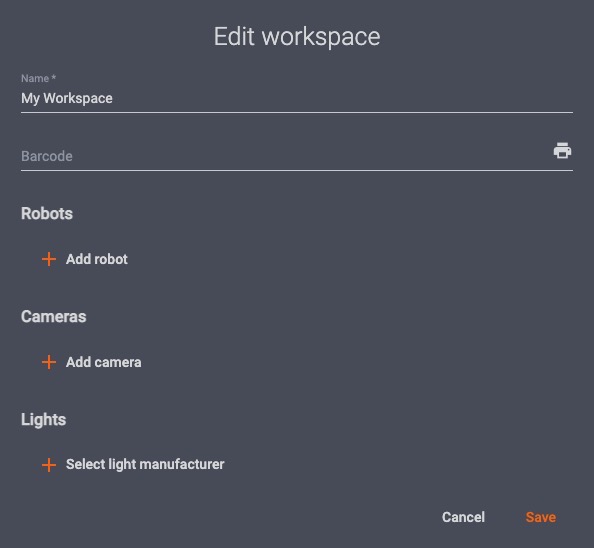
1 - Create a workspace
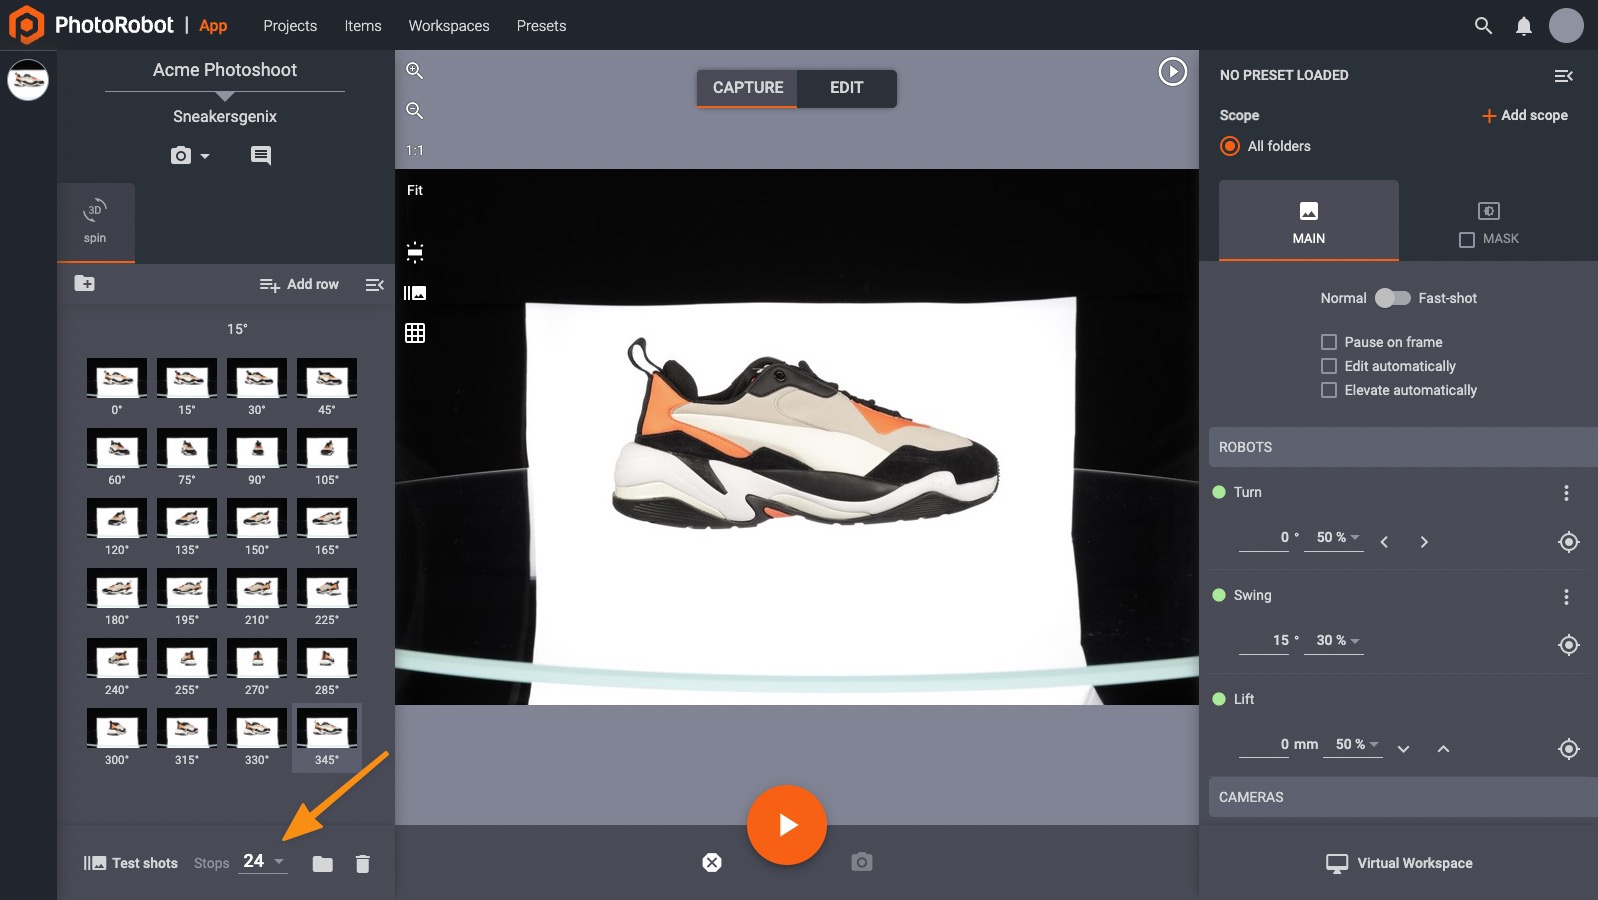
Within PhotoRobot Control software, a workspace is a list of hardware that will be in use for a specific photoshoot. It connects via one software interface all photography modules, cameras, lights, and other accessories. Users can activate Fast Shot mode for image capture during non-stop turntable rotation, configure lasers & lights, and add cameras.
2 - Start a project
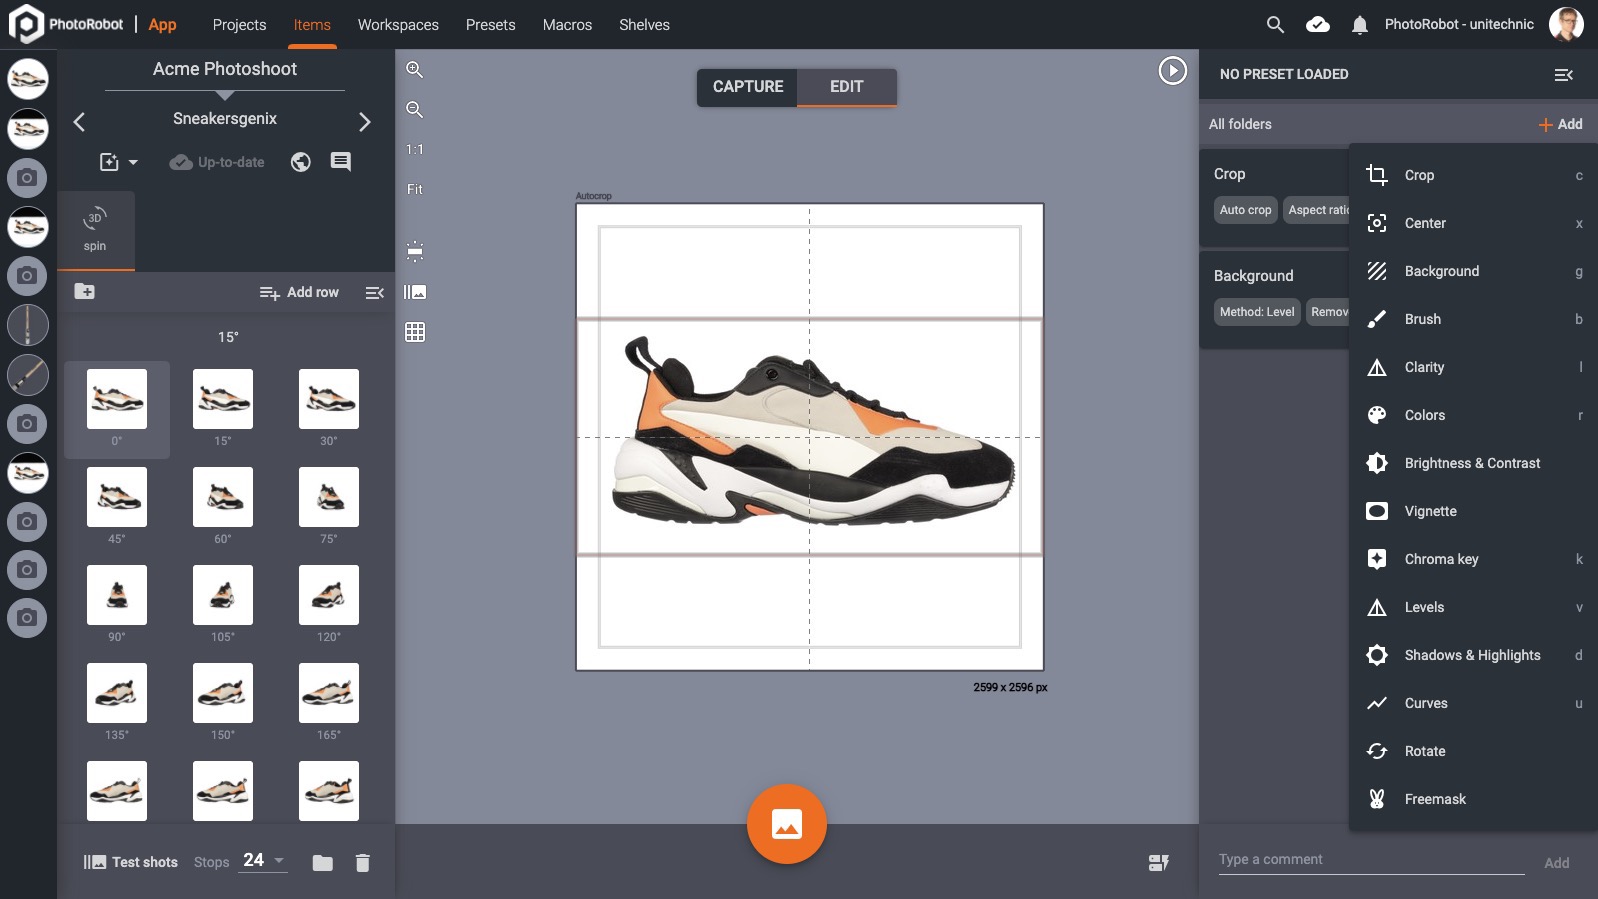
After configuring a workspace, a project will include items from a single photoshoot or perhaps a single shooting day/week. Projects are the highest level data entry, consisting of one or more items (photographs of a specific product). Within each item, there are one or more folders to organize different types of imagery (e.g. spins, stills, video). To begin shooting, you must first add a new project (unless one already exists), as well as at least one item.

3 - Add a spins folder
When creating a spin folder, the software automatically adds frames according to how many images per spin you select. The default number of frames is 36. With a higher number of frames, the rotation becomes smoother, although resulting spins require more storage space.
4 - Style the product (product prep)
From here, it’s important the product is in pristine condition from all sides that will show in photos. This includes for example the soles of a shoe if photographing from the bottom for 3D spins. Look for any dust or blemishes on the material, using a brush or compressed air to clean the product. Also keep in mind product staging (e.g. how the product will be positioned).
Usually, the stylist will decide on product staging based on the type of product, a style guide, and expected outputs. Among other factors, the style guide will dictate how many images to take, which angles to capture, camera and light settings, and post-processing parameters. Make sure to style the product accordingly, taking into account your brand style guide and desired results.

5 - Set the scene (product positioning)
After styling, place the product on the plate of a PhotoRobot 360° turntable. This is easy thanks to PhotoRobot features for precise object positioning. For example, both motorized turntables and robotic camera arms feature laser-guided positioning to easily locate the absolute center of rotation. They also make aligning the camera arm and the table simple.
In addition to this, PhotoRobot systems provide numerous features for product staging. Does the product need to be partly or wholly suspended in air, like the straps of a handbag? Consider using nylon strings, or combining your turntable with a product suspension device like PhotoRobot’s Cube.
The Cube’s top portal can also carry various holders, such as for pins, sockets, uni-clamps or heavy-duty clamps. Use these to hold spotlights, reflection boards, or other photography jigs to set the scene. Finally, be sure to check the turntable, just as you did the product, for any dust or unsightly blemishes. Also be on the lookout for any smudges or fingerprints if using a glass-plate turntable.

6 - Adjust product lighting
In the software interface, users can assign individual light positions, select predefined positions, or create a custom position. Generally, light positions will include product left / product right, and background top / background bottom. Be sure the product–left and product-right light groups illuminate the product in a natural light. It shouldn’t be too dark, nor too bright. It’s important the lighting exposes texture and makes the product look its best in photos.
Software control allows users to adjust lighting, or switch lights on or off via a power button. Use this for example when doing freemask background removal. In this approach, it’s necessary to switch off the front light to take a mask image. Beyond adjusting intensity, some DMX-controlled lights also provide control over color temperature.
Users can then save all light groups and light settings in the software for future automation. Software Presets allow users to create and save settings for machinery, cameras, lights, and post-processing. Each of these we can then automate for individual photoshoots, or across entire batches of similar types of products.
7 - Set background lighting
Next, set the background lighting to achieve a pristine white background. In the software, choose the background light groups, and adjust intensity to illuminate the background from behind. The software will automate background removal after capture, creating either a white or transparent background according to user settings.

8 - Check composure and focus
In the capture mode interface, the most central element is the preview window. This displays either the currently selected image (if one has been taken), or the Live View from the Camera. Live View is particularly useful for checking composure and focus before taking photos.
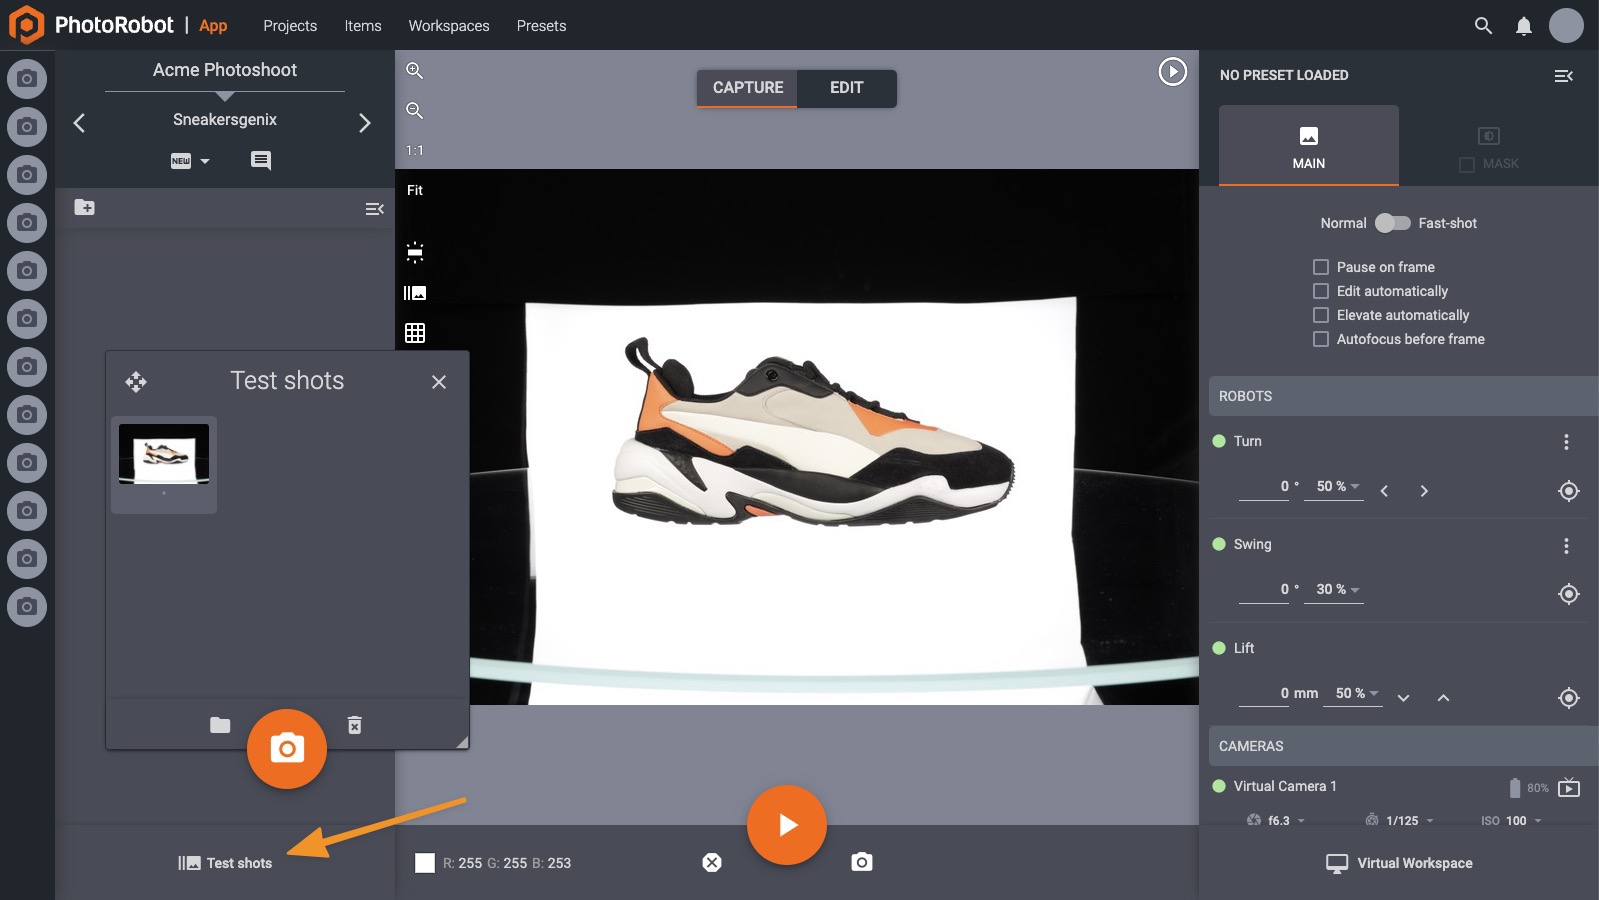
9 - Take a test shot
Before taking final images, it’s always a good idea to take one or more test shots. Do this either from the interface or via keyboard shortcut (press “T”). This helps users test settings of lights, cameras, and hardware before the capture sequence. All test images go to a folder for test shots, which users can access immediately after capture.
10 - Capture a 360 spinset
At this point, all that remains is pressing the “Play” button on the software. Press Play and the photography sequence begins. Additionally, users can begin the sequence via keyboard shortcut (space bar), or by scanning a special “Start” barcode. When the sequence completes, all thumbnails within the item will fill with images of individual frames.

11 - Post-processing images
After image capture, use Edit mode in the software interface to access post-processing tools. These provide a long line of editing operations, like automatic cropping and object centering. Object centering is particularly important for 360 spins. Even though most PhotoRobot machines provide laser positioning, some 360s will need additional software centering. This process is automatic by default, although there is also manual control.
Other useful post-processing automation tools include semi-automatic background removal (by level, by flood, or freemask). Use these operations to adjust the background of an image, or to completely remove it. Achieve different results by selecting the level, flood, or freemask method.
Keep in mind that how well the software performs background removal depends mainly on how the scene is lit. Sometimes, it will be necessary to experiment with light settings and reshoot frames before achieving satisfactory results.
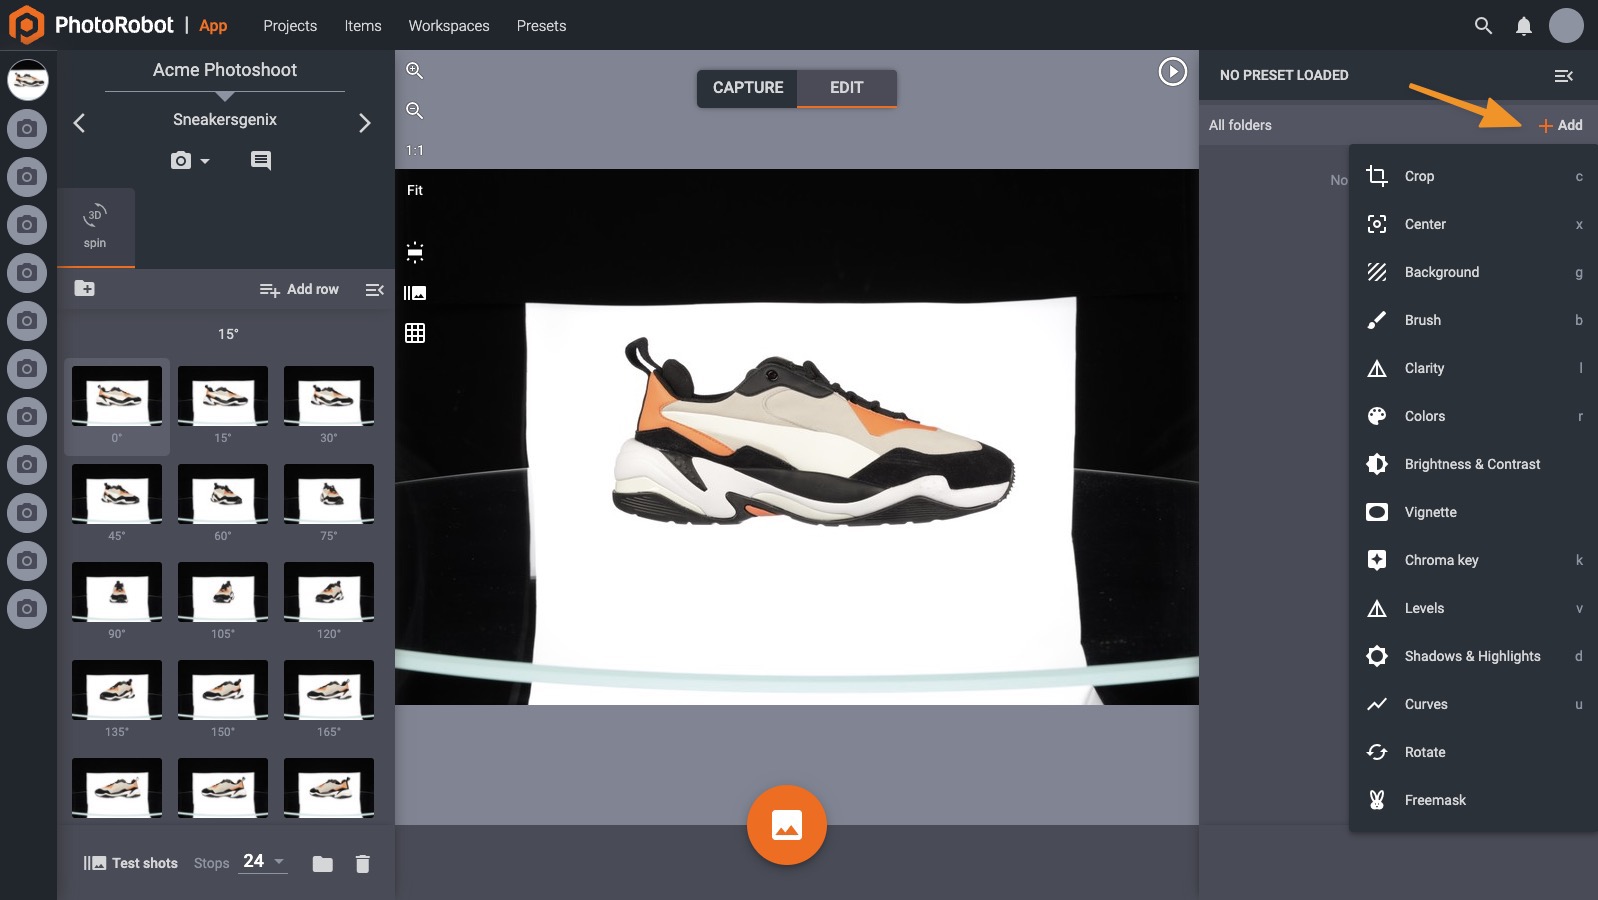
In the end, users can save their unique settings for each editing operation as a Preset to reuse in future photoshoots. Apply operations across entire folders, or select individual images to apply edits by setting Scopes in the software. Configuring scopes allows for per-picture edits, specific swing angle edits, or editing the entire folder spin.
12 - 360° spin creation, review & publishing
Immediately after image capture, your spin folder will begin filling up with images for each individual frame. The software post-processes each one according to user settings, and then stitches together final images to produce a 360° spin. In fact, usually these spins come out web-ready without any need for additional or manual retouching.
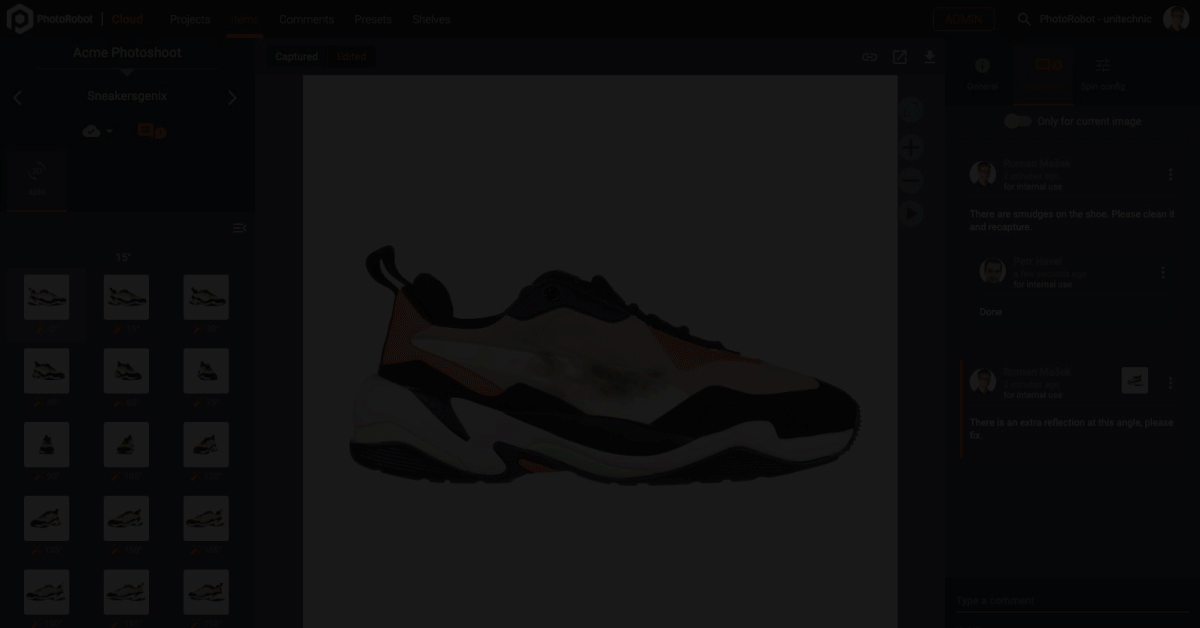
Users can work with images locally or in the cloud, now with broader unification of the local and cloud apps. Get everything on a single page, including info about photos, comments, or additional details & instructions. Additionally, software workflow statuses enable more effective communication & workflows across teams. Set status levels to assign tasks, communicate progress, and approve or reject work at stages.
Also, Retouch Access controls make it easy to clearly communicate and share tasks with external retouchers. Simply attach instructions in comments before sharing files to the responsible retoucher as “Ready to Retouch”. Retouchers can then access, download, and work on files from anywhere in the world, and then quickly upload final results. After upload, the software automatically sets files as “Retouch Done”. A project manager or client can then approve or reject changes, and choose to immediately publish images online.
How to produce 3D (multi-row) product content
To produce multi-row 3D spins (hemispherical or spherical), more complex equipment, prep, and camera setup is necessary. For the most part, this is because of the additional time that goes into photographing multiple rows around a product. With single row 360° spins, a robotic camera arm paired with PhotoRobot’s non-stop Fast Spin mode more than does the trick.
However, if shooting 4 or 5 rows at different elevation, a multi-camera rig dramatically reduces production times. These devices (like PhotoRobot’s Multi-Cam) support cameras at each vertical angle to photograph multiple rows simultaneously. They connect to motorized turntables like the Centerless Table, with software providing remote camera control and complete system integration.
Operators will have to adjust settings for each individual row, although this is quickly managed in the software. Users can adjust settings for lighting, camera capture, or camera & editing parameters, and apply unique settings to each row. PhotoRobot equipment and software then manages the rest on command, automating photography sequences and post-processing to produce the 3D spin. In fact, usually in under a minute, PhotoRobot produces post-processed, web-ready results we can publish online immediately.

Choosing 360° spins vs 3D content production
When deciding whether you need single row 360° spins or 3D spins, firstly consider the product. Is there any benefit to showing it in 3D that justifies the additional time (and costs) for production? Usually, it’s the more complex and technical products that benefit the most from 3D photography. However, it may also be clothing & apparel, or products like footwear. Really, anything that consumers need to view from all sides and top-to-bottom might call for 3D photos.
For more simple products, one row is usually enough to create a lifelike impression of an object. While these spins only move left and right on a horizontal axis, this can be more than enough for consumers. Think of a 36-frame spin of a pair of sunglasses. Combine that with a hero shot and few marketing angles on a product page, and your job is complete.

Now, it is important to consider costs and production workflow, whether doing it in-house or outsourcing. In general, 3D product content will cost more to produce than single-row 360s. It will also require more time, effort, and equipment. Always keep this in mind, especially if outsourcing, as costs and time-to-web vary from one provider to the next.
The bottomline
Single-row 360° product photography and multi-row 3D photography call for either in-house solutions or hiring a professional product photography studio. Among other factors, costs vary depending on the complexity of the photos, equipment necessary, and post-processing needs. There are also volumes, logistics and workflows to consider, as well as user training if doing production in-house.
Nonetheless, with the many solutions available today, 360° content production can be cost-efficient and planned around a budget. Look for a solution that best meets your consumers’ needs, as well as those of your business. There is a wide range of in-house 360° product photography equipment for projects of any scale or size. That, or professional product photography studios with the right tools for the job. Just keep in mind that outsourcing comes with many additional costs, and, with more volume, less ROI than in-house photography.
PhotoRobot-Powered 360 Product Photography
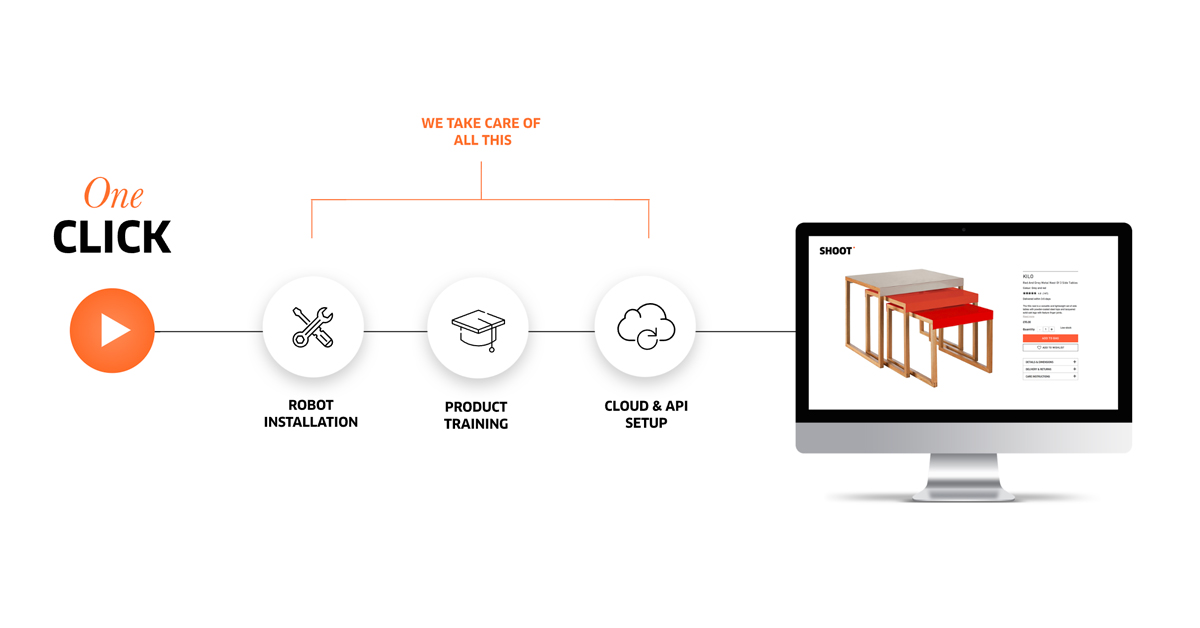
Ultimately, PhotoRobot aims to enable simple & cost-efficient 360° product photography, and overall improved online product experiences. 16 cutting-edge robots provide a solution for any type of product photography and 24/7 operations – large or small. Meanwhile, a unique, real-time operating system with cloud-based workflow and high-level automation drives each device. Our suite of automation software manages studio workflows, digital asset management, and image hosting. Further, automatic image capture and post processing tools are easy to integrate with 3rd party software for maximum productivity.
To learn more, browse our line of photography robots to see if a solution might fit your business needs. We have hardware for photographing products as small as a microchip to as large as automobiles and heavy machinery. Some are compact and easily transportable, while others can compliment studio, warehouse, or showroom floors. Have a look yourself, and let us know if PhotoRobot might be able to meet your 360° product photography needs.


